Avocados are highly nutritious and flavored, whether we’re talking about salad or guacamole they signal a healthy diet. Try growing an avocado tree at home, if you don’t like making regular trips to the grocery for your daily supply of fresh avocados. It’s surprisingly easy. You will see how you too can get a full – grown avocado tree from a little seed in 10 easy steps, making the whole process very easy to remember and educational.
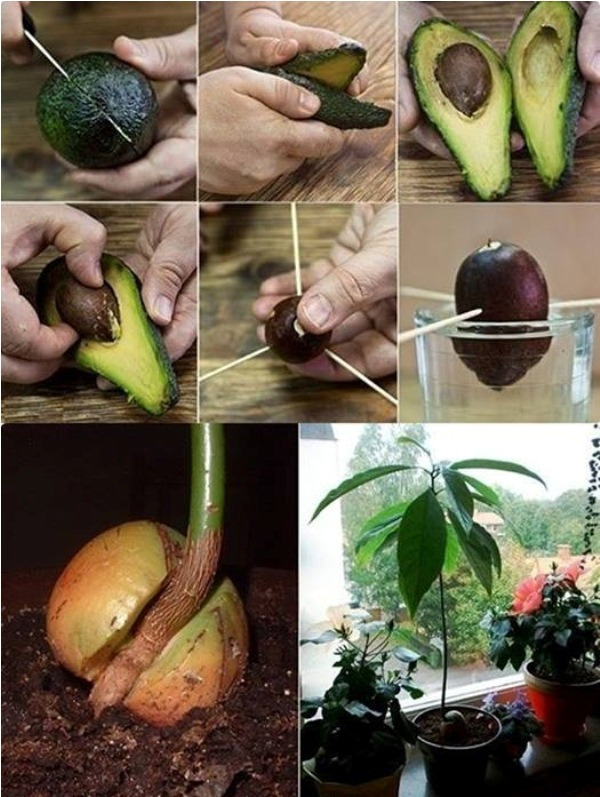
STEP 1: Remove and wash clean all of the avocado fruit, without cutting the pit from the avocado. It is very helpful to soak the pit for a few minutes in some water. But be careful not to remove the brown skin from the pit!
STEP 2: Despite not being perfect round shapes, all avocado pits, have a bottom and top side. The future roots will grow from the ‘bottom’, and the sprout will do the same for the ‘top’. You can easily distinguish which is which by looking after the slightly pointier end, that is the top. On the opposite side, the bottom will have a flat end. It’s important to place the bottom in water, so the roots will begin to gently grow.
STEP 3: Next, into the top side of the avocado seed stick 4 toothpicks. Make sure the injections are spaced evenly around the circumference and are made pointing down at a slight downward angle. Wedge the toothpicks strongly because they will allow you to place your avocado base in the water but still have the fruit hanging over a glass.
STEP 4: In a place with plenty of sunlight put the glass with the half – submerged avocado. In order to observe when the roots are going to start to grow, use a clear glass. It’s useful for warnings of fungus growth mold and bacteria, so you can change the water when it’s needed. It’s better to change the water every 5-7 days even though many professionals recommend changing it every day.
STEP 5: Although many websites suggest only 2 – 4 weeks, sprouting can take as long as 8 weeks. The best advice is to be patient. And pay attention so the seed that goes to the necessary stages of sprouting: the outer brown seed skin will slough off as the top of the avocado pit will dry out and form a crack; the crack will become bigger and at the bottom side, a tiny taproot will begin to show up; this will grow longer and longer until a small sprout will peek through the top of the avocado pit. It is important not to forget to maintain the taproot submerged, because if you don’t keep it submerged your plant will die.
STEP 6: When it comes to planting the newly born sprouts, there are a few tricks. Cut about 3 inches off the stem, when it reaches 6 – 7 inches in length, as this will make the new part grow faster. Then cut it and put it in a rich humus soil pot, when it has reached 6 – 7 inches again. The best pot to use is with a 8 – 10 inch diameter. Before placing it in a place with plenty of sunshine, make sure that you leave the top half of the seed exposed.
STEP 7: You need to know two things in this stage of planting your own avocado, about its relationship with water: the soil must always be moist. If you start to see yellow leaves, it’s a sign that you need to refill water and that you have waited too long. But there is no need to panic though, because the plant will need some time to absorb the water and continue after it has dried.
STEP 8: By pinching out the top two sets of leaves, you will encourage the plant to grow larger. Do this when the stem has reached about 12 inches in height. When another 6 inches have grown additionally on the plant, repeat the same method.
STEP 9: If you happen to come see some nasty bugs walking on your avocado, like aphids, you will need to remove them off the avocado immediately. You can do this by gently hosing or showering down your plant. Spray the avocado tree with a solution of water mixed with one teaspoon of neem oil and a few drops of dishwashing liquid, when there are no more pests on it. Check it after 4 – 5 days to see if it’s clean. If its not, repeat the same process until you see its clean.
STEP 10: In the winter or autumn, when it gets cooler than 45 degrees F, so it won’t freeze to death, you must bring the baby avocado tree indoor.
And here you have all the necessary information on how to plant your own avocado tree from a seed. The tree will begin to give fruit, after a couple or so years. Sometimes, some trees may take about 15 years to bear fruit, and some never do at all. Even if your commercial avocado – seed you used to plant the tree is advertised as the tastiest fruit on Earth, you can’t expect that yours should be the same. Avocados grown naturally are different. You can grow several avocado trees simultaneously to aid with pollination and you must ensure that your fruits are good as well (via Healthy & Natural Life).
If you like this idea, be sure to share it with your friends and inspire someone you know. Anything becomes possible with just a little inspiration…
