How To Become More Self-Sufficient Without Starting a Full-Blown Farm…
Want to start preserving your harvest, making your own soap, or building a backyard root cellar — but not sure where to begin? “Homesteading Advice” gives you instant lifetime access to 35+ practical homesteading books on food preservation, veggie gardening, DIY natural cleaning products (save over $250 per year with this skill alone), brewing, off-grid energy, and a whole lot more…
Click Here To Check It Out Now!
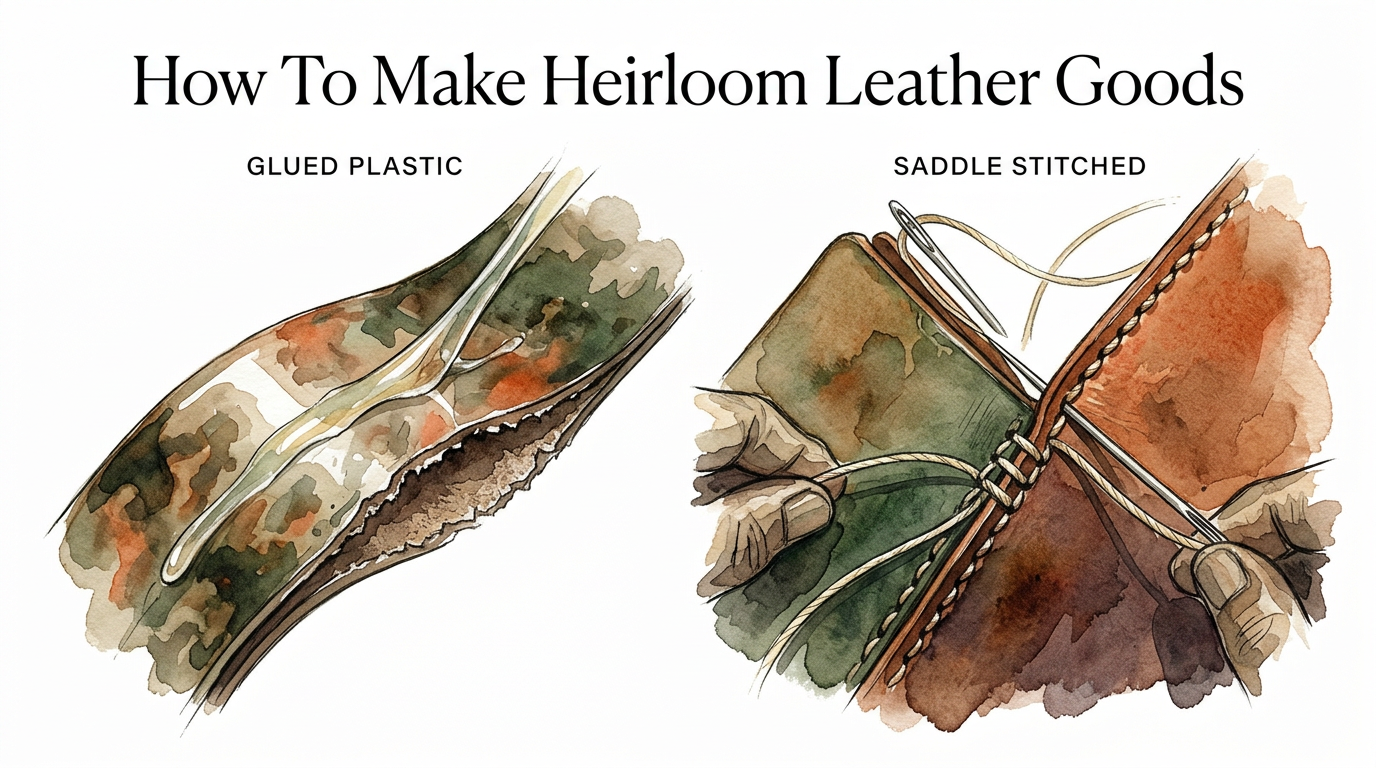
One of these will be in a landfill by next year; the other will be inherited by your grandson. Modern manufacturing relies on glue and weak machine loops that unravel the moment one thread breaks. We returned to the ancestral saddle stitch—a hand-sewing technique where two needles pass through every hole. If one thread snaps, the rest stays locked. This is how you build gear that lasts centuries.
Leather is a material that remembers. It remembers the sun on the animal’s back, it remembers the tannins of the oak bark that preserved it, and it will remember every mile you carry it. Most modern “leather” goods are actually a thin veneer of chrome-tanned hide glued to plastic fillers. They are designed to look good on a shelf and fall apart in the field. To build something that survives a lifetime, you must step away from the machine and embrace the slow, deliberate rhythm of the hand.
The path to creating an heirloom starts with a shift in perspective. You are no longer a consumer; you are a steward of a tradition that dates back to the first saddlers of the 19th century. Every cut of the knife and every pull of the thread must be intentional. This guide will walk you through the essential principles of traditional leathercraft, ensuring that the work of your hands becomes a legacy for the next generation.
How To Make Heirloom Leather Goods
Heirloom leather goods are defined by three pillars: the quality of the hide, the integrity of the stitch, and the refinement of the finish. Unlike mass-produced items, these goods are built with the expectation of repair, not replacement. They rely on vegetable-tanned leather, which uses natural plant tannins—derived from tree bark and leaves—to stabilize the collagen fibers of the hide. This process takes weeks or months, but it creates a material that breathes, matures, and develops a rich patina over time.
Real-world durability comes from the architecture of the product. In a factory, a sewing machine uses a “lockstitch,” where a top thread and a bottom thread loop around each other in the center of the leather. This creates a point of friction where the threads constantly saw at one another. If a single loop fails, the entire seam can unspool like a loose sweater. An heirloom piece uses the saddle stitch, an interlocking figure-eight pattern that creates a self-locking seam.
You will find this level of craftsmanship in the cockpits of vintage bush planes, the saddles of working cowboys, and the bags of high-end ateliers that refuse to compromise. It exists where failure is not an option. When you choose to make gear this way, you are choosing a philosophy of permanence over the disposable convenience of the modern world.
The Materials of Permanence
The foundation of any heirloom project is the leather itself. Most commercial leather is “chrome-tanned,” a chemical-heavy process that takes about 24 hours. While it is soft and uniform, it lacks the structural integrity required for a century-long lifespan. For true longevity, you must source full-grain vegetable-tanned leather. Full-grain means the top layer of the hide—the toughest part—remains intact.
Thread is the next critical component. Traditionalists often reach for waxed linen thread, like the famous Fil Au Chinois used by French luxury houses. Linen is a natural fiber with high tensile strength that does not stretch. For a more rugged, modern alternative, braided polyester thread (often called Tiger thread) is virtually indestructible and resistant to rot, UV rays, and moisture. The wax on the thread serves a dual purpose: it lubricates the passage through the leather and locks the fibers in place once the stitch is set.
Hardware should never be “plated” mystery metal. If you are building for the long haul, use solid brass or stainless steel. Plated hardware will eventually chip and reveal a corroded core, whereas solid metals can be polished back to their original luster or allowed to age naturally alongside the leather.
How to Perform the Ancestral Saddle Stitch
The saddle stitch is the heart of traditional leatherwork. To perform it, you need a single length of thread with a needle attached to each end. This allows the thread to pass through the same hole from opposite directions, crossing in the middle to form a bond that is physically superior to any machine-produced seam.
Step 1: Pricking and Piercing
Traditional leatherwork separates the marking of the holes from the piercing. You begin by using a pricking iron to mark even intervals along your stitch line. These irons do not go all the way through; they simply set the geometry. Once marked, you use a diamond awl to pierce each hole individually. This ensures that the exit hole on the back of the leather is just as clean as the entry hole on the front. Keeping your awl razor-sharp is non-negotiable; a dull awl will tear the fibers rather than slicing through them.
Step 2: Locking the Needles
Cast the thread through the eye of the needle, then pierce the thread itself with the point of the needle about an inch from the end. Pull the short end over the eye to “lock” it. This prevents the needle from slipping off the thread during the high-tension environment of hand-sewing. Repeat this for the second needle on the other end of the thread.
Step 3: The Figure-Eight Movement
Pass the first needle through the first hole and pull the thread until you have equal lengths on both sides. Insert the left needle into the next hole and pull it through halfway. Then, insert the right needle into the same hole, ensuring you do not pierce the thread already sitting there. Pull both needles through and tighten the stitch with a firm, even tug. This creates a “knot” within the leather that prevents unravelling.
Step 4: Casting the Thread
To achieve the beautiful slanted aesthetic seen in professional goods, you must “cast” the thread. As you pass the second needle through the hole, loop the thread from the first needle over the top of it. This slight adjustment forces the thread into a consistent angle. Consistency is the hallmark of the master; every stitch must be an exact replica of the one before it.
The Art of the Edge Finish
An unfinished leather edge is a vulnerability. It allows moisture to seep into the core of the hide, leading to swelling and eventual delamination. Traditional edge finishing—known as burnishing—is a mechanical process that uses heat and friction to fuse the leather fibers together into a single, glassy surface.
First, use an edge beveler to remove the sharp 90-degree corners of the leather. This prevents the edge from “mushrooming” over time. Sand the edges with progressively finer grits of sandpaper, starting at 220 and moving up to 800 or 1000. Apply a small amount of gum tragacanth or water to the edge to provide a bit of slip.
Use a wooden slicker or a piece of canvas to rub the edge vigorously. You are not trying to “sand” it further; you are using the heat of the friction to melt the natural waxes and tannins within the leather. Once a shine begins to appear, apply a final coat of pure beeswax and buff it with a clean cloth. This creates a waterproof seal that will protect the seam for decades.
Benefits of Traditional Hand-Stitching
Choosing to sew by hand provides several measurable advantages over machine production. These benefits are the reason why the world’s most expensive luxury brands and the most rugged outdoor outfitters still rely on manual labor.
- Individual Stitch Integrity: Because the threads cross inside every hole, a break in one section of the seam does not affect the tension of the surrounding stitches.
- Dynamic Tension Control: A human can feel the density of the leather and adjust the pull of the thread accordingly. Machines apply a uniform tension that can “cut” through softer sections of hide.
- Aesthetic Distinction: The slanted, slightly thick appearance of a saddle stitch is a “signature” of handcraft. It is visually deeper and more substantial than the thin, flat line of a machine stitch.
- Ease of Repair: Hand-stitched seams can be backed out and repaired with a single needle and a small length of thread, making them infinitely maintainable.
Challenges and Common Mistakes
The primary challenge of traditional leatherwork is the demand it places on your patience. Mistakes in hand-stitching are difficult to hide and even harder to fix once the leather has been pierced.
Inconsistent Tension: Beginners often pull the thread too tight on some stitches and too loose on others. This creates a “wavy” seam that looks amateurish and can cause the leather to pucker. You must develop a muscle memory for the exact amount of force required to set the stitch.
Piercing the Thread: When passing the second needle through a hole, it is very easy to pierce the thread that is already there. This “staples” the threads together, making it impossible to tighten the stitch or ever remove it for repair. Always pull the first thread to the corner of the hole before inserting the second needle.
Ignoring Tool Maintenance: A dull knife or awl is the enemy of quality. If you have to fight your tool to get through the leather, you will lose control. Stropping your blades with polishing compound every thirty minutes of work is a habit that separates the craftsman from the hobbyist.
Limitations of Hand-Stitching
While hand-stitching is superior in durability, it is not the ideal solution for every scenario. Understanding these constraints will help you decide when to use this technique.
| Factor | Saddle Stitch (Hand) | Lockstitch (Machine) |
|---|---|---|
| Production Speed | Very Slow (1-2 inches per minute) | Very Fast (30-60 inches per minute) |
| Material Thickness | Can handle very thick hides (12oz+) | Limited by machine motor and needle size |
| Thread Weight | Can use heavy waxed cords | Limited to thinner, lubricated threads |
| Complexity | Requires high manual dexterity | Requires mechanical setup and maintenance |
Hand-stitching is generally poorly suited for large-scale items like upholstery or thin garments where the sheer volume of stitching makes the time-cost prohibitive. For small-to-medium goods like wallets, belts, and holsters, the trade-off in time is almost always worth the increase in quality.
Practical Tips for the Modern Pioneer
If you are ready to begin your first project, focus on the fundamentals before investing in expensive exotic leathers. Start with a 3-4 oz vegetable-tanned shoulder. It is forgiving to cut and takes a stitch beautifully.
- Use a Stitching Pony: Trying to hold the leather in your hands while sewing is a recipe for frustration. A stitching pony acts as a third hand, clamping your work in place so you can use both hands for the needles.
- Skive Your Edges: Skiving is the process of thinning the leather where it will be folded or overlapped. This prevents the finished product from becoming too bulky and ensures a professional, streamlined profile.
- Measure Twice, Cut Once: Leather is unforgiving. Unlike fabric, you cannot “un-cut” a piece or hide a stray needle mark. Lay out your patterns on cardstock first to ensure everything fits perfectly.
Advanced Considerations: The Physics of Leather Aging
Serious practitioners understand that leather is a biological material that reacts to its environment. Over years of use, the oils from your hands will penetrate the surface of vegetable-tanned leather. This creates a “patina”—a darkening and hardening of the surface that actually makes the leather more resistant to water and abrasion.
The direction of the grain also matters. When cutting a belt or a strap, you should always cut along the spine of the hide rather than across the belly. The fibers along the spine are tightly packed and run parallel to the length of the strap, preventing it from stretching out of shape over time. Belly leather is loose and stretchy, making it better suited for internal pockets or decorative elements where structural strength isn’t the primary concern.
Example Scenario: The Lifetime Field Wallet
Imagine you are crafting a simple bi-fold wallet. You choose a 3oz cognac-colored vegetable-tanned leather. You cut the pieces with a Japanese skiving knife, ensuring every edge is square. You apply a light coat of contact cement—just enough to hold the pieces while you stitch.
You mark your holes at 3.85mm intervals. As you sit at your bench, the only sound is the “snick” of the needles passing through the hide. You spend two hours on the stitching alone. When you are finished, you burnish the edges until they look like polished mahogany. This wallet doesn’t just hold cash; it holds the evidence of your labor. In fifty years, when the leather is dark and supple, your grandson will pull it from his pocket and feel the same stitches you set today.
Final Thoughts
Building heirloom leather goods is an act of rebellion against a culture of planned obsolescence. It requires you to slow down, to sharpen your tools, and to trust in the wisdom of those who came before you. The techniques of the saddle stitch and the hand-burnished edge are not merely decorative; they are the engineering requirements of a product intended to outlast its maker.
True value is not found in the brand name stamped on the surface, but in the integrity of the hidden seams. When you master these skills, you gain the ability to create tools and accessories that are truly your own. You move from being a passenger in the modern economy to being a creator of lasting things.
Practice the rhythm of the needles. Respect the hide. Build gear that tells a story, and ensure that when the time comes to pass it on, it is still as strong as the day it left your workbench. This is the essence of self-reliance and the heart of the pioneer spirit.
