How To Become More Self-Sufficient Without Starting a Full-Blown Farm…
Want to start preserving your harvest, making your own soap, or building a backyard root cellar — but not sure where to begin? “Homesteading Advice” gives you instant lifetime access to 35+ practical homesteading books on food preservation, veggie gardening, DIY natural cleaning products (save over $250 per year with this skill alone), brewing, off-grid energy, and a whole lot more…
Click Here To Check It Out Now!
Your attic is a 140-degree furnace you’re currently paying to fight – here is how to make it pay your bills instead. In the middle of a cost of living crisis, why are we paying to vent our most powerful heat source? Your attic is a massive solar collector. Your roof absorbs thousands of BTUs every hour, turning that confined space into a pressure cooker of thermal energy. Harvesting that ‘waste’ heat to provide free hot water for your family allows you to slash utility bills, turning a summer nuisance into a massive energy asset.
Think of your home as a living organism. Most modern houses are designed to exhale their vitality through ridge vents and soffits, throwing away the very energy we spend our hard-earned wages to create downstairs. This is not the way of the self-reliant. Our ancestors understood that nothing should be wasted—not the scraps from the table, nor the heat from the hearth. We have forgotten that the scorching air above our heads is a gift, a thermal battery waiting for a simple connection to your plumbing system.
Setting up a recovery loop is an act of defiance against rising energy costs. It is a return to a mindset of stewardship where we look at our environment and see potential instead of problems. This guide will show you how to build a bridge between that scorched attic air and your water heater, ensuring that every sunny afternoon contributes to your household’s independence.
DIY Attic Heat Recovery System
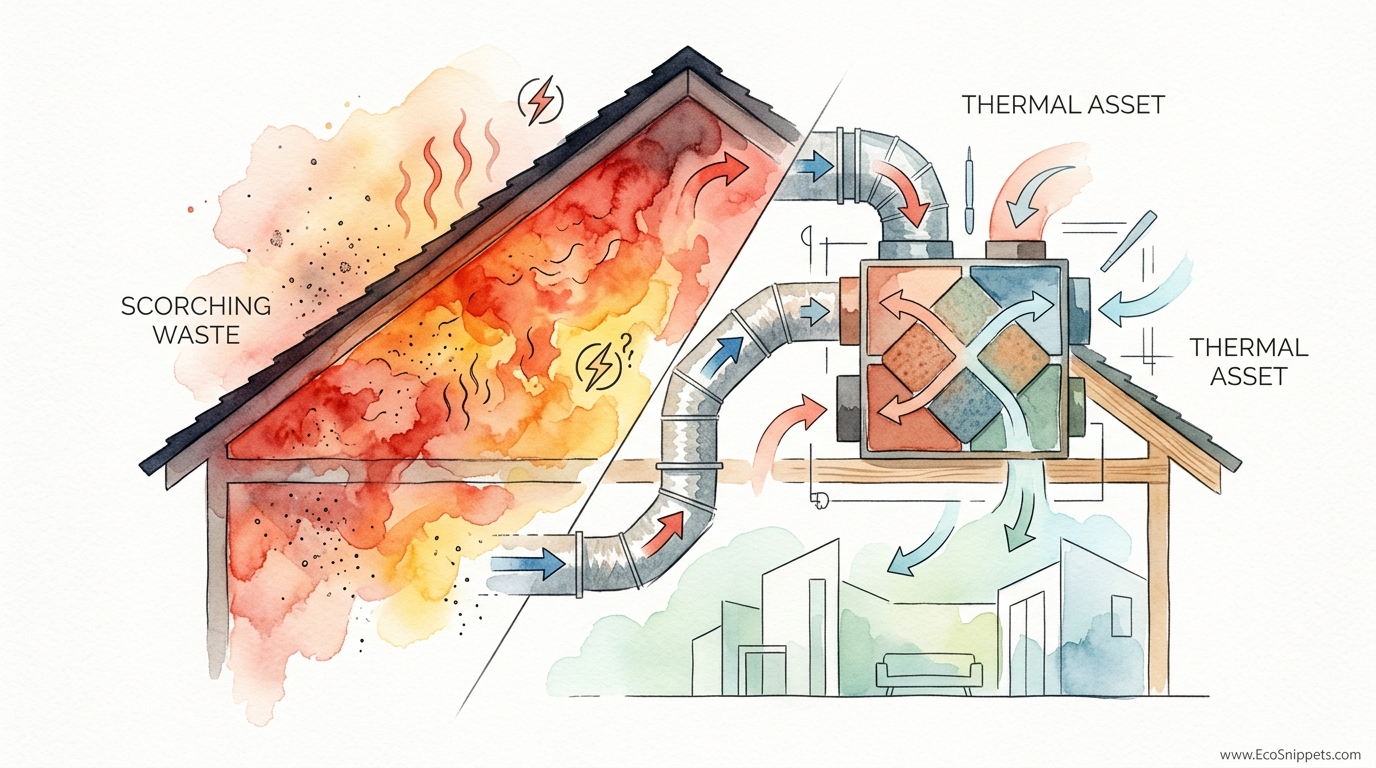
A DIY attic heat recovery system is a heat exchange interface designed to capture the high-ambient thermal energy trapped in a residential attic and transfer it to the domestic water supply. This system acts as a pre-heater for your existing water heater. It sits between the cold water main and your tank, raising the temperature of the incoming water so your heating elements or gas burners don’t have to work nearly as hard.
In the height of summer, a typical shingled roof can reach temperatures exceeding 150 degrees Fahrenheit. This heat radiates downward, warming the air in the attic space to a consistent 130 or 140 degrees. In a standard setup, you might use attic fans to blow this air outside, essentially paying for electricity to throw away heat. A recovery system changes the dynamic entirely. It treats the attic as a solar thermal collector, using a network of high-conductivity tubing to “soak” that heat into the water.
Real-world applications of this concept are found in “breadbox” solar heaters and industrial waste-heat recovery units. In a home setting, it is the ultimate low-tech, high-reward project. It requires no complex electronics, no expensive photovoltaic panels, and very little maintenance once the initial plumbing is secured. You are simply utilizing the laws of thermodynamics to move energy from where there is too much (the attic) to where you need it most (your hot water tap).
Visualize a car radiator but in reverse. Instead of using air to cool down a liquid, you are using hot air to warm up a liquid. This liquid—your family’s shower and tap water—enters the attic at a chilly 55 or 60 degrees and leaves at a much more comfortable 100 to 110 degrees. The heavy lifting is done by the sun, and the attic serves as the middleman.
How to Build Your Thermal Recovery Loop
Building this system requires a basic understanding of plumbing and a willingness to work in a cramped, hot environment. The goal is to maximize the surface area of your water line exposed to the attic air. Heat transfer is a function of surface area, material conductivity, and the “Delta T”—the difference in temperature between the air and the water.
Begin by selecting your heat exchange material. Copper is the gold standard here because its thermal conductivity is roughly 30 times higher than that of PEX or CPVC. A 100-foot coil of half-inch soft copper tubing is the heart of the system. You will want to mount this coil in the highest, hottest part of the attic, often near the ridge line.
Step one involves the layout. Uncoil the copper carefully to avoid kinks. Some builders prefer to create a “manifold” style system where multiple smaller lines run in parallel, but a single long spiral or a series of “S” curves is often more practical for a DIYer. Mounting the copper to a blackened plywood board can further increase heat absorption by creating a localized “hot zone” behind the pipes.
Step two is the plumbing integration. You must locate the cold water feed that goes into your water heater. Cut this line and install a three-way bypass valve. This valve allows you to send water up into the attic loop during the summer and bypass it entirely during the winter when the attic might be too cold. The “out” side of your attic loop then feeds back down into the “in” port of your water heater.
Step three focuses on safety and efficiency. Install a Pressure Relief Valve (PRV) on the attic loop. Water expands when it heats up; if the water sits in the attic for hours without being used, the pressure can spike. A PRV ensures that your pipes won’t burst under the midday sun. Additionally, consider a small circulation pump if you want an “active” system, though most homeowners find that the “passive” line pressure from the city or well is sufficient to move the water whenever a tap is opened.
Benefits of Harvesting Attic Heat
The most immediate benefit is the dramatic reduction in your monthly energy bill. Water heating typically accounts for 15% to 20% of a home’s energy consumption. By raising the input water temperature from 60 degrees to 110 degrees, you are forcing your water heater to bridge a much smaller gap to reach its target temperature (usually 120-140 degrees). This can result in a 30% to 50% reduction in the energy required for hot water during the peak summer months.
Lowering the temperature of your attic is a secondary but vital benefit. Heat is energy, and energy cannot be destroyed—only moved. When you transfer heat from the attic air into your water pipes, the air in the attic actually cools down slightly. This reduces the “heat soak” into your living quarters, meaning your air conditioning system doesn’t have to work as hard to keep the downstairs comfortable. It is a rare “win-win” where one system improves the efficiency of another.
Longevity of your appliances is also a factor. Most water heaters fail because of the stress of constant heating and cooling cycles. By providing pre-heated water, you reduce the thermal shock to the tank and the frequency with which the heating elements must cycle on and off. This can add years to the life of an expensive water heater, further increasing the return on your investment.
Self-reliance is the intangible benefit that carries the most weight for many. Relying on the sun to provide for your basic needs creates a sense of security. Whether the grid is stable or the price of natural gas is spiking, the sun still shines on your roof. Mastering this simple technology proves that you are a producer of energy, not just a consumer.
Challenges and Common Mistakes
Condensation is the primary enemy of the attic heat recovery system. When cold water from the ground (often 55 degrees) hits the humid, 140-degree air of the attic, moisture will instantly form on the outside of the pipes. This “sweating” can lead to water damage on your ceiling joists, mold growth in your insulation, and eventually, structural rot.
Avoiding this pitfall requires a dedicated drainage system. You should never install a bare copper coil over your insulation without a drip pan. Use a large, galvanized metal pan or a custom-built basin with a drain line that leads outside the house. This ensures that any condensation is safely carried away before it can harm your home.
Sizing the system incorrectly is another frequent error. A loop that is too short won’t stay in the attic long enough to absorb significant heat. A loop that is too long might cause a noticeable drop in water pressure at your fixtures. For most single-family homes, 60 to 100 feet of half-inch tubing provides a good balance between heat gain and flow rate.
Plumbing leaks in the attic are a nightmare scenario. Unlike a leak under a sink, a leak in the attic can go unnoticed for days while it saturates your ceiling. Using high-quality solder joints or pro-press fittings is essential. Always pressure test the system for at least 24 hours before you consider the job finished. Many practitioners also install a simple water alarm in the drip pan that will alert them to the first sign of a leak.
Limitations of the Attic Loop
Seasonal limitations are the most obvious constraint. This is fundamentally a summer-biased technology. In the winter, an attic can become a refrigerator, potentially cooling your water or even freezing and bursting your pipes. This makes the installation of a bypass valve mandatory. You must be diligent about “winterizing” the system, which includes draining the attic loop completely before the first frost.
Regional climate plays a massive role in the system’s effectiveness. If you live in a coastal area with high humidity, your condensation issues will be more severe. If you live in the Pacific Northwest where summer days are often overcast, the heat gain might not justify the complexity of the installation. This system shines brightest in the Sun Belt, the Midwest, and the South, where “scorching waste” is a daily reality for four to six months of the year.
Legionella bacteria growth is a serious consideration that many DIY guides overlook. Legionella thrives in warm, stagnant water between 68 and 113 degrees Fahrenheit. If the water sits in your attic loop for long periods at these temperatures without reaching the “kill zone” of 140 degrees, it could potentially become a breeding ground. To mitigate this, the water from the attic must always pass through a primary water heater that is set to at least 140 degrees to ensure any pathogens are neutralized before they reach your showerhead.
Comparing Copper vs. PEX for Heat Recovery
Choosing between copper and PEX is a decision between efficiency and ease of installation. Copper is the traditional choice for any thermal application, but modern cross-linked polyethylene (PEX) has its own set of advantages that might appeal to the weekend warrior.
| Factor | Copper Tubing | PEX Tubing |
|---|---|---|
| Thermal Conductivity | Excellent (Approx. 400 W/mK) | Poor (Approx. 0.5 W/mK) |
| Cost | High | Low |
| Installation Ease | Difficult (Requires soldering) | Easy (Flexible, crimp fittings) |
| Durability | Lifetime (if not frozen) | High (Resists freeze-bursting) |
| Condensation Risk | High (Rapid heat transfer) | Moderate (Insulating properties) |
For the serious practitioner, copper is almost always the better choice because the primary goal is heat transfer. PEX acts more like an insulator, which defeats the purpose of the system. However, if you are working with a tight budget, using a much longer run of PEX—perhaps 300 feet—can eventually compensate for its lower conductivity.
Practical Tips for System Optimization
Maximizing your “thermal asset” requires more than just throwing some pipes in the rafters. You need to think about the path of the sun. The south-facing side of your roof will be significantly hotter than the north-facing side. Mount your recovery loop against the south-facing rafters to ensure it receives the maximum amount of radiant energy.
Cleaning the exterior of your copper pipes can improve efficiency. Over time, dust and fiberglass particles from insulation can settle on the pipes, creating a thin insulating layer. A quick wipe-down with a damp cloth once a year keeps the metal-to-air interface clean. Some advanced users even paint their copper coils with a high-temperature matte black spray paint to increase their “emissivity,” or their ability to absorb radiant heat.
Managing flow rate is another way to tune the system. If you find the water isn’t getting hot enough, you can install a “tempering tank” in the attic. This is a non-insulated 20-gallon tank that acts as a reservoir. The water sits in this tank, slowly soaking up the attic heat over several hours, ensuring that when someone finally takes a shower, there is a large volume of pre-heated water ready to go.
Internal linking opportunities within your home’s maintenance plan might include checking your attic’s ventilation. A house that is too well-ventilated might actually have a cooler attic, which is great for your AC but bad for your heat recovery. Finding the “sweet spot” of attic temperature is part of the experimental process of becoming a home-energy pioneer.
Advanced Considerations for Serious Practitioners
If you want to take your recovery system to the next level, consider integrating it with a Heat Pump Water Heater (HPWH). These modern water heaters pull heat from the surrounding air to warm the water. By ducting the hot attic air directly to the HPWH intake, you are giving the machine a massive head start. This combines the “passive” recovery of the copper loop with the “active” efficiency of the heat pump.
Scaling the system for a larger family might involve multiple loops. If you have four or five people in the house, a single 100-foot coil might be depleted after the first shower. Using three parallel 100-foot coils connected to a manifold ensures that the flow rate remains high while the total “dwell time” in the attic is tripled. This allows for continuous recovery even during heavy usage periods.
Monitoring your performance is the hallmark of a true practitioner. Installing digital thermometers on the “in” and “out” lines of your attic loop allows you to see exactly how many degrees of “free” heat you are harvesting. On a 100-degree day, seeing the water enter at 65 and exit at 115 is a powerful motivator. It provides tangible proof of your ingenuity and the success of your stewardship.
Consider also the weight of the water. Water weighs roughly 8.3 pounds per gallon. If you decide to install a large tempering tank in the attic, you must ensure your ceiling joists can handle the load. A 40-gallon tank adds over 330 pounds to a concentrated area. Reinforcing the joists or spreading the load across several rafters is a mandatory safety step for advanced setups.
A Practical Scenario: The Texas Summer
Let’s look at how this works in a real-world scenario. Imagine a home in Dallas, Texas, in mid-July. The outside temperature is 98 degrees. Inside the unconditioned attic, the temperature has climbed to 138 degrees by 2:00 PM. The family has a standard 50-gallon electric water heater.
Without the recovery system, the cold water enters the tank at 70 degrees. To reach the 130-degree setpoint, the electric elements must raise the water 60 degrees. With the recovery loop in place, the water passes through 100 feet of copper coil in the 138-degree attic air. Because the water moves slowly or sits during the day, it enters the water heater at 112 degrees.
In this scenario, the water heater only needs to bridge an 18-degree gap instead of a 60-degree gap. That is a 70% reduction in the energy required for that specific volume of water. Over the course of a month, with multiple showers, loads of laundry, and dishes, the savings move from cents to significant dollars. The family is essentially using their roof as a free utility provider.
The cooling effect on the house is also measurable. By pulling those BTUs out of the air and into the water, the attic temperature might drop to 132 degrees. While six degrees sounds small, it significantly reduces the “conduction” of heat through the ceiling and into the bedrooms below. The air conditioner cycles less frequently, extending its life and further reducing the power bill.
Final Thoughts
Harvesting the scorching waste of your attic is more than just a plumbing project; it is an exercise in ancestral wisdom applied to modern problems. We live in an era of “throwaway” energy, where we are conditioned to ignore the massive potential of our environment. By installing a simple recovery loop, you reclaim a portion of that independence. You turn a source of discomfort into a thermal asset that pays dividends every time the sun rises.
The beauty of this system lies in its simplicity. It doesn’t require complex circuitry or a degree in engineering—just some copper, some grit, and a respect for the laws of nature. As you stand in your attic, feeling that 140-degree air, you should no longer see it as a nuisance. See it as the fuel for your family’s morning showers. See it as a way to opt-out of the rising costs of the modern world.
Take the leap and start small if you must, but do not let another summer pass where you pay to fight the heat. Instead, make the heat work for you. There is a profound satisfaction in knowing that while the rest of the neighborhood is draining their bank accounts to stay cool, your attic is quietly and efficiently paying your bills. This is the path of the self-reliant, and it starts with the air right above your head.
