How To Become More Self-Sufficient Without Starting a Full-Blown Farm…
Want to start preserving your harvest, making your own soap, or building a backyard root cellar — but not sure where to begin? “Homesteading Advice” gives you instant lifetime access to 35+ practical homesteading books on food preservation, veggie gardening, DIY natural cleaning products (save over $250 per year with this skill alone), brewing, off-grid energy, and a whole lot more…
Click Here To Check It Out Now!
Your Kitchen Trash Could Be the Reason You Never Have to Buy Propane Again
Most people see kitchen scraps and manure as a disposal problem, but for a homesteader, it is a hidden energy goldmine. Using a simple biogas digester, we turned our organic waste into a steady stream of free methane gas. It is cleaner, cheaper, and makes your homestead a closed-loop system.
Modern society teaches us to throw things away, but true self-reliance means realizing there is no such thing as “away.” Everything we once considered trash—potato peels, grass clippings, and animal droppings—contains stored solar energy. Capturing that energy allows you to cook your meals and heat your water without relying on a delivery truck or a utility company.
This guide will walk you through the process of building and maintaining your own fuel source. You will learn how to mimic the natural processes of a cow’s stomach to create a renewable supply of gas. Homesteading requires grit and a willingness to look at old problems in new ways, and biogas is the ultimate expression of that ancestral wisdom.
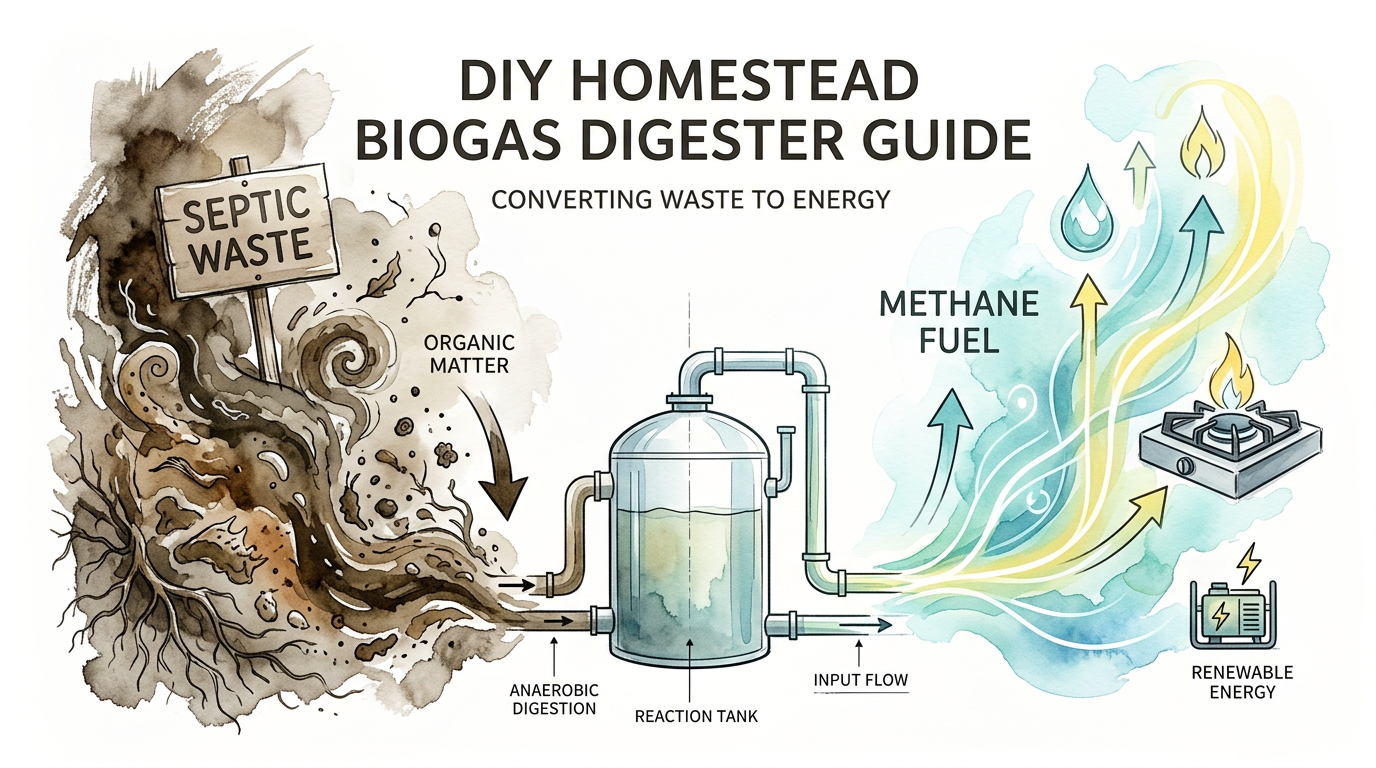
Diy Homestead Biogas Digester Guide
A biogas digester is essentially a large, airtight container where organic matter is broken down by bacteria in the absence of oxygen. This process, known as anaerobic digestion, releases a mixture of gases, primarily methane and carbon dioxide. While large-scale industrial plants use this technology to power cities, a homesteader can achieve similar results with a few recycled barrels or an IBC tote.
Think of the digester as a living organism on your farm. You feed it daily, keep it warm, and in return, it provides you with fuel for cooking and a high-quality liquid fertilizer for your garden. It bridges the gap between waste management and energy production, creating a cycle that benefits every part of your land.
Real-world applications for this technology are found across the globe, especially in areas where traditional fuels are expensive or unavailable. Small-scale farmers in Asia and South America have used these systems for decades to gain energy independence. On a North American homestead, a digester serves as a hedge against rising energy costs and a way to handle livestock manure responsibly.
The beauty of this system lies in its simplicity. You do not need a degree in chemical engineering to produce your own gas. Understanding the basic needs of the bacteria inside the tank is the only requirement for success. Once the system is balanced, it requires very little maintenance and provides a consistent yield of energy.
The Components of a Basic System
Every biogas digester consists of three main parts: the digestion tank, the inlet for feeding, and the gas storage system. The digestion tank is where the “magic” happens, housing the slurry of water and organic waste. The inlet allows you to add new material without introducing oxygen, which would kill the methane-producing bacteria.
The gas storage component is often a floating drum or a flexible bag that expands as gas is produced. This setup ensures that the gas stays under a consistent, low pressure so it can be piped directly to a stove. Without a way to store and pressurize the gas, it would simply vent away, wasting all your hard work.
How Anaerobic Digestion Works
The process of creating biogas happens in four distinct stages, all driven by different groups of microscopic organisms. First is hydrolysis, where complex organic molecules like fats and proteins are broken down into simpler sugars. This stage prepares the “food” for the next group of bacteria to consume.
The second stage is acidogenesis, where those sugars are converted into organic acids and alcohols. Following this, acetogenesis turns those acids into acetic acid, hydrogen, and carbon dioxide. These steps are crucial because they create the specific precursors that the final group of bacteria needs to produce fuel.
The final and most important stage is methanogenesis. During this phase, specialized microbes called methanogens consume the acetic acid and hydrogen to produce methane gas. Methanogens are sensitive creatures; they require a warm, oxygen-free environment and a stable pH to do their jobs effectively.
Maintaining this biological balance is the key to a productive digester. If you feed the system too much at once, it can become too acidic, stalling the production of gas. Slow and steady feeding ensures that each group of bacteria has time to process the material before the next batch arrives.
Building Your Digester: Step-by-Step
Starting with an IBC tote is often the easiest path for a beginner. These 275-gallon tanks are sturdy, UV-resistant, and already come with a metal cage for support. You will need to modify the tank by adding an inlet pipe that reaches near the bottom and an outlet pipe for the processed slurry.
The inlet pipe should be wide enough to prevent clogs, usually three to four inches in diameter. Position the inlet so that new material enters the bottom of the tank, forcing the older material to rise and eventually exit through the overflow pipe. This “first-in, first-out” system ensures that everything is fully digested before it leaves the tank.
Sealing the tank is the most critical step in the construction process. Any air leak will stop the production of methane and could even create a fire hazard. Using high-quality bulkheads and marine-grade sealants will ensure that your digester remains airtight for years to come.
Once the tank is built, you must “seed” it with the right bacteria. Fresh cow manure is the best starter culture because it is already teeming with the methanogens you need. Fill the tank halfway with water and manure, then let it sit for a few weeks until you see the gas storage begin to inflate.
Sourcing Your Feedstock
Feedstock is the fuel you put into the digester. High-energy materials like fats, oils, and sugary fruit scraps produce the most gas but can also upset the pH balance if used in excess. Green garden waste and manure provide a more stable, long-term food source for your bacteria.
Avoid putting woody materials like twigs, straw, or sawdust into your digester. These items contain lignin, which anaerobic bacteria cannot break down efficiently. These materials are better suited for your compost pile, where aerobic fungi can do the heavy lifting.
Kitchen waste is a fantastic primary source of fuel. Onion peels, coffee grounds, and old leftovers are all fair game. However, ensure that you chop or grind these scraps into small pieces before feeding them into the tank to increase the surface area for the bacteria.
Manure from chickens, goats, or cows is a traditional feedstock that provides a steady supply of nitrogen. Mixing different types of waste often leads to a more robust bacterial colony. A diverse diet for your digester results in a more resilient system that can handle minor fluctuations in temperature or feeding schedules.
Benefits of the Biogas System
Energy independence is the most obvious benefit of a biogas system. Reducing your reliance on fossil fuels feels like a weight being lifted off your shoulders. When the power goes out or the supply chain falters, you still have the ability to cook your food and keep your family fed.
The liquid effluent that comes out of the digester is a secondary benefit that is often overlooked. This “biogas slurry” is an incredibly potent organic fertilizer. Unlike raw manure, the slurry has had the pathogens and weed seeds “cooked” out of it by the digestion process, making it safe and effective for your garden.
Environmental stewardship is another major advantage. When organic waste decomposes in a landfill, it releases methane directly into the atmosphere, which is a potent greenhouse gas. By capturing that methane and burning it for fuel, you are drastically reducing your homestead’s carbon footprint.
Waste management becomes much simpler when you have a digester. Instead of worrying about flies and odors from a manure pile, you can process that waste in a sealed container. This keeps your homestead cleaner and reduces the risk of groundwater contamination from runoff.
Challenges and Common Mistakes
Temperature is the most common challenge for biogas producers. Methanogens are most active in the mesophilic range, which is between 85 and 100 degrees Fahrenheit. If the slurry drops below 60 degrees, gas production will slow down significantly or stop altogether.
Insulating your tank is non-negotiable in cooler climates. Wrapping the digester in rigid foam or burying it in a manure-heated greenhouse can keep the bacteria happy during the winter months. Many homesteaders use a small portion of the gas they produce to run a water heater that circulates warm water through the tank.
Overfeeding is another common pitfall. It is tempting to dump all your garden waste into the tank at once, but this can lead to “sour” conditions where the pH drops too low. If your gas starts to smell like rotten eggs more than usual, it may be a sign that the system is becoming too acidic.
Ignoring gas leaks is a dangerous mistake. While methane is generally safe when handled correctly, a leak in an enclosed space can lead to a fire. Regularly check your hoses and connections with soapy water to ensure everything is tight and secure.
Limitations and Realistic Expectations
Climate is the primary limitation for biogas technology. If you live in a region with long, harsh winters, keeping the digester at the proper temperature will require significant effort. You must weigh the energy required to heat the tank against the energy the tank produces.
Scale is another factor to consider. A single IBC tote digester will likely provide enough gas for one or two hours of cooking per day. It will not power your entire home or heat a large farmhouse. It is a supplemental energy source designed to handle household and small garden waste.
Maintenance, though minimal, is still required. You must feed the tank daily to keep the bacteria active. If you go on vacation for a month and stop feeding the system, the bacterial colony will dwindle, and you will have to restart the process when you return.
Space is a practical boundary. The digester and the gas storage system take up a fair amount of room. You need a flat, stable area that is close enough to the kitchen for convenience but far enough away to satisfy local building codes or personal preference regarding the proximity of manure processing.
Septic Waste vs. Methane Fuel
It is helpful to compare a biogas digester to a standard septic system to understand the difference in goals. A septic system is designed solely for waste disposal and water purification. It treats waste but allows the energy—in the form of gas—to escape into the soil or the air.
A biogas digester is an energy recovery system. While it also treats waste, its primary function is to harvest the methane produced during decomposition. The following table illustrates the key differences between these two systems.
| Feature | Standard Septic System | Biogas Digester |
|---|---|---|
| Primary Goal | Waste Disposal | Energy Production |
| Gas Handling | Vented to atmosphere | Captured for fuel |
| By-product | Septage (requires pumping) | High-quality liquid fertilizer |
| Complexity | Moderate (Drain fields) | Low to Moderate (DIY-friendly) |
| Temperature Sensitivity | Low | High |
Choosing a biogas digester over a simple septic setup means you are choosing to participate in the energy cycle. Instead of seeing waste as something to be hidden, you see it as a resource to be managed. This shift in mindset is what defines the modern homesteader.
Practical Tips for Success
Regularly stirring the contents of your digester can significantly increase gas production. Stirring breaks up the “scum layer” that forms on top of the liquid, which can trap gas and prevent it from reaching the storage tank. A simple hand-cranked paddle or even just rocking the tank slightly can make a difference.
Monitoring the pH of your slurry is a best practice for serious practitioners. You want to keep the pH between 6.5 and 8.0. If the system becomes too acidic, adding a small amount of baking soda or crushed eggshells can help neutralize the slurry and get the methanogens back on track.
Filtering your gas is important for the longevity of your appliances. Biogas contains small amounts of hydrogen sulfide, which can be corrosive and smells like rotten eggs. Passing the gas through a simple “scrubber” made of steel wool will remove most of the sulfur, protecting your stove and improving the smell of the flame.
Always use a flame arrestor in your gas line. This is a simple safety device that prevents a flame from traveling back through the pipe into the storage tank. Safety should always be your top priority when working with flammable gases, no matter how small the system is.
Advanced Considerations for Growth
Once you have mastered the basics of a single-tank system, you may want to consider scaling up. Linking multiple IBC totes in parallel allows you to process more waste and produce more gas without significantly increasing the complexity of the plumbing. This is ideal for homesteads with larger livestock populations.
Incorporating a solar water heating loop is an excellent way to maintain high temperatures in the winter. By running a coil of PEX pipe inside the digester and connecting it to a solar collector, you can use the sun to keep your bacteria active even when the air temperature is freezing. This creates a truly sustainable, year-round energy system.
Advanced users often experiment with “co-digestion,” which is the mixing of different types of waste to find the perfect carbon-to-nitrogen (C:N) ratio. The ideal ratio for biogas production is around 25:1 or 30:1. Mixing high-carbon materials like fallen leaves with high-nitrogen manure can optimize the output of your system.
Compression and storage is the final frontier for homestead biogas. While low-pressure storage is fine for cooking, compressing the gas into tanks would allow it to be used for engines or vehicles. However, this requires specialized equipment and a much higher level of safety protocol, making it a project for the most experienced pioneers.
Real-World Example: The 5-Acre Homestead
Imagine a family living on five acres with a small flock of chickens, two goats, and a large vegetable garden. Every day, they collect about five pounds of kitchen scraps and ten pounds of animal manure. By feeding this 15-pound mixture into a 300-gallon digester, they produce roughly 20 cubic feet of biogas daily.
This amount of gas is enough to run a single burner on a biogas stove for nearly two hours. The family uses this gas to cook breakfast and dinner, saving them from using two large propane tanks every year. The cost of the system was less than $300, mostly spent on the IBC tote and high-quality plumbing fittings.
Beyond the gas, the family harvests five gallons of liquid fertilizer every week from the overflow pipe. They dilute this slurry and use it to water their tomato and pepper plants. The result is a noticeable increase in crop yield and a significant reduction in the amount they spend on commercial fertilizers.
This scenario shows how a small investment in time and materials can yield consistent, long-term rewards. The family has effectively closed the loop on their waste, turning potential pollution into valuable energy and food. This is the essence of ancestral wisdom applied to modern living.
Final Thoughts
Building a biogas digester is one of the most rewarding projects a homesteader can undertake. It challenges you to understand the biological rhythms of your land and rewards you with the most basic of human needs: fuel. There is a profound sense of satisfaction in knowing that your morning coffee was boiled using the energy from yesterday’s kitchen scraps.
True self-reliance is built on these small, incremental steps toward independence. While a biogas system may not solve all your energy needs, it provides a foundational piece of the puzzle. It teaches you to value what others discard and to find abundance in the most unlikely places.
Take the leap and start gathering your materials today. The bacteria are ready to work for you if you provide them with a home. Experiment, observe, and refine your process as you join the growing community of homesteaders who are reclaiming their energy future through the power of biogas.
