How To Become More Self-Sufficient Without Starting a Full-Blown Farm…
Want to start preserving your harvest, making your own soap, or building a backyard root cellar — but not sure where to begin? “Homesteading Advice” gives you instant lifetime access to 35+ practical homesteading books on food preservation, veggie gardening, DIY natural cleaning products (save over $250 per year with this skill alone), brewing, off-grid energy, and a whole lot more…
Click Here To Check It Out Now!
One of these is a ticking clock of dependency; the other is a permanent portal to the sun’s furnace. Every propane canister you buy is a leash. A parabolic solar cooker uses the infinite energy of the sun to reach temperatures over 400 degrees in minutes. No soot, no canisters to haul, and no bill from the hardware store.
Taking control of your own energy is a hallmark of the self-reliant life. While modern convenience suggests we rely on a fragile grid and complex supply chains, ancestral wisdom reminds us that the greatest power source has been hanging over our heads for eons. The high-heat solar concentrator is more than a novelty; it is a tool of the modern pioneer. It represents a clean break from the industrial teat, allowing you to fry, boil, and bake using nothing but the raw, focused intensity of the sky.
Mastering this technology requires a blend of basic geometry and rugged craftsmanship. This guide will walk you through the mechanics of the sun’s furnace and show you how to build a device that turns a sunny afternoon into a high-performance kitchen. Whether you are preparing for a long-term grid-down scenario or simply want to cook a meal without leaving a footprint, the solar concentrator is your path to true thermal independence.
How To Build A High Heat Solar Concentrator
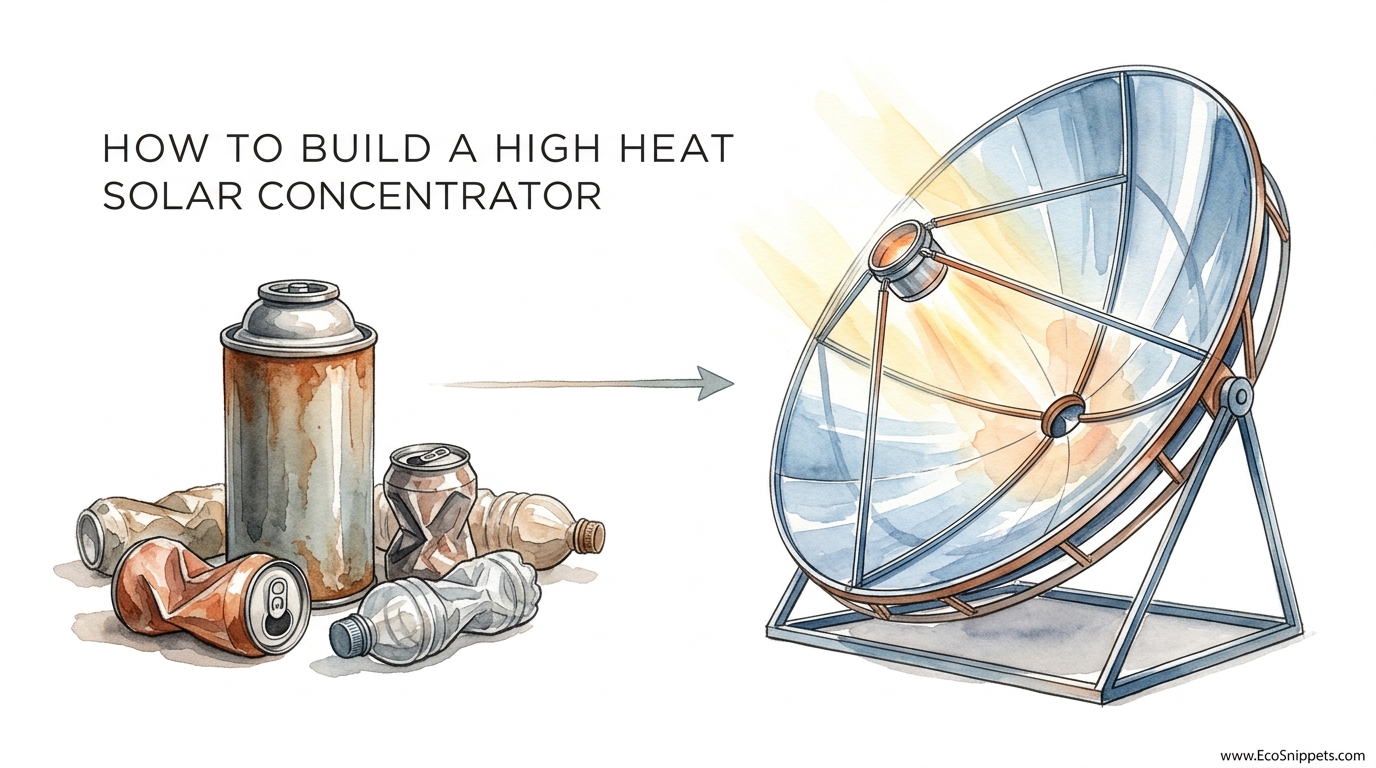
Building a high-heat solar concentrator is the process of creating a parabolic reflector that directs parallel rays of sunlight into a single, intense focal point. Unlike a standard solar box oven, which traps heat slowly like a greenhouse, a concentrator acts like a magnifying glass on a massive scale. It is a piece of precision engineering that can be assembled from salvaged materials.
This device exists to bridge the gap between “warming” food and “cooking” it. In real-world survival or off-grid homesteading, time is a resource. Waiting four hours for a stew to simmer in a box oven is often a luxury you cannot afford. A parabolic dish can boil a liter of water in under fifteen minutes or sear a steak as quickly as a cast-iron skillet on a gas range.
Think of the concentrator as a heavy-duty industrial tool. It is used in developing nations to pasteurize water and in advanced laboratories to test the melting points of metals. For the home practitioner, it is the ultimate backup stove. It requires no fuel, creates no smoke that might signal your position, and works as long as the sky is clear.
To begin your build, you must first understand the shape. A true parabola is the only geometric form that can reflect all incoming parallel light to a mathematical point. While you can approximate this with various designs, using a pre-existing parabolic shape, such as a salvaged satellite dish, is the most effective shortcut for the DIY builder.
The Geometry of the Sun: How It Works
The magic of the solar concentrator lies in the parabolic curve. When light hits a flat mirror, it bounces off at the same angle it arrived. However, when light hits a parabolic curve, every ray is redirected toward a central focus. This is the same principle used in satellite dishes to collect radio waves or in car headlights to project a beam of light.
Focusing the sun’s energy increases the “concentration ratio.” A dish with a surface area of one square meter that focuses light into a circle the size of a coin is concentrating the sun’s energy thousands of times. This is why these devices can reach temperatures exceeding 500 degrees Fahrenheit almost instantly.
Precision is the key to high heat. If your reflective surface is lumpy or your curve is misshapen, the light will “spill,” landing near the target but not on it. This results in a warm pot rather than a boiling one. High-performance builds prioritize a smooth, continuous reflective surface to ensure every photon contributes to the heat.
Tracking is the final piece of the functional puzzle. Because the Earth is constantly rotating, the sun’s position in the sky changes throughout the day. To keep the focal point directly on your cooking vessel, you must realign the dish every 15 to 20 minutes. This manual tracking is a small price to pay for the intense, free energy you receive in return.
Step-by-Step Construction Guide
Building your own furnace begins with the “bones” of the dish. Sourcing a discarded satellite dish is often the cheapest and most effective starting point. These dishes are already engineered to a perfect parabolic specification, saving you hours of complex woodworking or metal forming.
1. Prepare the Substrate
Find a satellite television dish, ideally 3 to 4 feet in diameter. Clean the surface thoroughly with soap and water to remove any grime, bird droppings, or oxidation. If the dish is made of mesh, you will need to cover it with a solid material like thin plywood or cardboard first, though solid metal dishes are far superior.
2. Apply the Reflective Surface
You have several choices for your “mirror.” The most common and effective DIY material is metalized Mylar film or specialized reflective vinyl. Apply a high-quality spray adhesive to the dish in small sections. Carefully smooth the Mylar onto the dish, working from the center outward to minimize wrinkles. Wrinkles cause light scatter, which kills your efficiency.
3. Calculate the Focal Point
Every dish has a unique focal point based on its depth and width. You can find this using the formula: f = D² / (16 * d), where D is the diameter of the dish and d is the depth. For example, if your dish is 36 inches wide and 6 inches deep, the focal point will be 13.5 inches from the center of the dish. This is where your cooking pot must sit.
4. Build the Support and Pot Stand
A sturdy stand is essential because a solar concentrator is essentially a large sail. Build a base from scrap lumber or metal that allows the dish to tilt up and down and rotate side to side. Use a tripod or a heavy-duty arm to position a ring or platform exactly at the focal point. This platform must be strong enough to hold a heavy cast-iron pot.
5. Blacken Your Cookware
Shiny pots reflect the very energy you are trying to capture. Use a matte black pot, preferably cast iron or thin steel painted with high-heat BBQ paint. The black surface absorbs the concentrated light and converts it into thermal energy, driving the heat into your food.
Benefits of Solar Concentration
The primary advantage is absolute energy independence. When you cook with solar, you are no longer a customer of the local utility or the hardware store’s propane aisle. This is a “buy once, use forever” technology that pays for itself within the first few months of regular use.
Beyond cost, there is the benefit of cleanliness. There is no soot to scrub off your pots, no ash to dispose of, and no carbon monoxide risk. This makes it a perfect tool for backyard cooking or for use in sensitive environments where open flames are prohibited due to fire risk or local regulations.
Power is also a measurable benefit. A well-built 4-foot dish can produce the equivalent of 1,000 to 1,200 watts of thermal energy. This is comparable to a standard electric stovetop burner on “high.” The speed of cooking is a significant upgrade over other solar technologies, making it a viable daily tool rather than just an experimental toy.
Versatility is the final pillar of its value. While primarily used for cooking, a concentrator can also be used for water distillation, making biochar, or even small-scale blacksmithing of low-melt metals. It is a multi-purpose thermal engine that scales with your ingenuity.
Challenges and Common Mistakes
One of the most frequent errors is ignoring the “spill” of the focal point. If the dish is not perfectly aimed, the concentrated beam of light can miss the pot and hit the support arm or the ground. This can quickly melt plastic components or start a fire in dry grass. Always stay with your cooker while it is in operation.
Material selection is another pitfall. Using standard kitchen aluminum foil is a common mistake for beginners. Aluminum foil has a relatively low reflectivity (around 80%) and crinkles easily, which scatters light. Over time, the foil will oxidize and lose its shine. Investing in Mylar or polished aluminum sheets will result in a much hotter and more durable cooker.
Wind management is a challenge that many overlook until their cooker is toppling over. Because the dish is a large concave surface, it catches the wind like a parachute. A sudden gust can flip the entire assembly, spilling your dinner and potentially damaging the reflective surface. Always weight your base with sandbags or anchor it to the ground.
Alignment errors can lead to frustratingly slow cook times. Even being a few degrees off-target can drop your temperature by half. Using a “shadow tracker”—a simple peg that stands perpendicular to the dish—allows you to see at a glance if you are perfectly aligned. When the peg casts no shadow, your dish is aimed directly at the sun.
Limitations and Environmental Constraints
The sun is a powerful ally, but it is not a 24-hour employee. The most obvious limitation is that a solar concentrator is useless at night or during heavy cloud cover. Unlike a box oven, which has some thermal mass to hold heat during a passing cloud, a concentrator loses its power the moment the sun is obscured.
Environmental conditions also dictate performance. In extremely cold climates, the “furnace” still works because it relies on light, not ambient temperature. However, you will lose heat to the wind via convection. In these cases, using a clear glass sleeve or a “heat trap” around your pot can help maintain the high temperatures needed for frying.
Size is a practical boundary. To get high heat, you need a large aperture area. A dish that is too small (under 2 feet) will struggle to boil large quantities of water. Conversely, a dish that is too large becomes difficult to transport and manage. Finding the “sweet spot” for your specific needs is a trade-off between portability and power.
Safety is a constraint that requires constant vigilance. The light at the focal point is blindingly bright. Looking directly at the reflection without proper eye protection (dark sunglasses or welding goggles) can cause permanent retinal damage. This is not a tool to be left around children or pets without strict supervision.
Disposable Canister vs. Solar Concentrator
Comparing a traditional propane stove to a solar concentrator highlights the difference between convenience and resilience. While propane is “instant,” it is also a finite resource that requires a supply chain. Solar is an investment in infrastructure that yields free energy for years.
| Feature | Disposable Propane | Solar Concentrator |
|---|---|---|
| Fuel Cost | Ongoing ($5-$10 per canister) | $0.00 |
| Heat-Up Time | Instant | 2-5 minutes in direct sun |
| Weather Dependence | Low (Wind affects flame) | High (Requires clear skies) |
| Sustainability | Low (Single-use canisters) | Very High (Zero waste) |
| Stealth/Security | Moderate (Hissing/Smell) | Low (Highly visible reflection) |
Practical Tips and Best Practices
Maximizing the efficiency of your sun furnace requires a few “tricks of the trade.” First, always pre-heat your pot. Placing a cold, heavy cast-iron Dutch oven on the focal point will take several minutes just to warm the metal. If you leave the empty pot on the focus for five minutes before adding ingredients, you will get an immediate sear.
Wind is the enemy of heat. Even on a sunny day, a stiff breeze will pull heat away from your pot faster than the sun can provide it. Use a simple wind shield—a piece of sheet metal or even a heavy board—to block the wind from hitting the pot. This small adjustment can shave 30% off your cooking time.
Use a “focal target” to ensure perfect aim. A small piece of dark metal or a blackened stone placed at the focal point can act as a visual guide. When you see the target begin to glow or shimmer, you know the beam is centered. This is much safer than trying to look at the brightness of the pot itself.
Cleanliness of the reflective surface is paramount. Dust, pollen, and fingerprints all scatter light. Wipe down your dish with a soft microfiber cloth and a bit of glass cleaner before every use. A dirty dish can lose up to 40% of its heating potential, turning your high-heat furnace into a mediocre warmer.
Advanced Considerations for the Serious Practitioner
For those who want to move beyond simple cooking, the solar concentrator offers a gateway into advanced off-grid engineering. One such area is thermal storage. By focusing the beam onto a container of salt or a specialized “phase change” material, you can store heat during the day to be used for cooking or warming after the sun goes down.
Solar tracking automation is another step for the tech-savvy pioneer. Using a simple Arduino setup with photoresistors, you can build a motorized mount that automatically follows the sun. This eliminates the need for manual adjustments and ensures the dish is always at peak performance, allowing you to focus on other tasks around the homestead.
Consider the “Stirling Engine” as a secondary use. A high-heat solar concentrator can provide the temperature differential needed to run a small Stirling engine, which converts heat into mechanical motion. This motion can then be used to pump water or even spin a small generator to charge batteries.
Water pasteurization and distillation are critical survival skills. A parabolic dish can easily reach the temperatures required to kill pathogens in water. By adding a simple condenser coil to your setup, you can turn brackish or salt water into pure, distilled drinking water using nothing but the sun. This makes the concentrator an essential tool for long-term survival.
Real-World Examples and Scenarios
Imagine a scenario where the local gas supply is interrupted for weeks. While others are rationing their few remaining cans of beans, the solar-equipped pioneer is out in the yard, boiling pasta and frying eggs. In one real-world test, a 1.2-meter dish was able to bring 2 liters of 60-degree water to a rolling boil in just 14 minutes.
In another scenario, consider the nomadic traveler. A collapsible parabolic cooker made from lightweight ribs and reflective fabric can be packed into a backpack. During a midday stop on the trail, the traveler can set up the cooker and have a hot meal without the weight of a fuel stove or the risk of starting a forest fire with a traditional campfire.
Finally, think of the home baker. By placing a small “oven box” at the focal point—essentially a blackened metal box with an insulated lid—you can bake bread or cookies. The concentrated heat maintains a steady temperature inside the box, allowing for professional-quality baking results without ever turning on the kitchen oven.
Final Thoughts
The high-heat solar concentrator is more than just a survival tool; it is a symbol of autonomy. It reminds us that the resources we need to thrive are already available if we have the grit to harness them. By building your own “sun furnace,” you are taking a definitive step away from the fragility of the modern world and toward the rugged stability of the pioneer life.
This technology demands respect and precision, but the rewards are measurable in every hot meal and every dollar saved. It is a bridge between the ancient power of the sun and the practical needs of the present. As you experiment with your build, you will find that the sun is the most reliable partner you could ask for—always there, always free, and always ready to provide.
Take these principles and start your own journey into solar mastery. Start small, refine your technique, and eventually, you will find that the ticking clock of dependency has been replaced by the steady, silent power of the heavens. The furnace is waiting for you to build it.
