How To Become More Self-Sufficient Without Starting a Full-Blown Farm…
Want to start preserving your harvest, making your own soap, or building a backyard root cellar — but not sure where to begin? “Homesteading Advice” gives you instant lifetime access to 35+ practical homesteading books on food preservation, veggie gardening, DIY natural cleaning products (save over $250 per year with this skill alone), brewing, off-grid energy, and a whole lot more…
Click Here To Check It Out Now!
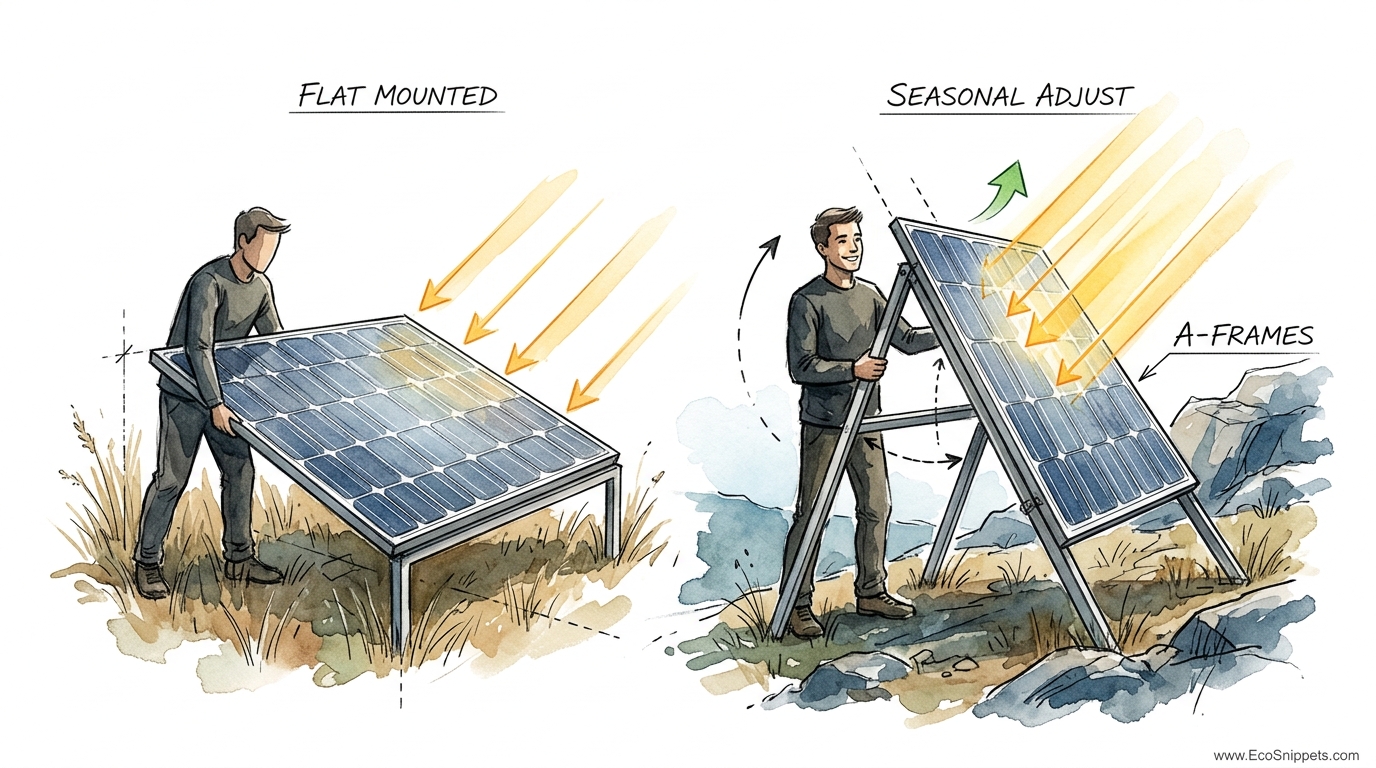
You are leaving 30% of your free energy on the table just because your panels are sitting flat. Most homesteaders set their panels and forget them. But the sun doesn’t stay in the same place all year. But switching from a ‘Standard’ flat mount to a ‘Pro’ seasonal tilt frame, you can double your winter charging capacity without spending a dime on new tech. It’s the difference between a dead battery by 5 PM and a full bank by noon.
Harnessing the sun is a lot like harvesting hay. If you don’t time it right and use the right tools, you lose most of the crop to the elements. Setting up a permanent solar array requires more than just a south-facing roof and some mounting bolts. It demands an understanding of how the heavens shift above your land.
Traditional flat mounts work well enough when the sun is directly overhead in July. However, as the world tilts away and the shadows grow long in November, those flat panels become nearly useless. This guide will walk you through the grit and the math of building a seasonal A-frame system that actually works for you year-round.
Maximizing Off-Grid Solar Efficiency With A-frames
Efficiency in the off-grid world isn’t about fancy gadgets; it’s about making the most of what the Creator provides. An A-frame solar mount is a ground-based racking system designed to hold your photovoltaic panels at a specific, adjustable angle. Unlike a roof mount that is slave to the pitch of your rafters, an A-frame stands on its own legs, allowing you to point your “harvesting tools” directly at the source.
These structures exist because the sun’s path across the sky is a moving target. During the summer solstice, the sun rides high, nearly vertical at noon. Come winter, it hugs the southern horizon, casting long, weak rays that glance off flat surfaces like a stone skipping across a pond. An A-frame allows you to pivot your panels so they catch those rays head-on at a 90-degree angle.
Real-world homesteads use these mounts to bridge the gap during the “dark months.” In a typical northern latitude, a panel tilted steeply toward the winter sun can produce up to 50% more power than one sitting at a summer angle. This is the secret to keeping the lights on and the fridge running when the days are short and the wood stove is working overtime.
Imagine trying to catch rain in a bucket. If the rain is falling straight down, you hold the bucket flat. If the wind is blowing the rain sideways, you tilt the bucket to catch the water. Solar energy works exactly the same way. The A-frame is simply the handle that lets you tilt the bucket.
The Physics of the Solar Harvest
Light travels in waves, and those waves carry energy. When a photon hits a solar cell, it knocks an electron loose, creating a current. This process is most efficient when the photon strikes the surface at a perfect perpendicular angle. Any deviation from that 90-degree strike results in what engineers call “cosine loss.”
Cosine loss means that as the angle of the sun becomes more shallow, the effective surface area of your panel “shrinks” from the sun’s perspective. A panel tilted 45 degrees away from the sun is essentially only 70% as large as it would be if it were facing the sun directly. You paid for a 400-watt panel, but because of a poor angle, you are only getting the performance of a 280-watt panel.
Atmospheric mass also plays a role. In the winter, the sun’s rays must travel through a much thicker layer of the Earth’s atmosphere because of the low angle. This scatters the blue light and weakens the overall intensity. While you cannot change the atmosphere, you can ensure that every bit of light that does make it through is captured as efficiently as possible by eliminating reflection losses through proper tilting.
Designing and Building Your Seasonal Frame
Building a sturdy A-frame requires a mix of common sense and solid materials. You are essentially building a sail that must withstand 80-mph wind gusts while supporting expensive glass modules. Cutting corners here is a recipe for a very expensive pile of scrap metal and shattered silicon.
Steel and aluminum are the kings of the solar world. Aluminum racking, such as Unistrut or specialized solar rails, is lightweight and will never rust. These materials allow for easy adjustment because they often use sliding nuts and T-bolts. A well-designed metal A-frame uses a pivot point at the top and a telescoping leg or a series of pre-drilled holes at the bottom to set the seasonal angles.
Wood is the traditional choice for the budget-conscious pioneer. Pressure-treated 4×4 posts and 2×4 framing can create a very capable mount if you account for the movement of the material. Wood swells and shrinks with the humidity. If you bolt your panels directly to a wooden frame without any “give,” the expansion of the wood can actually twist the panel frames and crack the glass. Always use metal rails—even if they are just basic galvanized steel—between the wood and the solar panels.
Foundation is everything. An A-frame has a large surface area, and a strong wind can lift it right out of the dirt. For a permanent setup, you want concrete piers dug below the frost line. If you are in a temporary or nomadic situation, heavy-duty earth anchors or weighted ballast boxes filled with several hundred pounds of stone can keep the array from taking flight.
The Seasonal Adjustment Schedule
Adjusting your panels every day is a fool’s errand. The gains are too small to justify the labor. Instead, most successful off-grid setups follow a four-season or two-season adjustment schedule. This aligns your panels with the solar “sweet spot” for each quarter of the year.
The “Rule of Thumb” for solar tilt is simple. For your year-round average, set the panels to match your latitude. If you live at 40 degrees North, a 40-degree tilt is your baseline. However, to truly maximize efficiency, you should follow this seasonal guide:
- Winter Tilt (November – February): Latitude + 15 degrees. In our 40-degree example, you would tilt the panels up to 55 degrees. This captures the low-hanging winter sun and helps shed snow.
- Spring/Fall Tilt (March – April & September – October): Set the angle equal to your Latitude. This provides the best balance as the sun crosses the equator.
- Summer Tilt (May – August): Latitude – 15 degrees. Lowering the panels to 25 degrees ensures you capture the sun when it is high overhead, maximizing your peak summer hours.
Some folks prefer a “set and forget” approach for six months at a time. If you only want to move the panels twice a year, make your adjustments on the Spring and Autumn Equinoxes. Move to the Winter Tilt in September and back to the Summer Tilt in March. This simple habit can boost your annual production by nearly 10% without much effort.
Benefits of the A-frame Approach
Moving your panels to the ground and onto an A-frame offers more than just raw power gains. It changes the way you interact with your energy system. Reliability is the currency of the homesteader, and A-frames offer it in spades.
Winter survival is the most significant advantage. For those living in snowy climates, a roof-mounted panel at a shallow angle can stay covered in snow for weeks. An A-frame tilted at 60 degrees in the winter acts like a slide. The dark surface of the panel absorbs heat, melts the bottom layer of snow, and the whole shelf slides off in minutes. This keeps your batteries charging while your neighbors are still climbing ladders with brooms.
Airflow is another hidden benefit. Solar panels are like people; they perform poorly when they get too hot. A roof-mounted panel can easily reach 150 degrees Fahrenheit, which causes the voltage to drop significantly. Because an A-frame is open on all sides, the wind can whistle right through the back of the modules, keeping them cool and maintaining peak efficiency even on a sweltering July afternoon.
Maintenance becomes a breeze when you don’t have to risk your neck on a pitch. Cleaning off dust, pollen, or bird droppings takes seconds with a garden hose or a soft brush. If a connection comes loose or a panel needs replacing, you can do the work standing firmly on the earth. This accessibility also encourages you to actually make the seasonal adjustments you planned.
Challenges and Common Mistakes
The biggest mistake new builders make is underestimating the power of the wind. A 400-watt solar panel is roughly 20 square feet of surface area. A four-panel array is an 80-square-foot sail. In a heavy storm, that array can generate thousands of pounds of lift. If your A-frame isn’t anchored into the earth with more than just a few tent stakes, you will find your investment in the next county over.
Shading is the silent killer of solar production. Even a small shadow from a leafless tree branch or a fence post can drop a panel’s output by 50% or more. When placing an A-frame on the ground, you must account for the shadows cast by your own house, barn, or the surrounding forest. Remember that shadows are three times longer in the winter than they are in the summer. A spot that is sunny in July might be in total shade by December.
Grounding is often overlooked in DIY ground mounts. A metal frame sitting in the dirt is a prime target for lightning or static buildup. You must tie the panel frames and the racking together with copper wire and run that wire to a dedicated eight-foot grounding rod driven into the earth. This protects your expensive charge controllers and inverters from getting fried during a summer thunderstorm.
Using the wrong fasteners is another frequent error. Never use standard zinc-plated screws or nails for solar mounting. They will rust and fail within five years. Use stainless steel hardware or hot-dipped galvanized bolts. The extra ten dollars spent at the hardware store now will save you from a structural failure a decade down the road.
Limitations: When an A-frame Isn’t Ideal
Despite their benefits, A-frames aren’t for everyone. They require a significant amount of cleared, south-facing land. If you live on a heavily wooded lot where the only sun is on your roof, then a roof mount is your only viable option. Pushing an A-frame into the shade of the trees just to get a better tilt is a losing trade.
Space is a luxury some don’t have. In suburban or urban environments, a large ground mount can be an eyesore or a violation of local zoning codes. A-frames also take up “useful” ground. You cannot easily garden or walk under them like you can with a high-clearance pole mount. You are essentially dedicating a portion of your yard to power generation.
Environmental factors like flooding or heavy brush can also pose problems. If your land is prone to standing water, your electronics and wires need to be elevated much higher than a standard A-frame allows. Similarly, if you have tall grass or weeds that you don’t intend to mow, they will quickly grow up and shade the bottom row of your panels.
Comparison: Flat Mount vs. Seasonal Adjust
The choice between a static mount and an adjustable one usually comes down to your energy needs during the winter. A flat mount is simpler, but an adjustable frame is smarter.
| Feature | Flat Mount (Fixed) | Seasonal A-frame |
|---|---|---|
| Winter Efficiency | Low (Poor Angle) | High (Optimized) |
| Maintenance Level | Set and Forget | Adjust 2-4x Yearly |
| Snow Shedding | Poor (Manual Clearing) | Excellent (Natural) |
| Airflow / Cooling | Fair to Poor | Excellent |
| Installation Cost | Lower | Moderate |
Practical Tips for the Modern Pioneer
Success with ground mounts often comes down to the details. Small adjustments in how you place and treat your array can result in surprisingly large gains in daily watt-hours.
Think about “Albedo” or surface reflectivity. If you place your A-frame on dark dirt or mulch, the ground absorbs the sunlight. If you place it over white gravel, light-colored concrete, or—best of all—fresh snow, that light reflects back up into the panels. This is especially important if you are using bifacial panels, which have cells on both sides. A reflective surface under an A-frame can boost production by an additional 10% to 20% through rear-side capture.
Protect your wiring from the critters. Ground-mounted arrays are a playground for squirrels, rabbits, and mice. They love to chew on the tasty plastic insulation of your solar cables. Run all of your wires through liquid-tight conduit from the panels down into the ground. A single chewed wire can short out your entire string and potentially damage your charge controller.
Use a magnetic inclinometer or a smartphone app to set your angles. Eyeballing a 45-degree angle is much harder than it looks. Being off by even five degrees might not seem like much, but over the course of a 30-day month, it adds up to a significant amount of lost energy. Precision is the mark of a craftsman.
Advanced Considerations: The Bifacial Advantage
Serious practitioners of off-grid solar are moving toward bifacial technology. These panels use a clear backsheet or double-glass construction, allowing them to generate power from light hitting the rear surface. Standard roof mounts kill this benefit because there is no light behind the panel.
An A-frame is the perfect partner for bifacial panels. Because the mount is elevated and open, “albedo” light can bounce off the ground and strike the back of the cells. During the winter, the reflection from the snow can turn the back of your panels into a secondary power source. This can push a standard 400-watt panel to behave like a 480-watt panel during peak reflective hours.
If you go this route, ensure your racking doesn’t create large shadows on the back of the panels. Traditional A-frames with center-support bars can block the very light you are trying to catch. Use “perimeter-only” mounting rails to keep the rear of the glass clear and unobstructed.
Example Scenario: The 400W Winter Challenge
Let’s look at a real-world scenario. Imagine a homesteader in Montana at 45 degrees North latitude with a single 400-watt panel. In December, the sun only stays above the horizon for about 8 hours, and its peak altitude is a measly 21 degrees.
If that panel is mounted flat on a 4/12 pitch roof (about 18 degrees), the sun strikes it at a very shallow angle. Accounting for atmospheric loss and the poor angle, that panel might only produce 600 watt-hours of energy in a full day—barely enough to run a few LED lights and a small fan.
Now, put that same panel on an A-frame adjusted to 60 degrees (Latitude + 15). The sun strikes the panel almost perfectly at noon. Production jumps to over 1,000 watt-hours for the day. That extra 400 watt-hours is enough to run a small chest freezer or keep a laptop charged for the evening. You haven’t added more panels; you’ve just stopped wasting the sun you already had.
Final Thoughts
Building a seasonal A-frame is about more than just numbers on a screen. It is about taking an active role in your own survival and self-reliance. It is a return to a way of life where we observe the seasons and adjust our tools accordingly, rather than expecting technology to solve every problem with brute force.
Adjusting your panels twice or four times a year connects you to the rhythm of your land. You begin to notice the shortening of the days long before the first frost hits. You learn to respect the power of the wind and the weight of the snow. This awareness is the foundation of true homesteading.
Don’t let your energy harvest go to waste. Start with a simple frame, anchor it well, and learn the math of your specific latitude. Within a year, you will likely find that your batteries are fuller, your generator runs less, and your connection to the sun is stronger than ever. Experiment with your angles and watch the results—the sun is waiting to give you more if you are willing to reach for it.
