How To Become More Self-Sufficient Without Starting a Full-Blown Farm…
Want to start preserving your harvest, making your own soap, or building a backyard root cellar — but not sure where to begin? “Homesteading Advice” gives you instant lifetime access to 35+ practical homesteading books on food preservation, veggie gardening, DIY natural cleaning products (save over $250 per year with this skill alone), brewing, off-grid energy, and a whole lot more…
Click Here To Check It Out Now!
Is your backup power system a survival tool, or a fire waiting to happen? In a high-voltage off-grid system, chaos isn’t just ugly—it’s dangerous. One loose connection can melt a battery or start a house fire. True self-sufficiency requires the discipline of order. If you can’t trace your wires at a glance, you aren’t ready for a grid-down scenario.
Off-grid living is often romanticized as a quiet life under the sun, but the heart of that life beats in the battery room. This is where raw energy is tamed and stored. If that heart is a tangled mess of cables and corroded terminals, your independence is built on a foundation of sand. Proper organization is the difference between a system that lasts twenty years and one that fails when the blizzard hits.
We are moving away from the era of “throwing some batteries in the corner” and toward professional-grade power stations. Whether you are using traditional lead-acid banks or modern lithium stacks, the principles of ancestral wisdom apply: keep your tools sharp, your workspace clean, and your fire contained. Let’s look at how to turn that dark corner of your basement or shed into a fortress of reliable energy.
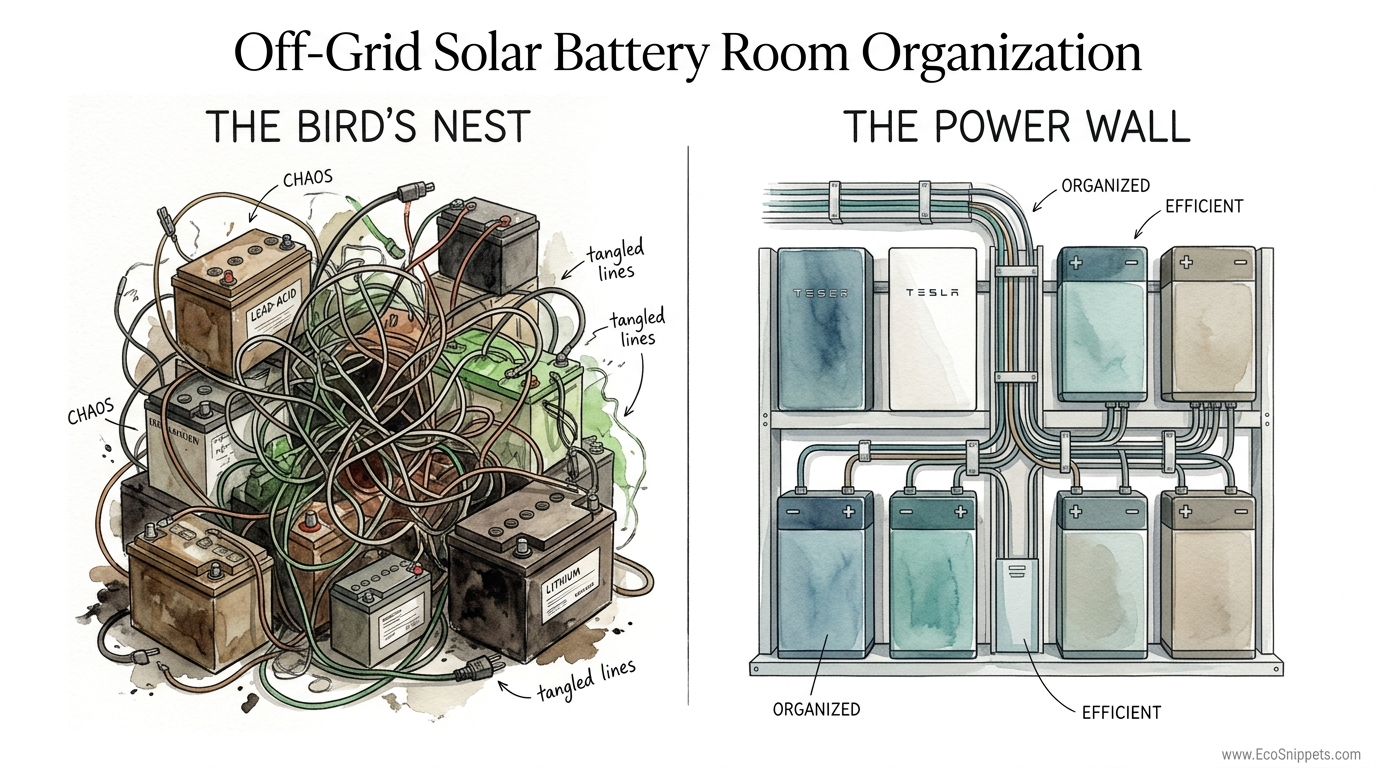
Off-Grid Solar Battery Room Organization
Off-grid solar battery room organization is the intentional arrangement of energy storage components, power electronics, and safety gear to ensure maximum system longevity and operator safety. It is not just about aesthetics. In the world of high-current DC electricity, organization serves a functional purpose by reducing resistance, preventing heat buildup, and allowing for rapid troubleshooting during emergencies.
In a real-world off-grid scenario, your battery room is your “fuel tank.” Just as a homesteader wouldn’t store leaking barrels of gasoline in a pile, a solar practitioner must treat battery banks with respect. This organization usually involves dedicated racking, clear labeling, environmental controls, and strategic placement of disconnects and busbars. It creates a “Power Wall” rather than a “Bird’s Nest.”
Think of it like an old-fashioned tool shed. When every wrench has its place, you can work in the dark. In a power outage, you might have to work on your system with nothing but a headlamp. An organized room ensures you don’t grab the wrong cable or trip over a loose battery in the middle of a crisis. It transforms a collection of parts into a cohesive, reliable machine.
How to Organize Your Off-Grid Battery Room
Starting your organization project requires a plan before you ever turn a wrench. The first step is selecting a location that is dry, temperature-controlled, and structurally sound. A single 48V lead-acid bank can weigh thousands of pounds; your floor must be able to handle that concentrated load without sagging or cracking over time.
Once the location is set, follow these steps to build your system with pioneer-grit precision:
- Racking and Elevation: Never place batteries directly on a concrete floor. Concrete can draw heat away from the cells or, in the case of lead-acid, lead to uneven discharge. Use heavy-duty steel racks or custom-built wooden stands treated with acid-resistant paint. Elevating the batteries also makes it easier to inspect the bottom of the cases for leaks or bulging.
- The Central Busbar Strategy: Instead of stacking multiple lugs on a single battery terminal—which creates “hot spots” and high resistance—run all battery strings to a central positive and negative busbar. This ensures even current draw across the entire bank and makes adding or removing batteries much simpler.
- Cable Management: Use conduit for long runs and cable trays for bundles. Avoid sharp bends in high-gauge wire; the “bend radius” should be at least five to eight times the diameter of the cable. Tight bends can fracture the copper strands inside the insulation, leading to invisible points of high resistance that generate heat.
- Labeling Everything: Every cable should have a label at both ends. Use a permanent labeling system (heat-shrink labels are best) to identify the source and destination of each wire. If your charge controller fails, you shouldn’t have to guess which pair of wires leads to the PV array.
Modern practitioners also prioritize the “working clearance.” According to standards like NFPA 855 and NEC 706, you should maintain at least 3 feet (1 meter) of clear space in front of your equipment. This isn’t just for the inspector; it’s so you can swing a tool or move a heavy battery without getting trapped in a corner during a fire or spill.
Benefits of an Organized Battery Room
The most immediate benefit of an organized system is safety. When wires are neatly routed and terminals are covered, the risk of “accidental bridging”—where a dropped tool creates a massive short circuit—is virtually eliminated. In a 48V system with high amp-hour capacity, a short can instantly weld a wrench to the terminals or cause a battery to explode.
Other practical advantages include:
- Thermal Management: Batteries that are spaced out according to manufacturer specs (usually 0.5 to 1 inch apart) stay cooler. Heat is the primary killer of both lead-acid and lithium batteries. Proper organization ensures that air can circulate around every cell, preventing the middle batteries in a bank from “cooking” while the outer ones stay cool.
- Efficiency and Performance: Shorter, well-sized cable runs reduce “voltage drop.” If your inverter thinks the batteries are at 47V because of poor wiring, but they are actually at 49V, your system will shut down prematurely. Order leads to accuracy.
- Easier Maintenance: For lead-acid users, organization means you can actually reach the caps to add distilled water. For lithium users, it means you can easily see the BMS (Battery Management System) display or access the communication ports for firmware updates.
There is also the “psychological benefit.” A tidy system inspires confidence. When you look at your Power Wall and see clean lines and clear labels, you feel in control of your destiny. When you look at a Bird’s Nest, you feel a lingering sense of dread that something might go wrong at any moment.
Challenges and Common Mistakes
The most common mistake in off-grid setups is the “Temporary Fix” that becomes permanent. You might tell yourself you’ll clean up the wiring next weekend, but three years later, you’re still running the entire house through a single undersized breaker. This “temporary grit” is actually just negligence, and it leads to equipment failure.
Another pitfall is improper stacking. Some practitioners try to save floor space by stacking batteries on top of each other. Unless the batteries are specifically designed for this (like certain rack-mount LiFePO4 modules), this is a recipe for disaster. The weight can crush the bottom units, and the heat trapped between layers will cause rapid degradation.
Failing to account for “cable symmetry” is a technical error that often goes unnoticed. In a parallel battery bank, the cables connecting each battery to the busbar must be the exact same length. If one cable is two feet longer than the others, that battery will have higher resistance and won’t work as hard as the others. Over time, the “hard-working” batteries will wear out prematurely while the others stay undercharged.
Limitations and Constraints
Organization cannot fix a fundamentally flawed environment. If your battery room is in a shed that hits 110°F in the summer or drops to -20°F in the winter, no amount of neat wiring will save your batteries. Lithium batteries cannot be charged below freezing without internal heaters, and lead-acid batteries lose significant capacity in the cold. You must balance organization with insulation and climate control.
Space is another constraint. Not everyone has a dedicated 10×10 room for their power system. If you are working in a small closet, you may have to prioritize certain components over others. However, the smaller the space, the more critical organization becomes. In tight quarters, an unmanaged cable is a trip hazard that could lead to a catastrophic fall against high-voltage terminals.
Cost is also a factor. High-quality busbars, custom-length cables with hydraulic-crimped lugs, and steel racking add significant expense to a build. While it is tempting to skip these “extras” to buy more panels, the structural integrity of your system is where you should never cut corners.
Comparison: Lead-Acid vs. Lithium (LiFePO4) Organization
The type of battery you choose dictates how you must organize your space. Traditional lead-acid batteries are the “old guard”—heavy, reliable if cared for, but demanding. Lithium (LiFePO4) is the “new frontier”—lightweight, efficient, but requiring high-tech monitoring.
| Feature | Lead-Acid (Flooded/AGM) | Lithium (LiFePO4) |
|---|---|---|
| Ventilation | Mandatory (Hydrogen Gas) | Minimal (Thermal Only) |
| Weight | Very Heavy (Requires Floor Reinforcement) | Light (Can be wall-mounted) |
| Maintenance | High (Watering, Equalization) | Very Low (BMS Monitored) |
| Orientation | Must stay upright | Flexible (Many can be sideways) |
| Safety Risk | Acid spills & Explosive Gas | Thermal Runaway (Rare for LFP) |
If you are building a “THE BIRD’S NEST” setup with lead-acid, the corrosive fumes will eventually eat through your messy wiring. Lithium systems, while cleaner, require much more attention to communication cables. A single loose ethernet-style cable between lithium modules can shut down your entire house if the BMS loses its handshake.
Practical Tips and Best Practices
To achieve a professional-grade setup, apply these best practices immediately:
- Color Coding: Always use Red for Positive and Black for Negative. Never use “whatever wire I had in the truck.” If you must use a different color, wrap the ends in red or black electrical tape to clearly mark the polarity.
- Torque Your Terminals: Use a torque wrench. Loose connections cause heat, and over-tightened connections can crack battery terminals. Check the manufacturer’s spec (usually measured in inch-pounds or Newton-meters) and stick to it.
- The “Master Disconnect” Rule: Install a high-amperage circuit breaker or a T-class fuse as close to the battery bank as possible. This is your “kill switch.” In an emergency, you need one single point to cut all power to the inverter.
- Keep a “Battery Log”: Hang a clipboard in the room. Record your monthly voltage readings, water additions (for lead-acid), and any system errors. This ancestral habit of record-keeping will help you spot a failing battery months before it dies.
Install a Class C fire extinguisher right next to the door. Note that I said “next to the door,” not next to the batteries. If the batteries are on fire, you don’t want to have to reach into the flames to grab your extinguisher. You want it where you can grab it on your way into the room to fight the fire.
Advanced Considerations for the Serious Practitioner
As you move beyond the basics, consider the integration of your Battery Management System (BMS) with your inverter’s software. High-end systems allow for “closed-loop communication,” where the batteries tell the inverter exactly how much current they can handle based on their current temperature and state of charge. This prevents the “death by a thousand cuts” that occurs when an inverter forces too much power into a cold or nearly full battery.
Consider the “DC Coupled” vs. “AC Coupled” layout of your room. In a DC-coupled system, your charge controllers should be mounted as close to the batteries as possible to minimize high-current DC losses. In an AC-coupled system, the distance is less critical, but you still want your battery-to-inverter cables to be as short as humanly possible (ideally under 10 feet).
Finally, think about seismic or structural movement. If you live in an earthquake-prone area, or even just a place with high winds that can shake a shed, your battery racks should be bolted to the floor and the batteries should be strapped into the racks. A 100-pound battery sliding off a shelf is a disaster you can easily prevent with five dollars worth of strapping.
Example Scenario: The Mountain Cabin Setup
Imagine a small off-grid cabin in the Cascades. The owner originally had a “Bird’s Nest” of four 12V lead-acid batteries sitting on a piece of plywood. The wires were a mix of jumper cables and scrap wire. Every time the well pump kicked on, the lights flickered because the voltage drop was so severe. One winter, a terminal corroded so badly it melted the plastic casing of the battery.
The owner decided to rebuild. They installed a dedicated steel rack and switched to a 48V LiFePO4 system. They mounted a 250A busbar on a non-conductive backboard and used 4/0 AWG welding cable for the main runs. All cables were cut to equal lengths and secured with nylon clamps. They added a 200A T-Class fuse for protection.
The result? The lights no longer flicker when the pump starts. The owner can check the health of every cell from their phone via Bluetooth. Most importantly, when they leave the cabin for the month, they have the “pioneer-grit” peace of mind knowing the system is organized, fused, and safe from fire.
Final Thoughts
Off-grid solar battery room organization is more than a chore; it is an act of stewardship. You are the operator of your own utility company. By bringing order to your power room, you are ensuring that your family has light, heat, and water when the rest of the world goes dark. Self-reliance is not just about having the equipment; it’s about having the discipline to maintain it.
Do not be overwhelmed by the complexity of a full rebuild. Start with the basics: clean the terminals, label three wires today, and plan your racking for tomorrow. Every step toward order is a step away from catastrophe. The grit of the pioneer isn’t just in the muscles; it’s in the meticulous care of the tools that sustain life.
As you refine your system, you may find that this discipline spills over into other areas of your homestead. An organized battery room often leads to an organized tool shop and a more efficient garden. Order is contagious. Embrace it, and your off-grid system will serve you faithfully for decades to come.
