How To Become More Self-Sufficient Without Starting a Full-Blown Farm…
Want to start preserving your harvest, making your own soap, or building a backyard root cellar — but not sure where to begin? “Homesteading Advice” gives you instant lifetime access to 35+ practical homesteading books on food preservation, veggie gardening, DIY natural cleaning products (save over $250 per year with this skill alone), brewing, off-grid energy, and a whole lot more…
Click Here To Check It Out Now!
You don’t need a high-tech lab to start seeds; you just need to understand the energy of the seasons. Stop babying your plants under expensive lights. Winter sowing uses the natural cycle of the sun and cold to produce hardier, stronger plants with zero electricity costs.
For generations, the earth has managed its own propagation without the help of plastic trays or humming ballasts. The wind scatters the seeds, the snow tucks them in, and the spring thaw wakes them up. Winter sowing is simply a way for the modern gardener to step back into that rhythm, using a bit of pioneer ingenuity to protect those seeds from the birds while letting the weather do the heavy lifting.
This method isn’t just a “hack” for the budget-conscious. It is a fundamental shift in how we think about plant health. By moving our seed starting outdoors, we eliminate the fragility that comes from artificial environments. We trade the sterile, static air of a basement for the rugged reality of the frost, and the result is a garden that stands tall when the first spring winds howl.
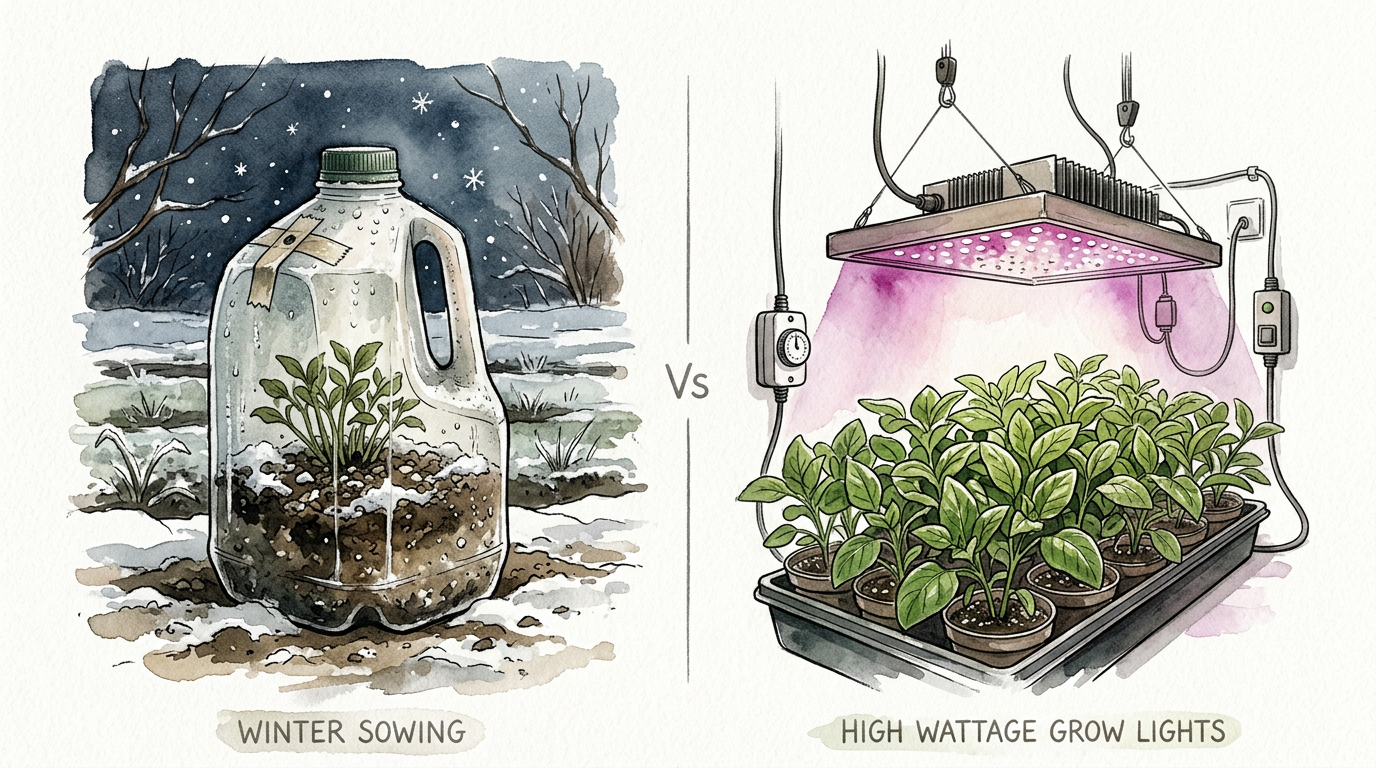
Winter Sowing Vs High Wattage Grow Lights
Winter sowing is the practice of planting seeds in miniature, vented greenhouses—usually made from recycled containers like milk jugs—and placing them outdoors during the coldest months of the year. While indoor gardening relies on human-controlled variables like light spectrum and humidity, winter sowing relies on the Earth’s natural cycles. It is a method born of necessity and refined by gardeners who realized that a seed’s internal clock is far more accurate than any digital timer.
In the real world, this method is used by native plant enthusiasts, market gardeners, and backyard self-reliance practitioners who want to scale their production without scaling their electric bill. Indoor grow lights are designed to mimic the sun, but they often fall short of providing the full spectrum and intensity required for truly robust growth. Consequently, indoor seedlings often become “leggy,” stretching toward the light and developing weak stems that require a tedious “hardening off” process before they can survive in the real world.
Think of it like raising a wolf versus raising a lapdog. Indoor seed starting under high-wattage lights creates a pampered plant that has never felt a breeze or a drop of real rain. When that plant finally meets the outdoors, it often goes into shock. Winter-sown plants, however, are born in the cold. They have felt the frost on their containers and the strength of the winter sun. They emerge as hardened warriors, ready to grow the moment the soil reaches the right temperature.
How the Winter Sowing Process Works
The process is deceptively simple, but it relies on a sophisticated biological trigger called cold stratification. Many seeds, particularly perennials and native wildflowers, have a built-in dormancy mechanism. They won’t sprout until they have experienced a specific period of cold and moisture. This ensures they don’t accidentally germinate during a warm spell in October only to be killed by the November freeze.
To start, you gather translucent or clear plastic containers. Milk jugs are the gold standard because they provide enough depth for root growth and a high “ceiling” for the young plants. You cut the jug in half, leaving a small hinge, and fill the bottom with a few inches of high-quality potting mix. After sowing your seeds and labeling the inside, you tape the jug shut and move it outside to a spot where it can receive sun and rain.
Rain and snow fall through the open spout of the jug, keeping the soil moist without any intervention from you. As the sun hits the plastic, it creates a micro-greenhouse effect, warming the soil just enough to encourage germination when the time is right. Because the container is vented, the seedlings don’t overheat on sunny days, and because they are outside, they are naturally acclimated to the UV rays and temperature swings of their permanent home.
The Unbeatable Benefits of Sowing with the Seasons
Practicality is the soul of the winter sowing method. One of the most measurable benefits is the **reduction in electricity costs**. Running high-output grow lights for 14 to 16 hours a day can add a significant sum to your monthly utility bill, especially if you are starting hundreds of plants. Winter sowing uses the sun, which is free and perfectly timed.
Another major advantage is the **elimination of the hardening-off period**. This is the week-long process of moving indoor plants outside for increasing intervals of time to prevent transplant shock. It is a chore that many gardeners find tedious and easy to mess up. Winter-sown plants never need this; they are already outside. They have been breathing the outdoor air since the moment they broke through the soil.
Furthermore, winter sowing allows you to **reclaim your living space**. Seed trays, lights, and fans take up valuable real estate in a home. By moving your “nursery” to the backyard, you keep the dirt and the humidity out of your kitchen or basement. This also prevents common indoor issues like “damping off” (a fungal disease that kills young seedlings) and fungus gnats, which thrive in the stagnant air of an indoor setup.
Common Pitfalls and How to Avoid Them
The most frequent error is **neglecting drainage**. A milk jug without holes in the bottom is just a bucket. During a heavy rain or a spring thaw, your seeds will drown in standing water, leading to rot before they ever have a chance to sprout. Use a hot soldering iron, a drill, or a sharp knife to poke at least four to six generous holes in the bottom of every container.
Another pitfall is **using the wrong soil**. People often reach for cheap garden soil or heavy topsoil, but these pack down too tightly in a container, suffocating the roots. You need a well-draining potting mix or a dedicated seed-starting mix. These lighter substrates allow for better aeration and moisture retention without becoming a muddy brick.
Temperature management is the final hurdle. Some gardeners get nervous during a late-season cold snap and try to “save” their jugs by bringing them into the garage or house. This is a mistake. The sudden warmth can trigger premature germination or cause the plants to grow weak and spindly. Trust the container. Unless you are facing a truly catastrophic, record-breaking weather event, the mini-greenhouse is enough to protect hardy species.
Limitations and Environmental Constraints
Winter sowing is not a magic bullet for every crop. **Heat-loving vegetables** like tomatoes, peppers, eggplants, and melons are not good candidates for early winter sowing. If you put tomato seeds out in January, they will likely sit in the cold, wet soil and rot before it ever gets warm enough for them to germinate. These tender crops should either be started indoors or winter-sown much later, usually within a few weeks of your last frost date.
Your local climate also dictates your success. If you live in an area with **extreme wind**, your jugs might blow away or be tipped over, spilling your hard work onto the frozen ground. In these conditions, you must weigh your containers down or nestle them together in a heavy crate.
Dry climates present a different challenge. In places with very low humidity and little winter precipitation, the soil in your jugs can dry out completely. While the spout is meant to let rain in, if there is no rain, you must manually check the moisture levels. If the jug feels light or the soil looks pale, a gentle misting through the top spout is necessary to keep the seeds viable.
Comparing Seed-Starting Strategies
When deciding how to fill your garden, it helps to look at the hard data. This comparison focuses on the practical realities of managing a large-scale home garden.
| Factor | High Wattage Grow Lights | Winter Sowing Method |
|---|---|---|
| Setup Cost | High ($100 – $500+) | Near Zero (Recycled items) |
| Ongoing Expense | Electricity & Bulb replacement | None |
| Maintenance | Daily watering & light adjustment | Occasional moisture checks |
| Plant Hardiness | Fragile; requires hardening off | Extremely hardy; no shock |
| Risk of Disease | High (Fungus gnats, damping off) | Low (Natural airflow) |
| Best For | Tropicals & long-season peppers | Perennials, greens, & hardy annuals |
Practical Tips for Success
If you are ready to start, follow these best practices to ensure your first season is a success. First, **label your containers with a permanent, oil-based marker** or a paint pen. Standard Sharpies often fade under the relentless UV rays of the winter sun, leaving you with a “mystery garden” come spring. Write the name of the plant on the bottom or the side where it is slightly shielded from direct light.
Second, consider the **placement of your jugs**. You want a spot that gets plenty of sun during the day to help with warmth, but you must avoid placing them directly against a south-facing brick wall or a dark-colored house. These surfaces reflect heat and can cause the jugs to bake on a sunny February day, tricking the seeds into sprouting far too early. An open area on the north or east side of a structure is often more stable.
Third, use the **”Hunk o’ Seedlings” method** when it comes time to transplant. Instead of trying to separate every tiny, delicate root, simply slice the soil into squares—like a tray of brownies—and plant the entire cluster. This minimizes root disturbance and allows the plants to support each other as they establish themselves in the garden bed.
Advanced Considerations for the Serious Grower
For those looking to push the boundaries of this method, **timing is the key variable**. You can stagger your sowing based on the specific needs of the seed. Native perennials that require 60 to 90 days of cold stratification should go out in the “dead of winter,” usually around the Winter Solstice. Hardy vegetables like kale, spinach, and onions can follow in late January or February.
You might also experiment with **container color**. While clear containers provide the most light, translucent (milk-white) containers offer a slightly more buffered environment, protecting seedlings from the most intense mid-day sun. Serious practitioners often use a mix of both to see which varieties prefer the extra light versus the extra shade.
Finally, consider the **soil depth**. While the standard advice is three inches, for long-taproot plants like poppies or certain native prairie species, a deeper container—like a two-liter soda bottle—might yield better results. The more soil volume you have, the more stable the temperature and moisture levels will be within that micro-environment.
Real-World Scenario: The Harvest Cycle
Imagine a gardener in Zone 5. In early January, they sow several jugs of Purple Coneflower and Milkweed. These containers sit under two feet of snow for most of the winter. In late February, they add jugs of kale and broccoli. By mid-March, the snow melts and the sun begins to warm the plastic.
The kale sprouts first, followed by the coneflowers. By the time the local nurseries are just beginning to sell their first pampered starts, this gardener is already transplanting “hunks” of deep-green, frost-touched kale into the ground. These plants don’t wilt; they don’t turn yellow from transplant shock. They simply keep growing, fueled by the natural energy of the returning sun.
By June, the winter-sown coneflowers are already larger than the ones bought in expensive pots at the store. The gardener has spent perhaps twenty dollars on seeds and soil, while the neighbor has spent hundreds on lights and nursery-grown plants. The difference is in the grit.
Final Thoughts
Winter sowing is more than just a gardening technique; it is an act of trust. It requires you to believe that the seed knows what to do and that the seasons are a better caretaker than any indoor environment. It rewards the patient and the resourceful, providing a bounty of healthy plants for the cost of a few bags of soil and some recycled plastic.
As you look out at your frozen yard this year, don’t see it as a dead space. See it as your nursery. By embracing the cold instead of fighting it, you tap into an ancient wisdom that produces the strongest possible start for your garden.
Whether you are a seasoned farmer or a beginner with a single milk jug, the results will speak for themselves. The strength of a winter-sown plant is a testament to the power of nature’s own systems. Start small if you must, but start this winter. You will never look at a plastic jug the same way again.
