How To Become More Self-Sufficient Without Starting a Full-Blown Farm…
Want to start preserving your harvest, making your own soap, or building a backyard root cellar — but not sure where to begin? “Homesteading Advice” gives you instant lifetime access to 35+ practical homesteading books on food preservation, veggie gardening, DIY natural cleaning products (save over $250 per year with this skill alone), brewing, off-grid energy, and a whole lot more…
Click Here To Check It Out Now!
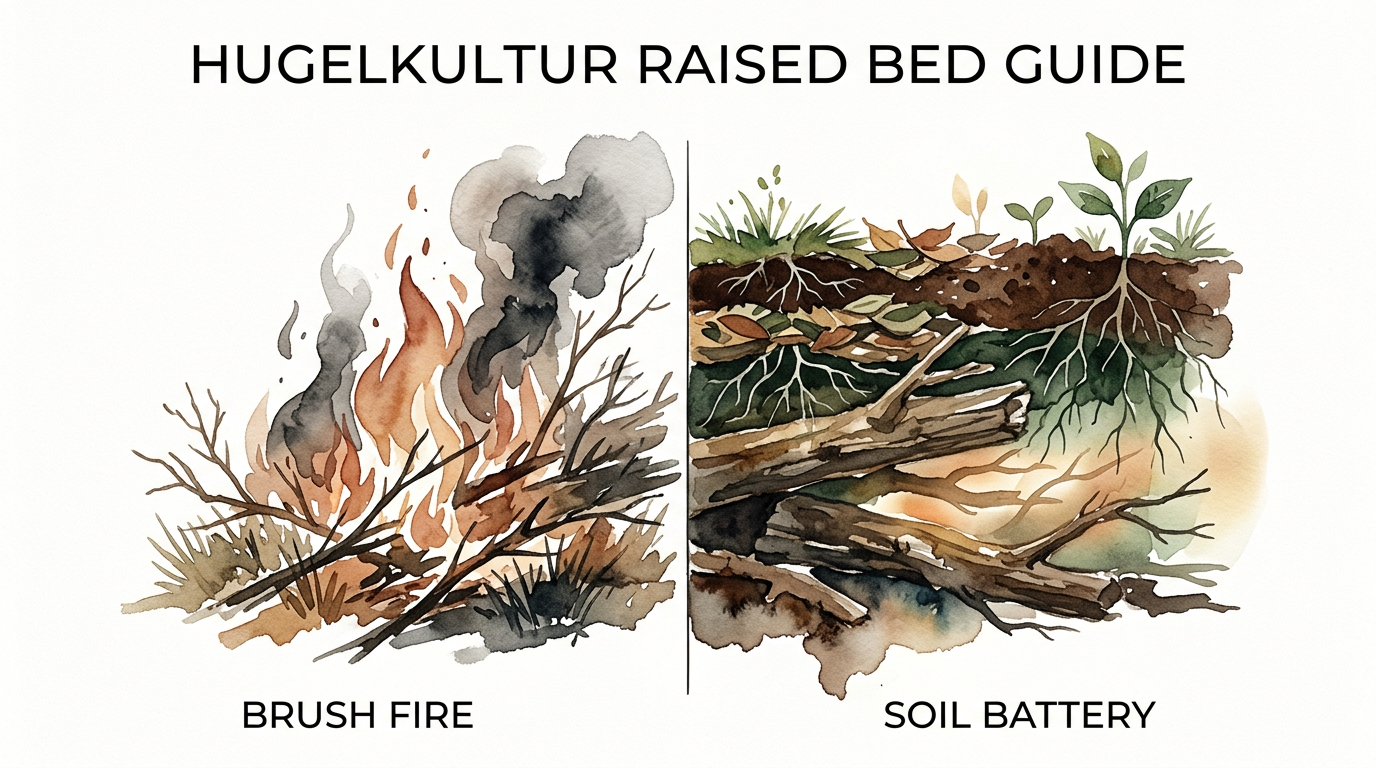
That pile of ‘trash’ wood is actually a 20-year battery for your garden. Hugelkultur turns fallen wood into a self-watering, self-fertilizing garden bed that lasts for decades. Stop burning your assets.
Every storm that passes through your property leaves behind a potential goldmine. Most folks see fallen limbs, rotting logs, and brush as a chore—a mess that needs to be hauled to the curb or fed into a hungry bonfire. In the eyes of a self-reliant gardener, however, those logs are the foundation of a drought-proof sanctuary. This is the essence of hugelkultur, an ancestral technique that builds soil from the bottom up using the very materials nature provides for free.
When you bury wood beneath your garden, you are doing more than just hiding a mess. You are installing a biological sponge that captures every drop of rain and stores it for the lean, dry months of July and August. Instead of a brush fire that sends your carbon and hard-earned nutrients into the atmosphere as smoke, you are building a soil battery. This battery slowly discharges life-sustaining minerals and moisture directly into the root zones of your crops for twenty years or more.
This guide will walk you through the grit and wisdom of building these mounds. We will look at why this system works, how to choose your timber, and the mistakes that can turn a productive mound into a nitrogen-sucking desert. If you are ready to stop fighting against nature and start working with her, let’s pick up the shovel and begin.
Hugelkultur Raised Bed Guide
Hugelkultur is a German word that translates literally to “hill culture” or “mound culture.” At its simplest, it is the practice of creating garden beds by mounding soil over a massive core of decaying wood and organic debris. While modern permaculture enthusiasts like Sepp Holzer have popularized the method globally, its roots stretch back centuries into the mountainous regions of Eastern Europe and Germany. It was a way for farmers to make use of woody waste in areas where the soil was thin, rocky, or otherwise difficult to till.
Imagine the floor of an old-growth forest. When a massive oak or pine finally falls, it doesn’t just disappear. It begins to rot, becoming a “nurse log.” This log absorbs moisture like a giant sponge, provides a home for billions of beneficial fungi, and slowly releases nutrients back into the earth. Hugelkultur mimics this exact process but brings it into the controlled environment of your vegetable garden or orchard. You are essentially building a forest floor in a concentrated, mounded form.
In the real world, hugelkultur is used by homesteaders looking to reduce their reliance on municipal water and commercial fertilizers. It is particularly effective in regions prone to drought or in areas with heavy clay soil that lacks aeration. Because the beds are mounded, they provide more surface area for planting than a flat garden, effectively giving you a larger “field” within the same footprint. Whether you are building a small 2-foot-high bed in a suburban backyard or a 6-foot-high ridge on a 40-acre farm, the principles remain the same: bury the wood, feed the soil, and harvest the results.
How the Underground Sponge Works
The magic of a hugelkultur bed happens out of sight. When you first bury fresh wood, it is a dense, carbon-heavy material. Over the first few seasons, fungi and bacteria begin the slow work of colonization. As they break down the lignin and cellulose in the wood, they create millions of tiny pores. These pores act as a reservoir, sucking up groundwater and rainfall. During a dry spell, your plants don’t need a hose; their roots simply dive deeper into the moist, rotting core of the mound to find the hydration they need.
Aeration is the second hidden benefit. As the wood decomposes, it physically shrinks. This process creates tiny air pockets throughout the bed, preventing the soil from becoming compacted over time. Most traditional gardens require annual tilling to keep the soil loose, but a hugelkultur mound is “self-tilling.” The constant, slow-motion shift of the internal materials keeps the earth friable and full of the oxygen that roots crave. This creates an environment where earthworms and beneficial microbes can thrive, further enriching the bed.
Temperature regulation is another reason these beds are so successful. The decomposition process is a chemical reaction that generates a small amount of heat. In the early years of a mound’s life, this warmth can actually help keep the soil a few degrees higher than the surrounding earth. This can effectively extend your growing season, allowing you to plant a little earlier in the spring or keep your peppers producing a few weeks longer into the autumn. It is a living, breathing heater built right into the landscape.
How to Build Your First Mound
Building a hugelkultur bed is a labor-intensive process, but the payoff is a lifetime of ease. The goal is to create layers of organic material that transition from “slow-burn” carbon at the bottom to “fast-burn” nutrients at the top. Follow these steps to ensure your foundation is solid and your soil is ready for planting.
Step 1: Site Selection and Preparation
Choose a spot that receives at least 6 to 8 hours of sun if you plan on growing vegetables. If you have a slope on your property, orienting the bed parallel to the contour of the hill can help it catch and hold even more runoff. Some gardeners choose to dig a trench 12 to 18 inches deep to hold the base of the logs, which helps keep the mound lower to the ground and provides better contact with the existing water table. If you prefer to skip the digging, you can build right on top of the turf, though you should lay down cardboard first to suppress the grass.
Step 2: Laying the Foundation
The bottom layer should consist of your largest, densest logs. These are the “heavy lifting” components of your soil battery. Lay them as tightly together as possible to minimize large air gaps where rodents might like to nest. If you have logs that are already partially rotted (often called “punky” wood), use those first. They will act like a pre-charged battery, absorbing water and supporting life almost immediately. Fresh wood works too, but it will take a year or two longer to reach peak performance.
Step 3: Filling the Gaps
Once your big timber is down, start layering in smaller branches, twigs, and sticks. This creates a transition zone. You want to avoid leaving large “caverns” inside the mound, so use wood chips or leaf litter to fill in the spaces between the logs. Watering the mound heavily at this stage is a pro tip. Getting the wood wet before you cover it with soil ensures the decomposition process starts on the right foot.
Step 4: Adding the “Green” Layers
Now it is time for the nitrogen. To balance out all that carbon-heavy wood, you need a thick layer of green materials. Fresh grass clippings, kitchen scraps, or well-rotted manure are perfect here. If you have excavated turf from your trench, flip it upside down and place it over the wood. This “green” layer feeds the microbes that will eventually break down the wood, preventing them from “stealing” nitrogen from your plants in the first year.
Step 5: The Final Soil Topping
Cover the entire structure with 2 to 6 inches of high-quality topsoil or finished compost. This is your immediate planting medium. The mound will look like a long, narrow hill—usually about 3 to 5 feet wide and as high as you care to stack it. Finish by applying a thick layer of mulch (like straw or wood chips) to protect the surface from erosion. Within a few days, the mound will begin to settle, and it will be ready for its first seeds.
The Wood Inventory: What to Use and What to Avoid
Not all wood is created equal. Using the wrong species can actually poison your garden or prevent it from rotting for a century. You want wood that will eventually surrender to the soil, not fight it off with chemical warfare. Hardwoods are generally the gold standard because they provide nutrients for the longest duration, but softwoods have their place in the system too.
The Best Woods: Apple, Alder, Birch, Maple, Oak, Cottonwood, Poplar, and Willow are all excellent choices. Fruit woods like Apple and Cherry (when fully dead) add fantastic nutrients. Willow and Poplar are known for their ability to rot quickly and absorb massive amounts of water. If you use a mix of hard and soft woods, you get the best of both worlds: a quick boost of nutrients from the fast-rotting species and a long-term reservoir from the dense hardwoods like Oak.
The Toxic Woods: Black Walnut is the most dangerous offender. It contains a chemical called juglone which is toxic to many common garden plants like tomatoes and peppers. Even after the tree is dead, the juglone can persist in the wood. Avoid using it at all costs. Similarly, Tree of Heaven (Ailanthus) contains herbicidal compounds in its bark and roots that can stunt your seedlings. If you aren’t sure what a log is, and it smells particularly “chemical” or pungent when cut, leave it out of the bed.
The “Forever” Woods: Cedar, Black Locust, Redwood, and Juniper are prized by builders because they resist rot. In a hugelkultur bed, this is actually a disadvantage. You want the wood to rot so it can become a sponge. While these woods won’t necessarily hurt your plants, they will sit in the ground for decades without contributing much to the soil’s fertility or water retention. If you have a surplus of Cedar, use it for the sides of a raised bed frame instead of burying it inside.
Benefits of This Ancestral Method
The primary reason anyone builds a hugelkultur bed is for the legendary water retention. In a well-established mound (usually after the second year), the core holds enough moisture that many gardeners stop watering entirely, even during the heat of summer. This makes it the ultimate system for off-grid homesteads or anyone living in an area with strict water restrictions. It turns the “waste” of a fallen tree into a life-saving utility.
Another major advantage is the increase in planting surface. Because the bed is a mound, you can plant on the top and both sides. A bed that takes up 4 feet of ground space might actually offer 6 or 7 feet of growing surface when you calculate the curve of the hill. This is a game-changer for small-scale urban gardeners who need to maximize every square inch. You can plant sun-loving tomatoes on the top and shade-tolerant greens on the north-facing slope of the same mound.
Finally, there is the cost savings. Filling a traditional raised bed with high-quality bagged soil can cost hundreds of dollars. By using logs and brush to fill the bottom 60% to 70% of the volume, you are only paying for (or making) a fraction of the soil. You are essentially composting in place. Instead of paying someone to haul away your yard waste, you are turning it into the most fertile ground on your property. It is the ultimate expression of the pioneer spirit: waste nothing, build for the future.
Challenges and Common Pitfalls
The most common struggle for new hugel-gardeners is nitrogen tie-up. When microbes break down carbon-heavy wood, they need nitrogen to do the job. If your mound is mostly wood with very little “green” material or manure, those microbes will pull nitrogen from the surrounding soil, leaving your plants yellow and stunted. This is why adding a heavy layer of nitrogen-rich material during construction is non-negotiable. If you see your plants struggling in the first year, a dose of fish emulsion or diluted urine can help bridge the gap.
Settling is another reality that catches people off guard. A mound that starts at 5 feet tall might sink to 3 feet within two years. This is not a failure; it’s a sign that the wood is decomposing as planned. However, it can make it difficult to grow long-term perennials or trees on the mound itself during those early years. You must be prepared to add a fresh layer of compost or mulch every autumn to keep the planting surface level and fertile. Expect your garden to “move” for the first half-decade.
Rodents can also find the internal air pockets of a poorly packed mound to be a luxury hotel. Voles and mice love the dry, protected spaces between logs. To prevent this, be meticulous when filling the gaps during construction. Use a hose to “wash” soil and fine compost down into the cracks as you build. The tighter the pile, the less room there is for unwanted guests. Some gardeners even line the bottom of their trench with hardware cloth to keep burrowing critters out entirely.
Limitations: When to Stick with Traditional Beds
Hugelkultur is a powerful tool, but it isn’t a silver bullet for every situation. If you are a renter or plan on moving within the next two years, building a massive mound is probably a waste of effort. These beds are long-term investments that take a few seasons to reach peak productivity. They are meant for permanent homesteads where you can steward the soil for a decade or more. If you need a “now” garden that can be easily dismantled, a standard cedar raised bed is a better choice.
Environmental constraints also play a role. In extremely wet or swampy environments, a buried wood bed can become “anaerobic”—meaning it stays so waterlogged that it begins to rot in a way that produces foul odors and kills plant roots. If your yard already has standing water, you shouldn’t bury logs. Instead, build your mounds entirely above ground or stick to traditional raised beds with excellent drainage. Hugelkultur needs to be able to “breathe” to some extent.
Aesthetics are the final hurdle. Let’s be honest: a 5-foot mound of dirt and wood can look like a burial mound or a construction site to the uninitiated. If you live in a neighborhood with a strict Homeowners Association (HOA), a traditional hugelkultur mound might land you a fine. In these cases, you can use the “hidden hugel” method—burying the logs inside a formal, rectangular raised bed frame. You get the benefits of the wood core without the “mountainous” look that might upset the neighbors.
The Comparison: Brush Fire vs. Soil Battery
To truly understand the value of this method, you have to look at how we typically handle wood waste versus how hugelkultur handles it. Most people view a pile of branches as a problem to be burned or hauled away. Both of those options represent a total loss of energy and nutrients.
| Factor | Brush Fire (The Old Way) | Soil Battery (Hugelkultur) |
|---|---|---|
| Nutrient Retention | Lost to smoke and ash (only minerals remain). | 100% retained and slowly released over 20 years. |
| Water Efficiency | Zero impact on garden hydration. | Acts as a sponge, reducing water needs by up to 80%. |
| Initial Labor | Low (pile and light). | High (digging and layering). |
| Long-term Value | None; task must be repeated every season. | Cumulative; bed gets better as it ages. |
| Environment | Releases carbon into the atmosphere. | Sequesters carbon into the earth. |
The “Soil Battery” approach requires a heavy upfront investment of sweat, but it pays out dividends every single day for decades. The “Brush Fire” is a quick fix that leaves you with nothing but a patch of scorched earth and a higher water bill. For the serious practitioner of self-reliance, the choice is clear.
Practical Tips and Best Practices
Success with hugelkultur is all about the details of the first 12 months. If you build your bed in the autumn, it has all winter to settle and absorb moisture before you plant your first seed. This “resting” period is crucial. It allows the microbial life to colonize the wood so that by springtime, the soil is alive and ready to support heavy feeders.
When it comes to planting, think about nitrogen fixers for the first year. Beans, peas, and clover are fantastic first-season crops because they pull nitrogen from the air and deposit it into the soil. This helps offset any “nitrogen robbery” occurring as the wood begins to break down. By the second or third year, the mound will be pumping out enough nutrients that you can grow heavy feeders like pumpkins, corn, and tomatoes without any supplemental fertilizer.
Don’t be afraid of height. Many beginners build mounds that are only 2 feet tall. While these work, they won’t offer the same self-watering benefits as a 5- or 6-foot mound. The taller the mound, the more internal mass it has to hold water. If you have the materials, aim high. You can always plant vining crops like squash or cucumbers on the slopes to cover the mound and prevent erosion. The “pioneer” way is to build it once and build it big enough to last a lifetime.
Advanced Considerations for Serious Practitioners
For those looking to scale this up, consider the “Pocket Garden” strategy. Instead of one long ridge, create a series of horseshoe-shaped mounds. The center of the horseshoe creates a micro-climate that is protected from the wind and holds extra heat. This is an ideal spot for delicate fruit trees or heat-loving Mediterranean herbs. By manipulating the shape of the mounds, you can create various zones of sun, shade, and wind protection across your property.
Another advanced technique is the use of mycelial inoculation. If you want to accelerate the breakdown of your wood core, you can “spike” the layers with mushroom spawn. Edible species like Wine Cap (Stropharia rugosoannulata) or Oyster mushrooms thrive in wood-rich environments. Not only will they help turn your logs into soil faster, but they will also provide a secondary harvest of high-protein food. You are essentially layering an edible fungi farm beneath your vegetable garden.
Scaling hugelkultur often involves the use of heavy machinery. If you are clearing acreage, don’t let the excavators haul the stumps away. Have them dig long “hugel-trenches” and bury the stumps right where they are. This is a common practice on permaculture farms to restore degraded land. A single 100-foot-long hugelkultur ridge can act as a massive “water brake” for a property, stopping erosion and recharging the local aquifer while providing tons of food annually.
Realistic Scenarios: How it Looks in Practice
Let’s look at a typical suburban scenario. You have a backyard with compacted clay soil and a large silver maple that just lost several heavy limbs in a storm. Instead of paying $200 for a brush removal service, you spend a weekend digging a 3-foot by 8-foot trench. You lay the maple logs at the bottom, pile the smaller branches on top, and use your weekly lawn clippings and kitchen scraps as the green layer. You finish with six bags of compost and a layer of straw.
In Year One, you plant bush beans and zucchini. You have to water occasionally because the wood hasn’t fully “charged” yet, but your plants look greener than your neighbor’s. In Year Three, the mound has settled by 12 inches, but the soil is now black and crumbly. You plant “Indeterminate” tomatoes that grow 8 feet tall because they have reached the moisture reservoir deep in the wood. You haven’t touched a fertilizer bag in three years.
Now consider a dry-land scenario in the high desert or a drought-prone area. You build a 6-foot tall mound using pine and cottonwood logs. Because the mound is so massive, it catches the limited winter snow and holds it deep in the core. While your neighbors’ gardens are crisping in the July sun, your hugelkultur bed is still cool and moist 6 inches below the surface. You’ve transformed a pile of “trash” wood into a survival asset that ensures your family has fresh produce regardless of the weather forecast.
Final Thoughts
Hugelkultur is more than a gardening trend; it is a return to a way of thinking that values longevity over convenience. It reminds us that there is no such thing as “waste” in nature, only resources that haven’t been put to work yet. By taking the time to build these mounds, you are investing in the health of your land and the resilience of your food supply. You are building a system that will continue to feed you long after the initial sweat of construction has been forgotten.
The beauty of the “soil battery” is its simplicity. It doesn’t require high-tech sensors, expensive plastic parts, or a constant stream of external inputs. It requires logs, leaves, dirt, and time. As the world becomes increasingly complex and fragile, these ancestral methods offer a path back to stability. Your garden should be a source of strength, not a drain on your wallet or your time.
I encourage you to look at your property with new eyes. That fallen tree isn’t a mess; it’s the beginning of your most productive garden bed. Grab a shovel, start a trench, and begin building your own 20-year battery. Your future self—and your soil—will thank you for the grit you showed today. Experiment with different wood types, play with the height of your mounds, and watch as nature turns your “trash” into the gold of a thriving harvest.
