How To Become More Self-Sufficient Without Starting a Full-Blown Farm…
Want to start preserving your harvest, making your own soap, or building a backyard root cellar — but not sure where to begin? “Homesteading Advice” gives you instant lifetime access to 35+ practical homesteading books on food preservation, veggie gardening, DIY natural cleaning products (save over $250 per year with this skill alone), brewing, off-grid energy, and a whole lot more…
Click Here To Check It Out Now!
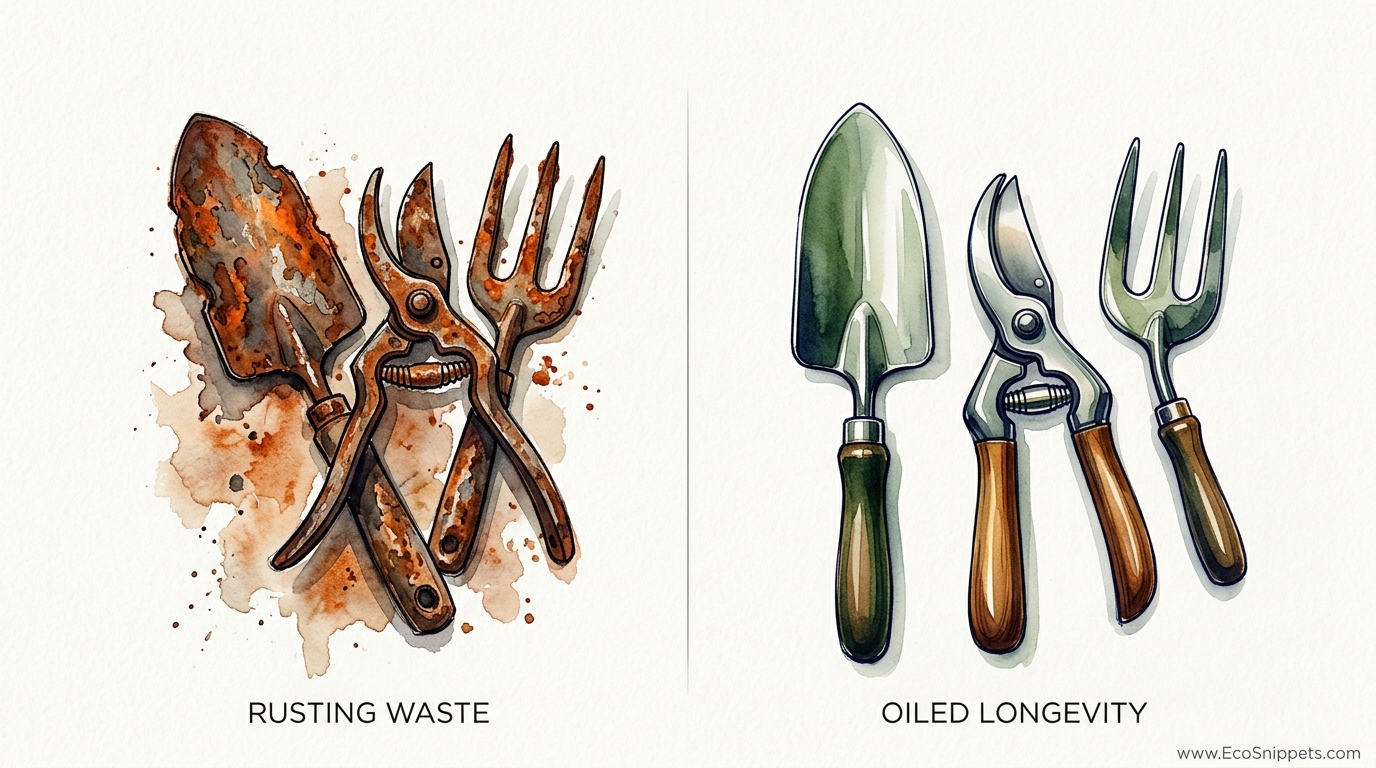
Is your shed a graveyard for expensive steel, or are you using the 5-second ancestral secret that makes tools last for three generations? Every year, thousands of tons of ‘disposable’ garden tools end up in landfills because of simple oxidation. But rust isn’t inevitable; it’s a choice. This simple bucket of oiled sand does three jobs at once: it sharpens, cleans, and coats your steel in a protective shield that defies the elements. Stop buying new tools and start keeping the ones you have forever.
Gardening is often sold as a hobby of consumption, where every season requires a new trip to the hardware store for a shiny trowel or a fresh spade. This cycle of waste is a modern invention, a far cry from the stewardship practiced by our ancestors who viewed a good tool as a lifelong companion. They understood that steel has an appetite for oxygen, and without a barrier, the air itself will devour your investment. The oiled sand bucket is the ultimate low-tech solution to this high-cost problem, acting as a self-cleaning station that resets your tools after every use.
Setting up this system requires less than ten minutes of your time and costs a fraction of a single premium shovel. It serves as a psychological anchor for your gardening routine, turning the chore of cleanup into a satisfying ritual of preservation. When you plunge a dirty spade into the grit, you are not just cleaning it; you are honoring the craftsmanship that went into forging that metal. This guide will walk you through every nuance of building, using, and maintaining your own tool-saving station so you never have to mourn a rusted blade again.
How To Prevent Garden Tool Rust Forever
The concept of an oiled sand bucket is a masterclass in functional simplicity, combining mechanical abrasion with chemical protection. At its core, the system consists of a sturdy container filled with coarse sand that has been saturated with a non-drying or slow-drying oil. This mixture serves as a specialized bath for your shovels, hoes, and hand trowels. Instead of leaning a muddy tool against the wall where moisture can sit and fester, you plunge the working end into the bucket.
Rust is the result of oxidation, a chemical reaction that occurs when iron-based metals are exposed to both oxygen and moisture. Garden tools are particularly vulnerable because they spend their lives in contact with damp soil, which is often acidic or laden with fertilizers that accelerate corrosion. The oiled sand bucket solves this by providing a hydrophobic (water-repelling) environment. When the metal enters the sand, the oil immediately displaces any residual water and forms a microscopic film over the surface of the steel, sealing out the air.
This method has been a staple in agrarian communities for centuries because it requires no electricity and utilizes materials that were historically easy to find on any homestead. While modern gardeners might reach for a can of aerosol spray, the sand bucket offers a “3-in-1” benefit that sprays cannot match. It cleans off caked-on dirt, it provides a light abrasive action to keep edges keen, and it applies a uniform coat of protection all in one five-second motion.
The Mechanics of the Oiled Sand System
Understanding why this works requires looking at the interplay between the grit and the lubricant. The sand acts as a thousands of tiny scrubbing pads. When you push a tool into the bucket, the friction between the sand grains and the metal surface scours away organic matter, sap, and early-stage surface rust. This prevents the buildup of “crud” that typically hides moisture and leads to deep pitting.
The oil in the mixture serves two critical roles: lubrication and insulation. As a lubricant, it reduces the effort required to plunge the tool into the bucket and prevents the sand from becoming a solid, unyielding mass. As an insulator, the oil molecules cling to the steel even after the tool is removed. Unlike water, which evaporates and leaves the metal vulnerable, the oil remains stable, creating a barrier that prevents oxygen molecules from bonding with the iron atoms in the steel.
Choosing the right sand is vital for the mechanical side of this process. Fine play sand is often too soft and can actually hold onto moisture if it gets contaminated. Professionals and experienced homesteaders prefer “sharp sand” or “builder’s sand.” This sand has jagged, irregular edges that provide the necessary “bite” to clean the metal without being so aggressive that it damages the tool’s structural integrity.
Step-by-Step: Building Your Preservation Station
Constructing your bucket is a straightforward process, but the order of operations matters to ensure the oil is distributed evenly throughout the sand. You will need a five-gallon plastic bucket, approximately 40 to 50 pounds of sharp sand, and about a quart of your chosen oil.
- Prepare the Bucket: Start with a clean, dry five-gallon bucket. If you live in a particularly rainy climate, you might consider drilling a few very small drainage holes in the very bottom, though many prefer a solid bucket to prevent oil from leaching onto the shed floor.
- The Layering Technique: Do not simply dump all the sand in and pour oil on top; this leads to a “concrete” effect at the bottom and a greasy mess at the top. Instead, pour in about three inches of sand, then drizzle a small amount of oil over the surface.
- Iterative Mixing: Continue adding layers of sand and oil, stirring the mixture with a sturdy stick or an old garden stake as you go. The goal is a consistency that feels like “damp beach sand” that can hold its shape but doesn’t feel liquid or dripping wet.
- Settling Period: Let the bucket sit for 24 hours. This allows the oil to migrate through the pores of the sand. If the top layer looks bone-dry the next day, add another half-cup of oil and stir again.
- The First Dip: Take your dirtiest (but dry) shovel and plunge it in. When you pull it out, the metal should look dark and slightly wet, but you shouldn’t see beads of oil dripping off it.
Maintaining this bucket is as easy as using it. Once every few months, give the sand a good stir to prevent the oil from settling entirely at the bottom. If you notice the sand is starting to feel dusty rather than damp, it is time to “recharge” the system with a fresh cup of oil.
The Great Oil Debate: Choosing Your Lubricant
The type of oil you choose for your bucket impacts everything from environmental safety to the smell of your tool shed. Historically, many used “crankcase oil” or used motor oil because it was free and effective. However, modern sensibilities and soil health concerns have led to better alternatives.
| Oil Type | Pros | Cons | Best For |
|---|---|---|---|
| Mineral Oil | Food safe, odorless, won’t go rancid. | Can be more expensive than alternatives. | Vegetable gardeners and hand tools. |
| Boiled Linseed Oil | Dries to a hard finish, great for wooden handles. | Combustible rags; can gum up over time. | Traditionalists and long-term storage. |
| Used Motor Oil | Free, heavy-duty protection. | Contains heavy metals; bad for soil health. | Heavy construction tools only. |
| Vegetable/Cooking Oil | Cheap, accessible, non-toxic. | Goes rancid and smells; attracts rodents. | Short-term use only. |
For most home gardeners, **food-grade mineral oil** is the gold standard. It provides excellent rust inhibition without the risk of introducing petroleum-based chemicals into your organic tomato beds. If you prefer a more traditional homesteading approach, boiled linseed oil is a fantastic choice because it not only protects the metal but can also be wiped onto wooden handles to prevent them from becoming brittle and splintering.
Benefits of the Oiled Sand Method
The most immediate benefit is the massive extension of tool life. A high-carbon steel spade that is regularly cleaned in an oiled sand bucket can easily last 50 years, whereas the same tool left in a damp corner might be structurally compromised by rust within five. This is not just about saving money; it is about having a tool that performs better. A clean, oiled shovel slides through the soil with significantly less resistance than one covered in rough, oxidized scale.
Beyond preservation, there is the benefit of “passive sharpening.” While the sand bucket won’t turn a dull axe into a razor, the constant abrasive action of the sand helps maintain the existing bevel of your spades and trowels. Every time you clean the tool, you are essentially giving it a very fine hone. Over months of use, you will notice that your tools stay “working sharp” much longer than those cleaned with just a garden hose.
Efficiency is the final major advantage. Most gardeners skip tool maintenance because it feels like a secondary chore after an exhausting day of digging. The sand bucket turns a multi-step process (wash, dry, oil, store) into a single gesture. You walk into the shed, “thunk” the shovel into the bucket, and you are done. This ease of use ensures that the maintenance actually happens, which is the most important factor in any preservation strategy.
Common Mistakes and How to Avoid Them
One of the most frequent errors is plunging wet tools into the sand. While the oil is designed to displace moisture, introducing significant amounts of water into the bucket will eventually lead to clumps of mud forming within the sand. This compromises the abrasive quality of the mixture and can eventually lead to a “mud-rust” slurry at the bottom of your container. Always knock off large clumps of dirt and give your tool a quick wipe with a rag if it is soaking wet before using the bucket.
Another pitfall is using the wrong kind of sand. Fine-grained play sand or beach sand should be avoided. Beach sand, in particular, is a disaster for tools because it contains salt. Even a small amount of residual salt will act as a catalyst for corrosion, effectively turning your “protection bucket” into a rust chamber. Always use clean, washed sharp sand from a hardware store or masonry supplier to ensure no corrosive contaminants are present.
Neglecting the wooden handles is a mistake that can lead to tool failure even if the metal is pristine. A shovel with a rusted-out handle socket or a splintered grip is just as useless as a rusted blade. When you use your sand bucket, take an extra thirty seconds once a month to wipe a little bit of the oil (especially if using linseed oil) onto the wooden parts of the tool. This keeps the wood supple and prevents the “shrink-and-wobble” that occurs when handles dry out and lose their fit in the metal head.
Limitations: When Oiled Sand Isn’t the Answer
As effective as this method is, it is not a universal solution for every piece of equipment in your shed. Tools with moving parts or complex mechanisms—such as pruners, loppers, or shears—should never be plunged into a sand bucket. The grit can easily find its way into the pivot points and springs, acting like a grinding paste that will quickly destroy the precision of the tool. For these items, a simple wipe-down with an oily rag is far superior.
Additionally, the sand bucket is a maintenance tool, not a restoration miracle. If you have a shovel that is already covered in heavy, flaking “scale” rust, the sand bucket will not fix it. In those cases, you must first remove the rust manually using a wire brush, sandpaper, or a chemical rust converter. Once the metal is back to a clean state, the sand bucket can then be used to keep it that way.
Environmental conditions also play a role. In extremely humid or coastal environments, the light film of oil provided by a quick dip may not be enough for long-term winter storage. If you are putting your tools away for six months in a damp basement, you should apply a much thicker, manual coat of paste wax or heavy grease after the final sand dip of the season to ensure a total moisture seal.
Practical Tips for Maximum Tool Longevity
To get the most out of your system, consider keeping a “pre-cleaning” station next to your bucket. A simple stiff-bristled brush or an old putty knife hanging on a string allows you to scrape off the heavy clay before the tool hits the sand. This keeps your sand cleaner for longer and prevents the oil from being “soaked up” by excess dirt.
Another best practice is to store your smaller hand tools directly in the bucket. For trowels, hand forks, and dibbers, you can leave them standing upright in the sand when they aren’t in use. This keeps them organized and ensures the metal is constantly surrounded by protective oil. For larger tools like rakes and spades, a quick “in-and-out” dip is sufficient before hanging them on their respective hooks.
If you find that your sand is becoming too compacted over time, you can add a handful of small pebbles or crushed walnut shells to the mix. This increases the internal air pockets and makes the “plunge” easier. This is particularly helpful for older gardeners or those with wrist issues who might find a densely packed bucket of sand difficult to navigate.
Advanced Considerations: Additives and Steel Types
For the serious practitioner, the chemistry of the metal matters. Carbon steel tools—the kind that hold the best edge—are the most susceptible to rust. These are the tools that benefit most from the sand bucket. Stainless steel tools are more resistant to rust but can still suffer from “tea staining” or surface pitting in harsh environments. Using the sand bucket on stainless steel is still recommended, but it is less critical than it is for your carbon steel heritage pieces.
Some advanced homesteaders like to add natural disinfectants to their oil mix. Adding a few drops of tea tree oil or neem oil can help kill off fungal spores or bacteria that might be clinging to your tools after working with diseased plants. While the sand bucket is primarily a mechanical and anti-rust tool, these small additions can turn it into a sanitation station as well.
Lastly, consider the temperature of your storage area. In freezing winters, mineral oil can become quite thick. If you find your bucket is too “stiff” in January, you can thin the mixture slightly with a small amount of odorless mineral spirits. This increases the “creep” of the oil, allowing it to penetrate into the microscopic pores of the steel even in sub-zero temperatures.
Scenario: Restoring a Neglected Spade
Imagine you’ve found an old, high-quality forged spade at a garage sale. It’s covered in orange surface rust and the handle feels like bone-dry driftwood. To bring it back to life using this system, you wouldn’t start with the bucket. First, you’d use a wire wheel or a stiff brush to knock off the loose rust. Then, you’d use a mill file to reset the edge of the blade.
Once the “surgery” is done, the spade enters the maintenance phase. You plunge it into the oiled sand bucket twenty or thirty times. This acts as a final polish, removing the last bits of grit from your sharpening process and immediately sealing the freshly exposed steel. You then take a rag dipped in the bucket’s oil and rub down the wooden handle until it glows. From that day forward, the shovel never touches a hook without first visiting the bucket. Five years later, that spade will look better than the day you bought it, possessing a dark, seasoned patina that only comes from proper stewardship.
Final Thoughts
The oiled sand bucket is more than a simple DIY project; it is a philosophy of gardening that rejects the “throwaway” culture of the modern age. It acknowledges that good tools are an investment of both money and energy, and that five seconds of prevention is worth hours of restoration. By creating this simple station in your shed, you are ensuring that your tools remain sharp, clean, and ready for work at a moment’s notice.
Remember that the best system is the one you actually use. The beauty of the sand bucket lies in its lack of friction—not just for the tool, but for the gardener. It removes the excuses that lead to rusty shovels and broken handles. It turns the end of a long day into a moment of quiet satisfaction as you hear the “hiss” of the sand cleaning your blade.
Take the time this weekend to find a bucket, buy some sharp sand, and choose a quality oil. Your tools have been working hard for you in the dirt; it is only fair that you give them a place to rest that protects them from the hunger of oxidation. Apply these ancestral secrets, and you will find that you aren’t just growing a garden—you are building a legacy of self-reliance that will last for generations.
