How To Become More Self-Sufficient Without Starting a Full-Blown Farm…
Want to start preserving your harvest, making your own soap, or building a backyard root cellar — but not sure where to begin? “Homesteading Advice” gives you instant lifetime access to 35+ practical homesteading books on food preservation, veggie gardening, DIY natural cleaning products (save over $250 per year with this skill alone), brewing, off-grid energy, and a whole lot more…
Click Here To Check It Out Now!
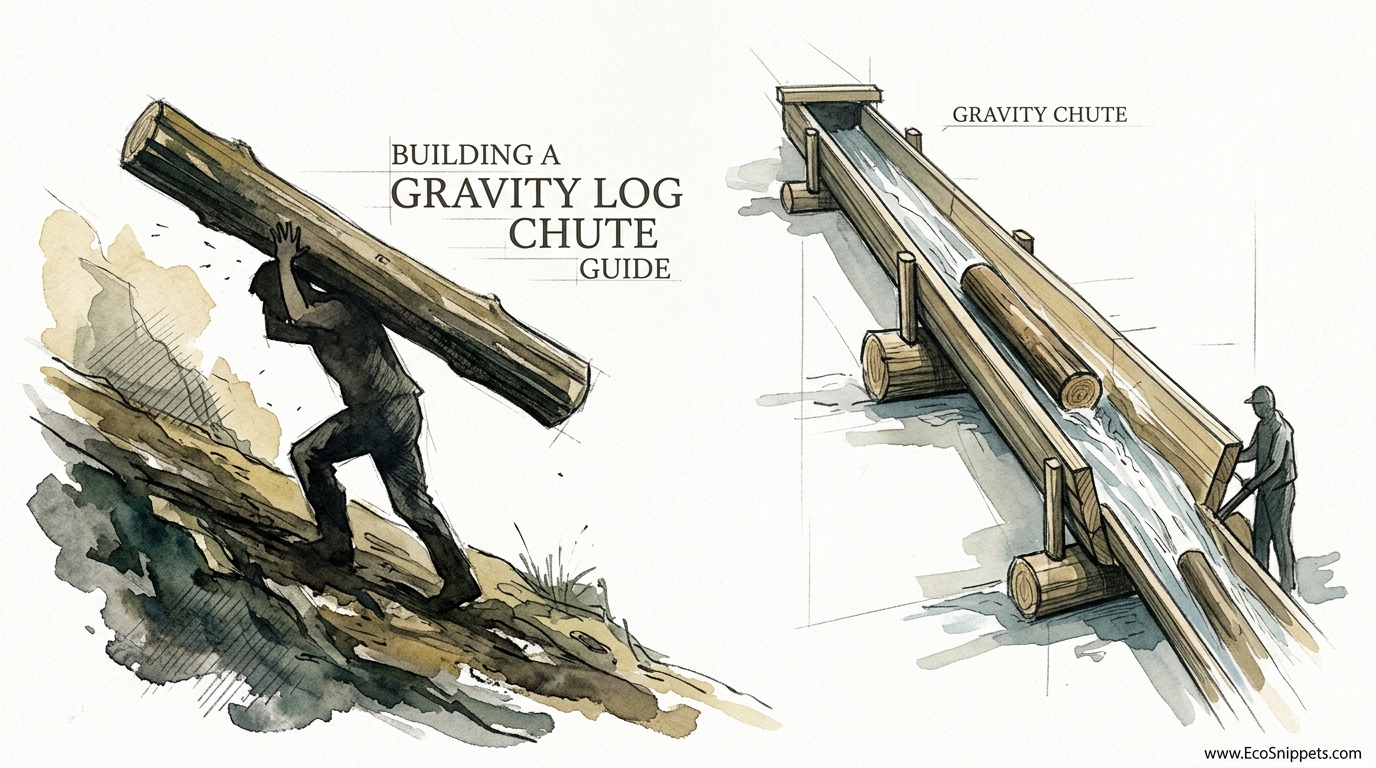
Stop trading your spinal health for firewood when basic physics can do the heavy lifting for you. Most homesteaders burn out because they try to muscle through every chore. Moving tons of firewood doesn’t require a tractor or a broken back—it just requires a few smooth poles and an understanding of the slope. See how to move a winter’s worth of fuel in one afternoon without breaking a sweat.
Working the land requires more than just grit; it requires the wisdom to let nature take the lead. For centuries, our ancestors didn’t move timber by sheer force alone. They used the natural contours of the earth and the relentless pull of gravity to transport massive logs from the high ridges down to the valley floors. Today, we call it a gravity log chute, but to the old-timers, it was simply common sense.
Whether you are moving split logs into a basement or sliding rounds down a steep hillside to your woodlot, a well-built chute transforms a grueling multi-day task into a few hours of efficient work. This guide will walk you through the mechanics, the materials, and the hard-won secrets of building a system that works as hard as you do.
Building A Gravity Log Chute Guide
A gravity log chute is a structural trough designed to transport firewood or logs from a higher elevation to a lower one using gravitational potential energy. Historically, these systems were known as “dry chutes” or “logging slides,” distinct from the water-filled flumes used in the late 19th century. While flumes used a constant flow of water to float timber, chutes rely on the relationship between the incline angle and the friction of the sliding surface.
In the 1860s, pioneers like J.W. Haines revolutionized this concept by introducing the V-shaped trough. Before this, box-shaped chutes were common, but they were prone to frequent jams and required significantly more lumber to construct. The V-shape allows a log to center itself naturally, reducing the likelihood of it jumping the track while minimizing the contact surface area to keep speeds high.
Today, homesteaders use these chutes to overcome terrain that is too steep for a tractor or too soft for a wheelbarrow. It is a low-tech, high-efficiency solution that embodies the spirit of self-reliance. By understanding the simple physics of the slide, you can move cords of wood with nothing more than a gentle nudge.
The Anatomy of a Modern Chute
A functional chute consists of three primary zones: the loading head, the run, and the landing zone. The loading head is where you stage your wood, usually at the highest point of your harvest area. The run is the main body of the chute, which must be secured against the slope to prevent shifting under the weight of moving timber. Finally, the landing zone is the most critical area, designed to absorb the kinetic energy of the logs and pile them safely for seasoning or storage.
How It Works: The Physics of the Slide
To build a chute that actually moves wood without manual pushing, you must understand the coefficient of friction. Every material—whether it is raw pine, planed oak, or PVC—has a specific “grip” on the logs. For a log to begin moving on its own, the angle of the incline must be steep enough that the force of gravity parallel to the slope exceeds the force of friction holding it back.
The “critical angle” for most dry wood on a wooden chute is approximately 30 to 45 degrees. If your slope is shallower than this, you will find yourself constantly poking the logs along with a pike pole. If it is steeper, the logs can reach dangerous speeds, turning a helpful tool into a projectile launcher. Finding that “sweet spot” is the difference between a productive afternoon and a dangerous disaster.
Managing Friction
Pioneers often greased their wooden chutes with tallow, crude oil, or axle grease mixed with kerosene to keep things moving. On a modern homestead, you have better options. Many wood-burners find that simply keeping the chute wet with a garden hose or waiting for a light rain provides enough lubrication to move green wood on a shallow slope. For permanent setups, lining the trough with repurposed plastic culverts or HDPE (High-Density Polyethylene) can drop the required angle to as low as 15 or 20 degrees.
The condition of the wood matters as much as the chute. Debarked logs slide significantly faster than those with rough bark. If you are moving un-split rounds, the smooth, sap-filled interior of the wood provides its own lubrication. Split wood, however, presents more edges and can catch on the seams of your chute, which is why a smooth liner is always recommended for processed firewood.
Benefits of a Gravity-Fed System
The primary advantage of a log chute is the preservation of the human body. Carrying 40-pound rounds down a 30-degree slope is a recipe for knee blowouts and spinal compression. A chute allows you to stand at the top, maintain a neutral posture, and let the earth do the heavy lifting.
Beyond health, there is the matter of pure efficiency. A single person operating a chute can often move more wood in an hour than three people using wheelbarrows or sleds. Since the system has no moving parts and requires no fuel, the operating cost is zero. It is a silent, sustainable way to manage a woodlot that works in any weather—and in fact, often works better in the snow.
- Zero Fuel Costs: Unlike a tractor or ATV, gravity is free and never runs out of gas.
- Reduced Soil Compaction: Heavy machinery tears up the forest floor; a modular chute leaves almost no footprint.
- Speed: Logs travel at 10–20 miles per hour, covering distances in seconds that would take minutes to walk.
- Accessibility: Chutes can be deployed in ravines and steep hillsides where wheels simply cannot go.
Challenges and Common Mistakes
The most common mistake beginners make is building the chute too “tight.” If the trough is only slightly wider than your largest log, a crooked piece of wood or a stray branch will cause a jam. Once one log stops, the ones behind it will pile up, creating a “log jam” that can be incredibly dangerous to clear. Always build your chute at least 1.5 to 2 times wider than your average log diameter.
Another frequent error is failing to secure the chute to the ground. As a 50-pound log accelerates, it creates significant vibration and lateral force. If the chute isn’t staked down or lashed to trees, it will slowly “walk” down the hill or twist out of alignment. Use heavy-duty stakes every 8 to 10 feet to ensure the run stays true.
The Danger of “The Missile”
Speed is your friend until it isn’t. On very long or very steep runs, logs can reach speeds that cause them to “jump” the chute. If a log hits a bump or a seam at high speed, it can become airborne. This is why “exclusion zones” are mandatory. No one should ever be standing at the bottom or along the sides of the chute while logs are in transit. Communication between the loader at the top and the spotter at the bottom is essential—use a whistle or two-way radios if the run is out of sight.
Limitations and Environmental Constraints
While gravity is a powerful ally, it is not a universal solution. The most obvious limitation is that a chute only works in one direction. You cannot use it to move wood uphill, which means your wood storage or processing area must be at the base of your harvest site. If your terrain is perfectly flat, a chute is essentially a very long, very heavy piece of furniture that does nothing but take up space.
Environmental factors also play a role. In high-heat summers, wooden chutes can warp or “check,” creating splinters that grab onto the wood and stop the flow. Conversely, in deep winter, ice can make the chute *too* fast, requiring you to throw sand or dirt into the trough to provide some braking friction—a trick used by old-time loggers to prevent their timber from shattering upon impact at the bottom.
Comparison: Manual Labor vs. Gravity Chute
To understand the value of this system, we have to look at the numbers. The following table compares moving two cords (roughly 10,000 lbs) of wood down a 100-foot slope with a 30-degree incline.
| Factor | Manual (Wheelbarrow/Sled) | Gravity Log Chute |
|---|---|---|
| Time Required | 8–12 Hours | 2–3 Hours |
| Physical Strain | Extreme (Back/Knees) | Low (Upper Body Only) |
| Equipment Cost | $50–$150 (Wheelbarrow) | $100–$300 (Materials) |
| Safety Risk | Moderate (Trips/Falls) | High (Speed/Impact) |
| Longevity | Limited by stamina | Works as long as gravity does |
Practical Tips for Success
Success with a log chute is found in the details. One of the best ways to improve the slide is to use “sacrificial” lubrication. If the chute is running slow, don’t reach for expensive oils. Instead, throw a few handfuls of dry leaves or pine needles into the trough. These act like tiny ball bearings, reducing the surface tension between the log and the chute walls.
The “Landing Zone” is where most beginners fail. If you let logs fly into a pile of dirt, they will bury themselves, making them twice as hard to retrieve. Build a “backstop” out of old tires or a heavy timber wall. Even better, design the end of the chute to have a slight upward “kick” or ramp. This uses the log’s own momentum to loft it slightly into the air, allowing it to land on top of the pile rather than crashing into the base.
- Bark Up: When loading split wood, place it bark-side up if the interior is smoother, or bark-side down if the split face is jagged.
- Bevel the Seams: If you are joining multiple sections of chute, always overlap them like shingles on a roof—the higher piece should rest inside the lower piece.
- The 45-Degree Rule: If your slope is steeper than 45 degrees, use a “zigzag” chute design or add braking flaps made of heavy rubber matting to slow the wood down.
Advanced Considerations for Serious Practitioners
For those managing large acreage, a modular chute system is a game-changer. Instead of building one long, permanent structure, construct 10-foot sections that can be bolted together. This allows you to move the “veins” of your transport system to different parts of the forest as you clear them. Lightweight materials like HDPE plastic or aluminum siding are excellent for these portable sections.
Consider the “Multi-Stage” approach for very long runs. A single 300-foot run can generate terrifying amounts of kinetic energy. By breaking the run into three 100-foot sections with small “catch basins” or flat spots in between, you can reset the log’s speed to zero at each stage. This makes the system much safer and prevents the logs from shattering or damaging the chute at the bottom.
Serious practitioners also think about “The Winter Slide.” In northern climates, you can build a chute out of packed snow and ice. By carving a trench and spraying it with a light mist of water overnight, you create a frictionless “luge” for your firewood. This was a standard practice in the logging camps of the Adirondacks and the Pacific Northwest, and it remains the most efficient way to move wood over frozen ground.
Example Scenario: The Ridge-to-Road Move
Imagine you have a stand of dead-standing oak on a ridge 150 feet above your access road. The hill is too steep for your truck, and the brush is too thick for a log arch. You decide to build a 160-foot gravity chute using 10-inch PVC culvert pipes cut in half lengthwise.
First, you clear a 4-foot wide path through the brush. You lay the half-pipes in the track, overlapping them by 6 inches at each joint. Using paracord, you lash the pipes to saplings along the route to keep them centered. At the bottom, you place two old tractor tires filled with sand to act as a buffer. You spend one hour building the chute. In the next three hours, you slide two full cords of wood down the hill. By sunset, your wood is staged by the road, and your back feels as fresh as it did at breakfast. That is the power of the chute.
Final Thoughts
The gravity log chute is more than just a convenience; it is a return to a way of working that respects the laws of the physical world. By stepping away from the “muscle-it-out” mentality, you open yourself up to a more sustainable, thoughtful approach to homesteading. It’s about being a steward of your land and your own health, ensuring you have the energy left to enjoy the fire you worked so hard to build.
As you experiment with your own designs, remember that every hillside is different. Start with a short run, test your angles, and always respect the power of a moving log. With a bit of ingenuity and a healthy dose of pioneer grit, you’ll find that the heaviest loads are lightened when you let the mountain do the work.
If you found this guide helpful, consider exploring our other resources on self-reliant timber management, such as our deep dive into traditional firewood seasoning or our guide to selecting the right axe for the job. The path to true independence is built one smart chore at a time.
