How To Become More Self-Sufficient Without Starting a Full-Blown Farm…
Want to start preserving your harvest, making your own soap, or building a backyard root cellar — but not sure where to begin? “Homesteading Advice” gives you instant lifetime access to 35+ practical homesteading books on food preservation, veggie gardening, DIY natural cleaning products (save over $250 per year with this skill alone), brewing, off-grid energy, and a whole lot more…
Click Here To Check It Out Now!
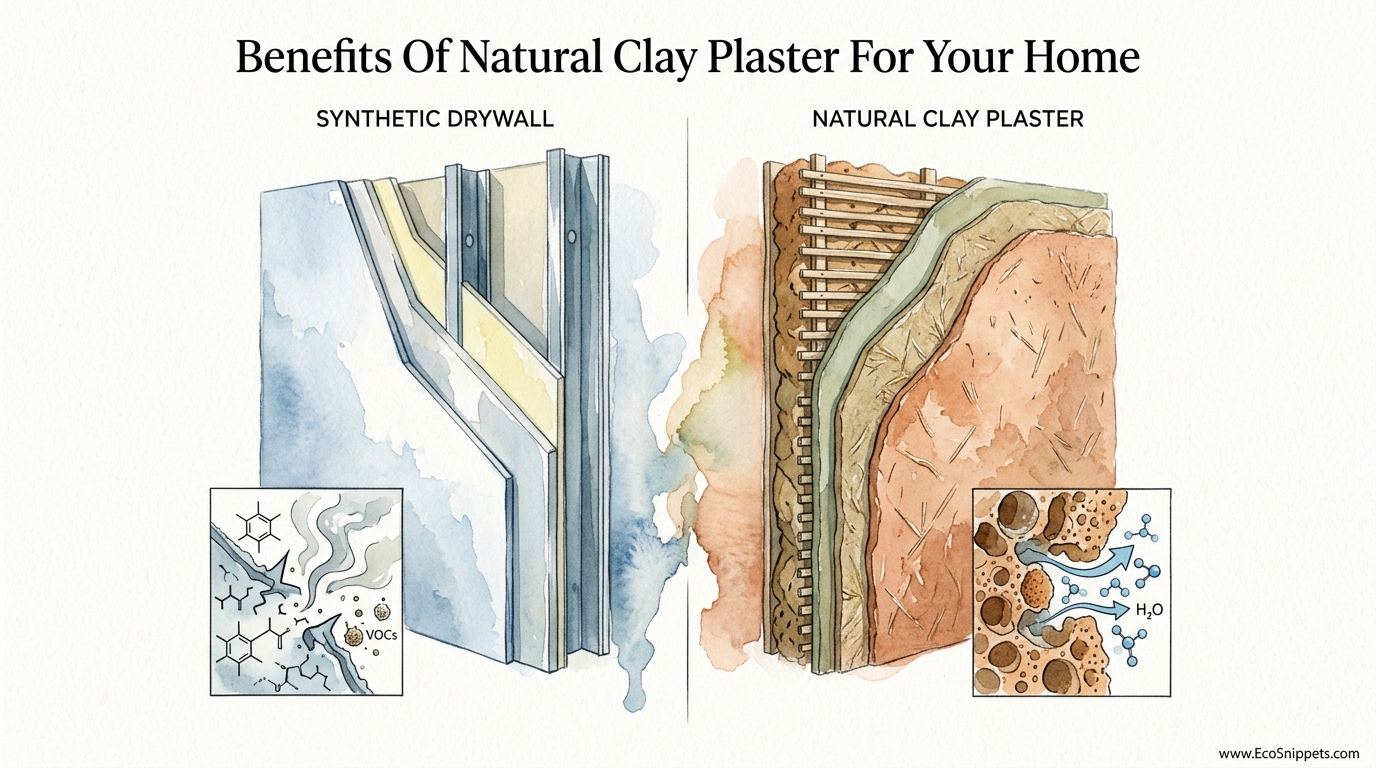
One of these walls is a toxic, non-recyclable liability, while the other actually cleans the air inside your home. We traded 5,000 years of breathable, earth-based architecture for gypsum boards wrapped in paper and toxic glue. Modern drywall traps moisture and off-gasses VOCs, while ancestral clay plaster naturally regulates humidity and neutralizes odors. It’s time to stop living in a plastic box and start breathing again.
The shift toward modern building materials was sold to us as a victory of efficiency, but it came at a hidden cost to our health and our heritage. Our ancestors understood something that the modern construction industry has largely forgotten: a house is a third skin. Just as your own skin breathes and regulates temperature, your walls should do the same.
Choosing natural clay plaster is about more than just aesthetics; it is a return to a self-reliant way of living. It is a commitment to a home that works with nature rather than trying to wall it out with synthetic barriers. When you step into a room finished with earth, you feel a difference in the air that no high-tech HVAC system can replicate.
Benefits Of Natural Clay Plaster For Your Home
Natural clay plaster is a traditional wall finish made from a simple blend of unfired clay, sand, and natural fibers like straw or hemp. Unlike modern gypsum-based products that are chemically set and often contain synthetic binders, clay plaster remains “alive” in a sense. It does not go through a chemical transformation; it simply dries, which means it can be re-wetted and reworked at any time.
In a real-world setting, clay plaster serves as a powerful humidity regulator. Because clay is hygroscopic, it possesses the unique ability to absorb excess moisture from the air when humidity is high and release it when the air becomes dry. This passive buffering system keeps indoor relative humidity within the “optimal zone” of 40% to 60%, which is the range where viruses and bacteria find it hardest to survive.
Think of clay plaster as a massive, silent air purifier. It doesn’t just manage moisture; it also neutralizes odors and binds to airborne toxins. While synthetic drywall often releases volatile organic compounds (VOCs) like formaldehyde and benzene into your living space, clay plaster actively works to reduce these pollutants, with some studies showing a reduction of indoor air pollutants by up to 40% in clay-finished homes.
Beyond the health benefits, the aesthetic of clay is unmatched by any bucket of hardware-store paint. It has a soft, light-diffusing quality that creates gentle shadows and a sense of “hygric mass.” This thermal mass helps to stabilize indoor temperatures, keeping your home cooler in the summer and warmer in the winter by absorbing and slowly releasing heat energy.
How to Apply Clay Plaster Step-by-Step
Applying clay plaster is a tactile, rewarding process that brings you into direct contact with the materials of the earth. While it requires more grit and patience than slapping up a sheet of drywall, the results are far more durable and beautiful.
The process begins with surface preparation. If you are working over existing synthetic drywall, you cannot simply apply clay directly; the smooth, paper-faced surface doesn’t provide enough “tooth” for the heavy mud to grab onto. You must first apply a natural primer with a gritty texture—often containing fine sand or marble dust—to create a mechanical bond.
Once the primer is dry, you move to the base coat. A standard recipe for a base coat involves one part screened clay, one part sharp sand, and roughly one to two parts chopped straw. You mix these in a large trough or bucket using a heavy-duty plaster whisk until the consistency resembles a thick, mousse-like mud that holds its shape on a hawk.
The application involves “throwing” or spreading the mud onto the wall using a steel trowel. You work in broad, semicircular motions, aiming for a thickness of about 10mm to 15mm for a base coat. It is often more effective to apply this in two “passes” rather than one thick layer to avoid sagging and to ensure a better bond with the substrate.
After the base coat has reached a “leather-hard” state—firm to the touch but still damp—you can apply the finish coat. This final layer uses a finer sand and sometimes mineral pigments for color. For a polished, high-end look, you use a technique called burnishing, where you run a clean, flexible trowel over the drying surface to compress the clay particles and create a subtle, natural sheen.
Advantages of Choosing Earth Over Plastic
The most significant advantage of clay plaster is its total lack of toxicity. In an era where “Sick Building Syndrome” is a genuine concern, clay offers a way to build without the fear of off-gassing. Standard drywall and the paints used to cover it are often sources of formaldehyde, a known carcinogen that can linger in the air for years.
The durability of clay is another overlooked strength. While a stray piece of furniture can easily punch a hole through thin gypsum board, clay plaster is dense and impact-resistant. Even if a corner gets chipped, the repair process is incredibly simple compared to the “cut-patch-sand-repeat” cycle of drywall repair.
Acoustic comfort is a benefit you feel immediately. Because clay plaster is much denser than a hollow drywall assembly, it absorbs sound waves rather than reflecting them. This eliminates the “echo-chamber” effect found in many modern homes, creating a quiet, sanctuary-like atmosphere that is essential for a peaceful home life.
From an environmental standpoint, clay plaster has a nearly zero-carbon footprint. It is minimally processed and requires no high-heat firing like cement or lime. At the end of its life, it is 100% biodegradable; you could literally take a clay wall and turn it back into a garden bed. It is the ultimate circular building material.
Challenges and Common Mistakes to Avoid
One of the most frequent errors beginners make is failing to properly wet the substrate. If you are applying clay to a dry, porous base like brick or a previous coat of plaster, the dry wall will suck the moisture out of your new mud too quickly. This results in “suction failure,” causing the plaster to crack and peel away before it even has a chance to set.
Overworking the plaster is another trap. It is tempting to keep smoothing and troweling the wall as it dries to get it “perfect,” but this often brings too much moisture to the surface and can cause the clay to “craze” or develop tiny spiderweb cracks. Success with clay requires learning the “patience of the mud”—knowing when to leave it alone and when the timing is right for that final burnishing stroke.
Mixing consistency is critical for a long-lasting finish. If your mix is too wet, it will sag and slump down the wall; if it is too dry, it won’t adhere properly. Aim for a mix that is wet enough to flow smoothly off the trowel but firm enough to hold a sharp edge when you cut into it with your tool.
Ignoring the environmental conditions during the drying phase can lead to disaster. Clay needs to dry naturally and evenly. Using high-powered heaters or fans to force the drying process can cause uneven shrinkage and massive cracking. You want a steady, gentle airflow and consistent temperatures to allow the clay to “knit” together as it loses its moisture.
Limitations and When Clay May Not Be Ideal
While clay plaster is a miracle material for most of the home, it has realistic boundaries. It should never be used in areas where it will be subjected to standing or running water. A shower or the wall directly behind a kitchen sink are poor candidates for clay, as the constant moisture will eventually soften the clay and cause it to erode back into mud.
Clay plaster also has a significantly longer “total project time” than modern drywall. While you can hang and tape drywall in a weekend, a multi-coat clay plaster system can take weeks to fully dry depending on the thickness and the local humidity. If you are on a tight construction deadline, the slow pace of ancestral building can be a frustrating constraint.
The surface of clay plaster is inherently softer than cement or lime-based finishes. While it resists dents well, it can be susceptible to surface scratches from pets or sharp objects. In very high-traffic commercial areas, you might find yourself doing more frequent surface touch-ups than you would with a harder, synthetic finish.
Finally, finding a professional who specializes in clay is increasingly difficult. Because the trade was largely abandoned in favor of fast-moving drywall, there is a scarcity of skilled artisans. This means you will likely either pay a premium for a specialist or have to invest the time to learn the craft yourself through trial and error.
Natural Clay Plaster vs. Synthetic Drywall
| Feature | Natural Clay Plaster | Synthetic Drywall |
|---|---|---|
| Toxicity | Zero VOCs, non-toxic | Often contains glues/VOCs |
| Moisture Control | Active humidity buffering | Passive, prone to mold |
| Repairability | Easy (re-wet and rework) | Hard (patching/sanding) |
| Acoustics | High sound absorption | Reflective (echoey) |
| Cost (Installed) | $2 – $10 per sq. ft. | $1.50 – $3 per sq. ft. |
Practical Tips and Best Practices
If you are just starting your journey into earth-based building, begin with a small, low-stakes project. A feature wall in a bedroom or a small hallway is the perfect place to get a feel for the material without the pressure of finishing a whole house. The “pioneer-grit” approach means starting small, building your skill, and then scaling up.
Always keep a “patch kit” from your original mix. When you are mixing your final colored coat, set aside a small jar of the dry powder. If you ever need to repair a deep scratch or a chip years down the line, you will have a perfect color match ready to go. Simply mix it with a bit of water and dab it into the damaged area.
Invest in a few high-quality tools rather than a bucket full of cheap ones. A Japanese stainless steel trowel with a flexible blade is a game-changer for finishing clay. It allows you to follow the subtle curves and undulations of the wall, creating a surface that feels hand-crafted rather than machine-made.
For those applying clay over modern substrates, use a “clay slip” to improve adhesion. A slip is essentially a very thin, watery version of your plaster. Brushing this onto the primed wall just before you apply the main coat “wakes up” the surface and creates a chemical-mechanical bond that prevents delamination over time.
Advanced Considerations for the Serious Practitioner
For the experienced builder, clay plaster offers opportunities for artistic expression that go far beyond a flat wall. You can experiment with different aggregates—like crushed oyster shells, mica flakes, or straw silk—to change how the wall catches the light. These materials are added to the finish coat to create depth and texture that changes throughout the day as the sun moves across the room.
Consider the role of “thermal mass” in your overall energy design. By applying a thick (20mm+) layer of clay plaster to a wall that receives direct winter sun, you create a “trombe wall” effect. The clay absorbs the solar heat during the day and radiates it back into the room long after the sun has gone down, significantly reducing your heating needs.
Advanced practitioners often use “wheat paste” or “casein” (milk protein) as natural binders in their finish coats. These additives increase the surface hardness of the clay and make it more resistant to dusting. Using wheat paste creates a “clay paint” that can be brushed over existing finishes to give them the benefits of clay without the full thickness of a traditional plaster coat.
When working on historic timber-frame structures, the “breathability” of clay is not just a health benefit; it is a structural necessity. Using synthetic, non-permeable finishes on old oak or cedar frames can trap moisture against the wood, leading to rot and structural failure. Clay allows the timber to stay dry and healthy for centuries.
A Realistic Scenario: The Master Bedroom Retrofit
Imagine a standard 12×12 bedroom with cold, echoing drywall and a faint smell of stale paint. The goal is to transform this into a restful sanctuary using clay plaster. The project begins by sanding the existing paint and applying a quartz-grit primer. This takes one day of work and $50 in materials.
Next, you mix a base coat of local clay and straw. You apply this in two passes on a Saturday, focusing on leveling out the unevenness of the original drywall. By Sunday evening, the room smells like fresh rain on dry earth—a natural byproduct of wetting the clay. The walls are left to dry for four days with the windows cracked.
Finally, you apply a top coat of white kaolin clay mixed with fine marble sand and a hint of yellow ochre pigment. You burnish the surface as it reaches the leather-hard stage. The result is a room that is noticeably quieter, stays 5 degrees cooler in the afternoon, and possesses a soft, luminous glow that makes the space feel twice as large.
Final Thoughts
Returning to the use of natural clay plaster is a radical act of self-reliance in a world dominated by synthetic, disposable products. It requires us to slow down, to use our hands, and to respect the ancient wisdom of the earth. The result is a home that doesn’t just shelter you, but actively supports your health and well-being through every breath you take.
While the initial cost and labor are higher than standard drywall, the long-term value of a clay-finished home is undeniable. You are investing in durability, air quality, and a timeless aesthetic that will never go out of style. It is an investment in your “third skin,” ensuring that your home remains a breathable, healthy environment for generations to come.
Do not be intimidated by the learning curve of natural building. The earth is a forgiving teacher, and clay is one of the most accommodating materials you will ever handle. Start with one room, feel the difference in the air, and you will likely find yourself looking at the rest of your “plastic box” with a new, determined perspective. It is time to peel back the paper and glue and let your home breathe again.
