How To Become More Self-Sufficient Without Starting a Full-Blown Farm…
Want to start preserving your harvest, making your own soap, or building a backyard root cellar — but not sure where to begin? “Homesteading Advice” gives you instant lifetime access to 35+ practical homesteading books on food preservation, veggie gardening, DIY natural cleaning products (save over $250 per year with this skill alone), brewing, off-grid energy, and a whole lot more…
Click Here To Check It Out Now!
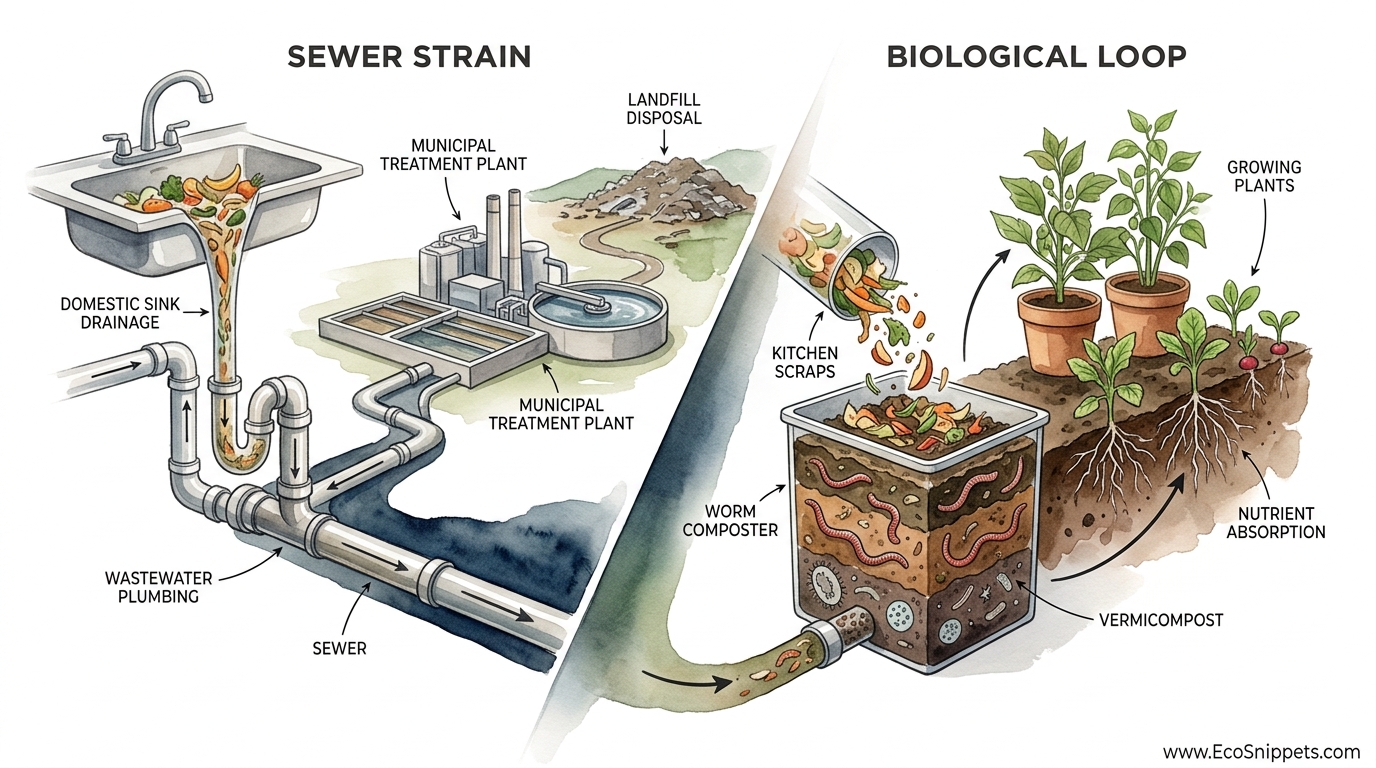
One system wastes gallons of water to flush nutrients into the sea, while the other turns your daily dishwater into a high-speed soil engine. The electric sink disposal is a linear lie—it takes valuable organic matter and turns it into a problem for the water treatment plant. Integrating a biological vermifilter turns your kitchen plumbing into a living ecosystem. Your ‘waste’ becomes the fuel for a worm colony that produces the world’s best fertilizer right under your dish soap.
Working with nature rather than fighting it is the hallmark of true self-reliance. Most modern homes treat the drain as a magic portal where problems disappear, but a pioneer knows there is no such thing as ‘away.’ Everything goes somewhere. Diverting your kitchen sink water into an under-sink worm composter allows you to recapture nitrogen, phosphorus, and carbon that would otherwise poison local waterways. This process is not just about waste management; it is about active soil building.
Setting up a vermifilter is a practical step toward a closed-loop homestead. It requires a shift in how you view your kitchen chores. Instead of mindlessly rinsing scraps down a grinding machine, you become a steward of a microscopic herd. This guide will show you how to build, maintain, and optimize a biological loop that pays dividends in garden health and reduced utility strain.
DIY Under Sink Worm Composter
A DIY under-sink worm composter, more technically known as an indoor vermifilter, is a biological trickling filter designed to capture organic solids and treat greywater directly at the source. Unlike a standard worm bin that only accepts solid food scraps, this system is integrated into your plumbing. It sits between your sink drain and the final discharge point, acting as a living sieve.
This system exists to solve the problem of ‘dark greywater.’ Kitchen wastewater is notoriously difficult to recycle because it contains fats, oils, and fine food particles that clog traditional irrigation lines. A vermifilter uses a community of composting worms—usually *Eisenia fetida*—and aerobic bacteria to digest these particles as the water trickles through a porous media bed.
In real-world applications, these systems are common in off-grid cabins, permaculture homesteads, and eco-conscious urban dwellings. Think of it as a miniature version of the large-scale vermifiltration systems used by municipalities in countries like Chile and India to treat entire village sewage streams. Under your sink, it serves as a primary treatment stage that prepares water for safe use in mulch basins or subsurface garden irrigation.
How It Works: The Biological Engine
Gravity is the primary driver of this system. When water flows down the drain, it enters the top of a ventilated container filled with various layers of organic and inorganic media. The first layer usually consists of a coarse material like wood chips or coconut husk, which slows the water and catches larger food solids.
Composting worms live in this upper layer. They move through the media, grazing on the organic solids and the microbial biofilm that forms on the surface of the wood chips. Their burrowing action is critical because it prevents the filter from clogging. Worms act as biological ‘aerators,’ keeping the system aerobic and preventing the foul odors associated with stagnant, anaerobic water.
Beneath the worm-rich organic layer lies a secondary filtration zone, often composed of pea gravel or coarse sand. This stage provides a massive surface area for beneficial bacteria to colonize. These microbes perform the chemical heavy lifting, breaking down dissolved organic compounds and reducing the Biological Oxygen Demand (BOD) of the water. Treated water then exits the bottom of the bin through a bulkhead fitting, significantly cleaner and enriched with ‘worm tea’ nutrients.
Step-By-Step Assembly
Building this system requires basic plumbing skills and a few common hardware store items. You will need two nested bins, a bulkhead fitting, various PVC connectors, and a supply of red wiggler worms.
1. Preparing the Bins
Select two heavy-duty plastic totes that fit comfortably inside your sink cabinet. The top bin will hold the media and the worms, while the bottom bin acts as a safety catch or a surge tank for treated effluent. Drill a series of 1/4-inch holes in the bottom of the top bin to allow water to drain through. Install a 1-inch bulkhead fitting at the lowest point of the bottom bin to serve as the final exit for the treated water.
2. The Multi-Stage Media Bed
Layering the media correctly ensures the system does not overflow or clog. Start with 3 inches of large river stones at the bottom of the top bin to ensure the drainage holes stay clear. Add 4 inches of pea gravel above the stones. The top 8 to 10 inches should be a mix of coarse wood chips, shredded coconut coir, and a small amount of finished compost to ‘seed’ the system with microbes.
3. Plumbing the Diversion
Install a three-way diverter valve into your existing sink drain line, downstream of the P-trap. This valve allows you to send water to the worm bin during normal operation or divert it back to the sewer if you need to use harsh cleaning chemicals. Connect the ‘worm’ side of the valve to a flexible hose that leads into the top of your composter. Ensure there is an air gap between the hose and the media to prevent back-siphoning and to allow for oxygenation.
4. Seeding the Colony
Add at least one pound of red wiggler worms to the top layer of wood chips. Covering the media with a layer of damp burlap or a thick mat of shredded cardboard helps keep the worms near the surface where the food solids accumulate. This cover also prevents fruit flies from accessing the organic matter.
Benefits of the Biological Loop
Choosing a vermifilter over a garbage disposal offers measurable advantages for both the homeowner and the environment. Recovering nutrients at the source is much more efficient than trying to extract them from a centralized sewage treatment plant.
Immediate access to liquid fertilizer: Every time you do the dishes, you are essentially ‘brewing’ a batch of nutrient-rich liquid gold. The water exiting the system contains dissolved worm castings, which act as a powerful soil amendment for nearby trees or ornamental gardens.
Significant reduction in septic load: Homeowners on septic systems often find that their tanks fill up much slower when food solids are processed biologically rather than being flushed. This reduces the frequency of expensive pump-outs and extends the life of the leach field.
Elimination of the ‘Sewer Strain’: Municipalities spend millions processing the organic sludge produced by garbage disposals. Using a worm bin keeps this high-energy waste out of the pipes, preventing ‘fatbergs’ and reducing the carbon footprint of your home’s wastewater.
Challenges and Common Mistakes
Operating a living plumbing system requires more attention than a standard drain. Mistakes can lead to odors or, in extreme cases, the death of your worm colony.
Managing Fats, Oils, and Grease (FOG): Excessive grease is the primary enemy of a vermifilter. Fats can coat the worms’ skin, preventing them from breathing, and can seal the pores of the filtration media. Scaping plates thoroughly with a spatula or dry-wiping them with a used paper towel before washing is a mandatory habit for anyone using this system.
Chemical Toxicity: Common household cleaners like bleach, ammonia, and high-salt detergents will kill your worms instantly. You must switch to ‘biocompatible’ or ‘plant-safe’ soaps. These products are typically free of boron and chlorine, making them safe for both the worms and the soil where the water eventually goes.
Temperature Fluctuations: Worms thrive between 55°F and 80°F. If you pour a large pot of boiling pasta water directly down the drain, you risk scalding the colony. Standard practice involves letting hot water cool slightly or diluting it with cold water before it enters the bin.
Limitations and Environmental Constraints
This method is highly effective, but it is not a universal solution. Understanding its boundaries ensures you do not create a biological failure.
Space Requirements: An effective under-sink vermifilter needs at least 15 to 20 gallons of volume to process the daily flow of a typical household. Many modern kitchen cabinets are too cramped to house the necessary bins and plumbing bypasses.
Legal and Regulatory Hurdles: Plumbing codes in many regions, including most of California, classify kitchen sink water as ‘blackwater’ due to the high organic load and potential for pathogens. Installing an unpermitted greywater system can result in fines or issues during home inspections. Researching local ‘experimental’ or ‘alternative’ plumbing codes is essential before starting.
Nitrate Management: While the system removes solids, it does not fully remove dissolved nitrogen. In areas with sensitive groundwater or high water tables, discharging even treated greywater into the ground may be restricted to prevent nitrate contamination.
Sewer Strain vs. Biological Loop
Understanding the difference between these two paradigms helps in making an informed decision about home infrastructure.
| Feature | Sewer Strain (Standard Disposal) | Biological Loop (Vermifilter) |
|---|---|---|
| Energy Consumption | High (Electric Motor) | Zero (Gravity Powered) |
| Resource Output | Waste/Sludge | Organic Fertilizer |
| Maintenance Cost | Mechanical Repair/Replacement | Occasional Media Refresh |
| Water Impact | Pollutes Local Waterways | Enriches Soil Microbes |
Practical Tips for Success
Maintaining a healthy colony requires a blend of observation and routine. These best practices will keep your system running without smell or clog.
- Use a sink strainer: Even with a worm bin, catching large chunks at the sink level is easier than harvesting them from the bin later.
- Incorporate carbon: Adding a handful of shredded cardboard or dry leaves to the top of the bin once a week balances the high-nitrogen liquid diet and prevents odors.
- Monitor pH levels: Kitchen water can become acidic. Sprinkling a tablespoon of crushed eggshells or agricultural lime on the media every month helps buffer the pH for the worms.
- Check for ‘bridging’: Sometimes the wood chips can mat together, causing water to pool. Stir the top two inches of the media with a small hand fork every few weeks to ensure even distribution of the water.
Advanced Considerations
For those looking to push the system further, integrating the vermifilter into a larger permaculture design offers the best results. Advanced practitioners often link the effluent line to a series of ‘greenfilters’ or hydroponic troughs.
Vertical Integration: Using the height of a house allows for multiple treatment stages. A kitchen on the second floor can drain into a primary vermifilter on the first floor, which then overflows into a gravity-fed outdoor wetland. This sequential treatment can bring the water to near-potable quality, suitable for a wider range of irrigation needs.
Micro-Hydraulics: Installing a bell siphon at the exit of the vermifilter creates a pulsed discharge. Instead of a constant trickle, the siphon releases a large volume of water all at once, which ensures the liquid reaches the far ends of your irrigation pipes and prevents the buildup of biofilm in the lines.
Example Scenario: The Cabin Loop
A small off-grid cabin in the woods provides the perfect setting for this technology. The owners use a double-basin sink. One side is used for washing with biodegradable soap, and its drain is permanently plumbed into a 20-gallon vermifilter located in the crawlspace below. The other side is used for ‘dirty’ tasks and drains into a standard greywater pit.
This setup allows them to process roughly 10 gallons of water per day. The worms thrive on the starch from pasta water and the fine food particles left after rinsing. The treated effluent flows into a subsurface mulch basin surrounding a group of fruit trees. In three years of operation, the owners have never had to empty the septic tank or purchase fertilizer for their orchard. The trees grow twice as fast as those in the surrounding forest, fueled by the steady supply of nitrogen-rich ‘dishwater’ tea.
Final Thoughts
Building an under-sink worm composter is more than a DIY project; it is a commitment to a different way of living. It replaces the ‘flush and forget’ mentality with a conscious participation in the nutrient cycle. While it requires a bit more effort than flipping a switch on a garbage disposal, the rewards are tangible and profound.
Turning your kitchen waste into soil fertility is the ultimate act of homesteading wisdom. It saves water, protects the environment, and provides your garden with a constant supply of high-grade nutrients. The technology is simple, but the impact is lasting.
Experimenting with this system will likely change how you think about every drop of water that enters your home. Whether you are off-grid or in the heart of the city, the biological loop offers a path toward true sustainability. Start small, listen to your worms, and watch as your ‘waste’ transforms your backyard into a thriving oasis.
