How To Become More Self-Sufficient Without Starting a Full-Blown Farm…
Want to start preserving your harvest, making your own soap, or building a backyard root cellar — but not sure where to begin? “Homesteading Advice” gives you instant lifetime access to 35+ practical homesteading books on food preservation, veggie gardening, DIY natural cleaning products (save over $250 per year with this skill alone), brewing, off-grid energy, and a whole lot more…
Click Here To Check It Out Now!
This black ‘waste’ can keep your soil fertile for over a thousand years. Burning garden waste releases carbon into the atmosphere. Turning it into biochar locks that carbon in your soil, creating a permanent sponge for nutrients and moisture.
Imagine a soil that doesn’t just grow plants for a season but builds a legacy of fertility for generations. This isn’t a modern chemical miracle; it is ancestral wisdom rediscovered for the self-reliant gardener. Biochar is the grit in the gears of a truly sustainable homestead, turning what we used to call trash into a permanent subterranean infrastructure.
When you master the art of the char, you stop fighting against the cycle of decay and start working with it. You are not just gardening; you are building a carbon-rich foundation that mimics the legendary “Terra Preta” of the Amazon. Let’s look at how you can craft this black gold in your own backyard.
How To Make Biochar For Soil
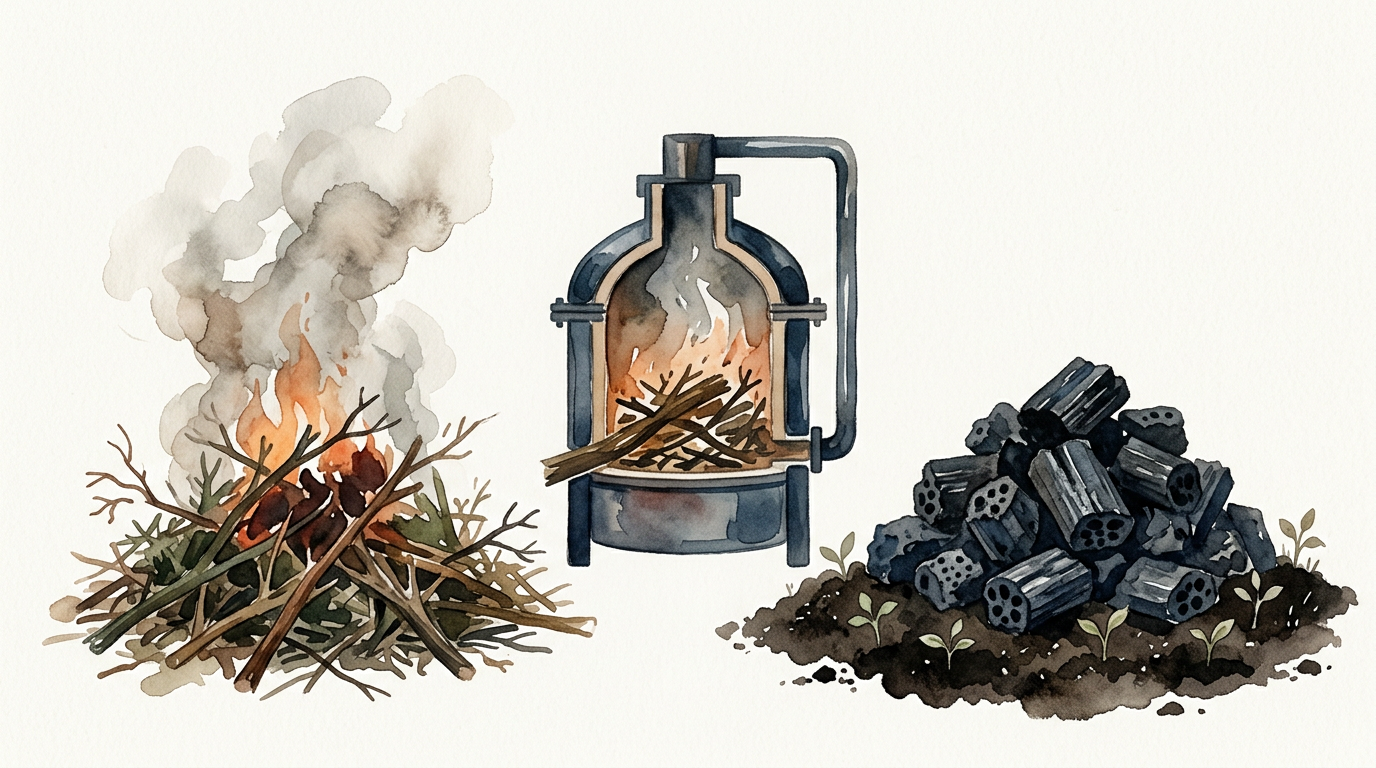
Biochar is a specialized form of charcoal produced through a process called pyrolysis. Pyrolysis occurs when organic material—biomass—is heated to high temperatures in an environment with little to no oxygen. Unlike a standard campfire that leaves behind a pile of white ash, biochar production preserves the physical structure of the wood, leaving you with a porous, carbon-rich skeleton.
This material has existed in nature for eons, often formed after forest fires. Ancient civilizations in the Amazon Basin perfected its use over 2,500 years ago. They created vast regions of dark, highly fertile soil known as Terra Preta (Portuguese for “black earth”) by mixing charred residues with organic waste and broken pottery. These soils remain incredibly productive today, even in tropical regions where nutrients usually leach away in the rain.
In real-world terms, biochar acts like a microscopic honeycomb. Every tiny piece is riddled with millions of pores that provide housing for beneficial microbes and “hooks” for nutrients to latch onto. When you add it to your garden, you are essentially installing a permanent battery for water and minerals that never wears out.
The Science of the Flame: How Pyrolysis Works
Understanding what happens inside the kiln is the first step toward self-reliance. When you heat wood without oxygen, it doesn’t “burn” in the traditional sense; it decomposes. This process typically happens in three distinct stages that every practitioner should recognize.
The first stage is the drying phase. As your kiln heats up, the initial energy goes into driving out remaining moisture. You will see thick, white steam rising from the stack. Chemical changes haven’t started yet, but the wood is preparing for the transition.
Next comes the pre-carbonization stage. Temperatures rise between 200°C and 500°C. Here, unstable components like hemicellulose and cellulose begin to break down. This is where the magic happens—the physical structure of the wood starts to transform into a stable carbon lattice.
The final stage is carbonization. At temperatures between 500°C and 800°C, most of the volatile gases are driven off, leaving behind a material that is up to 80% or 90% pure carbon. If you allow the temperature to go too high for too long with oxygen present, the carbon will oxidize, leaving you with nothing but mineral ash. The goal of the biochar maker is to stop the clock right at the peak of carbonization.
Tools of the Trade: DIY Production Methods
You don’t need a million-dollar laboratory to produce high-quality char. You need grit, a few basic tools, and an understanding of airflow. Here are the most reliable methods for the home producer.
The Cone Pit (Kon-Tiki) Method
This is the simplest, most ancestral way to produce char. You dig a hole in the ground shaped like an inverted cone. The shape is critical because it creates a “flame curtain” that prevents oxygen from reaching the wood at the bottom.
To start, light a small fire at the very bottom of the pit. Once it is roaring, add a thin layer of dry wood. As that layer starts to show a white ash dusting on the edges, add another layer. This new layer “smothers” the one below, keeping oxygen away while the heat from the top continues to bake the wood underneath. Continue this until the pit is full, then quench it immediately with water.
The 55-Gallon Drum Retort
For those who want a cleaner, more efficient burn, a retort system is the way to go. A retort is essentially a “nested” system. You place your feedstock (the wood you want to turn into char) inside a sealed metal container with only a few small vent holes. This container is then placed inside a larger fire.
The heat from the outer fire bakes the wood inside the inner drum. Since there is no oxygen inside the inner drum, the wood cannot catch fire. Instead, it releases “syngas” through the vent holes. This gas is highly flammable and will actually catch fire, helping to heat the retort from the inside out. This method produces very high-quality char with almost no smoke.
Top-Lit Up-Draft (TLUD) Kilns
TLUD kilns use a vertical pipe or barrel. You fill the entire barrel with wood first, then light it from the top. As the fire burns down, it creates a heat front that moves through the wood. The gases released are burned off at the top by a secondary air supply, making it a very clean-burning process.
The Critical Step: Charging Your Biochar
One of the most common mistakes a beginner makes is taking fresh, “raw” biochar and putting it straight into the soil. This can actually stunt your plants for the first year. Because biochar is like a dry, empty sponge, it will suck up every bit of nitrogen and moisture it can find to fill its pores.
To avoid this, you must charge or inoculate your biochar before it hits the garden. Charging is the process of pre-loading those microscopic honeycombs with the nutrients your plants need.
- Compost Soaking: Mix your biochar into an active compost pile. The microbes and nutrients will migrate into the char over a period of 2 to 4 weeks.
- Urine Charging: This is a classic pioneer method. Human or animal urine is rich in nitrogen. Soaking your char in a barrel of urine for a week creates a high-powered, slow-release fertilizer.
- Compost Tea Drenching: If you are in a hurry, soaking the char in a concentrated compost tea for 24 to 48 hours will jumpstart the microbial colonization.
- Worm Casting Slurry: Mixing biochar with worm castings and water creates a nutrient-dense mud that is perfect for filling the pores of the char.
Benefits of Black Gold
Why go through all this effort? The rewards are measurable and permanent. Once biochar is in your soil, it doesn’t decompose like compost or manure. It stays there, working for centuries.
Water Retention: In sandy soils, water usually drains away too fast. Biochar acts like a reservoir, holding onto moisture and releasing it slowly during dry spells. In some trials, biochar-amended soils held up to 12% more moisture than untreated plots.
Microbial Habitat: Beneficial fungi, such as Mycorrhizae, love the structure of biochar. It provides them a safe harbor from predators and a stable environment to thrive. A healthy soil microbiome is the secret to pest resistance and high yields.
Nutrient Efficiency: Biochar has a high Cation Exchange Capacity (CEC). This is a fancy way of saying it has a negative electrical charge that “grabs” onto positive ions like potassium, calcium, and magnesium. This prevents these nutrients from washing away during heavy rains.
Soil Structure: In heavy clay soils, biochar helps break up the compaction, allowing air and roots to penetrate deeper into the earth.
Common Pitfalls and Mistakes
Even the best intentions can lead to poor results if you skip the details. Here is what to watch out for.
Using Wet Feedstock: Trying to make biochar from green or wet wood is a recipe for frustration. It produces massive amounts of thick, acrid smoke and very little usable char. Always use wood that has been seasoned for at least six months.
Over-burning to Ash: If you don’t quench your fire with water or seal the kiln at the right time, the carbon will continue to burn until it turns into white ash. Ash is a good source of potassium, but it lacks the structural benefits of biochar.
Applying Raw Char: As mentioned before, putting uncharged char into the soil will temporarily deplete the nitrogen available to your plants. If your plants turn yellow after adding biochar, you likely skipped the charging step.
Inhaling Dust: Biochar is extremely friable and produces fine dust that can irritate the lungs. Always wear a mask when crushing dry char, or better yet, keep the material moist while handling it.
Limitations: When Biochar May Not Be Ideal
While biochar is powerful, it is not a “magic pill” for every situation. You must understand its boundaries.
In already highly fertile, high-organic-matter soils, the addition of biochar may show very little immediate benefit. The return on investment is highest in “marginal” soils—those that are too sandy, too acidic, or depleted by years of chemical use.
Biochar is also generally alkaline. If you are growing acid-loving plants like blueberries or azaleas, adding a large amount of biochar could raise the soil pH too much, causing nutrient lockout. Always test your soil pH before and after large applications.
Furthermore, biochar is a permanent amendment. Once you till it into the ground, you cannot easily remove it. If you apply a poorly made char—one that was made at too low a temperature and still contains toxic resins—you could contaminate your soil for a long time. Quality control is paramount.
Comparison: Smokey Brush Pile vs. Carbon-Rich Biochar
Most people treat garden waste as something to be gotten rid of. Let’s compare the traditional way of burning versus the biochar method.
| Feature | Traditional Brush Burn | Biochar Pyrolysis |
|---|---|---|
| Carbon Fate | Released as CO2 into the air | Locked in solid form (Sequestration) |
| End Product | Mineral Ash (Potassium/Lime) | Carbon Structure (Bio-sponge) |
| Longevity | Wash away in one season | Lasts 500 to 1,000+ years |
| Soil Impact | Temporary pH spike | Permanent habitat for microbes |
| Complexity | Very Low | Moderate (Requires quenching/timing) |
Practical Tips for the Modern Pioneer
Applying biochar isn’t just about dumping it on the surface. You want to place it where the action is: the root zone.
- The 10% Rule: Aim for biochar to make up about 10% of your soil volume in the top 6 inches of the bed. For a standard 4×8 raised bed, this is roughly one large bag of charged char.
- Quench and Crush: When your burn is done, use plenty of water to stop the combustion. Once cooled, crush the char into small pieces (about the size of a pea). This increases the surface area and makes it easier to mix into the soil.
- Trench Application: If you don’t want to till your entire garden, dig a small trench 6 inches deep right where you plan to plant your row. Fill the bottom with an inch of charged biochar and cover it back up.
- Animal Bedding: One of the smartest ways to “double charge” biochar is to use it as bedding in your chicken coop or goat pen. It absorbs odors and nitrogen from the manure, and then the whole mix can be composted together.
Advanced Considerations: Wood Vinegar and Scaling
For the practitioner looking to go deeper, the pyrolysis process offers more than just black chunks of carbon. When you use a retort or a specialized kiln, you can capture the smoke and condense it into a liquid known as wood vinegar (mokusetsu).
Wood vinegar is a powerful biological stimulant. In highly diluted forms, it can improve seed germination and act as a natural pest repellent. It is the “distilled essence” of the forest, and capturing it is the next level of homestead efficiency.
If you are looking to scale up, consider moving away from pits and toward “flame curtain” metal kilns like the Oregon Kiln. These allow for larger batches and can be moved around the property to process brush right where it falls, saving you the labor of hauling heavy wood.
A Realistic Scenario: The Tired Garden Bed
Let’s look at a practical example. Imagine a gardener with a 100-square-foot vegetable patch that has become “tired.” The soil is heavy clay, it bakes hard in the summer, and the tomatoes are struggling.
The gardener produces two 55-gallon drums of raw biochar using the retort method. They crush the char and soak it in a 50/50 mix of compost and water (with a few gallons of urine added for good measure). After two weeks of “cooking” in the barrel, the char is fully charged.
They spread the char over the 100-square-foot bed and fork it into the top 4 inches. Within one season, the clay feels more friable. The next summer, the gardener notices they are watering 30% less often, and the tomato plants stay dark green even during the August heat. That biochar will continue to provide those same benefits to whoever gardens that land for the next several hundred years.
Final Thoughts
Biochar is more than just a soil amendment; it is a way of thinking about our place in the landscape. By taking “waste” wood and locking its carbon into the earth, we are actively reversing the depletion of our soils. We are building a subterranean cathedral for the life that feeds us.
Do not be intimidated by the science of pyrolysis. Start small with a simple cone pit. Experiment with different charging methods. Observe how your plants respond to the “black gold” you’ve created.
The grit to build your own fertility is within your reach. In a world of fleeting solutions, biochar is a permanent investment in the health of your land and the legacy of your harvest. Stick with the process, master the flame, and your soil will thank you for the next thousand years.
