How To Become More Self-Sufficient Without Starting a Full-Blown Farm…
Want to start preserving your harvest, making your own soap, or building a backyard root cellar — but not sure where to begin? “Homesteading Advice” gives you instant lifetime access to 35+ practical homesteading books on food preservation, veggie gardening, DIY natural cleaning products (save over $250 per year with this skill alone), brewing, off-grid energy, and a whole lot more…
Click Here To Check It Out Now!
The Hidden Landscape Trick That Turns a Flood into a 10-Year Drought Insurance Policy
Traditional gutters treat rain like a nuisance to be exported. Integrated swales treat it like the lifeblood of your homestead. By slowing, spreading, and sinking water, you create a self-sustaining ecosystem that thrives even in a drought. Learn the secret of earthworks.
Water is the most precious resource on any homestead, yet most modern properties are designed to get rid of it as fast as possible. We build slanted roofs, paved driveways, and concrete culverts all for the purpose of shunting rain into the nearest storm drain. This is a tragedy of missed opportunity. When you export your water, you are exporting your fertility and your future security.
The old-timers knew better. They understood that the land is a giant sponge, or at least it should be. If your soil is hard-packed and your hillsides are scarred with gullies, you don’t have a drainage problem; you have a storage problem. By reimagining your relationship with the rain, you can turn a destructive downpour into a decade of hydration for your orchards and gardens.
This isn’t about complex machinery or high-cost engineering. It is about pioneer grit and a basic understanding of gravity. It is about working with the shape of the land to ensure that every drop of rain that falls on your property stays there, soaking deep into the earth to recharge the aquifers and feed the roots of your heritage trees.
Permaculture Swale Design For Beginners
At its simplest, a swale is nothing more than a ditch dug exactly on the contour of the land. This means the bottom of the ditch is perfectly level from one end to the other. Unlike a drainage ditch, which is designed to move water from point A to point B, a swale is designed to hold water in place until it can soak into the ground.
When rain hits a slope, it naturally wants to race downhill, picking up speed and taking your topsoil with it. A swale acts as a speed bump. It catches that runoff, levels it out across the hillside, and gives it nowhere to go but down—into the soil. This creates what permaculturists call a “plume” of moisture that moves slowly through the subsoil, hydrating the land for weeks or even months after the rain has stopped.
On the downhill side of this ditch, we place the soil we dug out to create a mound, or a “berm.” This berm becomes the perfect planting bed. Because it is made of loose, aerated soil and sits right next to a concentrated source of water, plants grown here tend to explode with growth. This is the foundation of a self-sustaining food forest.
Think of a swale as a long-term investment account. The rain is your deposit, the swale is the bank, and the deep-rooted trees you plant on the berm are the interest you draw for years to come. In a world of increasing weather extremes, this “landscape banking” is the ultimate insurance policy against the lean years of drought.
How It Works: The Mechanics of Earthworks
To build a swale that actually works, you have to understand the layout of your land. You cannot eyeball a contour line. Even a slight slope can deceive the human eye, and if your swale is not level, the water will pool at one end, eventually breaching the berm and causing a catastrophic blowout. You must use tools to find the level line of the earth.
Finding the Contour
The most reliable way to find your contour is with an A-frame level. This is a simple tool you can build yourself with three pieces of scrap lumber, a bit of string, and a weight. It looks like a giant letter “A.” When the weight hangs perfectly in the center, the two legs of the “A” are at the exact same elevation. By walking this tool across your hillside, you can mark a path that follows the natural curve of the slope.
If you prefer a more modern approach, a transit level or a laser level can do the job faster, but there is a certain satisfaction in using the same geometry our ancestors used. Once you have marked your contour line with flags or stakes, you have the “skeleton” of your water harvesting system.
Digging and Berming
Once your line is marked, the digging begins. For a small garden swale, a shovel and a strong back are all you need. For larger homestead applications, a backhoe or an excavator might be necessary. The goal is to create a flat-bottomed trench. The width and depth depend on your local rainfall patterns; you want the swale to be able to handle a “100-year storm” event without failing.
As you dig, place all the excavated soil on the downhill side of the trench. This creates the berm. Do not pack this soil down too tightly; you want it to remain porous so roots can penetrate it easily. Shape the berm so it has a broad, rounded top rather than a sharp peak. This prevents erosion and makes it easier to walk on later.
The Importance of the Spillway
Every swale must have a “safety valve.” In a massive rain event, your swale will eventually fill to capacity. If you don’t give the excess water a controlled place to go, it will find its own way out, usually by washing away your berm. A spillway is a slightly lower section of the berm, reinforced with rocks or heavy mulch, that allows excess water to flow out gently and move toward the next swale or a designated pond.
Benefits of Integrated Swales
The transformation of a landscape after installing swales is often nothing short of miraculous. Where there was once dry, cracked earth and struggling weeds, there becomes a lush, green oasis. But the benefits go much deeper than what you see on the surface.
- Deep Soil Hydration: Instead of water running off and leaving the top inch of soil wet, swales force water deep into the profile, reaching the “parent material” of the soil and recharging the water table.
- Erosion Control: By slowing the water down, you stop the mechanical force that strips away your precious topsoil. Your land stays where it belongs.
- Passive Irrigation: Once established, a swale-based system requires little to no supplemental watering. The trees drink from the massive underground reservoir you’ve created.
- Microclimate Creation: The combination of water and dense vegetation creates a cooler, more humid environment, which can protect sensitive plants from the scorching heat of mid-summer.
- Fertility Accumulation: Swales don’t just catch water; they catch organic matter. Leaves, mulch, and manure that would normally wash away get trapped in the swale, where they break down into rich compost.
Challenges and Common Mistakes
While swales are powerful, they are not a “one-size-fits-all” solution. If installed incorrectly, they can cause more harm than good. You must approach earthworks with respect for the sheer power of moving water.
Steep Slopes: Never build a swale on a slope steeper than 15 to 20 degrees. On steep ground, the weight of the water soaking into the soil can actually trigger a landslide. On steep terrain, other techniques like “pitting” or “net-and-pan” systems are safer and more effective.
Poor Siting: Avoid building swales near the foundations of your home or other structures. You are intentionally saturating the ground, and you do not want that water pressing against your basement walls or softening the soil under your footings. A good rule of thumb is to keep swales at least 50 feet away from any permanent structure.
Lack of Vegetation: A swale is an unfinished project until it is planted. Bare soil on a berm will wash away in the first heavy rain. You must cover the berm with thick mulch and plant it immediately with groundcovers, shrubs, and trees. The roots of these plants act like rebar in concrete, holding the earthwork together.
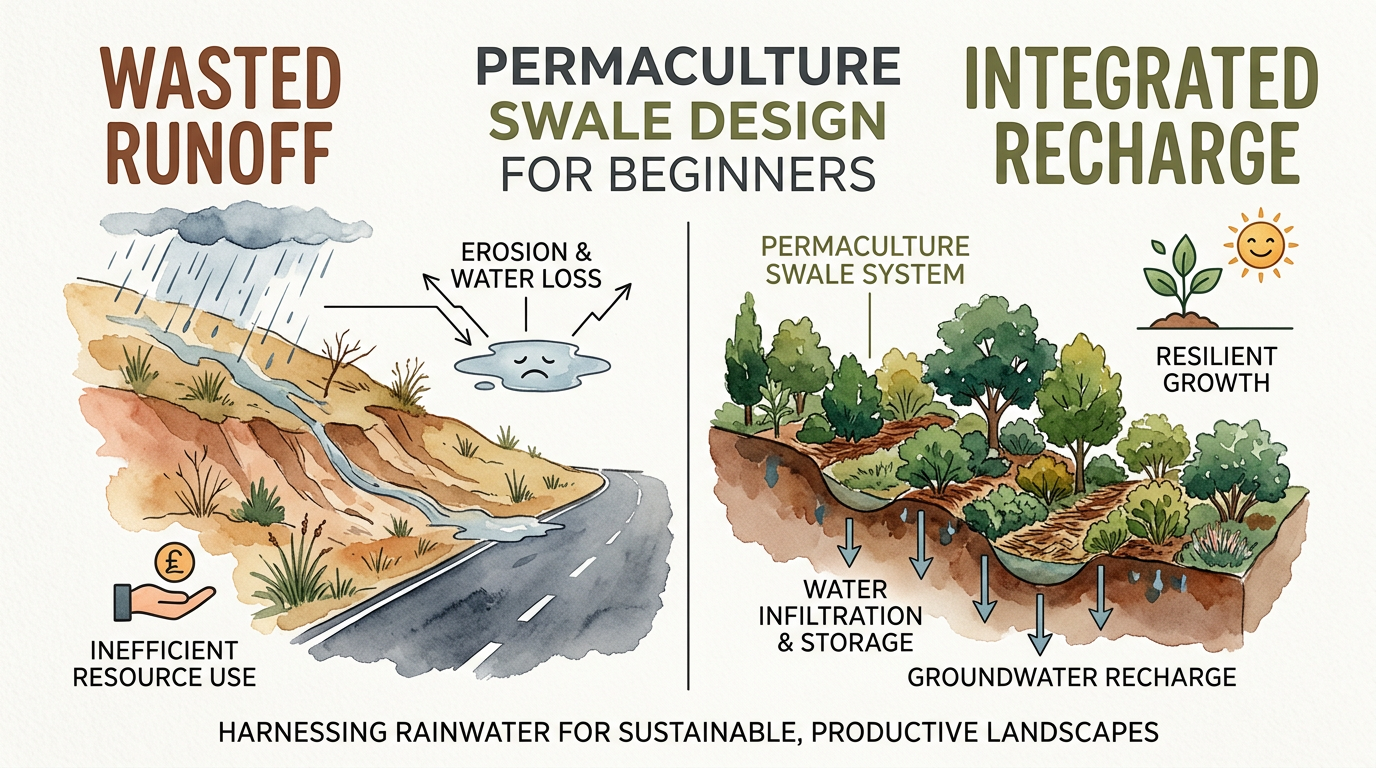
Wasted Runoff vs. Integrated Recharge
To understand the value of this system, we have to look at the difference between the modern “drainage” mindset and the “harvesting” mindset. The following table illustrates why the traditional approach is failing our landscapes.
| Feature | Wasted Runoff (Traditional) | Integrated Recharge (Swales) |
|---|---|---|
| Water Movement | Accelerated via pipes and ditches. | Decelerated and spread across contour. |
| Soil Impact | Dries out quickly; prone to erosion. | Stays hydrated; builds topsoil. |
| Plant Health | Dependent on city water or wells. | Utilizes stored groundwater plumes. |
| Landscape Resilience | Vulnerable to drought and flash floods. | Buffers extremes; self-regulating. |
| Maintenance | Constant cleaning of gutters and drains. | Self-mulching; occasional spillway check. |
When you choose integrated recharge, you are choosing to work with the natural laws of the universe. You are acknowledging that the rain is a gift, not a burden. This shift in perspective is what separates a mere gardener from a true steward of the land.
Practical Tips for Success
If you are ready to start moving earth, keep these best practices in mind to ensure your swales stand the test of time. The goal is to build it once and let it work for a hundred years.
- Start at the Top: Always begin your earthworks at the highest point of your property. If you start at the bottom and a big storm hits, the unmanaged runoff from above can wash out your new work. Catch the water where it first lands.
- Size for Extremes: Look up the historical rainfall data for your area. Don’t build for the average rain; build for the record-breaking deluge. Make your trenches wider and your spillways more robust than you think you need.
- Mulch Heavily: The bottom of your swale should be filled with organic matter—wood chips, straw, or fallen logs. This prevents the “sealing” of the soil, which happens when fine silts settle and block the water from soaking in.
- Observe and Interact: The best time to evaluate your swale is during a rainstorm. Put on your raincoat, go outside, and watch how the water moves. If you see a weak point in the berm or a spillway that isn’t handling the flow, you can fix it before it becomes a disaster.
- Use Nitrogen Fixers: When planting your berm, include “pioneer” species like black locust, alder, or autumn olive (if appropriate for your region). These plants pull nitrogen from the air and deposit it into the soil, feeding your fruit trees for free.
Consider looking into internal resources or local guides on native tree selection to ensure the species you plant on your berm are well-suited to your specific hardiness zone. Similarly, understanding soil composition will help you determine how quickly your swales will drain and how much organic matter you need to add to the trench.
Final Thoughts
The transition from a high-maintenance, water-hungry property to a resilient homestead begins with a single shovel full of dirt. Permaculture swale design isn’t just a landscaping technique; it’s a fundamental shift in how we inhabit the earth. It is a return to a more thoughtful, observant way of living—one that honors the cycles of nature rather than trying to override them.
By slowing, spreading, and sinking the rain, you are doing more than just watering your garden. You are cooling the local atmosphere, building deep reserves of soil fertility, and ensuring that your land remains productive even when the clouds refuse to open. This is the grit and wisdom of the pioneer spirit applied to the modern age.
Take the time to walk your land. Watch where the water flows during the next spring thaw or summer thunderstorm. Listen to what the topography is telling you. The contours are already there, waiting for you to follow them. Once you master the art of earthworks, you will never look at a rainstorm the same way again. You won’t see a flood; you’ll see a future.
