How To Become More Self-Sufficient Without Starting a Full-Blown Farm…
Want to start preserving your harvest, making your own soap, or building a backyard root cellar — but not sure where to begin? “Homesteading Advice” gives you instant lifetime access to 35+ practical homesteading books on food preservation, veggie gardening, DIY natural cleaning products (save over $250 per year with this skill alone), brewing, off-grid energy, and a whole lot more…
Click Here To Check It Out Now!
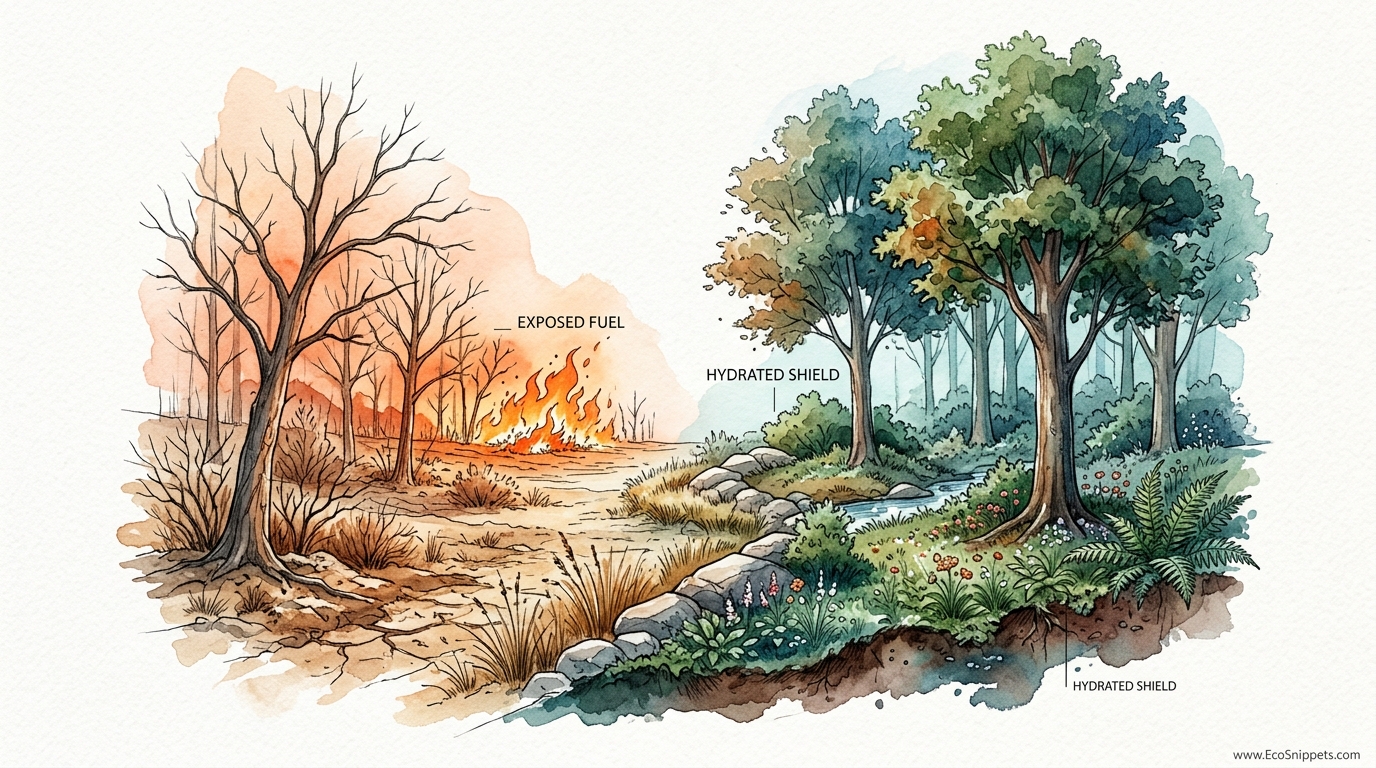
In a fire-prone world, the best defense isn’t a hose – it’s a hydrated landscape. Traditional fire-wise advice says to clear everything away, but that often leaves the soil dry and brittle. The ‘Hydrated Buffer’ strategy uses high-moisture plants and greywater basins to create a biological shield that absorbs heat and slows down embers. It’s the difference between a house that burns and a house that stays standing.
If you have spent any time watching the wind whip through a dry canyon, you know that fire doesn’t just crawl; it leaps. It hunts for the parched, the brittle, and the forgotten. For generations, we have been told that the only way to save a home is to strip the earth bare, creating a “moonscape” of dirt and gravel. But there is an older wisdom, a way of working with the land that turns your property into a sponge rather than a tinderbox. This is not about vanity gardening; it is about building a living, breathing fortress that uses the very lifeblood of the earth—water—to stand its ground.
This guide will walk you through the grit and the glory of building a hydrated shield. We are moving beyond the basic “clear your gutters” advice and into the realm of landscape engineering. You will learn how to bank water in the soil like a pioneer banks embers in a hearth, ensuring that when the heat comes, your land has the moisture it needs to fight back.
Using Hydrated Landscapes For Fire Protection
A hydrated landscape is a strategic arrangement of high-moisture vegetation and water-harvesting earthworks designed to lower the ambient temperature and increase the humidity around a home. In the world of wildfire mitigation, this is often called a “greenbelt” or a “living firebreak.” Unlike a traditional firebreak, which relies on a lack of fuel, a hydrated shield relies on the presence of moisture to resist ignition.
At its core, this approach acknowledges a simple physical truth: wet things are harder to burn. When a fire front approaches, it radiates intense heat that pre-dries everything in its path. A hydrated landscape acts as a thermal heat sink. The water stored in the leaves of thick-leafed plants and the moisture held deep within the soil must be evaporated before the plant itself can catch fire. This process of evaporation consumes a massive amount of energy, effectively “stealing” the heat from the fire and slowing its advance.
In real-world situations, such as the destructive wildfires in California or the bushfires of Australia, homes surrounded by well-maintained, hydrated oases have often stood untouched while neighboring properties were reduced to ash. These systems are used on homesteads, in community parks, and even in large-scale ranching operations where “Exposed Fuel” is replaced by a “Hydrated Shield.” It is a method that values life and biomass over sterile, bare earth.
The Mechanics of a Living Shield: How It Works
Building a hydrated landscape is a three-pronged effort involving soil management, water harvesting, and plant selection. You are not just planting flowers; you are installing a biological cooling system.
The first step is the **Soil Sponge**. Healthy soil rich in organic matter can hold incredible amounts of water. By using compost and high-quality mulch in targeted areas, you increase the soil’s “water-holding capacity.” Imagine the difference between a dry cracker and a damp sponge; one shatters and burns, the other yields and protects. This moisture doesn’t just sit there; it migrates into the roots of your plants, keeping their internal “blood pressure” high even during the hottest, driest weeks of August.
Next comes **Water Harvesting**. This is where we use the “pioneer-grit” approach to engineering. Techniques like swales—shallow, on-contour ditches—catch every drop of rain and sink it into the ground rather than letting it run off. Greywater basins are another critical tool. By directing “laundry-to-landscape” water from your washing machine into mulch-filled basins near your home, you provide a constant, reliable source of moisture to your defensive plants. These basins keep the ground surrounding your house “charged” with water, creating a cool microclimate that can drop local temperatures by several degrees.
Finally, we look at **Plant Physiology**. You want plants that are “succulent” or “deciduous” with high leaf-moisture content. Broadleaf trees like oaks or maples are generally much safer than resinous conifers like pines or junipers. When embers land on a hydrated oak leaf, they often go out because the leaf is too wet to ignite. This is the “Shield” in action—catching the small fires before they become big ones.
The Benefits of a Hydrated Approach
Choosing a hydrated landscape over a traditional cleared-earth strategy offers practical advantages that go beyond fire protection. It is a more resilient, sustainable way to live with the land.
The most immediate benefit is **Microclimate Cooling**. A property filled with hydrated plants and moist soil stays significantly cooler during heatwaves. This “evapotranspiration” acts like a natural air conditioner, reducing the cooling costs for your home and making the outdoor space more livable for you and your livestock. In a survival situation, a cooler home means less stress on your body and your resources.
Furthermore, you gain **Soil Stability and Health**. Bare dirt is prone to erosion and weed invasion. A hydrated landscape uses deep-rooted plants and mulch to hold the soil in place and build fertility. This creates a virtuous cycle: better soil holds more water, which supports healthier plants, which provides better fire protection. It also creates a sanctuary for local wildlife and pollinators, who are often the first victims of a “moonscape” fire-wise design.
Lastly, there is the **Psychological Peace of Mind**. There is a deep, ancestral comfort in being surrounded by green, lush life rather than a dry, dusty perimeter. Knowing that your land is “charged” with water provides a sense of security that a simple gravel patch cannot match. You are not just waiting for the fire; you are actively tending a defense that grows stronger with every passing season.
Challenges and Common Pitfalls
While the hydrated buffer is powerful, it is not a “set it and forget it” system. It requires an honest assessment of your resources and a commitment to maintenance.
A common mistake is **Over-watering the Wrong Plants**. Not every plant wants to live in a wet basin. If you put drought-adapted natives into a greywater system without proper drainage, you will end up with root rot and dead wood—which is exactly what you don’t want near your house. You must match the plant to the “water regime” of the spot you put it in.
Another pitfall is **Neglected Maintenance**. Even the most fire-resistant plant can become a hazard if it is allowed to accumulate “dead-and-down” material. Dry twigs, old leaves, and “gorilla hair” (shredded bark) mulch can catch embers and carry fire into the canopy of a hydrated tree. You must be diligent about raking out the old and keeping the “fuel ladder” clear. If you don’t prune the lower branches of your oaks, the fire will use them to climb.
Finally, many people underestimate the **Water Requirement**. In a severe drought, keeping a hydrated shield “charged” can be difficult if you rely solely on municipal water. This is why ancestral wisdom focuses on “sinking” the rain when it falls and reusing every drop of household water. If you don’t have a plan for where the water comes from, your shield will wither when you need it most.
Limitations of the Hydrated Shield
To be clear: no landscape is “fireproof.” Under extreme, catastrophic conditions—think 70 mph winds and single-digit humidity—even a hydrated landscape can be overwhelmed.
The primary limitation is **Convection and Crown Fires**. If your property is adjacent to a dense, unmanaged forest that goes up in a “crown fire,” the sheer radiant heat can be enough to evaporate all the moisture in your shield in seconds. In these cases, the hydrated buffer acts as a “speed bump” rather than a wall. It may save the house from embers, but it won’t stop a wall of flame 100 feet tall.
Another constraint is **Topography**. On extremely steep slopes, water harvesting becomes much more complex and can even lead to landslides if not engineered correctly. You cannot simply dig a swale on a 45-degree incline and expect it to hold. In these environments, you have to rely more on targeted irrigation and deep-rooted, fire-resistant groundcovers rather than large-scale earthworks.
Lastly, **Water Scarcity** is a hard limit. If you live in an area with strict water rationing and no access to greywater or rainwater harvesting, maintaining a lush greenbelt may be impossible. In these scenarios, you must lean more heavily on hardscaping—using rocks and stone walls—to supplement a smaller, more focused hydrated zone.
Comparison: Traditional Defensible Space vs. Hydrated Buffer
Understanding the measurable differences between these two strategies helps you decide where to invest your sweat equity.
| Feature | Traditional Defensible Space | Hydrated Buffer Strategy |
|---|---|---|
| Primary Goal | Eliminate fuel (Bare earth/Gravel) | Increase moisture (Living Shield) |
| Microclimate | Hot, dry, and reflective | Cool, humid, and absorbent |
| Maintenance | Low (mostly weeding) | Moderate (pruning/water management) |
| Ecology | Low biodiversity; sterile | High biodiversity; supports life |
| Cost | Low upfront, high “ugly” factor | Higher upfront (earthworks/plants) |
The “Exposed Fuel” model of the past is effectively a scorched-earth policy. It works by giving the fire nothing to eat. The “Hydrated Shield” works by giving the fire something it cannot swallow. For most homeowners, a hybrid approach—Zone 0 (0-5 feet) as bare earth/gravel and Zone 1 (5-30 feet) as a hydrated buffer—is the most effective setup.
Practical Tips for Building Your Shield
If you are ready to start digging, keep these best practices in mind. This is where the work meets the earth.
- Start with a “Laundry-to-Landscape” system. This is the easiest greywater setup. Use a 3-way valve on your washing machine to direct soapy water (use biocompatible soap!) into mulch basins around your most valuable trees.
- Choose “Succulent” Groundcovers. Plants like Sedum, Purslane, and Ice Plant are living bags of water. They stay low to the ground and are incredibly hard to ignite.
- Mulch with Wood Chips, Not Bark. In your hydrated basins, use 6-12 inches of coarse wood chips. They hold moisture like a sponge. However, never put this mulch within 5 feet of your house; use gravel or stone there.
- Limb Up Your Trees. Ensure there is at least a 6-to-10 foot gap between the ground and the first branches of your shade trees. This prevents “ladder fires” from moving into the canopy.
- Use “Island” Planting. Instead of one continuous hedge, plant in small clusters separated by stone paths or mowed clover. This breaks up the fuel path.
Remember to rake out “duff” (dead leaf litter) twice a year. A hydrated tree with a foot of dry leaves at its base is a liability, not an asset.
Advanced Considerations for the Serious Practitioner
For those who want to go deeper, we look at the integration of large-scale earthworks and moisture monitoring.
**Swale Design:** If you have acreage, digging on-contour swales can transform the hydrology of your entire property. By catching rainwater and forcing it to sink, you can rehydrate old springs or create “sub-surface irrigation” that keeps the landscape green long after the rains stop. This requires a laser level and a solid understanding of “A-frame” surveying.
**Moisture Sensors:** Serious practitioners often install solar-powered soil moisture sensors in their defensive zones. By linking these to an automated irrigation system (or just a manual valve), you can ensure your shield is “maxed out” on water content when the local fire department issues a Red Flag Warning. You want your soil at “field capacity”—the point where it is fully saturated but not puddling—before the wind starts to howl.
**Passive Cooling Walls:** You can supplement your biological shield with physical ones. Rammed earth walls or stone gabions filled with local rock act as “radiant heat shields.” When placed strategically on the side of the house facing the prevailing fire-winds, these walls protect your hydrated plants from the initial blast of heat, allowing them to do their job longer.
Example: The Oasis Homestead
Consider a five-acre homestead in a high-risk area of the Pacific Northwest. The owners moved away from the “clear-cut” model after seeing a neighbor’s house survive a brush fire thanks to a neglected, but heavily watered, vegetable patch.
They began by installing two large **swales** on the uphill side of the property. These swales catch the spring snowmelt and sink it into the hillside. Over three years, they noticed that the “drainage” area below the swales stayed green two weeks longer into the summer than the rest of the mountain.
In the 30-foot “Zone 1” around their house, they installed a **greywater basin system** fed by the shower and washing machine. They planted this area with California Redbud, Coast Live Oaks, and a carpet of Clover. The Redbud and Oak provide a “biological screen” against embers, while the Clover keeps the soil surface moist and cool.
When a small grass fire broke out half a mile away last summer, the owners didn’t panic. They felt the air; it was noticeably more humid in their garden than on the dry road. They checked their soil—it was damp to the touch. The “Hydrated Shield” was ready. The fire was contained before it reached them, but the experience proved the value of their “pioneer-grit” engineering.
Final Thoughts
Building a hydrated landscape is an act of stewardship and self-reliance. It is a rejection of the idea that we must destroy the land to save the home. By understanding the mechanics of soil moisture and plant physiology, you can create a sanctuary that is as beautiful as it is resilient. This is ancestral wisdom updated for a modern crisis: bank your water in the earth, and the earth will stand by you.
Do not feel overwhelmed by the scale of the task. Start with one greywater basin or a single cluster of fire-resistant succulents. Every gallon of water you sink into the soil is a gallon that won’t be needed by a fire hose later. Every hydrated leaf is a shield against the coming heat.
As you tend your garden, remember that you are not just growing plants; you are growing safety. Experiment with the land, watch how the water flows, and learn which species thrive in your specific microclimate. The knowledge you gain today will be the most valuable tool in your kit when the sky turns orange. Keep your grit, keep your shovel, and most importantly, keep your landscape hydrated.
