How To Become More Self-Sufficient Without Starting a Full-Blown Farm…
Want to start preserving your harvest, making your own soap, or building a backyard root cellar — but not sure where to begin? “Homesteading Advice” gives you instant lifetime access to 35+ practical homesteading books on food preservation, veggie gardening, DIY natural cleaning products (save over $250 per year with this skill alone), brewing, off-grid energy, and a whole lot more…
Click Here To Check It Out Now!
Stop fighting the temperature in your house and start using the 55-degree gift sitting right beneath your floorboards. Most people spend a fortune on electricity to keep food cold while ignoring the massive thermal battery under their house. An integrated floor cache uses the earth’s natural temperature to keep your harvest crisp without a single watt of power.
For generations, the kitchen floor was more than just a surface to walk on; it was the gateway to the family’s survival. Before the hum of the modern refrigerator became the heartbeat of the American home, our ancestors understood a fundamental truth about the earth. Just a few feet below the frost line, the soil maintains a remarkably consistent temperature, regardless of whether a blizzard is howling outside or the summer sun is beating down.
Building a kitchen floor root cellar, or an integrated floor cache, is about reclaiming that ancestral wisdom. It is a commitment to self-reliance that turns a small patch of “dead space” into a high-performance food preservation system. This isn’t just about saving a few dollars on the electric bill; it’s about the grit of knowing your family is fed, come hell or high water.
In this guide, we will walk through the process of carving out this sanctuary for your harvest. We will look at the physics of the earth’s thermal mass and the practical steps to ensure your potatoes don’t sprout and your carrots don’t shrivel. It is time to look beneath your feet for the solution to modern waste.
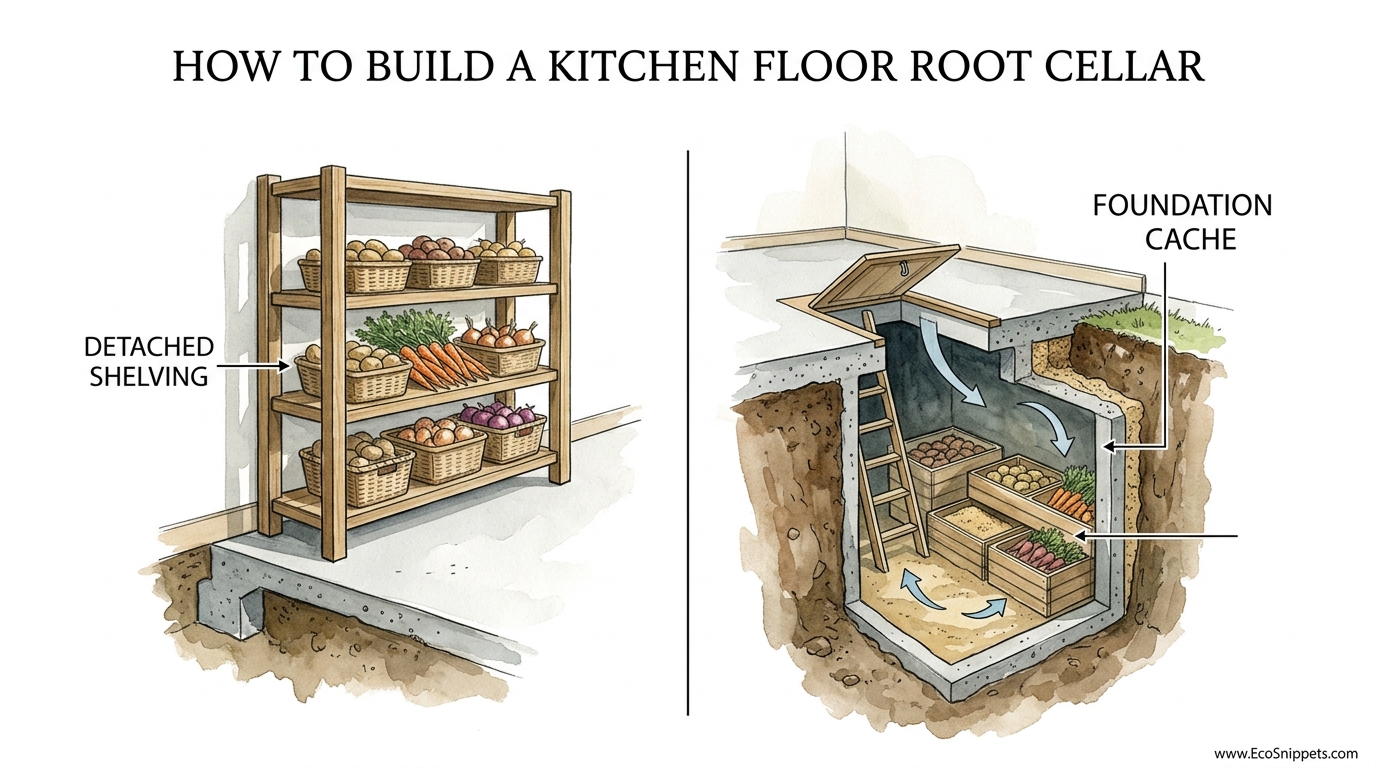
How To Build A Kitchen Floor Root Cellar
A kitchen floor root cellar is a specialized storage compartment built directly into the foundation or subfloor of a home, typically accessed via a trapdoor. Unlike a full-sized basement, which is often heated by the home’s furnace, a floor cache is designed to be thermally isolated from the living space. It reaches down into the cool, damp earth to create a microclimate specifically tuned for vegetable dormancy.
Historically, these “pantry pits” were common in pioneer cabins where space was at a premium and a full exterior root cellar was too much labor to undertake during the first few seasons of settlement. They were strategically placed in the kitchen or the “buttery” for immediate access during meal preparation. In modern times, they have found a new life among homesteaders and those looking to harden their homes against power grid instabilities.
The concept is simple: you are creating a well-insulated box that rejects the 70-degree air of your kitchen and embraces the 50-degree air of the soil. When done correctly, this space acts as a natural refrigerator that regulates itself using nothing but gravity and thermal conductivity. It is an elegant solution to the problem of “food miles” and industrial dependency.
To visualize this, imagine a heavy-duty, insulated cooler that has been buried in your backyard, only the lid is flush with your kitchen tiles. You aren’t just digging a hole; you are engineering a climate-controlled vault. Whether you are working with an existing crawlspace or cutting into a concrete slab, the goal remains the same: harness the earth’s steady breath.
How the Integrated Floor Cache Works
The success of a floor cache relies on four pillars: temperature, humidity, ventilation, and darkness. The earth provides the cooling, but you must provide the management. Without a balance of these factors, your cellar will either become a moldy swamp or a dry kiln that mummifies your produce.
Thermal Mass and Stability: The primary driver is the earth’s ability to hold a constant temperature. Once you get about four to six feet down, the soil temperature fluctuates very little between seasons. A floor cache utilizes this by keeping the storage area in direct contact with the ground, allowing the earth to “wick” away any heat that might enter from the house above.
The Role of Humidity: Most root vegetables, such as carrots and beets, require a relative humidity of 90% to 95%. This prevents the moisture inside the vegetable from evaporating into the air. A dirt or gravel floor is the best way to achieve this, as the ground naturally releases water vapor. If your cellar is too dry, you can sprinkle water on the gravel to boost the humidity levels.
Gravity-Fed Ventilation: Even though the space is small, the food is “breathing.” Vegetables release carbon dioxide and ethylene gas as they age. To prevent spoilage, you need a two-pipe system. A cold-air intake pipe should bring fresh air from the outside down to the floor of the cache, while a warm-air exhaust pipe should exit near the ceiling of the cache to pull out stale gases.
Total Darkness: Light is the enemy of dormancy. It triggers photosynthesis in potatoes, turning them green and toxic, and encourages seeds to sprout. A well-constructed floor cache uses a heavy, light-tight trapdoor. This door must be thick enough to provide insulation and sealed well enough to prevent any kitchen light from leaking into the storage area.
Steps to Construct Your Floor Cache
Building an integrated floor cache requires careful planning, especially regarding the structural integrity of your home. You should always consult with a structural engineer before cutting into floor joists or foundation slabs. The process generally follows a sequence of excavation, lining, and sealing.
1. Choosing the Location: The ideal spot is usually the coldest corner of the house, often the northeast corner. This area receives the least amount of direct sunlight on the exterior foundation walls. Ensure the spot is away from heat sources like water heaters, furnaces, or ovens that could bleed heat through the floor and into your cache.
2. Excavation and Framing: If you have a crawlspace, you can dig a pit between the joists. If you have a slab, you will need to cut a rectangular opening with a concrete saw. Once the hole is dug (aiming for at least 3-4 feet of depth), frame the opening with pressure-treated lumber or rot-resistant cedar. This frame will support the weight of the floor and provide a mounting point for the trapdoor.
3. Lining the Walls: You must prevent the soil from collapsing into your cache. For a permanent build, concrete blocks or poured concrete are the gold standard. However, many successful caches use rot-resistant wood like cedar or even stacked stone. Ensure that the walls are thick enough to provide some insulation from the upper, warmer layers of soil.
4. Installing the Floor: Resist the urge to pour a concrete floor. A dirt floor covered with 2-3 inches of clean, washed gravel is the best option for humidity control. The gravel provides a clean surface to stand on and increases the surface area for water evaporation if you need to boost humidity. It also allows for natural drainage if any water should seep in.
5. Managing Airflow: Run two 4-inch PVC pipes to the outdoors. The intake pipe should terminate just a few inches above the gravel floor. The exhaust pipe should start at the highest point of the cache ceiling. Cover the exterior openings with fine mesh screen to prevent rodents or insects from using your cellar as a winter home.
6. The Trapdoor: This is the most critical component for maintaining the internal temperature. Build a “sandwich” door: two layers of plywood with a 2-inch layer of rigid foam insulation (like extruded polystyrene) in the middle. Use heavy-duty hinges and a weather-stripping seal around the perimeter to ensure an airtight fit when the door is closed.
Benefits of a Kitchen Floor Root Cellar
The most immediate benefit of an integrated floor cache is the **reduction in energy consumption**. A standard refrigerator is one of the most energy-hungry appliances in the home. By moving your bulk produce—potatoes, apples, squash, and carrots—into a passive earth-cooled space, you can often downsize your refrigerator or run it less frequently.
Beyond the cost savings, there is a marked improvement in **food quality**. Commercial refrigeration is often too dry for root crops, leading to shriveled carrots and rubbery beets within weeks. The high-humidity environment of a floor cache keeps vegetables in a state of suspended animation, preserving their “snap” and nutritional profile for months longer than a fridge ever could.
There is also the undeniable benefit of **food security and convenience**. Having your winter store literally beneath your feet means you aren’t tramping through three feet of snow to an exterior cellar in January. It provides a central, organized hub for your harvest that is accessible even during a total grid collapse or a prolonged storm.
Finally, this project adds **intrinsic value to a homestead**. It is a functional piece of infrastructure that demonstrates a commitment to sustainable living. In a world of planned obsolescence, a well-built stone or concrete floor cache will outlast a dozen modern refrigerators and serve your family for generations.
Challenges and Common Mistakes
The most frequent error in building a floor cache is **inadequate ventilation**. Many builders think that because the space is small, it doesn’t need to breathe. Without the two-pipe system, ethylene gas (produced naturally by ripening fruit) will build up and cause your potatoes to sprout prematurely or your carrots to rot. You must ensure there is a constant, gentle exchange of air.
Another common pitfall is **poor insulation of the top lid**. Since the cache is located in a heated kitchen, the lid is the only barrier against 70-degree air. If the lid isn’t well-insulated and tightly sealed, heat will leak in, raising the internal temperature above the 40-degree danger zone. This leads to condensation on the ceiling, which can drip onto your produce and cause mold.
Many beginners also make the mistake of **storing incompatible crops together**. Apples and pears release large amounts of ethylene gas. If you store them right next to your potatoes, those potatoes will think it’s spring and start growing eyes immediately. You must learn the “zoning” of your cellar—keep the gassy fruits near the exhaust vent and the sensitive roots near the intake.
Finally, there is the issue of **moisture management**. While high humidity is good, standing water is a disaster. If your site has a high water table, you cannot simply dig a hole. You must ensure the area has proper drainage or use a waterproof “tub” design, though this complicates the humidity-from-earth benefits. Always check your soil’s drainage before you start digging.
Limitations and Environmental Constraints
An integrated floor cache is not a universal solution. It works best in climates with distinct seasons where the earth actually gets cold. If you live in a tropical or subtropical climate, the ground temperature may never drop below 60 or 70 degrees. In these areas, a floor cache will still be cooler than the surface, but it won’t provide the 32-40°F range needed for long-term dormancy.
Soil and Water Table: If your home is built on a site with a high water table or in a flood-prone area, a floor cache is likely to become a well. You cannot fight hydrostatic pressure with wood and luck. In such cases, a “mound” or “hillside” cellar located away from the house’s foundation is a safer and more practical choice.
Structural Risks: Not every home can support a hole in the floor. Modern “TJI” joists or pre-stressed concrete slabs require specific engineering to modify. If you cut into a load-bearing element without proper shoring, you risk a catastrophic floor failure. This is particularly true in older homes where the floor joists may already be under significant stress.
Radon Gas: This is a serious consideration that many pioneer-style guides overlook. Radon is a naturally occurring radioactive gas that seeps from the soil. By digging a hole in your floor and leaving it open to the earth, you may be creating a collection point for radon. If you live in a high-radon area, you must seal your cache walls and use a vapor barrier, then supplement humidity manually.
Detached Shelving vs. Foundation Cache
When deciding how to store your food, you might consider a simple set of shelves in an unheated garage (Detached Shelving) versus the built-in Foundation Cache. Each has its place, but they serve different needs.
| Feature | Detached Shelving (Garage/Shed) | Foundation Cache (Floor Cellar) |
|---|---|---|
| Temperature Stability | Low; fluctuates with air temp. Risk of freezing. | High; moderated by the earth’s thermal mass. |
| Humidity Control | Difficult; usually very dry. | Natural; maintained by soil contact. |
| Convenience | Moderate; requires walking to another building. | Excellent; located right in the kitchen. |
| Construction Cost | Low; just lumber and space. | Moderate to High; involves excavation/structural work. |
While detached shelving is easier to set up, it lacks the biological “stasis” provided by the foundation cache. In a garage, you often have to worry about your potatoes freezing solid during a cold snap. The foundation cache uses the home’s “leaked” heat to ensure temperatures never drop below freezing, while using the earth to ensure they never get too warm.
Practical Tips and Best Practices
Once your floor cache is built, the real skill lies in “tuning” it. You aren’t just a builder; you are now a cellar master. The following tips will help you maximize the shelf life of your harvest.
- Use a Digital Hygrometer: Don’t guess the humidity. Place a wireless sensor in the cache and a monitor in your kitchen. This allows you to check the “health” of your cellar without opening the door and letting heat in.
- Layering in Sand: For carrots and parsnips, don’t just throw them in a bin. Pack them in wooden crates filled with damp (not wet) sand or sawdust. This mimics being in the ground and prevents them from drying out even if the cellar humidity dips.
- The “One Bad Apple” Rule: Regularly inspect your stores. If you find a potato that has gone soft or a cabbage that is starting to slime, remove it immediately. Decay releases heat and moisture, which accelerates the spoilage of everything around it.
- Night-Time Air Flushing: In the late autumn, when the days are still warm but the nights are crisp, open your vents fully at night. This “charges” the thermal mass of the cellar with cold air. Close them tightly before the sun comes up to lock that cold in.
- Cure Before Storing: Never put vegetables straight from the garden into the cellar. Potatoes and squash need to “cure” in a dry, shaded area for 1-2 weeks to toughen their skins. This prevents moisture loss and protects against bruising.
Advanced Considerations for Serious Practitioners
For those who want to take their integrated floor cache to the next level, consider **zoning by height**. Because heat rises, even in a small pit, the top few inches will be slightly warmer than the floor. Use the bottom level for your “heavy lifters” like potatoes and carrots, and use the upper shelves for things that prefer slightly warmer temperatures, like onions and pumpkins.
You can also integrate a **drainage sump**. If you are concerned about accidental water intrusion, dig the floor of the cache slightly sloped toward one corner. Install a small gravel-filled pit (a sump) in that corner. If water enters, it will collect there rather than soaking your crates, and you can easily pump it out or let it drain into a deeper gravel bed.
Another advanced technique is the use of **active solar venting**. A small, low-voltage fan powered by a single solar panel can be used to pull air through the cache. By setting the fan to only run when the outside air is colder than the cellar air (using a simple differential thermostat), you can automate the cooling process and maintain much tighter temperature controls.
Finally, consider the **materials of your crates**. Avoid plastic bins, which trap moisture and prevent the “breathability” the cellar provides. Use wooden slats or wire mesh baskets. Cedar is particularly good because it is naturally rot-resistant and has antimicrobial properties that can help suppress mold growth in a high-humidity environment.
Real-World Example: The “Crawlspace Conversion”
Consider the case of a homesteader in Vermont with a 1950s ranch house built over a crawlspace. The kitchen was situated directly over a section of the crawlspace that was easily accessible. They cut a 3-foot by 3-foot hole in the kitchen floor, reinforced the surrounding joists with double-headers, and built a “drop-in” box.
Instead of a full concrete pour, they used 2-inch thick tongue-and-groove cedar boards for the walls, extending 4 feet down into the earth. The floor was left as native soil, topped with 3 inches of crushed limestone. For ventilation, they ran 4-inch insulated flex-duct from the cache out to the north-facing foundation wall.
The result? They were able to store 400 pounds of potatoes, 100 pounds of carrots, and several dozen heads of cabbage. Throughout a winter where temperatures hit -20°F outside, the cache stayed a rock-steady 36°F. By March, the carrots were still so crisp they snapped like they were picked yesterday. The total cost was under $300 in materials, most of which was spent on high-quality cedar and insulation for the lid.
Final Thoughts
Building a kitchen floor root cellar is an act of defiance against a culture of convenience that has forgotten how to live with the seasons. It requires sweat, a bit of engineering, and a willingness to get your hands dirty, but the reward is a tangible connection to your food supply. When you open that trapdoor in the middle of January and the smell of cool earth and fresh potatoes rises to meet you, you realize that the grid is just an option, not a requirement.
This project is about more than just storage; it is about learning the language of your land. It teaches you to watch the weather, to understand the thermal properties of the soil, and to respect the delicate balance of life and dormancy. Whether you are starting with a small pantry pit or a sophisticated vaulted cache, you are building a bridge to a more resilient future.
Do not be intimidated by the labor. Start small, plan carefully, and trust in the 55-degree gift that has been waiting beneath your floorboards all along. Your harvest deserves more than a plastic bin in a noisy refrigerator; it deserves the quiet, cool embrace of the earth.
