How To Become More Self-Sufficient Without Starting a Full-Blown Farm…
Want to start preserving your harvest, making your own soap, or building a backyard root cellar — but not sure where to begin? “Homesteading Advice” gives you instant lifetime access to 35+ practical homesteading books on food preservation, veggie gardening, DIY natural cleaning products (save over $250 per year with this skill alone), brewing, off-grid energy, and a whole lot more…
Click Here To Check It Out Now!
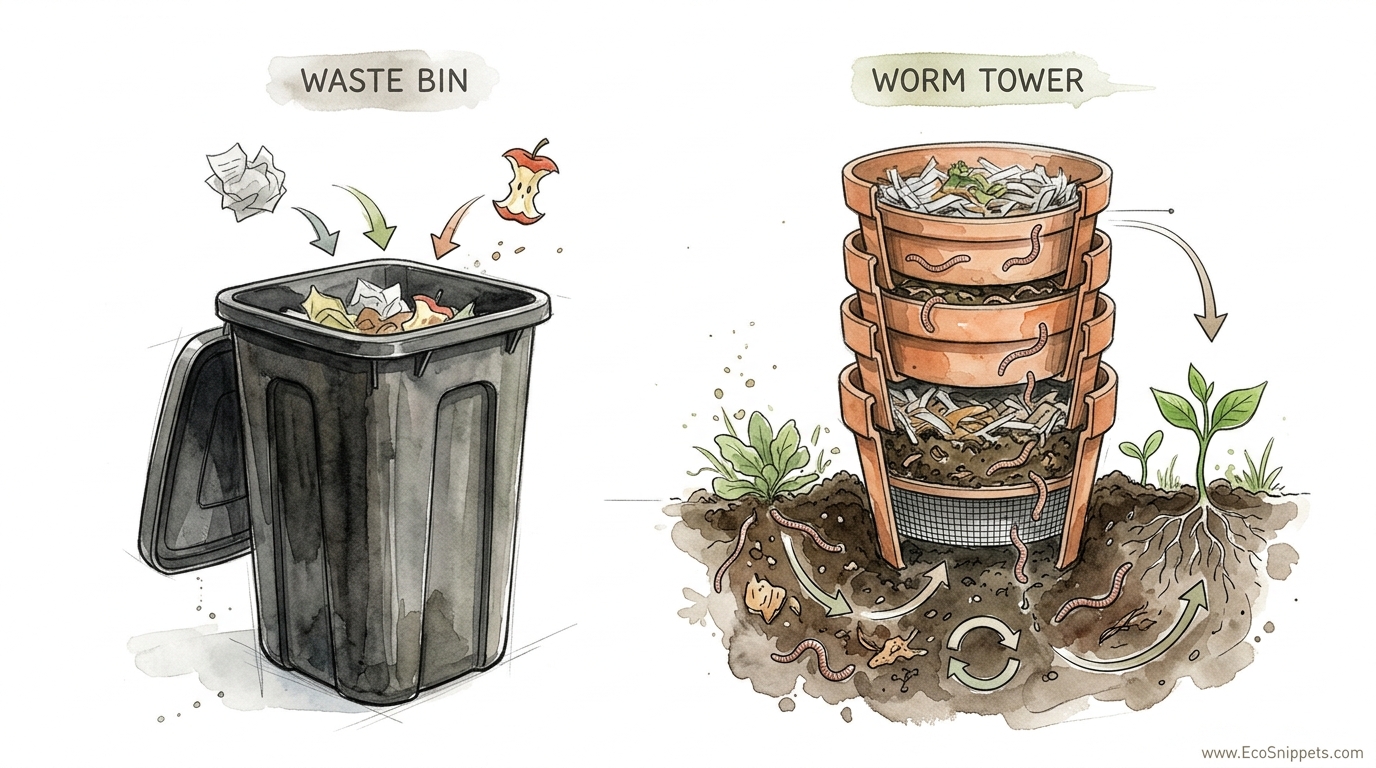
Stop treating your water and food scraps like waste and start treating them like your garden’s lifeblood. Why haul heavy buckets of kitchen waste to a distant bin just to haul the soil back months later? The Worm Tower integrates the composting process directly into your garden beds. By placing the ‘waste’ where the plants actually live, worms distribute the nutrients automatically, aerating your soil and feeding your roots in real-time. It’s a closed-loop system that turns your kitchen scraps into 10-pound tomatoes without the shovel work.
Mastering the art of the garden worm tower is about reclaiming the ancestral wisdom of closed-loop systems. Our ancestors didn’t have plastic curbside bins; they understood that every scrap of organic matter belonged back in the earth. A worm tower is essentially a perforated pipe or bucket buried vertically in the soil. It serves as a permanent feeding station where composting worms live, eat, and migrate. This method brings the “black gold” of vermicompost directly to the root zone, where it is needed most.
Modern gardening often relies on expensive, store-bought fertilizers that provide a quick hit of nitrogen but do little for long-term soil health. A worm tower works in the opposite way. It builds a living, breathing ecosystem within your raised beds or rows. As the worms move through the holes in the tower, they create tunnels that allow air and water to reach deep into the soil. They leave behind castings—one of the most nutrient-dense fertilizers on the planet—enriching the ground with every inch they travel.
How To Build A Garden Worm Tower
A garden worm tower is a simple, effective tool for in-situ vermicomposting. It consists of a vertical cylinder, usually a PVC pipe or a five-gallon bucket, that is modified with numerous holes and buried in the garden bed. This structure creates a protected habitat for red wiggler worms, allowing them to process kitchen scraps while remaining in direct contact with the surrounding soil. Unlike a standalone worm bin, the tower allows worms to venture out into the garden and return to the food source whenever they wish.
This system exists to bridge the gap between waste management and plant nutrition. It is widely used in permaculture designs, urban raised beds, and small-scale homesteads where efficiency is paramount. Imagine the soil as a living organism. The worm tower acts like a digestive organ, breaking down raw material and distributing energy throughout the body of the garden. It is particularly useful in heavy-feeding areas where vegetables like squash, tomatoes, or leafy greens are growing.
Visualizing the setup is easy. Picture a “cylindrical headstone” that is largely hidden beneath the surface. Only the top few inches and a sturdy lid remain visible above the mulch. Inside, a thriving colony of worms works through layers of greens and browns, creating a slow-release nutrient stream that radiates outward. Most growers find that one tower can effectively service a 30 to 40 square foot area, making it a powerful addition to any intensive growing system.
Materials and Preparation
Gathering the right materials is the first step toward self-reliance. You will need a length of PVC pipe—ideally 4 to 6 inches in diameter—or a 5-gallon bucket if you have a larger waste volume. A drill with a 1/2-inch bit is necessary for creating the access points. You also need a lid to keep out rodents and rain, such as an end cap, a terracotta saucer, or a heavy stone. Finally, you must source “Red Wiggler” worms (*Eisenia fetida*), as standard garden earthworms are not suited for the high-density feeding required in a tower.
How It Works: Step-by-Step Installation
Building the tower requires more grit than gear. Start by cutting your pipe to a length of about 20 to 30 inches. Measure 12 to 18 inches from the bottom and mark this as your burial depth. Use your drill to create dozens of holes in this lower section. These holes are the highways for your worms, allowing them to move between the compost and your garden soil. Make sure the holes are at least 1/2 inch wide so the worms can pass through easily without getting stuck.
Digging the hole is the next stage. Use a post-hole digger or a narrow shovel to create a vertical shaft in the center of your garden bed. Place the pipe in the hole, ensuring the perforated section is entirely below the soil line. Firm the soil around the pipe to keep it steady. The top 6 to 10 inches of the pipe should remain above ground to prevent soil from falling in and to make feeding easier.
Inoculating the tower is where the magic begins. Start with a layer of bedding at the bottom of the pipe. Shredded cardboard, dried leaves, or coconut coir work perfectly. Moisten this bedding until it feels like a wrung-out sponge. Introduce about 100 to 500 red wigglers into the pipe. Give them a day to settle into the bedding before adding your first handful of kitchen scraps. Always top the food with a layer of “browns”—dry leaves or shredded paper—to prevent odors and keep fruit flies away.
Feeding the Colony
Maintaining the tower involves a simple rhythm. Add your fruit and vegetable scraps once or twice a week. Soft foods like melon rinds, banana peels, and squash are favorites. Avoid meat, dairy, oily foods, and excessive amounts of citrus or onions, as these can create acidic conditions that harm the worms. Success in vermicomposting is about balance; keep the tower moist but not soggy, and always ensure there is a carbon-rich layer on top of the fresh waste.
Benefits: Why the Tower Wins
The practical advantages of a worm tower are measurable in both time and harvest yields. Because the worms do the distribution for you, you eliminate the need for turning compost piles or hauling heavy bags of manure. The nutrients are delivered in a bioavailable form, meaning plants can absorb them immediately. This results in sturdier stalks, deeper green foliage, and higher resistance to common garden pests.
- Automatic Aeration: As worms travel in and out of the tower, they create a network of tunnels that improve soil structure and oxygen flow.
- Reduced Waste: Kitchen scraps are processed right where they are produced, lowering your household’s trash output without the smell of a traditional bin.
- Moisture Retention: Worm castings hold up to nine times their weight in water, helping your garden beds stay hydrated during dry spells.
- Cost Efficiency: Building a tower from salvaged materials costs almost nothing, yet it provides a lifetime of free, high-quality fertilizer.
Choosing this approach over a traditional bin also saves space. In small urban gardens, a large compost heap is often impractical or forbidden by local ordinances. A worm tower is discreet and virtually odorless when managed correctly. It integrates seamlessly into the aesthetic of a well-tended vegetable patch, acting as a quiet engine of fertility beneath the surface.
Challenges and Common Mistakes
Pioneer-style gardening requires a watchful eye for potential pitfalls. One of the most common errors is overfeeding. If you add more food than the worms can process, the waste will begin to rot anaerobically, creating a foul smell and attracting pests. This happens because the oxygen is used up by bacteria faster than the worms can move through the pile. Always check the previous feeding before adding more; if the food is still mostly there, wait a few days.
Temperature control is another hurdle. In extreme heat, the worms may retreat deep into the garden soil or perish if the pipe is exposed to direct afternoon sun. Painting the top of the PVC pipe white or covering it with a decorative terracotta pot can help reflect heat. Conversely, in freezing winters, the worms may die if the ground freezes solid. Adding a thick layer of mulch around the tower or filling the pipe with extra straw can provide the insulation they need to survive the cold months.
Pests can occasionally become an issue. Moles and voles are attracted to the high concentration of worms, while rats may try to dig into the tower for food scraps. Ensuring your pipe is made of sturdy material and has a tight-fitting lid is the best defense. If you notice flies or gnats, it is usually a sign that your “green to brown” ratio is off. Adding more shredded paper or cardboard to the top of the food pile will quickly resolve the issue.
Limitations: When This May Not Be Ideal
Every system has its boundaries. A worm tower is not a high-volume composting solution. If you have a large family producing several gallons of waste per day, a single 4-inch pipe will quickly overflow. In these cases, you would need multiple towers or a secondary composting system. The limited surface area of a narrow pipe means that only a certain number of worms can feed at any given time, capping the daily processing capacity.
Environmental constraints also play a role. In areas with extremely heavy clay soil, drainage can become an issue. If the bottom of the tower sits in standing water after a rain, the worms will drown. You may need to amend the soil around the tower with sand or organic matter to ensure proper drainage. Similarly, very sandy soils may dry out too quickly, requiring you to add water to the tower more frequently to keep the worms’ skin moist.
Root invasion is a specific challenge for certain crops. Aggressive feeders like tomatoes or zucchini have roots that can sense the high nutrient concentration inside the tower. Over time, these roots may grow through the holes and fill the pipe, making it difficult to add food or for worms to move. To prevent this, some gardeners rotate the pipe slightly every few weeks to break any small roots attempting to enter the system.
Waste Bin vs. Worm Tower
Understanding the difference between these two systems helps you choose the right tool for the job. A standard waste bin is designed for volume and heat, while a worm tower is designed for precision and direct feeding. Each has a place on a self-reliant homestead, but their efficiencies vary depending on your goals.
| Feature | Traditional Waste Bin | In-Bed Worm Tower |
|---|---|---|
| Maintenance | High (Requires turning) | Low (Hands-off) |
| Nutrient Delivery | Requires hauling & spreading | Direct and automatic |
| Processing Speed | 3-12 months | 4-8 weeks |
| Capacity | High | Low to Moderate |
| Odor Risk | Moderate | Low |
Traditional bins are better for processing large amounts of yard waste, such as grass clippings and fallen leaves. However, for kitchen scraps that need to be turned into fertilizer quickly without the work of turning a heavy pile, the worm tower is superior. Integrating both systems allows you to handle bulk brown material in a bin while feeding your prized vegetables via the tower.
Practical Tips and Best Practices
Applying these best practices will ensure your worm colony thrives year-round. Start by chopping your food scraps. While worms can eat whole carrots or apple cores, smaller pieces have more surface area for bacteria to colonize, which helps the worms process the food much faster. Think of it as pre-digesting the waste for your “underground livestock.”
- The 50/50 Rule: Aim for a balance of 50% green waste (scraps) and 50% brown waste (bedding) by volume. This prevents the tower from becoming too wet or acidic.
- Moisture Monitoring: Check the tower during summer dry spells. If the bedding feels dry, add a cup of non-chlorinated water. Worms breathe through their skin and require moisture to survive.
- Use Only Composting Worms: Avoid using “Earthworms” or “Nightcrawlers” dug from the yard. These species prefer deeper soil and will likely leave the tower. Red Wigglers are surface dwellers that thrive in the concentrated organic matter of a tower.
- Lid Security: Use a heavy lid or a locking cap. Raccoons and other scavengers are clever and can easily tip over a loose stone to get at the contents.
Harvesting the castings is an optional but rewarding task. Once a year, typically in the spring, you can pull the tower out of the ground and empty the contents. The bottom will contain pure, dark worm castings. Use this concentrated fertilizer for starting seeds or top-dressing your hungriest plants. Re-install the tower and start the process again to maintain the cycle.
Advanced Considerations
Serious practitioners can take their worm towers to the next level by focusing on microbiology. Introducing beneficial fungi or specialized inoculants can speed up the breakdown of woody materials. You might also consider “wicking” your towers. In very dry climates, a small wick of natural fiber leading from the tower into the soil can help distribute the nutrient-rich liquid (leachate) even further into the bed.
Scaling the system is another advanced move. Instead of single towers, some growers use a “trench worm farm” method. This involves burying a long, perforated trough between rows. It provides a massive surface area for worms and can process all the waste from a large homestead. This approach requires more initial labor but creates a powerhouse of fertility that can sustain intensive vegetable production for years without external inputs.
Consider the “ancestral timing” of your feedings. In the wild, organic matter falls in cycles. Mimic this by providing varied diets—fall leaves in the autumn, spent pea vines in the summer, and kitchen scraps throughout the year. Diversity in the worms’ diet leads to a more diverse microbial profile in their castings, which in turn creates a more resilient garden ecosystem.
Example Scenarios
Consider a standard 4′ x 8′ raised bed growing tomatoes and basil. A gardener installs two 6-inch PVC worm towers, one at each end of the bed. Each week, they add roughly two pounds of kitchen scraps to the towers. Within weeks, the worms have established a population of several thousand. The tomato plants nearby show significantly thicker stems and larger fruit compared to the previous year, as they are receiving a constant, slow-release stream of vermicompost. The gardener spends zero time hauling compost and only five minutes a week “feeding the bed.”
In another scenario, an urban gardener with a small patio uses 5-gallon buckets as worm towers tucked into large containers. Even in this limited space, the towers process all their vegetable peels and coffee grounds. The containers stay moist longer due to the water-holding capacity of the castings, and the flowers remain vibrant throughout the heat of August. This demonstrates that the principles of ancestral stewardship work just as well on a balcony as they do on a 40-acre farm.
Final Thoughts
The garden worm tower is more than just a DIY project; it is a commitment to a different way of living. It represents a shift from being a consumer who produces waste to a steward who manages resources. By inviting these humble creatures into your garden beds, you are tapping into a biological system that has been refining the earth’s soil for millions of years. It is a quiet, powerful act of self-reliance that pays dividends in every harvest.
Success with a worm tower doesn’t come from fancy equipment, but from observation and grit. Watch your worms, feel the moisture of the soil, and adjust your feedings to match the rhythm of your garden. Over time, you will see your soil transform from a mere medium for roots into a dark, crumbly, and living foundation for life. This is the goal of the modern pioneer: to work with nature rather than against it.
Start with one tower. Experience the ease of dropping a banana peel into a pipe and knowing it will become a tomato in a few weeks. Once you see the results, you will likely find yourself installing towers in every bed you own. This is how we build the future of gardening—one scrap, one worm, and one tower at a time. Experiment, observe, and let the worms do the heavy lifting.
