How To Become More Self-Sufficient Without Starting a Full-Blown Farm…
Want to start preserving your harvest, making your own soap, or building a backyard root cellar — but not sure where to begin? “Homesteading Advice” gives you instant lifetime access to 35+ practical homesteading books on food preservation, veggie gardening, DIY natural cleaning products (save over $250 per year with this skill alone), brewing, off-grid energy, and a whole lot more…
Click Here To Check It Out Now!
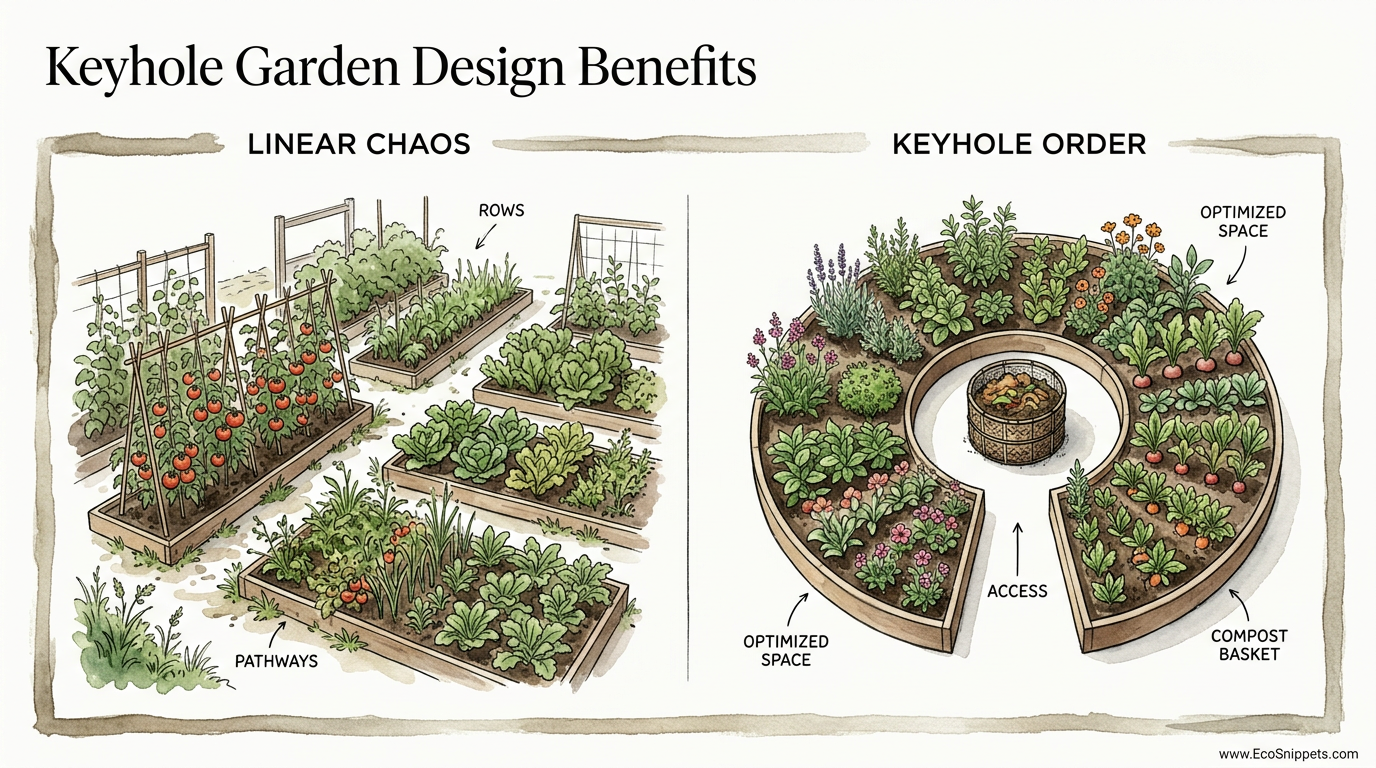
You are wasting 40% of your garden space on paths you shouldn’t even be walking on. Why do we still grow in straight lines? It’s a relic of the industrial tractor era. On a human-scale homestead, the keyhole bed is king. It maximizes your growing space, minimizes walking distance, and ensures you never compact the delicate soil your plants are trying to breathe in.
Walking through a modern row garden often feels like patrolling a factory floor. You spend more time navigating the gaps between the plants than you do actually tending to the life within the soil. This is **LINEAR CHAOS**, a system designed for machines, not for the calloused hands of a self-reliant grower. To find a better way, we must look toward **KEYHOLE ORDER**, a design that respects the limits of the human reach and the laws of biological efficiency.
I want to guide you through the process of reclaiming your land. We aren’t just talking about a fancy shape; we are talking about a closed-loop fertility system that works while you sleep. Whether you are battling the parched winds of a high-plains summer or the nutrient-leached sands of a coastal plot, the keyhole bed is the ultimate tool for ancestral-style self-sufficiency.
Keyhole Garden Design Benefits
The keyhole garden is a circular raised bed with a notched, wedge-shaped path leading to its center. At the very heart of this circle sits a porous composting basket. This design was popularized in the 1990s by the Consortium for Southern Africa Food Security Emergency (C-SAFE) to help families in Lesotho grow food under extreme drought conditions and with limited physical mobility.
It exists to solve three ancient problems: water scarcity, soil depletion, and physical strain. In the real world, this translates to a garden that effectively waters and fertilizes itself. When you pour water or greywater into the central basket, it filters through a core of decomposing organic matter. This “compost tea” then leaches outward into the surrounding soil, delivering nutrients directly to the root zones of your vegetables.
Imagine a traditional row garden as a sprawling city with too many roads. A keyhole garden, by contrast, is a compact village where everything you need is within arm’s reach. By eliminating the need for multiple internal paths, you can pack 80 square feet of growing potential into the same footprint that would traditionally yield only 40.
This design thrives in arid climates, but its utility is universal. For the homesteader with a bad back or the gardener facing poor native soil, the raised nature of the keyhole bed provides a sturdy, accessible, and high-yielding alternative to the “dig and hope” methods of the past.
How to Build Your Own Keyhole Garden
Building a keyhole bed is an act of engineering that mirrors the layered wisdom of the forest floor. You aren’t just piling dirt; you are creating a living battery.
Step 1: Mark the Footprint
Select a sunny spot with good drainage. Clear a circle approximately 6 to 8 feet in diameter. Drive a stake into the center and use a 3-to-4-foot string to scribe a perfect circle in the dust. Mark your “keyhole” notch—a 2-foot wide path that leads from the edge straight to the center stake.
Step 2: Construct the Retaining Wall
Use what the land provides. Stacked stones, old bricks, cedar logs, or even recycled cinder blocks work well. Build the wall to a height of 2 to 3 feet. This height is critical; it brings the soil up to your waist, eliminating the need to kneel and providing enough depth for a serious Hügelkultur-style base.
Step 3: The Heart of the System
In the center, where your path ends, install a 1-foot wide cylinder made of chicken wire, hardware cloth, or woven branches. This is your compost basket. It should stand about a foot taller than your outer walls. Fill the bottom of this basket with a few inches of coarse gravel or broken pottery to ensure the “juice” can flow freely.
Step 4: The Layering Process
This is where you build the “lasagna” of fertility. Start with a layer of wet cardboard or newspaper across the bottom of the entire bed to suppress grass. Follow this with a thick layer of woody debris—thick branches and logs—to act as a long-term sponge. On top of that, add “green” materials like grass clippings or fresh manure, followed by “brown” materials like straw or shredded leaves.
Step 5: The Hilled Topsoil
The final layer should be high-quality topsoil and finished compost. Here is the secret: hill the soil so it slopes downward from the center compost basket toward the outer walls. This allows gravity to help distribute the moisture and nutrients that emanate from the central core.
Advantages of the Keyhole Approach
The measurable benefits of this system are often startling to those used to traditional row cropping. Efficiency is the currency of the homestead, and the keyhole bed is a high-yield investment.
* Water Conservation: Because you water through the central basket, the moisture is delivered deep into the bed rather than evaporating off the surface. The layered organic matter acts as a reservoir, holding onto that hydration for days.
* Self-Fertilization: Every time you add kitchen scraps to the central bin, you are fueling the next month’s harvest. The worms will travel between the bin and the soil, distributing nutrients far more effectively than any synthetic spray could dream of.
* Soil Protection: You never step on the growing area. In a row garden, your boots are constantly compacting the soil, crushing the delicate mycelial networks and air pockets. In a keyhole bed, your feet stay on the path, and the soil stays fluffy and aerated forever.
* Thermal Mass: If you build your walls from stone or brick, they will soak up the sun’s heat during the day and radiate it back into the soil at night. This can extend your growing season by weeks in the spring and fall.
Common Mistakes to Avoid
Even the best-laid plans can go sideways if you ignore the biology of the bed. Most failures in keyhole gardening stem from a lack of patience or a misunderstanding of the “engine.”
One frequent error is using fresh, green wood in the very bottom of the bed. While Hügelkultur principles encourage wood, “green” logs can actually tie up nitrogen as they begin to break down, stealing the very nutrients your young plants need. Always use seasoned or partially rotted wood for the base.
Another pitfall is neglecting the compost basket. If you let the central core dry out, the decomposition stops. The basket must be kept moist—comparable to a wrung-out sponge—to ensure the microbial activity stays high. If the “heart” stops beating, the rest of the garden will slowly starve.
Lastly, watch your drainage. In heavy clay areas, if you don’t provide that bottom layer of coarse material (the “bones” of the bed), the entire structure can become a boggy mess. A keyhole garden is an aerobic system; it needs to breathe from the bottom up.
Limitations and Practical Constraints
While the keyhole bed is a powerhouse, it is not a magic bullet for every crop. Understanding its boundaries is what separates a lucky gardener from a master practitioner.
The most obvious limitation is size. Because the reach is limited to about 3 feet from the center or the perimeter, you cannot simply make a keyhole bed 20 feet wide. You are bound by the geometry of the human arm. For large-scale caloric staples like corn or field pumpkins, you are still better off with larger, dedicated plots.
Environmentally, these beds are “raised,” which means they can dry out faster than in-ground beds if they aren’t properly mulched. In extremely windy plains, the exposed walls of the bed can lead to higher soil temperatures, which might stress cool-weather crops like spinach or lettuce during a heatwave.
Finally, there is the matter of initial labor. A keyhole bed requires a significant upfront investment of time and physical effort to build the walls and source the internal layers. If you are looking for a “instant garden” you can plant in ten minutes, this isn’t it. This is a legacy structure built to last for five to seven years before needing a major refresh.
Keyhole Efficiency vs. Traditional Rows
When we look at the numbers, the “Pioneer-Grit” approach of the keyhole bed outshines the industrial model every time on a small scale.
| Feature | Traditional Row Garden | Keyhole Garden Bed |
|---|---|---|
| Growing Space | Approx. 60% (40% lost to paths) | Approx. 80-90% |
| Water Usage | High (Surface evaporation) | Low (Sub-surface delivery) |
| Fertility | External (Requires hauling) | Internal (Closed-loop) |
| Soil Compaction | Frequent (Walking between rows) | Zero (Permanent paths) |
| Initial Effort | Low (Tilling/Digging) | High (Construction) |
Practical Tips for Success
To get the most out of your new structure, you need to think about the layout of the plants themselves. Don’t just scatter seeds and hope for the best.
Strategic Placement: Plant your high-maintenance crops—the ones you pick daily like herbs or leafy greens—right along the edge of the keyhole notch. Put the “one-and-done” crops like carrots, beets, or onions toward the back of the circle where you don’t need to reach as often.
The Power of Mulch: Once your seedlings are established, cover every square inch of exposed soil with 2 to 3 inches of clean straw or shredded leaves. This mimics the forest floor and keeps the “engine” of the bed from overheating.
Basket Maintenance: Never put meat, dairy, or oils into your central basket. Stick to vegetable scraps, eggshells, coffee grounds, and a bit of brown cardboard. Every few months, give the basket a gentle poke with a stick to ensure there are no air pockets and that the material is settling properly.
Advanced Considerations
For those who have mastered the basic circle, the next step is integration. A serious homestead doesn’t just have one bed; it has a system.
Consider the **Thermal Mass Optimization** of your walls. If you live in a cold climate, use dark basalt or black-painted cinder blocks to capture maximum solar gain. If you are in the desert, use thick, light-colored limestone to reflect the harshest midday sun while keeping the soil core cool.
You can also scale this into **Mandala Gardening**. By nesting multiple keyhole beds together, you create a winding path system that looks like a flower from above. This minimizes “edge” effects and creates a microclimate where the beds actually protect one another from the wind.
Serious practitioners also look at **Water Harvesting**. You can divert a rain gutter downspout directly into a series of keyhole beds. By using a “swale-and-keyhole” hybrid, you can capture every drop of rain that falls on your roof and store it in the woody “sponge” at the bottom of your garden beds.
A Practical Example: The “Full Table” Bed
Let’s look at a 7-foot diameter bed in a temperate climate. In the center basket, the gardener adds kitchen scraps daily. Around the basket, in a 1-foot radius, they plant heavy feeders: two tomato plants and a trellis of pole beans.
In the middle ring, they plant moderate feeders: kale, broccoli, and swiss chard. On the outer edge and along the keyhole path, they tuck in radishes, green onions, and a thick border of marigolds to deter pests.
By mid-summer, the tomatoes are reaching 6 feet high, fed by the constant nutrient flow from the center. The beans are fixing nitrogen for the kale. The radishes have already been harvested and replanted twice. Because the gardener only has to stand in one spot—the keyhole—they can weed and harvest the entire 40-square-foot growing area in under five minutes. This is the definition of homesteading efficiency.
Final Thoughts
The keyhole bed is more than a garden; it is a testament to the idea that we can do more with less. By stepping away from the industrial row and embracing a design that mirrors the efficiency of nature, you reclaim your time and your soil. You stop fighting the land and start collaborating with it.
Building one of these beds is an investment in the future of your homestead. It requires the grit to move stones and the wisdom to wait for the soil to “cook,” but the reward is a garden that feeds you while building its own fertility year after year.
I encourage you to look at your current garden layout. Are you walking on space that could be growing food? Are you hauling water to plants that are parched by noon? If so, it’s time to stop walking in circles and start growing in one. Build a keyhole bed, and let the soil finally breathe.
