How To Become More Self-Sufficient Without Starting a Full-Blown Farm…
Want to start preserving your harvest, making your own soap, or building a backyard root cellar — but not sure where to begin? “Homesteading Advice” gives you instant lifetime access to 35+ practical homesteading books on food preservation, veggie gardening, DIY natural cleaning products (save over $250 per year with this skill alone), brewing, off-grid energy, and a whole lot more…
Click Here To Check It Out Now!
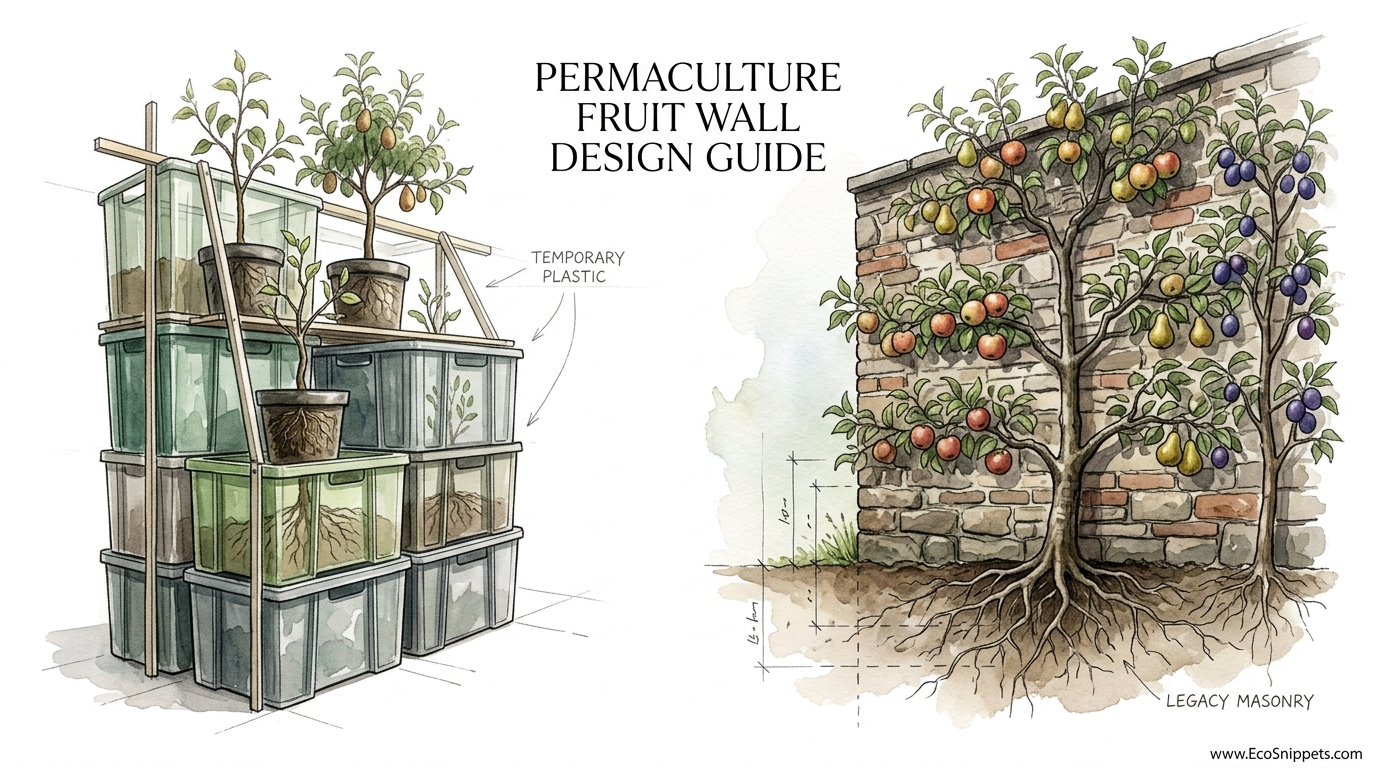
This 200-year-old brick wall creates a tropical microclimate that can outperform a modern greenhouse without using a single watt of power. Before we relied on fossil-fuel-derived plastics, ancestors used the ‘Fruit Wall’ to grow peaches in the snow. This isn’t just a boundary; it’s a multi-generational thermal battery that turns your garden into a self-heating engine. While the plastic tunnel on the left will be in a landfill in three years, the wall on the right will still be feeding your great-grandchildren.
Sturdy masonry has always been the backbone of the resilient homestead. In an era of disposable solutions, the fruit wall stands as a testament to the power of thermal mass and clever geometry. You don’t need a high-tech climate control system to grow Mediterranean figs in a frost-prone valley. You simply need to understand how heavy materials interact with the sun.
Ancestral wisdom taught us that stone and brick are more than just structural. They are active participants in the ripening of fruit and the protection of tender blossoms. Modern permaculture is finally catching up to these 17th-century secrets, rediscovering how a simple vertical surface can extend a growing season by months.
This guide will walk you through the mechanics of these “passive solar engines.” We will explore how to build them, which fruits thrive against them, and why this legacy infrastructure is the ultimate hedge against an uncertain future.
Permaculture Fruit Wall Design Guide
A fruit wall is a vertical masonry structure designed to capture, store, and radiate solar energy to create a localized microclimate. These walls were the standard for high-end horticulture long before the invention of glass or plastic greenhouses. In places like Montreuil, France, and across the English countryside, miles of these walls once turned cold regions into literal fruit baskets.
The concept is rooted in the principle of thermal inertia. Dense materials like clay brick, fieldstone, or rammed earth absorb the sun’s shortwave radiation during the day. As the sun sets and the air temperature drops, the wall begins to release that stored energy as longwave infrared heat. This creates a “thermal envelope” that can keep plants 8 to 12 degrees Celsius warmer than the surrounding air.
Beyond heat, these walls act as massive windbreaks. Wind is one of the primary killers of tender fruit trees, as it accelerates transpiration and strips away the thin layer of warm air surrounding a leaf. A well-placed fruit wall creates a pocket of still, warm air that allows trees to survive and thrive in zones where they would otherwise perish.
In a permaculture system, the fruit wall is a prime example of “stacking functions.” It provides a boundary, supports vertical growth, stores water in its shadow during summer, and acts as a heat source during the winter. It is a permanent landscape feature that requires zero external energy to operate once constructed.
The Science of Thermal Inertia
Thermal mass is the secret sauce of the fruit wall. Think of the wall as a giant battery that charges under the sun. Dense materials have a high “specific heat capacity,” meaning they can hold a significant amount of thermal energy before their own temperature rises significantly.
Materials like brick and stone are particularly effective because they have a high degree of thermal lag. This means it takes several hours for the heat to travel from the surface to the core, and several more hours for it to radiate back out. In a well-designed wall, the peak heat release occurs during the coldest hours of the night, exactly when the blossoms need it most.
Reflectivity also plays a crucial role. Historical fruit walls in France were often coated in white gypsum plaster. This served two purposes: it protected the masonry from weather, and it reflected light onto the undersides of the leaves. This increased photosynthesis and ensured that fruit ripened evenly on all sides, not just the side facing the sun.
Darker colors can be used to maximize heat absorption in extremely cold climates. A dark, textured stone wall will soak up every bit of winter sun, though it may become too hot during the peak of summer. Balancing the color and texture of your wall is a critical step in tuning your microclimate to your specific plant needs.
Types of Fruit Walls: Serpentine to Sun-Traps
The most basic fruit wall is a straight, south-facing structure. While effective, our ancestors developed more sophisticated shapes to maximize stability and heat retention. The “Crinkle Crankle” or serpentine wall is perhaps the most famous. Its undulating S-shape provides natural structural strength, allowing it to be built only one brick thick without buttresses.
Serpentine walls do more than just stand strong against the wind. The concave “bays” of the curves act as sun traps, focusing solar radiation into small, protected pockets. This creates even more intense microclimates within the overall system. These bays are the perfect home for the most sensitive varieties, such as lemons or apricots in temperate zones.
Angled walls are another historical variation. By tilting a wall slightly back toward the north, gardeners found they could capture more direct solar rays during the spring and autumn when the sun is lower in the sky. While more difficult to build, these angled structures can significantly accelerate the “waking up” of trees in early spring.
Heated walls, or “hot walls,” represent the pinnacle of this technology. These were hollow masonry walls with internal flues connected to small fires or furnaces. During a sudden late-spring frost, a gardener could light a small fire and send warmth directly through the masonry. While modern permaculture leans toward passive systems, the design of a hollow wall offers incredible insulation benefits even without an active fire.
Materials for a 100-Year Battery
Choosing the right material is the difference between a wall that lasts a lifetime and one that crumbles in a decade. Traditional clay bricks are a top choice for their availability and excellent thermal properties. They are easy to work with and provide a consistent surface for training trees.
Fieldstone is the ultimate choice for the self-reliant homesteader. If you have stones on your land, you have a free source of massive thermal mass. Dry-stack stone walls are beautiful and durable, but for maximum heat retention, a mortared stone wall is superior. The mortar seals the gaps, preventing cold air from whistling through the structure and stealing your stored heat.
Rammed earth and cob are excellent sustainable alternatives. These materials have massive thermal mass and can be built using soil from your own site. However, they require significant protection from rain. A large “hat” or roof over the wall is mandatory to prevent the earth from washing away over time.
Mortar choice is often overlooked. Using a lime-based mortar instead of modern Portland cement allows the wall to “breathe” and flex slightly with temperature changes. This is vital for a structure that will experience extreme thermal expansion every single day. A lime-bonded wall is a legacy wall; it can be repaired and maintained for centuries.
How to Build Your Own Thermal Microclimate
Building a fruit wall begins with observation. You must track the sun’s path across your property during the shortest day of the year. Your wall should be oriented to face the midday sun—usually south in the northern hemisphere. Avoid placing the wall where it will be shaded by tall trees or existing buildings.
A solid foundation is the first physical step. Because a masonry wall is incredibly heavy, you need a trench filled with compacted gravel or a concrete footing that sits below the frost line. If the ground heaves in winter, your wall will crack. Spending the time to get the foundation right is the only way to ensure the wall survives for your grandchildren.
Lay your masonry with a slight “batter” or lean if you are building with stone. For brick walls, ensure you are using a bond pattern that provides structural integrity, such as the English or Flemish bond. If you choose a serpentine design, the radius of the curves should be consistent to distribute the weight evenly.
Finalize the structure with a “coping” or cap. A row of slanted bricks, stone slabs, or even small roof tiles on top of the wall will shed water. This prevents moisture from seeping into the core of the masonry, where it could freeze and shatter the wall from the inside out. A dry wall is a warm wall.
Best Fruit Varieties for Passive Heat Systems
The primary purpose of a fruit wall is to grow “tender” fruits that would otherwise struggle in your zone. Peaches are the classic choice. They require high heat for ripening and are prone to blossom damage from early frosts. Against a thermal wall, peaches can thrive in climates as far north as Canada or Northern Europe.
Figs are another excellent candidate. Most fig varieties are hardy to Zone 7, but with the help of a south-facing masonry wall, they can be grown successfully in Zone 5. The wall protects the “breba” crop—the first crop of the season that grows on old wood—from freezing, ensuring a much higher yield.
Nectarines, apricots, and even certain hardy citrus varieties can be pushed several zones north with a well-tuned wall. For those in more temperate climates, the wall can be used to grow high-quality dessert grapes. The extra heat ensures the sugars fully develop, resulting in fruit that is far superior to anything grown in the open field.
Don’t ignore the “cold” side of the wall. The north-facing side of a fruit wall creates a cool, shaded environment. This is the perfect spot for currants, gooseberries, or even certain varieties of morello cherries that prefer cooler temperatures. By using both sides of the wall, you double your production in the same footprint.
The Art of the Espalier: Training for Yield
A fruit wall is only as effective as the training of the trees against it. Espalier is the ancient practice of pruning and tying branches so they grow flat against the masonry. This ensures that every square inch of the tree is in direct contact with the thermal envelope of the wall.
Fan training is the most popular method for stone fruits like peaches and cherries. The branches are spread out in a fan shape, allowing for maximum airflow and light penetration. This reduces the risk of fungal diseases, which can be a problem in the still-air environment near a wall.
Cordon training involves growing a single stem, often at an angle. This is ideal for apples and pears. By training multiple cordons close together, you can create a literal “living fence” of fruit. This method is incredibly space-efficient, allowing you to grow dozens of varieties in a very small garden.
Using “loques” or small strips of soft fabric to tie the branches to the wall is a traditional French technique. Modern gardeners often use wire trellises anchored into the masonry. Whatever method you choose, the goal is to keep the wood close to the heat source without allowing it to rub against the abrasive surface of the stone.
Advantages Over Modern Plastic Alternatives
Modern gardening often relies on the “poly tunnel” or plastic greenhouse. While these are cheap and easy to set up, they represent a temporary mindset. Plastic degrades under UV light, becomes brittle in the cold, and eventually ends up as microplastic pollution in our soil.
A masonry fruit wall is a legacy investment. It does not tear in the wind or collapse under heavy snow. While a greenhouse requires active ventilation to prevent overheating and fans to move air, the fruit wall works with the natural rhythms of the day. It provides a more stable, buffered environment that is less prone to the wild temperature swings seen in plastic structures.
Energy independence is perhaps the greatest advantage. A heated greenhouse can be a massive drain on resources during a cold winter. The fruit wall is a “zero-watt” solution. It uses the free energy of the sun to provide heat, and it does so with a beauty and permanence that plastic can never match.
Furthermore, a wall improves the local ecology. Masonry provides a habitat for beneficial insects and spiders that help control pests. It also adds a vertical dimension to the garden, creating a windbreak that benefits all the plants in its lee, not just the ones trained against it.
Common Pitfalls and How to Avoid Them
The most frequent mistake is poor orientation. A wall that faces east or west will still provide some benefit, but it will miss the intense midday sun required to truly charge the thermal battery. If your site doesn’t allow for a perfect southern exposure, you may need to increase the thickness of the wall to hold heat longer.
Inadequate drainage at the base of the wall can lead to “wet feet” for your fruit trees. Masonry walls can cause water to pool at their base if the soil isn’t properly graded. Ensure you have a slight slope away from the wall, or install a French drain to move excess water away from the sensitive root zones of your trees.
Over-pruning is another common error. Beginners often get excited with the shears and remove too much of the fruiting wood. Remember that the wall provides heat, but the tree still needs leaves to produce energy. Aim for a balance where the branches are flat against the wall, but the canopy is still lush enough to support a heavy crop.
Ignoring the foundation is a mistake you only make once. A wall that cracks due to frost heave is nearly impossible to repair properly. Invest the time and money in a deep, well-drained foundation. It is the only way to ensure the structure remains stable for the decades required to reach peak fruit production.
Limitations of the Fruit Wall
A fruit wall is not a magic bullet. In areas with extremely low light levels or constant heavy cloud cover, the wall may never fully “charge.” Without direct sunlight, the masonry will only reach the ambient air temperature, providing wind protection but no thermal boost.
Summer overheating is a real concern in hotter climates. A south-facing wall in a Mediterranean climate can become so hot that it actually scorches the fruit and leaves. In these areas, gardeners often use lime wash to keep the wall cooler, or provide temporary shade during the hottest months.
Space is another constraint. A proper fruit wall is a permanent, immovable structure. It takes up a significant footprint and can cast a long shadow over the rest of your garden. You must be certain of your garden layout before you lay the first stone, as moving a masonry wall is not an option.
Lastly, the initial cost and labor are much higher than buying a kit-built greenhouse. Building a 10-foot-high brick wall requires skill, time, and a significant investment in materials. However, when viewed over a 50-year timeframe, the fruit wall is often the most cost-effective option due to its lack of maintenance and replacement costs.
Comparison: Masonry Wall vs. Poly Tunnel
| Feature | Masonry Fruit Wall | Plastic Poly Tunnel |
|---|---|---|
| Lifespan | 100+ Years | 3 – 7 Years |
| Energy Use | Passive (0 Watts) | Often requires heating/fans |
| Thermal Mass | Extremely High | Negligible |
| Maintenance | Low (occasional pointing) | High (plastic replacement) |
| Wind Resistance | Excellent | Poor |
| Initial Cost | High | Low |
Practical Optimization Tips
Maximize your thermal gain by choosing the right color for your climate. In very cold northern latitudes, a dark-colored stone or brick will absorb more heat. If you find your wall is getting too hot in the summer, a simple coat of white lime wash can be applied in the spring and washed off in the autumn.
Use water as a secondary battery. Placing large barrels of water at the base of the wall can add even more thermal mass to the system. Water has a higher heat capacity than brick and will help to further stabilize the temperature during extreme cold snaps.
Insulate the back of the wall if it faces an area you don’t care about heating. By adding a layer of insulation to the north side of the wall, you prevent the stored heat from escaping out the back. This focuses all the radiant energy toward your fruit trees, effectively making the wall twice as efficient.
Mulch the root zone heavily. While the wall keeps the branches warm, the roots can still freeze in the ground. A thick layer of straw or wood chips will insulate the soil, ensuring the tree’s vascular system remains active and can support the early blossoms that the wall’s heat will encourage.
Advanced Considerations: Passive Geothermal Integration
Serious practitioners can take the fruit wall concept further by integrating it with “earth tubes” or passive geothermal systems. By burying pipes deep in the ground and venting them out at the base of the wall, you can draw 55-degree air into the microclimate during the winter.
Another advanced technique is the use of “glazing” over the wall during the coldest months. By attaching temporary glass or polycarbonate panels a few inches away from the masonry, you create a “Trombe wall” effect. The air between the glass and the stone heats up rapidly, and the wall soaks up that energy even more efficiently.
Consider the “long-view” of soil fertility. A permanent wall means you can’t easily rotate crops or till the soil. You must build a robust “fruit tree guild” at the base of the wall. This involves planting nitrogen-fixers like clover, dynamic accumulators like comfrey, and pest-repelling plants like garlic or chives.
This holistic approach turns the fruit wall from a simple heater into a self-sustaining ecosystem. The wall provides the heat, the guild provides the nutrients, and the trees provide the yield. This is the essence of permaculture: designing systems that do the work for you.
The Legacy of Montreuil: A Success Scenario
In the 1800s, the town of Montreuil, just outside Paris, was home to over 600 kilometers of peach walls. This maze of masonry allowed the town to produce millions of peaches every year, even though the climate was technically too cold for the fruit. These peaches were so famous they were exported to the royal courts of London and St. Petersburg.
The success of Montreuil wasn’t just due to the walls themselves, but the density of the system. Each wall provided heat to its neighbor, creating a massive, town-wide microclimate. Even after the sun went down, the sheer amount of thermal mass in the town kept the temperature significantly higher than the surrounding countryside.
The decline of Montreuil came not from a failure of the technology, but from the arrival of the railroad. Cheap fruit from the south of France could be shipped north, outcompeting the labor-intensive wall-grown peaches. However, as we look toward a future where long-distance shipping may become more expensive and less reliable, the Montreuil model offers a blueprint for local resilience.
Today, small community groups in France are restoring these walls. They are proving that this “low-tech” solution is still perfectly viable. A single well-built wall can provide a family with hundreds of pounds of high-quality fruit for a century, requiring nothing more than a few hours of pruning every year.
Final Thoughts
The fruit wall is more than a garden feature; it is a statement of intent. It says that you are building for the long term, using the natural laws of physics to provide for your family. In a world of flickering screens and plastic gadgets, there is a profound satisfaction in the weight of a stone and the warmth of a sun-baked brick.
Building a fruit wall requires grit, patience, and a bit of ancestral wisdom. It is a slow solution in a fast world. But as the first blossoms open in the dead of spring, protected by the heat of a wall you built with your own hands, you will realize the value of this legacy.
Start small if you must, but start with the best materials you can afford. Observe your land, respect the sun, and build something that will still be standing when you are gone. The trees will thank you with their fruit, and the earth will thank you for choosing stone over plastic.
