How To Become More Self-Sufficient Without Starting a Full-Blown Farm…
Want to start preserving your harvest, making your own soap, or building a backyard root cellar — but not sure where to begin? “Homesteading Advice” gives you instant lifetime access to 35+ practical homesteading books on food preservation, veggie gardening, DIY natural cleaning products (save over $250 per year with this skill alone), brewing, off-grid energy, and a whole lot more…
Click Here To Check It Out Now!
The Ancestral Path to Real Bread: Why You Should Mill Your Own Flour
Once you taste bread made from five-minute-old flour, there is absolutely no going back. The aroma alone is enough to convince the most skeptical baker that what we have been buying in paper bags is a pale shadow of the real thing. Store-bought flour is often months old and stripped of its most vital nutrients to ensure a long shelf life on a grocery store pallet.
Milling your own grains at home ensures maximum flavor and health while making your pantry truly disaster-proof. It is a shift in mindset from a passive consumer to an active producer, taking control of the most fundamental element of the human diet. When you grind your own grain, you are reclaiming a piece of ancestral wisdom that was nearly lost to the industrial machine.
In this guide, we will explore the practical steps of home milling, the equipment you need, and the profound benefits of working with “living” flour. Whether you are looking to improve your health or build a more resilient household, the journey starts with a single grain of wheat.
The Living Kernel: Benefits Of Milling Your Own Flour
To understand why home milling is superior, you must first understand the anatomy of a grain kernel. Every berry consists of the bran, the germ, and the endosperm. In the industrial milling process, the bran and the germ are removed to create “white” flour. This is done because the germ contains volatile oils that go rancid quickly once exposed to air.
Freshness is the ultimate nutrient delivery system. When a grain is cracked open, it begins to oxidize immediately. Within seventy-two hours of milling, a significant percentage of the vitamins and minerals in the flour have already begun to degrade. By milling just before you bake, you capture every bit of Vitamin E, B-vitamins, and essential fatty acids that the plant intended for the next generation.
Flavor is the most immediate reward for your efforts. Freshly milled flour has a nutty, sweet, and complex profile that disappears in commercial products. Because the oils are still intact, the texture of your bread will be more supple and the crumb more fragrant. You are not just eating calories; you are eating the concentrated essence of the field.
From a self-reliance perspective, whole grains are the ultimate survival food. Flour spoils in months, but un-milled wheat berries can remain viable and nutritious for decades if stored properly in a cool, dry place. By keeping whole grains and a mill, you ensure your family has access to high-quality carbohydrates regardless of what happens to the commercial food supply chain.
Choosing Your Weapon: Types of Home Grain Mills
If you are ready to make the leap, your first decision is the type of mill that fits your lifestyle. Not all mills are created equal, and the right choice depends on your volume, your physical ability, and whether you want to be able to bake during a power outage.
Electric Impact Mills
These mills use high-speed stainless steel fins to burst the grain into flour. They are incredibly fast and can produce a very fine flour suitable for light pastries and sandwich breads. However, they are loud—resembling a vacuum cleaner in decibel level—and they require electricity to function.
Electric Stone Burr Mills
These are the gold standard for many home bakers. They use two rotating stones to crush the grain, mimicking the traditional grist mills of the past. They are generally quieter than impact mills and allow for a wide range of texture adjustments, from coarse cracked wheat to fine bread flour. The slow grinding process helps keep the flour cool, preserving more nutrients.
Manual Hand Mills
For the true pioneer, a manual mill is an essential tool. These require no electricity and are built to last several lifetimes. While they require physical effort (grit) to operate, they offer the ultimate in food security. Many high-end manual mills can be motorized later, giving you the best of both worlds: daily convenience and emergency reliability.
Understanding Your Grains: Beyond Generic Flour
One of the greatest joys of home milling is the access to a variety of grains that you simply cannot find in a standard grocery store. When you are the producer, your “pantry” becomes a library of different flavors and baking properties.
- Hard Red Wheat: High in protein and gluten, this is the classic choice for hearty yeast breads. It has a bold, traditional “whole wheat” flavor.
- Hard White Wheat: This has the same protein content as red wheat but lacks the bitter pigment in the bran. It produces a lighter-colored loaf that is more palatable to those used to white bread.
- Soft White Wheat: Lower in protein, this grain is ideal for biscuits, pie crusts, and pastries where you want tenderness rather than chewiness.
- Ancient Grains (Einkorn, Spelt, Emmer): These are the ancestors of modern wheat. They often have weaker gluten structures and are prized for their digestibility and deep, rich history.
Sourcing your grain is just as important as how you grind it. Look for farmers who offer “triple-cleaned” grain to ensure you aren’t putting small stones or debris through your mill. Buying in bulk—usually in 25 or 50-pound bags—significantly reduces your cost per loaf compared to buying pre-milled flour.
How It Works: The Process of Home Milling
The actual act of milling is remarkably simple, but there are a few nuances to master to get the best results. You don’t just dump grain in and walk away; you must learn to listen to the mill and feel the flour as it exits the stones.
First, ensure your grain is clean and dry. Moisture is the enemy of a stone mill, as it can cause the flour to “gum up” the stones, requiring a tedious cleaning process. Set your mill to the desired coarseness. For bread, you want a fine, powdery feel. For cereals or porridge, a coarse crack is better.
Keep the temperature in check. If you are milling large quantities, the friction of the stones can heat the flour. High heat can damage delicate enzymes. If the flour feels hot to the touch, slow down or mill in batches. Some bakers even freeze their wheat berries before milling to keep the final flour temperature low.
Once the flour is milled, you have a choice: bake immediately or wait. While “five-minute-old flour” is the goal for maximum nutrition, some bakers find that letting the flour “age” for a few hours or a day helps the gluten perform better. However, never mill more than you plan to use within a week, as the lack of preservatives means the clock is ticking on rancidity.
The Baker’s Transition: Working With Fresh Flour
Baking with freshly milled flour is not a one-to-one swap for store-bought all-purpose flour. Because the bran and germ are present, the flour behaves differently in the bowl. Fresh flour is “thirsty.” The bran particles act like tiny sponges, absorbing more water than refined flour.
Hydration is key. When using your own flour, you will likely need to increase the water content of your recipes. It is also helpful to allow the dough to rest for 20-30 minutes after the initial mixing (a process called autolyse). This gives the bran time to fully soften and hydrate, preventing a “gritty” texture in the finished bread.
You may also notice that your dough ferments faster. The natural minerals and enzymes present in whole, fresh flour act as a booster for yeast and sourdough cultures. Keep a close eye on your rising times, as a loaf that usually takes four hours might be ready in three. This increased biological activity is a sign of the vitality of the grain.
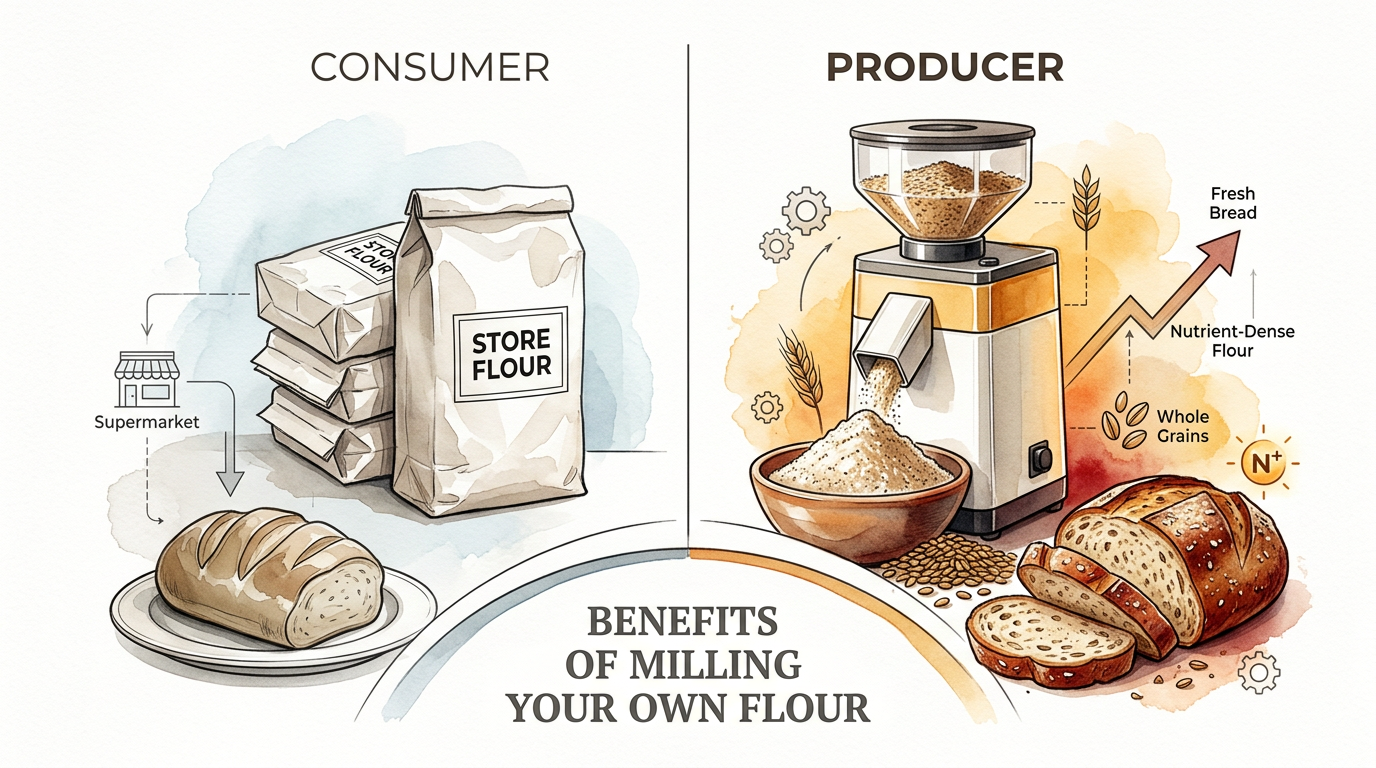
Consumer Flour vs. Producer Grain
To truly appreciate the value of home milling, it helps to compare the two approaches. The following table highlights the differences between the industrial food system and the self-reliant home kitchen.
| Feature | Store-Bought Flour (Consumer) | Home-Milled Flour (Producer) |
|---|---|---|
| Nutrient Profile | Stripped and “enriched” with synthetics. | Full spectrum of natural vitamins/minerals. |
| Shelf Life | Highly processed to last months. | Must be used fresh (3-7 days). |
| Flavor | Neutral, often bland or chalky. | Rich, nutty, and sweet. |
| Resilience | Dependent on complex supply chains. | Dependent only on your grain storage. |
Challenges And Common Mistakes
The path to the perfect loaf is rarely a straight line. One of the most common mistakes beginners make is trying to mill oily seeds or wet grains. Never put flax seeds, oily nuts, or damp corn through a stone mill unless it is specifically rated for it. The oil will coat the stones and prevent them from grinding, requiring you to disassemble the unit for cleaning.
Another pitfall is over-milling. It is tempting to mill a giant bucket of flour to save time later in the week. Resist this urge. The primary reason we mill at home is to avoid oxidation. If you mill more than you need, store the excess in the freezer in an airtight container to slow down the degradation of the oils.
Don’t be discouraged if your first few loaves are denser than you are used to. Whole wheat flour contains bran, which has sharp edges that can “cut” the gluten strands as the bread rises. This leads to a shorter, heavier loaf. Over time, you will learn techniques like high-hydration doughs and gentle folding to compensate for this, resulting in light, airy, and 100% whole-grain bread.
Practical Tips For Success
To make home milling a sustainable part of your lifestyle, you need to develop a rhythm. It shouldn’t feel like a chore; it should feel like a ritual. Here are a few ways to streamline the process:
- Sift for Versatility: You can use a fine-mesh sifter to remove some of the larger bran particles from your fresh flour. This gives you a “high-extraction” flour that behaves more like commercial bread flour while retaining the germ and flavor.
- Clean Your Mill Regularly: A simple pastry brush is usually all you need to sweep out the milling chamber. Don’t let old flour sit in the crevices, as it can attract pests or go rancid.
- Keep a Grain Journal: Different harvests and different grains require different settings. Note down which setting worked best for your Hard Red Wheat versus your Spelt.
- Source Locally When Possible: While big-box survival grains are fine, finding a local farmer who grows organic or heirloom wheat adds another layer of flavor and community connection to your bread.
Final Thoughts
Milling your own flour is a small act of rebellion against a food system that prioritizes shelf life over human life. It requires an investment of time and resources, but the dividends are paid out in every slice of warm, nutrient-dense bread you serve to your family. It is a return to a more honest way of eating—one that respects the integrity of the seed and the needs of the body.
As you begin this journey, remember that you are learning a skill that served our ancestors for millennia. There will be learning curves, and there will be loaves that don’t rise as high as you’d like, but the “pioneer grit” you develop along the way is just as valuable as the bread itself. You are no longer just a consumer; you are a steward of the grain.
Take it one step at a time. Start by sourcing a small bag of berries and a reliable mill. Once you experience the vitality of five-minute-old flour, the path forward will be clear. The kitchen is the heart of the home, and the mill is the heart of the kitchen. Happy baking.
