How To Become More Self-Sufficient Without Starting a Full-Blown Farm…
Want to start preserving your harvest, making your own soap, or building a backyard root cellar — but not sure where to begin? “Homesteading Advice” gives you instant lifetime access to 35+ practical homesteading books on food preservation, veggie gardening, DIY natural cleaning products (save over $250 per year with this skill alone), brewing, off-grid energy, and a whole lot more…
Click Here To Check It Out Now!
You are paying for liquid gold, but the sun is turning your healthy fats into toxic liabilities before you even pop the seal. Most homesteaders focus on the harvest, but they lose the battle in the kitchen. Light is the primary enemy of nutrient-dense fats. If your oils are sitting on the counter for ‘convenience,’ you’re eating oxidized molecules that cause inflammation instead of curing it. Here is how to shield your stash.
Every pioneer knew that a winter without fat was a death sentence. In the modern world, we’ve traded that survival instinct for pretty glass bottles sitting on sunny windowsills. We see those golden hues and think of health, but what’s actually happening inside that bottle is a slow-motion chemical explosion. When light and heat hit those delicate lipid chains, they shatter, leaving behind a trail of free radicals that do more harm than the calories do good.
Mastering the art of fat storage isn’t just about preparedness; it’s about honoring the energy and resources that went into producing that oil. Whether you are rendering your own tallow from a grass-fed steer or investing in high-quality extra virgin olive oil, you are handling a volatile asset. This guide will show you how to lock that nutrition in a vault, ensuring your fats remain as life-giving as the day they were pressed.
Best Way To Store Cooking Oils Long Term
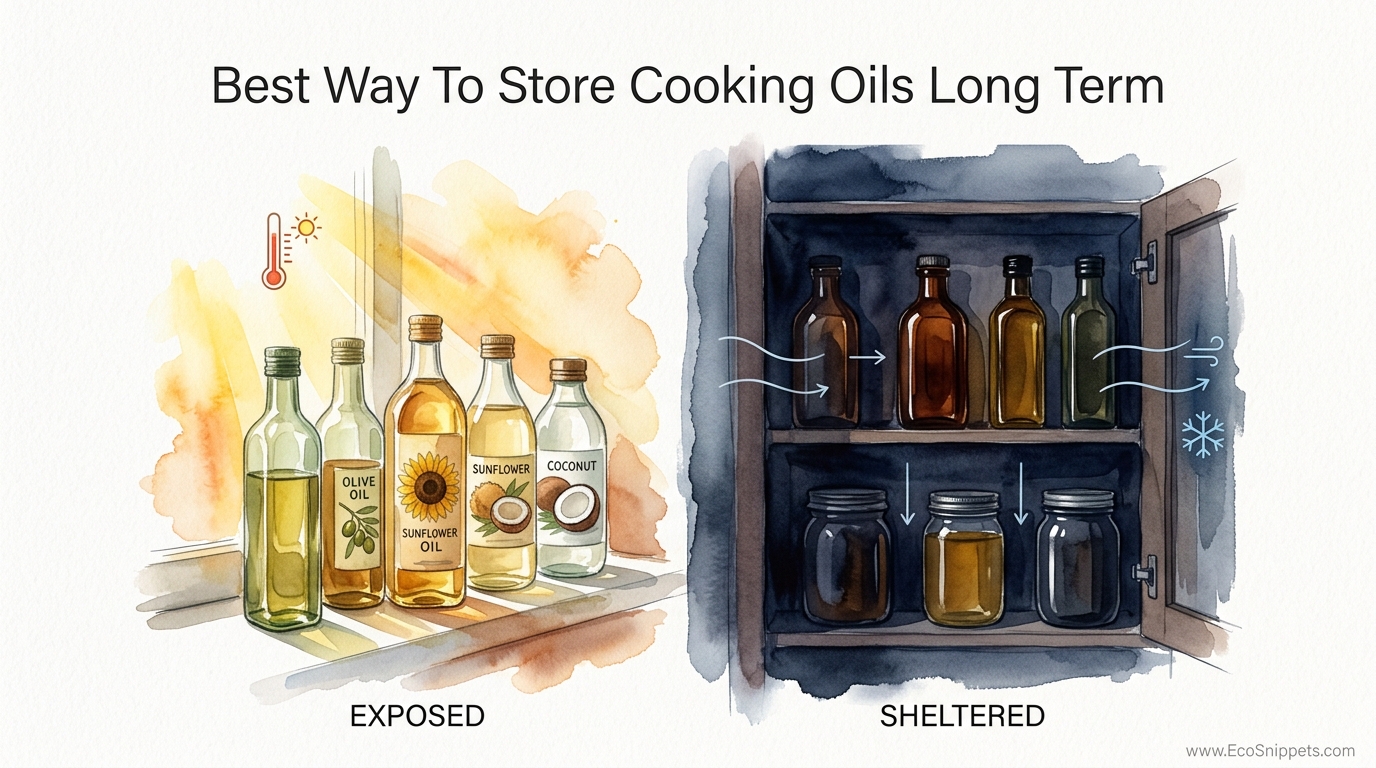
The best way to store cooking oils long term is to create a controlled environment that mimics a deep, dark cave: consistently cool, absolutely dark, and oxygen-deprived. While modern kitchens are designed for aesthetics, true long-term storage requires moving your bulk fats into a dedicated cellar or a climate-controlled pantry where temperatures remain below 60 degrees Fahrenheit. This prevents the molecular agitation that leads to rancidity.
Oxidation is the primary culprit behind oil spoilage. This process occurs when oxygen molecules bond with the carbon chains in the fat, particularly at the “double bonds” found in unsaturated fats. Saturated fats, like coconut oil and tallow, have fewer of these “atomic keyholes,” making them naturally more resistant to spoilage. However, even the hardiest fats will eventually succumb if they are exposed to the relentless assault of UV light and fluctuating temperatures.
In a real-world scenario, this means moving your oils out of the clear plastic jugs they often come in and into non-reactive, opaque containers. Stainless steel fustis or amber glass bottles are the gold standard here. These materials provide a physical barrier against light and do not leach chemicals into the oil over years of storage. Think of your oil storage as a bank account; every time you expose it to light or air, you are making a withdrawal from its shelf life.
How the Process of Rancidity Works
Understanding the “why” behind storage helps you make better decisions when things get messy. There are three main types of rancidity that can destroy your stash: oxidative, hydrolytic, and microbial. Oxidative rancidity is the most common, triggered by exposure to air and light, which creates those nasty “off” flavors that remind you of wet cardboard or old paint.
Hydrolytic rancidity occurs when moisture finds its way into your fat. This is a common issue with home-rendered lard or tallow that hasn’t been properly clarified. If even a tiny amount of water or protein remains in the fat, it becomes a breeding ground for enzymes that break down the triglycerides. This is why “dry” rendering—ensuring every drop of moisture is evaporated—is a critical skill for the self-reliant kitchen.
Microbial rancidity is rare in pure oils because bacteria generally need water to grow. However, in fats like butter or unclarified lard, microbes can feast on the non-fat solids. To prevent this, you must prioritize purity. High-quality oils are filtered and refined to remove the very impurities that microbes love. When you store these pure fats in a cool environment, you effectively put the chemical clock on pause.
Step-by-Step Storage Protocol
- Decant into Dark Glass: If you buy in bulk, immediately move the oil into smaller, amber glass bottles. This reduces the amount of “headspace” (air) the oil is exposed to as you use it.
- Seal the Perimeter: Use high-quality caps with airtight liners. Oxygen can seep through cheap plastic lids over time, so consider wax-sealing the tops of bottles intended for multi-year storage.
- Temperature Regulation: Aim for a steady 50–60°F. Avoid the “freeze-thaw” cycle, as constant temperature swings can cause the oil to expand and contract, potentially drawing in moist air through the seal.
- The “Floor” Rule: Heat rises. Always store your bulk fats on the lowest possible shelf or directly on a cool concrete floor to take advantage of the natural thermal mass of the earth.
Benefits of Proper Oil Storage
Preserving the integrity of your fats provides a measurable boost to your health. Oxidized oils are a primary source of systemic inflammation, which is linked to nearly every modern chronic disease. By shielding your oils from the elements, you ensure that the antioxidants—like Vitamin E and polyphenols—stay in the oil to protect your body rather than being “spent” trying to protect the oil in the bottle.
Economic resilience is another major advantage. Buying high-quality fats in bulk during sales or harvest seasons can save a homesteader hundreds of dollars a year. When you know how to keep that oil fresh for two to five years, you can bypass the “just-in-time” supply chain and build a true SHELTERED reserve that protects your family from price spikes and shortages.
Culinary quality is the final, undeniable benefit. Fresh oil carries the terroir of the olives, the sweetness of the coconut, or the richness of the pasture. Rancid oil doesn’t just taste “bad”; it masks the flavor of your hard-won harvest. Proper storage ensures that your fried eggs, sourdough crusts, and garden salads taste exactly as nature intended.
Challenges and Common Mistakes
The “Convenience Trap” is the most frequent error. Many people keep their daily-use oil in a clear bottle right next to the stove for easy access. While this is convenient, the heat from the burners and the light from the kitchen act like a catalyst for spoilage. A better approach is to keep a tiny “working bottle” on the counter and the rest of your stash in the dark.
Plastic containers are another hidden enemy. While high-density polyethylene (HDPE) is generally safe for short-term use, it is slightly permeable to oxygen. Over several years, oxygen can migrate through the plastic walls, slowly degrading the oil even if the cap is never opened. Furthermore, fats are aggressive solvents and can slowly leach phthalates and other chemicals out of the plastic over long periods.
Inadequate filtration of home-rendered fats often leads to heartbreak. If you are rendering tallow or lard, any bit of “crackling” or meat left in the jar will cause the fat to sour within months. Many beginners rush the rendering process, but the old-timers knew that slow and steady wins the race. You must filter your fat through multiple layers of cheesecloth until it is as clear as glass when melted.
Limitations: When Long-Term Storage Fails
Not all oils are created equal when it comes to the long haul. High-polyunsaturated oils, such as flaxseed, walnut, and most “seed oils” (soybean, corn, canola), have so many double bonds in their molecular structure that they are virtually impossible to store for more than a few months at room temperature. These are the “EXPOSED” fats of the oil world—highly volatile and prone to rapid decay.
Environmental extremes can also break your storage system. If you live in a humid, tropical climate without a cellar, your “room temperature” might be 85°F. In these conditions, even saturated fats will degrade much faster. You cannot fight the laws of thermodynamics; if you can’t provide a cool environment, you shouldn’t buy more oil than you can use in six months.
Nothing lasts forever. Even under perfect conditions, oils will eventually lose their flavor and nutritional potency. While a sealed jar of coconut oil might be safe to eat after five years, it won’t be as beneficial as a fresh jar. The goal is to build a “deep pantry” that you actually rotate through, not a museum of ancient lipids that you’re afraid to use.
Comparison: Countertop vs. Dark Pantry Storage
The differences between leaving your oil “exposed” on the counter and keeping it “sheltered” in a pantry are stark. The following table illustrates why kitchen placement is the single most important factor in oil longevity.
| Feature | Countertop (Exposed) | Dark Pantry (Sheltered) |
|---|---|---|
| Light Exposure | Constant (UV and Fluorescent) | Near Zero |
| Temperature Fluctuations | High (Near Stove/Windows) | Low and Stable |
| Estimated EVOO Shelf Life | 2–4 Months | 18–24 Months |
| Nutritional Integrity | Rapidly Declining | Well Preserved |
Practical Tips and Best Practices
One of the most effective tricks for long-term storage is the “Oxygen Displacement” method. If you have a half-full bottle of expensive oil, the air inside the bottle is working against you. You can drop clean glass marbles into the bottle to raise the oil level back to the neck, reducing the surface area of the oil that is in contact with oxygen.
Antioxidant boosting is another pro-level strategy. Adding a small amount of Vitamin E (alpha-tocopherol) or rosemary oleoresin to your bulk oils can act as a “sacrificial lamb.” The oxygen will attack these natural antioxidants first, leaving the fatty acids of your oil untouched for a longer period. This is particularly useful for more delicate oils like avocado or high-quality lard.
The “Nose and Tongue” test is your most reliable diagnostic tool. Every time you open a bottle from storage, smell it. Fresh oil should smell like its source. If you get a whiff of old crayons, putty, or a sharp metallic scent, the oil is already too far gone. Don’t risk your health for the sake of a few dollars; if it smells bad, use it for soapmaking or as a lubricant for your farm tools, but keep it out of your body.
- Keep it Grounded: Store heavy glass jugs on the floor to prevent breakage and keep them at the lowest possible temperature.
- Label Everything: Include the “Date of Purchase,” “Date of Opening,” and “Harvest Date” (if available).
- Small Batches: When buying 5-gallon buckets of oil, immediately transfer them to 1-quart jars. This ensures that 95% of your stash stays sealed while you use the first quart.
Advanced Considerations for Serious Practitioners
Nitrogen flushing is the ultimate way to store oil for five years or more. Professional manufacturers use nitrogen to displace oxygen in the bottle before sealing. While a full industrial setup is expensive, serious preppers sometimes use “Wine Preserver” spray—which is essentially a can of inert gas (nitrogen, argon, and CO2)—to spray into their oil bottles before capping. This creates a protective “blanket” over the oil.
Consider the “Saturate Strategy” for your deep-reserve calories. In a true long-term survival scenario, you should prioritize fats that are naturally stable. Ghee (clarified butter), refined coconut oil, and beef tallow are the kings of the long-term pantry. Ghee, specifically, has been known to stay edible for years even at room temperature because it has no water, no protein, and is almost entirely saturated fat.
Rotating your stock using the First-In, First-Out (FIFO) method is mandatory. A serious practitioner doesn’t just store oil; they manage an inventory. By regularly using your oldest oil and replacing it with fresh stock, you ensure that your “emergency” calories are always high-quality. This also allows you to catch any storage failures (like a leaky seal) before they ruin an entire batch.
Real-World Example: The Two-Year Lard Test
Imagine two homesteaders, Elias and Sarah, who each render 50 pounds of lard from their fall pig harvest. Elias follows the modern “convenience” route, storing his lard in clear plastic buckets in his warm kitchen pantry. Sarah, however, takes the “pioneer-grit” approach. She clarify-renders her lard until it is bone-dry, pours it into half-gallon amber glass jars, and moves it to her root cellar which stays a constant 55°F.
By the following summer, Elias opens one of his buckets and finds a yellowed crust and a sour, funky smell. His lard has undergone both oxidative and hydrolytic rancidity due to the light, heat, and slight moisture remaining in the fat. He has to discard 40 pounds of what should have been precious winter calories. The high temperatures of his kitchen acted as a catalyst, accelerating the chemical breakdown by four to five times the normal rate.
Sarah, meanwhile, pulls a jar from her cellar two years later. The lard is still snow-white and has no detectable odor. Because she removed all moisture and shielded the fat from the two primary triggers of oxidation—light and heat—she has effectively frozen the fat in time. Her meticulousness at the start saved her hundreds of dollars and provided her family with clean, healthy cooking fat throughout the following seasons.
Final Thoughts
Protecting your cooking oils is a fundamental skill of self-reliance that bridges the gap between modern nutrition and ancestral wisdom. We live in a world that prioritizes the “now,” but a true provider looks years into the future. By treating your fats with the respect they deserve—keeping them cool, dark, and sealed—you are securing the most calorie-dense and nutritionally vital part of your diet.
Rancidity is not a sudden event but a slow, invisible erosion of quality. You cannot always see the damage, but your body feels it in the form of oxidative stress and inflammation. Taking the extra twenty minutes to decant your bulk oils into dark glass and moving them to a proper storage area is a small investment that pays massive dividends in both health and security.
Encourage yourself to look at your kitchen through a new lens. Identify the “EXPOSED” vulnerabilities on your countertops and move them to a “SHELTERED” sanctuary. Whether you are prepping for a total collapse or just trying to cook a better meal for your family tonight, the rules are the same. Shield your liquid gold, and it will sustain you for years to come.
