How To Become More Self-Sufficient Without Starting a Full-Blown Farm…
Want to start preserving your harvest, making your own soap, or building a backyard root cellar — but not sure where to begin? “Homesteading Advice” gives you instant lifetime access to 35+ practical homesteading books on food preservation, veggie gardening, DIY natural cleaning products (save over $250 per year with this skill alone), brewing, off-grid energy, and a whole lot more…
Click Here To Check It Out Now!
Why fight a motor when you can use gravity and body mechanics to prep your soil? Rototillers destroy soil biology and consume expensive fuel. A broadfork uses the kinetic energy of your own body weight to aerate the ground, preserving the soil web and your wallet. If you are looking to build a garden that stands the test of time, you must first understand that the most powerful tool in your arsenal is the one that works with nature, not against it.
In the old days, our ancestors knew that a healthy field was a living thing. They didn’t have high-octane gasoline to pulverize the earth into a fine, lifeless dust. They used leverage, grit, and a deep understanding of the land. Today, we call this “no-till” or “low-till” gardening, but for the self-reliant homesteader, it is simply common sense. You want soil that breathes, drains, and teems with the unseen labor of earthworms and fungi.
The broadfork is the modern embodiment of this ancestral wisdom. It is a simple frame of steel with long, vertical tines designed to dive deep into the earth. Instead of turning the soil upside down and exposing delicate microbes to the scorching sun, the broadfork simply lifts. It cracks the hardpan, lets in the oxygen, and leaves the layers exactly where they belong. It is a quiet, rhythmic way to work that feeds the soul as much as it prepares the bed.
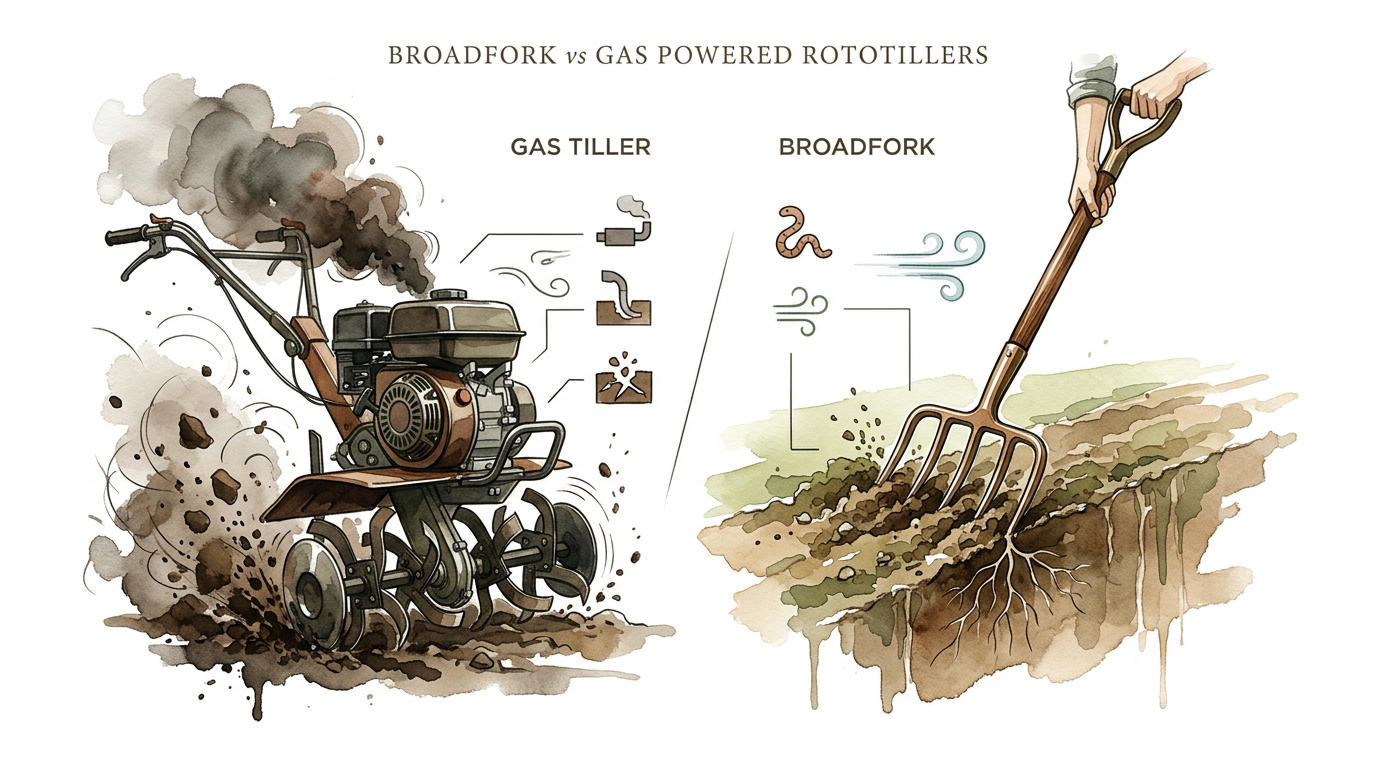
Broadfork Vs Gas Powered Rototillers
A broadfork is a wide, manual aeration tool featuring two long handles and a series of heavy-duty tines, often used to loosen soil without inverting the layers. It stands in stark contrast to the gas-powered rototiller, a machine that uses spinning metal blades to churn the top six to eight inches of earth into a uniform fluff. While a tiller offers speed and the appearance of a “clean” bed, it often creates a hidden disaster beneath the surface.
Think of your soil like a multi-story house. The earthworms live in the basement, the fungi build their networks in the hallways, and the bacteria manage the pantry on the top floor. When you run a rototiller through that house, you aren’t just cleaning; you are taking the entire structure and putting it through a giant blender. The result is a pile of rubble. The broadfork, by comparison, is like opening the windows and doors to let the fresh air in. It relieves the pressure of compaction while keeping the furniture—and the inhabitants—exactly where they need to be.
In the real world, tillers are often the go-to for those breaking massive amounts of sod or those who view gardening as a battle of man against nature. However, for the market gardener or the serious home grower, the broadfork is the tool of choice for established beds. It exists to maintain the long-term health of the soil web. It is used in permanent bed systems where the goal is to improve the “tilth” or structure of the soil every single season.
The Mechanics of the Fork: How to Aerate Without Agony
Using a broadfork is an exercise in physics and patience. It is not about brute strength; it is about using the leverage of the long handles and the mass of your own body. This process respects the natural stratification of the soil, ensuring that the nutrient-rich topsoil stays on top while the deeper layers are opened to air and water.
First, you must stand at the top of your garden bed. Place the tines on the soil surface, holding the handles upright. Step onto the crossbar with both feet, using your weight to drive the tines into the earth. If your soil is particularly heavy or compacted, a slight side-to-side wiggle of the handles can help the steel find its way down. You want those tines buried deep—ideally 10 to 12 inches.
Once the tines are fully submerged, step back off the bar. Grasp the handles and pull them back toward your body until they are at about a 45-degree angle. You will feel the ground “heave” or crack open. This is the moment of aeration. Do not pull the handles all the way to the ground, and do not attempt to flip the soil over. Your goal is to create cracks and fissures, not a somersault. After the soil lifts, return the handles to the vertical position and pull the tool out of the ground. Step back 6 to 10 inches and repeat the process until the entire row is finished.
The Underground Advantage: Why Your Soil Will Thank You
The benefits of broadforking are both immediate and cumulative. By choosing this manual path, you are actively protecting the “anecic” earthworms—the deep-dwellers that create permanent vertical burrows. These burrows act as superhighways for roots and water. Rototilling chops these engineers into pieces, but the broadfork tines simply glide past them, leaving their homes intact.
Another measurable benefit is the suppression of weeds. Your soil contains a “seed bank” of millions of dormant weed seeds buried deep where they cannot sprout. A rototiller acts as an elevator, bringing those seeds to the surface where they find the light and moisture they need to germinate. Because the broadfork does not invert the soil, those weed seeds stay buried and dormant. Over time, this drastically reduces the amount of weeding you have to do during the growing season.
Furthermore, broadforking prevents the “hardpan” layer that tillers often create. The spinning blades of a tiller exert downward pressure, effectively smearing the soil at the lowest point of their reach and creating a compacted shelf that roots cannot penetrate. The broadfork tines, however, break through existing hardpan, improving drainage and allowing taproots to dive deep into the subsoil to access minerals and moisture that would otherwise be out of reach.
Pitfalls and Operator Errors: Where Most Gardeners Go Wrong
Even a tool as simple as a broadfork can be used incorrectly. One of the most common mistakes is working the soil when it is too wet. If you can form a ball of soil in your hand and it stays together without crumbling, it is too wet to fork. Forcing tines into saturated earth will cause the soil to “smear” inside the holes, which actually increases compaction rather than relieving it. This mistake creates “clods” that dry into bricks, making for a miserable planting experience.
Another frequent error is the “tiller’s itch”—the urge to turn the soil over. Beginners often pull the handles too far back, flipping the soil and burying the aerobic bacteria that live in the top few inches. These microbes need oxygen to survive; burying them is a death sentence. Keep your movements controlled and focus on the lift, not the flip.
Finally, some gardeners treat the broadfork like a crowbar to pry up massive rocks or thick tree roots. While high-quality forks like those from Meadow Creature are nearly indestructible, cheaper models with wooden handles or thinner tines can snap under that kind of lateral pressure. If you hit a solid obstruction, do not force the tool. Pull it out and use a dedicated digging bar or shovel to remove the obstacle.
When the Broadfork Meets Its Match
While the broadfork is a masterpiece of design, it is not a universal solution for every situation. Its primary limitation is scale. If you are preparing five acres of new pasture for a commercial corn crop, a broadfork is a recipe for a hospital visit. It is a tool designed for human-scale agriculture—gardens measured in hundreds or thousands of square feet, not dozens of acres.
Environmental factors also play a role. In extremely rocky soil, the tines may constantly “clink” against buried stones, preventing them from reaching full depth. In these cases, you may need a primary tillage pass with a more aggressive tool to clear the largest obstructions before a broadfork can be used effectively. Additionally, if you are attempting to break heavy sod for the first time, a standard broadfork may struggle to penetrate the thick mat of grass roots. You might need to “scalp” the grass or use a silage tarp to kill the vegetation before the fork can do its job.
The Real Cost: A Breakdown of Investment and Longevity
When comparing a broadfork to a gas tiller, the numbers tell a compelling story of self-reliance. A professional-grade broadfork will cost you between $150 and $300. It has no moving parts, requires no fuel, and needs no annual oil changes. If you buy a solid-steel model, it is a tool that you will leave to your grandchildren in your will.
| Feature | Broadfork | Gas Rototiller |
|---|---|---|
| Initial Cost | $150 – $300 | $500 – $1,500+ |
| Annual Maintenance | $0 (Wipe with oil) | $50 – $100 (Fuel, oil, tines) |
| Lifespan | 30 – 50+ Years | 10 – 15 Years |
| Soil Health Impact | Preserves Biology | Destroys Biology |
| Learning Curve | Low (Physical technique) | Medium (Mechanical skill) |
The “hidden” cost of a tiller is the damage to your land. If you have to spend more on fertilizers and herbicides because you’ve destroyed the soil’s natural fertility and invited a weed explosion, the tiller becomes an expensive liability. The broadfork is an investment in the biology of your farm.
Masterclass Tips for the Serious Practitioner
If you want to move from a beginner to a master of the fork, you must learn the rhythm of the “rowing” motion. Instead of lifting the heavy tool with every step, keep the tines in the soil and “walk” the tool backward. Once you finish a pull, slide the tines out and drag them on the surface to the next spot. This saves your lower back and keeps your energy focused on the soil, not the equipment.
Consider the “Compost Sandwich” technique. Before you broadfork, spread a thick layer of high-quality compost or aged manure over your bed. As the tines penetrate and the soil cracks open, some of that compost will fall deep into the fissures. You are essentially “deep-feeding” your soil without having to dig. This places nutrients exactly where the roots will be searching for them in mid-summer.
Spacing is also critical. For routine maintenance of established beds, you can space your forkings about 10 to 12 inches apart. If you are working with heavy clay that hasn’t been touched in years, tighten that spacing to 6 inches. The more “honeycombed” you make the ground, the faster the soil life will move in to finish the job for you.
Beyond the Basics: Scaling Your No-Till Operation
For those looking to go beyond a backyard hobby, the broadfork is the foundation of the 30-inch permanent bed system popular in modern market gardening. Using a fork that is specifically 20 to 24 inches wide allows you to aerate the growing zone of a standard bed without disturbing the compacted pathways. This separation is vital; you want your beds to be loose and your paths to be solid for walking.
Serious practitioners also look at the design of the tines. Parabolic tines—those with a slight, calculated curve—are superior to straight tines because they require less effort to achieve the necessary lift. Companies like Treadlite or Johnny’s Selected Seeds offer forks with varying tine counts and lengths. A 5-tine fork is standard, but a 7-tine “monster” can be used in very loose, sandy soils to cover ground even faster.
A Day in the Dirt: Broadforking a Clay Patch
Imagine a patch of North Carolina red clay that has been baked by the August sun. It is hard as a kiln-fired brick. A rototiller would bounce off the surface, likely taking the operator with it. To prep this for a fall crop of carrots—which require deep, loose soil to grow straight—the broadfork is the only logical choice.
A gardener would wait for a light rain, then apply two inches of compost. Using a heavy-duty, all-steel broadfork, they would step onto the bar, let their weight sink the tines, and pull back. You would hear the ground literally “groan” as the vacuum is broken and air rushes into the clay. After one pass, the bed is no longer a brick; it is a sponge. By the following spring, that clay will be easier to work, more productive, and full of life, all because the gardener chose the fork over the blade.
Final Thoughts
The transition from a gas-powered mindset to a manual one is more than just a change in tools; it is a change in philosophy. It is an admission that we do not have all the answers and that the billions of organisms living beneath our feet are better at managing the earth than we are. By using a broadfork, you are signing a peace treaty with your soil.
Apply what you have learned by starting small. Take one bed this season and commit to never tilling it again. Use the broadfork to keep it open, keep it fed with organic matter, and watch as the soil transforms from a stubborn burden into a thriving ecosystem. The pioneer spirit is not about doing things the hard way—it is about doing things the right way, for the right reasons.
As you stand in your garden, listening to the quiet snap of the earth opening up under your weight, you will feel a connection to the land that a roaring engine can never provide. That is the true power of the broadfork. It builds more than just better vegetables; it builds a better steward of the land. Experiment with your technique, trust the biology, and let gravity do the heavy lifting.
