How To Become More Self-Sufficient Without Starting a Full-Blown Farm…
Want to start preserving your harvest, making your own soap, or building a backyard root cellar — but not sure where to begin? “Homesteading Advice” gives you instant lifetime access to 35+ practical homesteading books on food preservation, veggie gardening, DIY natural cleaning products (save over $250 per year with this skill alone), brewing, off-grid energy, and a whole lot more…
Click Here To Check It Out Now!
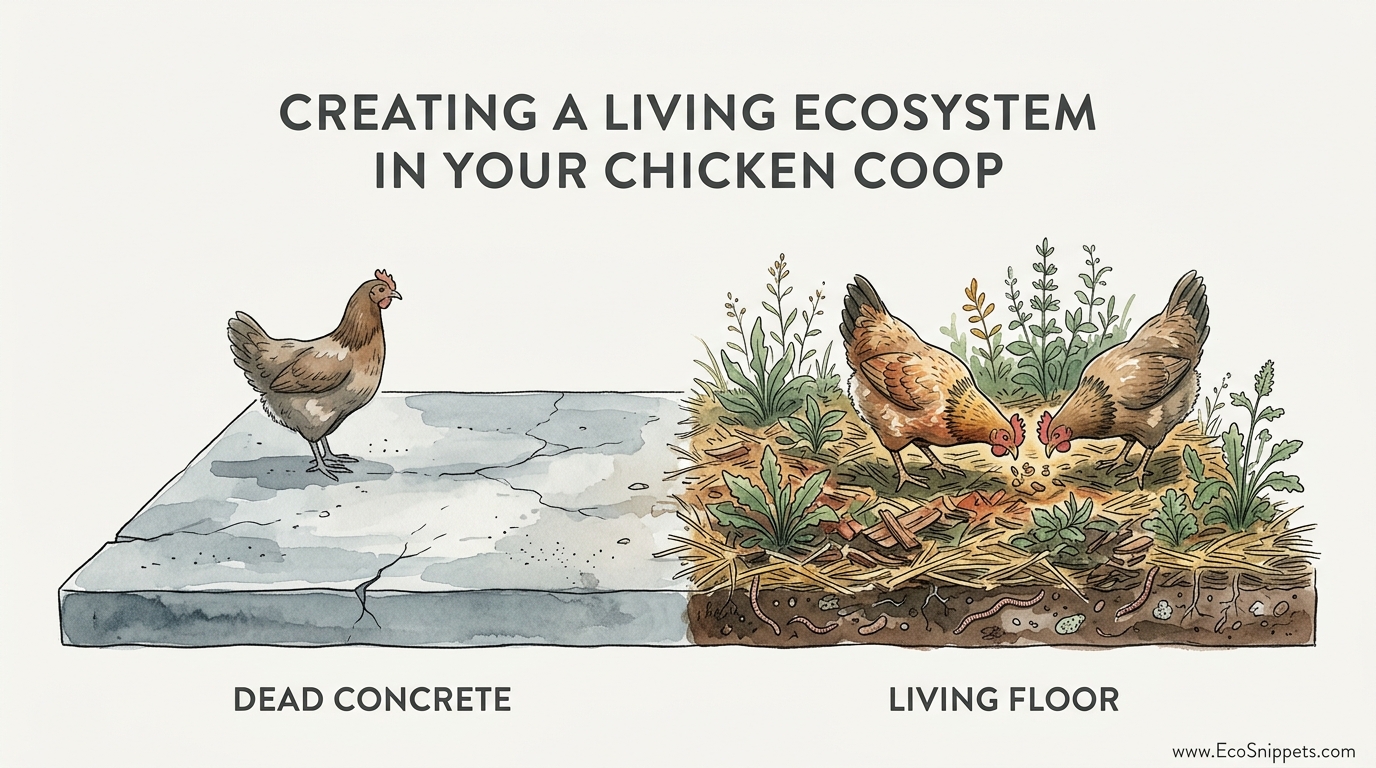
A ‘clean’ coop is actually a biological desert that’s stressing your birds and wasting your time. I used to spend every Saturday scrubbing concrete and smelling ammonia. Now, I let biology do the work. A living deep-litter floor composts the waste in place, provides free snacks for the birds, and creates the best fertilizer on earth while I sleep.
For many years, the standard advice for keeping backyard chickens focused on sterile environments. We were told to scrape floors, use harsh disinfectants, and fear every dropping. This approach turns your coop into a high-maintenance infirmary rather than a productive part of your homestead. True self-reliance means working with the natural systems of decay and renewal that have kept birds healthy in the wild for millennia.
The transition from a dead concrete floor to a living floor is more than a change in bedding. It is a fundamental shift in how you view the ecology of your farm. Instead of fighting against the nitrogen produced by your flock, you provide the carbon necessary to transform that waste into gold.
Creating A Living Ecosystem In Your Chicken Coop
A living ecosystem in a chicken coop is a managed biological system where organic bedding and poultry manure are broken down by a “micro-herd” of beneficial bacteria, fungi, and insects. This is not a lazy shortcut or a way to avoid cleaning. It is an intentional composting system that happens right under the feet of your birds.
In the natural world, the forest floor is never scrubbed. It is a deep, spongy layer of leaves, twigs, and organic matter that processes animal waste immediately. A living floor mimics this process. When you provide a thick layer of carbon-rich material—usually 6 to 12 inches deep—you create a habitat for billions of microorganisms. These microbes consume the nitrogen-rich manure and convert it into stable humus.
This system exists in real-world agricultural settings under names like the “Deep Litter Method” or “Built-up Litter.” It has been used by successful farmers for generations to maintain flock health without the need for synthetic chemicals. In a living floor, the “waste” becomes the fuel for a biological engine that regulates temperature, suppresses pathogens, and generates nutrients.
Visualize your coop floor as a slow-cooking compost pile. On the surface, it remains dry and friable. Just a few inches down, a hidden world of *Actinomycetes* and *Lactobacillus* is hard at work. This micro-herd acts as a biological shield, outcompeting harmful bacteria like *E. coli* and *Salmonella*, keeping your birds safe through the power of competitive exclusion.
The Mechanics of Composting in Place
The success of a living floor depends on the balance between carbon and nitrogen. Chicken manure is extremely high in nitrogen. If left on a bare floor, it off-gasses ammonia, which is toxic to a chicken’s sensitive respiratory system. To prevent this, you must provide an overwhelming amount of carbon.
Carbon-to-nitrogen (C:N) ratios are the secret to a smell-free coop. While a standard compost pile thrives at a 30:1 ratio, a living floor often performs better with a much higher carbon load—sometimes 50:1 or more. This ensures that every bit of nitrogen is quickly bound and processed by the microbes.
Oxygen is the second critical component. Without air, the floor becomes anaerobic, leading to putrefaction and foul smells. Your chickens are the primary aerators. Their natural instinct to scratch and peck for hidden grains keeps the top layers moving and oxygenated. If the chickens aren’t turning it enough, a quick toss with a pitchfork once a week is usually all that is required.
Moisture management completes the trifecta. A living floor should feel like a wrung-out sponge—slightly damp but never soggy. If the floor is too dry, decomposition stops. If it is too wet, it becomes a matted, smelly mess. Achieving this balance often requires nothing more than proper ventilation and ensuring waterers are positioned to prevent leaks into the bedding.
How to Establish Your Living Floor
Setting up a living floor requires a foundational commitment to depth. You cannot achieve biological stability with two inches of shavings. You need mass to provide insulation and a stable environment for the microbes.
- Start with a clean base: Clear out any old, matted bedding. If you have a dirt floor, you are in a great position for drainage. If you have wood or concrete, ensure it is dry before you begin.
- Apply the first carbon layer: Pour in at least 6 inches of high-carbon material. Pine shavings, hemp hurd, or dried autumn leaves are excellent choices. Avoid cedar, as its aromatic oils can irritate chicken lungs.
- Introduce the micro-herd: You can speed up the process by “seeding” the floor. Toss in a few shovelfuls of healthy garden soil or finished compost. This introduces the bacteria and fungi needed to start the breakdown.
- Add the chickens: Let your birds start contributing nitrogen. As they roost at night, they will deposit manure; as they scratch during the day, they will mix it into the carbon.
- Monitor and top-off: Every few weeks, or whenever you notice the surface looks soiled, add another 2 inches of fresh carbon. Over the course of a year, the floor will naturally rise in height.
Avoid using hay as your primary bedding. Hay is relatively high in nitrogen and tends to mat down, trapping moisture and encouraging mold growth. Stick to “brown” materials that are dry, fluffy, and high in cellulose.
The Practical Benefits of a Living Floor
The most immediate benefit is the dramatic reduction in labor. Instead of a weekly deep-clean, you spend a few minutes every month adding a fresh layer of carbon. Most homesteaders only perform a full clean-out once or twice a year.
Animal health is where the living floor truly shines. As the litter decomposes, it produces Vitamin B12 and Vitamin K. Chickens pecking at the floor ingest these nutrients, along with beneficial probiotics that strengthen their gut microbiome. This natural exposure to the world’s pharmacy creates a more resilient bird.
In the winter, a living floor acts as a giant thermal mass. The biological activity in the lower layers generates a gentle, consistent heat. In coops with 12 inches of active bedding, the floor temperature can be 10 to 15 degrees warmer than the outside air, providing a “living heater” for your flock without the fire risk of heat lamps.
Finally, the output is pure garden gold. The material you scoop out after a year is not “manure”—it is nearly finished compost. It is rich in stabilized nitrogen, phosphorus, and potassium, ready to feed your fruit trees or garden beds after a short curing period.
Common Pitfalls and Smelly Mistakes
The smell of ammonia is the first sign of a management failure. If you can smell the coop before you see it, the C:N ratio is out of balance. This usually happens when there is too much manure and not enough carbon. The solution is simple: add more dry bedding immediately.
Wet spots are the second most common issue. These often occur under waterers or near leaky windows. A wet patch of bedding will quickly go anaerobic and breed pathogens like coccidia. You must remove any saturated bedding and replace it with dry material to keep the system healthy.
Overcrowding can overwhelm the biology of the floor. If you have too many birds in a small space, the nitrogen load will be too high for the microbes to process. Ensure you have at least 4 square feet of floor space per bird to allow the living floor to function effectively.
Ignoring ventilation is a fatal error. Even a perfectly managed living floor produces moisture as a byproduct of decomposition. If that moisture cannot escape through high-level vents, it will condense on the ceiling and drip back onto the floor, leading to a swampy environment and respiratory distress for the birds.
Limitations: When This May Not Be Ideal
A living floor is not a universal solution for every poultry setup. It requires a specific physical environment to work safely and effectively.
- Small, raised coops: If your coop is a small “tractor” or a pre-fab unit with a shallow tray, you simply don’t have the depth required for a living ecosystem. These coops are designed for frequent cleaning, not biological processing.
- Poor drainage: If your coop is in a low-lying area where water pools on the floor, the system will fail. The litter will become waterlogged, and you will end up with a mud pit rather than a composting floor.
- Pre-existing disease: If your flock is currently battling a contagious respiratory illness or a severe parasitic load, do not start a living floor. You must first clear the infection and sanitize the environment before establishing a biological system.
In these cases, a “thin-litter” system with frequent replacements is safer. A living floor is a tool for healthy flocks in well-designed structures.
Comparison: Living Floor vs. Sterile Concrete
Understanding the differences between these two management styles helps you choose the right path for your homestead.
| Feature | Sterile Concrete Floor | Living Deep-Litter Floor |
|---|---|---|
| Cleaning Frequency | Daily or Weekly | 1-2 times per year |
| Odor Control | Relies on chemicals/removal | Relies on biological binding |
| Winter Insulation | None (Cold sink) | High (Generates heat) |
| Initial Cost | Low | Moderate (Buy bulk bedding) |
| Fertilizer Value | Raw manure (Burns plants) | Stabilized compost |
| Bird Health | Relies on external hygiene | Builds internal immunity |
Practical Tips for Success
Experience is the best teacher, but these best practices will shorten your learning curve.
Use the “Sniff Test” daily. When you enter the coop, take a deep breath. You should smell wood shavings, dry leaves, or a faint earthy scent like a forest floor. If you smell even a hint of sharp ammonia, it is time to act.
Incorporate biochar. Adding a layer of biochar (crushed charcoal) to the floor is a master move. Biochar has an incredible surface area that hosts even more microbes and acts as a “magnet” for nitrogen, preventing smell and locking nutrients into the eventual fertilizer.
Source local carbon. You don’t have to buy every bag of shavings. Dried autumn leaves are one of the best carbon sources available and they are free. Many municipalities will even deliver shredded wood chips for free if you ask.
Avoid Diatomaceous Earth (DE) in the litter. While DE is often used for mite control, it is a broad-spectrum killer of small life. It will dry out and kill the beneficial microbes and predatory mites that keep your living floor healthy. Use it only on the birds or in dust baths, not in the floor ecosystem.
Advanced Considerations for the Serious Practitioner
For those who want to take their coop biology to the highest level, consider the use of Indigenous Microorganisms (IMO) or Effective Microorganisms (EM-1). These are concentrated liquid cultures of beneficial bacteria and yeasts. Spraying a diluted solution of EM-1 onto your bedding once a month can supercharge the decomposition process and virtually eliminate odors.
Consider the “Seed and Leave” technique during your annual clean-out. Never scrape the floor down to the bare wood or dirt. Leave the bottom one or two inches of the old, finished compost. This “mother” culture contains the established micro-herd and will immediately inoculate the fresh carbon you put on top, preventing any “new coop” smell or biological lag time.
Observe the fungal growth. If you see white, thread-like structures (mycelium) in the lower layers of your litter, celebrate. This is a sign of a high-functioning ecosystem. These fungi are experts at breaking down tough cellulose and outcompeting pathogenic molds.
Example Scenario: A Year on the Living Floor
Let’s look at how this plays out in a standard 8×8 coop with 15 birds.
Spring: You perform your annual clean-out, leaving 2 inches of old litter. You haul the rest to the garden. You add 8 inches of fresh pine shavings and a few bags of biochar. The birds spend more time outside, so the nitrogen load is light.
Summer: The floor stays dry. You add a thin layer of grass clippings (dried first) and some old garden weeds. The chickens spend their days scratching, keeping the floor fluffy. You notice the coop smells like a woodshop.
Autumn: You rake up ten bags of oak leaves and dump them in. The floor level rises to 10 inches. The birds are spending more time inside as days shorten. The increased nitrogen from more indoor time triggers faster decomposition.
Winter: Outside it’s 15 degrees, but inside the coop, the floor is a cozy 40 degrees. You toss a handful of scratch grain onto the litter every morning to encourage the birds to turn the bedding. You haven’t cleaned the floor in nine months, yet the air is fresh.
Final Thoughts
The living deep-litter floor is a return to a more ancestral way of animal husbandry. It moves us away from the “war on germs” and into a partnership with biology. By providing the right environment, you turn a chore into a system that serves both you and your birds.
This approach requires more observation and less scrubbing. It demands that you trust the invisible work of microbes and the natural instincts of your flock. The rewards are a healthier flock, a more resilient homestead, and a garden that thrives on the recycled energy of your birds.
Start small if you must, but start. Once you experience the ease and the health of a living floor, you will never go back to the sterile, ammonia-scented desert of a “clean” coop again. Experiment with your local carbon sources and let biology do the heavy lifting.
