How To Become More Self-Sufficient Without Starting a Full-Blown Farm…
Want to start preserving your harvest, making your own soap, or building a backyard root cellar — but not sure where to begin? “Homesteading Advice” gives you instant lifetime access to 35+ practical homesteading books on food preservation, veggie gardening, DIY natural cleaning products (save over $250 per year with this skill alone), brewing, off-grid energy, and a whole lot more…
Click Here To Check It Out Now!
Stop hauling manure every week and start letting it heat your coop for free. Most backyard farmers waste hours hauling away ‘trash’ that could actually be heating their coop and feeding their soil. The Deep Litter Method turns a messy chore into a self-sustaining ecosystem. Here is why your chickens want you to stop cleaning.
Working against nature is a tired man’s game. For generations, the standard advice for keeping a clean coop has been a cycle of constant scooping, scrubbing, and hauling. We have been taught that a sterile floor is a healthy floor, but the old-timers knew better. They understood that when you work with the natural cycle of decomposition, you don’t just save your back; you build a living foundation that protects your flock and enriches your land.
The Deep Litter Method is more than just a “lazy” way to manage a coop. It is a biological engine. By allowing organic material and manure to accumulate in a controlled, aerobic environment, you are essentially building a compost pile right under your chickens’ feet. This is self-reliance in its purest form—turning waste into warmth and fertility without spending a dime on external heaters or expensive chemicals.
Deep Litter Method For Chicken Coops
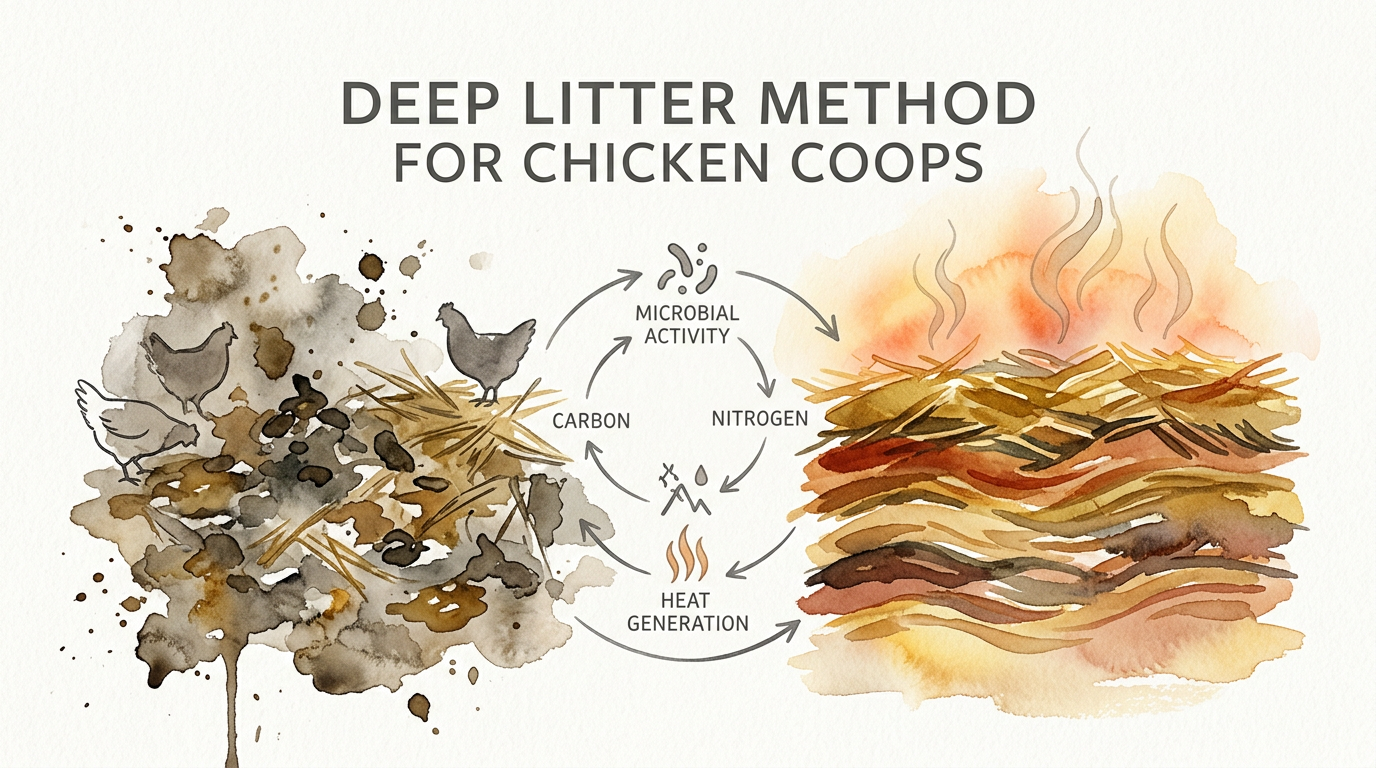
At its core, the Deep Litter Method is a system of managed composting that takes place inside the chicken coop. Instead of removing manure as it falls, you provide a deep base of carbon-rich bedding that absorbs nitrogen and facilitates a slow, “cold” composting process. This method has been a staple of traditional farming for centuries, utilized long before the arrival of modern bagged fertilizers and electric brooder heaters.
Think of the coop floor as a miniature forest floor. In the wild, organic matter falls, breaks down, and is constantly turned by the scratching of birds and the movement of soil life. In a deep litter system, your chickens are the primary laborers. Their natural instinct to scratch for bugs or grain keeps the bedding aerated, preventing the anaerobic conditions that lead to rot and stench. When balanced correctly, the litter doesn’t smell like a sewer; it smells like rich, damp earth.
This system exists because nature does not recognize “waste.” In a closed-loop homestead, chicken manure is a high-nitrogen resource that, when paired with high-carbon bedding like wood shavings or dried leaves, becomes a powerhouse of microbial activity. These beneficial microbes don’t just break down the waste; they actually compete with and suppress harmful pathogens, creating a more robust immune environment for your birds.
How to Start and Manage Your Living Floor
Starting a deep litter system requires a shift in mindset. You are no longer a janitor; you are a microbiologist with a pitchfork. The process begins with a clean, dry floor. While a dirt floor is ideal because it allows soil microbes and earthworms to migrate into the litter, you can successfully run this method on wood or concrete if you manage your moisture levels carefully.
Step 1: The Foundation
Lay down a thick base of carbon-rich material. You want at least 4 to 6 inches to start. Pine shavings are the gold standard here because they are highly absorbent and have a high surface area for microbes to colonize. You can also use hemp bedding, dried fall leaves, or chopped straw. Avoid using long-strand hay or straw alone, as these tend to mat together and “cap” the surface, which blocks oxygen and stops the composting process.
Step 2: Nitrogen Loading
As your chickens roost and go about their day, they will contribute nitrogen in the form of manure. At first, it might seem like you are just letting the coop get dirty. This is where the management comes in. Every time the surface begins to look soiled or damp, add a fresh “cap” of bedding—usually about an inch or two. This keeps the chickens on a clean surface while the older material underneath begins its transformation.
Step 3: Aeration and Turning
Oxygen is the lifeblood of this system. If the litter becomes compacted, it will go anaerobic, and you will start to smell ammonia. To prevent this, you must ensure the litter is turned. You can do this manually with a pitchfork once or twice a week, but the most efficient way is to let the chickens do it. Scatter a handful of scratch grains or whole corn into the litter. The birds will dig deep to find the treats, effectively fluffing the bed for you.
Step 4: Monitoring Moisture
The litter should be about as damp as a wrung-out sponge. If it is too dry, the microbes cannot work, and the decomposition stops. If it is too wet, it becomes a muddy, smelly mess. Most coops stay at the right moisture level just from the manure and ambient humidity, but if you notice it getting dusty, a very light misting of water can actually help “jumpstart” the biological activity.
The Benefits of Bio-Thermal Gold
The primary advantage of the Deep Litter Method is the Bio-Thermal Heat it generates. During the winter, a well-functioning deep litter bed can reach internal temperatures significantly higher than the outside air. While it won’t make the coop feel like a sauna, that gentle, rising warmth can take the “edge” off a sub-zero night, protecting combs from frostbite and keeping the birds comfortable without the fire hazard of a heat lamp.
Beyond warmth, this method provides a Microbial Shield. A mature deep litter bed is teeming with beneficial bacteria and fungi. These organisms outcompete many common poultry pathogens, including those that cause coccidiosis. Research has shown that chickens raised on “old” litter often have stronger immune systems because they are exposed to low, manageable levels of environmental microbes that “train” their bodies to fight off infection.
Then there is the Garden Gold. After six months to a year, the bottom layer of your coop floor will have turned into a dark, crumbly, nearly finished compost. This material is incredibly rich in nitrogen, phosphorus, and potassium. Instead of hauling “trash” to the dump, you are harvesting the highest quality fertilizer your garden has ever seen. It is the ultimate reward for your patience and stewardship.
Common Pitfalls and How to Avoid Them
The most frequent mistake beginners make is treating the deep litter method as neglect. It is not a “set it and forget it” system. If you stop adding carbon (bedding) or stop ensuring aeration, the system will fail. The moment you smell ammonia, you have a problem. Ammonia is a sign that the nitrogen-to-carbon ratio is off or that there isn’t enough oxygen. Your immediate fix is to add more dry bedding and turn the pile thoroughly.
Another common error is Inadequate Ventilation. Because a composting floor releases moisture and small amounts of gases, you must have excellent airflow at the top of the coop. Some farmers make the mistake of sealing their coops tight in the winter to “save the heat.” This traps humidity and ammonia, which will cause respiratory issues for your birds far faster than the cold ever will. Always keep your eaves open; the rising heat from the litter will help push the stale, moist air out the top.
Watch out for Leaking Waterers. A spill in a deep litter system can create a “wet spot” that goes foul very quickly. It is best to keep waterers on a raised platform or, better yet, outside in the run. If a spill does happen, you must shovel out that specific wet section and replace it with fresh, dry material immediately. Excess moisture is the enemy of a healthy bio-thermal floor.
Limitations and Environmental Constraints
While the Deep Litter Method is a marvel of ancestral wisdom, it is not a universal solution for every backyard setup. Small coops often struggle with the depth required. To get the “thermos” effect and proper composting, you really need a litter depth of at least 8 to 12 inches. If your coop door is low to the ground or the floor space is very cramped, you might not have the volume necessary to sustain the biological activity.
Climate also plays a role. In extremely humid or tropical environments, the litter may struggle to dry out enough to remain aerobic. Conversely, in very arid climates, the litter might stay too dry to actually compost, leaving you with just a deep pile of dry manure and shavings. While it still saves labor, you won’t get the same bio-thermal benefits or microbial protection without that sweet spot of moisture.
Finally, if you have a disease outbreak in your flock, the deep litter method must be suspended. Pathogens like Marek’s or severe mite infestations can hide in the deep layers of organic matter. In these cases, the only responsible course of action is to strip the coop to the bare floor, disinfect everything, and start fresh once the health crisis has passed.
MESSY WASTE vs BIO-THERMAL GOLD
To understand the value of this method, it helps to compare the traditional “Scoop and Scrub” approach with the Deep Litter system. One treats manure as a nuisance to be eliminated, while the other treats it as a fuel to be managed.
| Feature | Traditional Cleaning (Messy Waste) | Deep Litter (Bio-Thermal Gold) |
|---|---|---|
| Labor Required | High (Weekly or daily scooping) | Low (Adding layers & light turning) |
| Bedding Cost | Medium (Frequent total replacement) | Low (Adding small amounts over time) |
| Winter Heat | None (Requires external heaters) | Self-Generated (Biological warmth) |
| End Product | Raw waste (Needs separate composting) | Rich humus (Garden-ready) |
| Odor Management | Requires constant cleaning to prevent | Natural microbial suppression |
Practical Tips for Success
If you are ready to transition your coop, start in the Late Summer or Early Fall. This gives the microbial population time to establish themselves before the cold weather hits. A “mature” bed of litter is much more effective at generating heat and resisting pathogens than a brand-new one started in the dead of winter.
- Use the “Dust Test”: If you kick the litter and a cloud of fine dust rises, it is too dry. Add a little moisture. If it clumps into a ball like mud, it is too wet. Add more dry shavings.
- The Seed Inoculant: If you have a friend with a healthy deep litter system, ask for a bucket of their “old” stuff. Adding this to your new coop floor is like adding a starter to sourdough; it jumpstarts the microbial life.
- Don’t Overcrowd: The system only works if the amount of carbon can handle the nitrogen. A standard rule is 4 square feet of floor space per bird. If you pack too many chickens in, they will overwhelm the litter’s ability to process waste.
- Leave a Little Behind: When you finally do your big annual clean-out, never scrape the floor completely bare. Leave an inch or two of the old, dark compost to serve as a “seed” for the next year’s cycle.
Advanced Considerations for the Serious Practitioner
For those looking to optimize their system, consider the C:N (Carbon to Nitrogen) Ratio. Chicken manure is extremely high in nitrogen (around 7:1). Most wood shavings have a ratio of about 500:1. Your goal is to keep the overall environment around 30:1 for active composting. As a practitioner, you learn to “read” the litter. If it’s breaking down too fast and smelling, your C:N is too low—add more carbon. If nothing is happening and the manure is just sitting there, your C:N is too high—add a little more nitrogen-heavy material or slightly increase moisture.
You can also experiment with Multi-Species Litter. If you keep ducks or geese, their “wet” waste can be a challenge. However, if managed in a large enough space, the extra moisture from waterfowl can actually accelerate the composting of the dry chicken litter. This requires a much larger volume of bedding—often wood chips rather than shavings—to handle the increased water load without going anaerobic.
Advanced homesteaders often use Diatomaceous Earth (DE) sparingly. While some suggest it for pest control, be aware that DE is non-discriminatory; it can kill the beneficial predatory mites and soil life that help keep the litter ecosystem healthy. Use it only on the roosts or in dust baths, rather than mixing it into the floor litter where your “micro-livestock” are working.
Real-World Scenario: The Winter Shift
Consider a homestead in the North with a 10×10 coop and 15 hens. In October, the farmer lays down 8 inches of pine shavings. Every week, they toss a handful of cracked corn into the corners. The hens spend their mornings digging, mixing their manure into the shavings. By December, the litter has compacted to about 6 inches, so the farmer adds another 3 inches of dried oak leaves gathered from the yard.
Outside, the temperature drops to 10°F. Inside the coop, the chickens are roosting comfortably. If the farmer sticks a thermometer 4 inches into the litter, it reads 55°F. This “floor heater” is keeping the ambient coop temperature just above freezing, preventing the waterer from icing over as quickly and keeping the birds’ metabolic energy focused on egg production rather than just staying alive. By April, the farmer scoops out the bottom 6 inches—now a dark, earthy-smelling “gold”—and hauls it directly to the pumpkin patch. The cycle is complete.
Final Thoughts
The Deep Litter Method is a testament to the idea that the best solutions are often the oldest ones. It requires us to step back and trust the biological processes that have governed the earth for millennia. By shifting our role from a cleaner to a manager of an ecosystem, we gain more than just a warm coop; we gain a deeper connection to the cycles of our land.
Efficiency on the homestead isn’t about the newest gadget; it’s about making every movement count. When your chickens are healthy, your garden is fed, and your winter chores are halved, you have achieved a level of self-reliance that no store-bought solution can match. Start your floor today, let it mellow, and watch as your “waste” transforms into the most valuable asset on your farm.
Don’t be afraid to experiment with the materials you have on hand. Whether it’s wood chips from a local arborist or the leaves from your own backyard, the principles remain the same. Observe your birds, follow your nose, and let the microbes do the heavy lifting. Your chickens—and your garden—will thank you.
