How To Become More Self-Sufficient Without Starting a Full-Blown Farm…
Want to start preserving your harvest, making your own soap, or building a backyard root cellar — but not sure where to begin? “Homesteading Advice” gives you instant lifetime access to 35+ practical homesteading books on food preservation, veggie gardening, DIY natural cleaning products (save over $250 per year with this skill alone), brewing, off-grid energy, and a whole lot more…
Click Here To Check It Out Now!
Stop wrapping your home in plastic; let your wood breathe with a finish that actually gets better with age. Most modern paints are essentially liquid plastic. When moisture gets behind them, they bubble and peel, destroying the wood. Milk paint is an ancient formula made from lime and milk protein that bonds to the wood fibers. It’s non-toxic, breathable, and will never peel—it only patinas into a beautiful heirloom finish that lasts centuries.
Wood is a living material, even after it has been hewn into a timber frame or a kitchen table. It expands and contracts with the seasons, inhaling and exhaling the humidity of its environment. When you smother it with modern acrylics, you are essentially sealing it in a tomb of petroleum-based film. Milk paint offers a different path, one used by our ancestors for millennia to protect their most valued possessions with nothing more than the contents of a barn and a lime pit.
DIY Eco-friendly Milk Paint Recipe
Crafting your own paint from scratch is a foundational skill for the self-reliant homestead. This recipe relies on the interaction between casein—the primary protein in milk—and hydrated lime. Together, they create a stone-like bond that becomes part of the wood itself rather than just sitting on top of it. This finish has been found on artifacts in King Tut’s tomb and on the walls of 20,000-year-old caves, proving its unmatched longevity.
To begin, you will need simple, raw ingredients that are often already in your pantry or available at a local builders’ yard. This recipe creates a base that can be tinted with any earth pigment to match the character of your home.
The Ingredients List
- 1 Gallon of Skim Milk: Use fresh milk, never powdered. It must be fat-free, as fat will cause the paint to go rancid and prevent proper adhesion.
- 2 Cups of White Vinegar: This acts as the catalyst to separate the curds (casein) from the whey. Lemon juice can be used as a substitute.
- 112 Grams (Approx. 3/4 Cup) of Hydrated Lime: Ensure this is Type S hydrated lime (calcium hydroxide), commonly used in masonry. Wear gloves and a mask when handling the dry powder.
- 200 Grams of Earth Pigment: Choose natural oxides or ochres for a finish that will never fade under the sun’s UV rays.
- Clean Water: You will need this for rinsing the curds and slaking the lime.
Preparation of the Casein Base
The first stage of the process involves extracting the protein from the liquid milk. Pour your gallon of skim milk into a large, non-reactive container and allow it to reach room temperature. Cold milk will not curdle as effectively. Once warmed, slowly stir in the vinegar. You will see the milk begin to separate immediately into thick white clumps and a yellowish liquid.
Let this mixture sit undisturbed for several hours, or even overnight. This gives the acid time to fully precipitate the casein proteins. After the separation is complete, line a large colander with several layers of cheesecloth. Pour the mixture through, allowing the whey to drain away. What remains in the cloth is “quark”—the raw material for your binder. Rinse the quark thoroughly with cool water to remove any residual vinegar, then gently squeeze the cloth to remove excess moisture.
How It Works: The Chemistry of the Bond
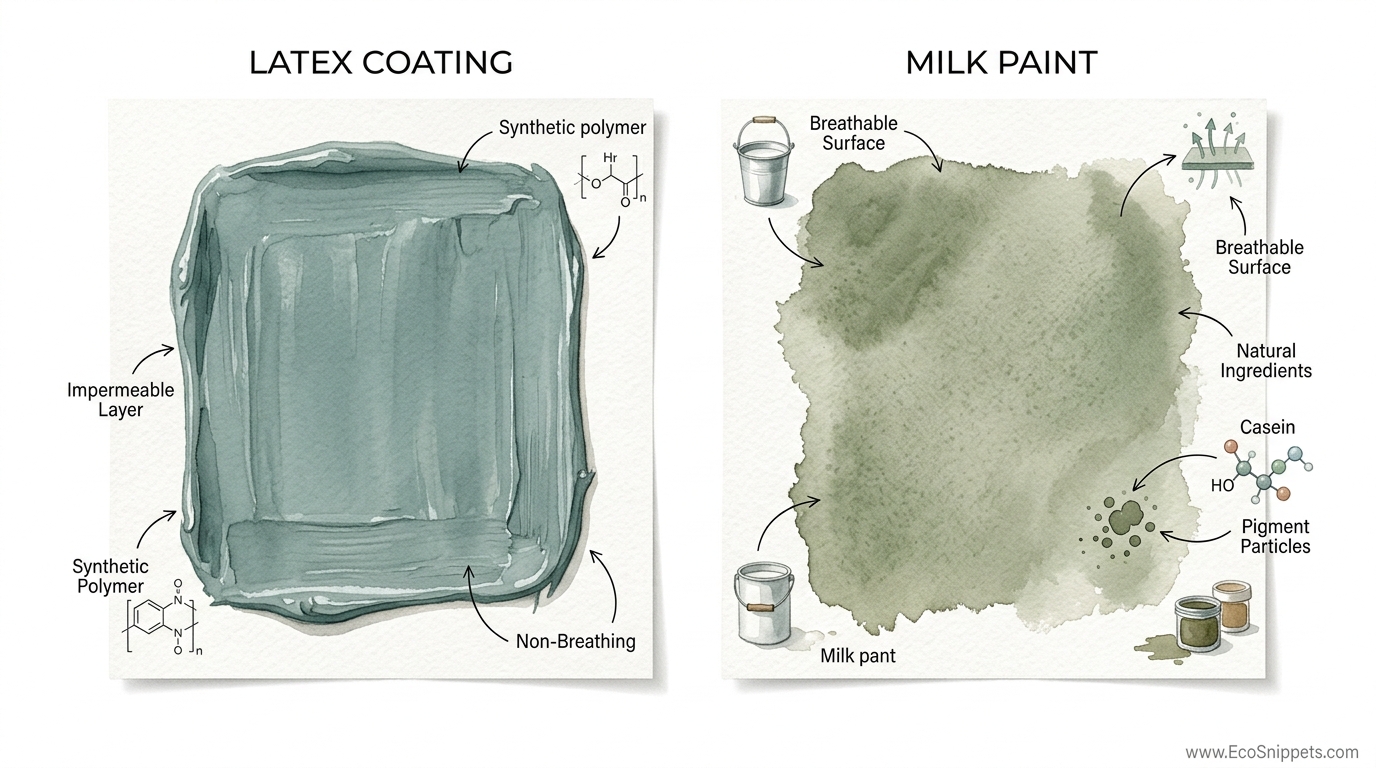
Milk paint does not dry in the same way modern latex paint does. While latex relies on the evaporation of water to leave behind a plastic film, milk paint undergoes a chemical transformation. When the moist casein curds are mixed with the alkaline hydrated lime, a reaction occurs that produces calcium caseinate. This substance is a powerful natural adhesive, historically used as a wood glue in its own right.
This liquid stone penetrates deep into the cellular structure of the wood. As it cures, it undergoes carbonation, absorbing carbon dioxide from the air and returning to a state similar to the limestone it originated from. This is why milk paint does not peel. For the paint to come off, the wood fibers themselves would have to fail. It is a molecular marriage between the finish and the substrate.
Furthermore, the structure of milk paint is microporous. This means it allows water vapor to pass through while still providing a durable, protective shell. If a timber gets wet, the moisture can escape through the paint instead of becoming trapped and causing rot. This breathability is the secret to why 200-year-old barns in New England still stand with their original milk-painted siding intact.
Benefits of Choosing a Traditional Finish
The advantages of returning to this ancestral method go far beyond aesthetics. In a world increasingly saturated with synthetic chemicals, milk paint represents a return to honest, safe materials. It contains zero Volatile Organic Compounds (VOCs), meaning you can paint a nursery or a kitchen without worrying about off-gassing or toxic fumes.
Unrivaled Durability and Patina
Unlike modern coatings that look their best the day they are applied and degrade thereafter, milk paint improves with age. It wears away gracefully at high-touch points, revealing the layers beneath and developing a soft, burnished glow. It does not crack or flake in the sun because it is chemically stable and UV-resistant. If you use earth pigments like red iron oxide or yellow ochre, the color will remain vibrant for generations.
Environmental Stewardship
Since every ingredient in a traditional milk paint recipe is naturally occurring, the process is entirely biodegradable. Any leftover paint can be safely composted or washed down the drain without introducing microplastics into the water table. The carbon footprint of a bag of lime and a gallon of milk is negligible compared to the complex industrial processing required for petroleum-based paints.
Challenges and Common Mistakes
Working with a living finish requires a different mindset than using a store-bought can of paint. The most common pitfall for beginners is failing to account for the short shelf life of the liquid mixture. Because this is a food-based product, it will begin to spoil within 24 to 48 hours once mixed. Only prepare what you can use in a single day’s labor.
Mixing Consistency
Getting the right ratio of lime to casein can be tricky. If you add too much lime, the paint will become brittle and may “chalk” off when touched. If you add too little, the binder will not be strong enough to hold the pigment to the wood. Always weigh your ingredients rather than relying on volume measurements for consistent results. A digital scale is a modern tool that serves this ancient craft well.
Lumps and Grittiness
Nothing ruins a finish faster than unmixed clumps of lime or pigment. The lime should be “slaked”—mixed with a small amount of water to form a smooth paste—before being added to the curds. Similarly, powdered pigments should be mixed with water into a slurry first. If your final mixture still has lumps, do not hesitate to strain it through a fine mesh or a pair of nylon stockings.
Limitations: When to Look Elsewhere
While milk paint is a superior choice for many applications, it is not a universal solution. Its greatest strength—its ability to bond with porous surfaces—is also its primary limitation. It will not adhere well to non-porous materials like metal, glass, or previously varnished wood without significant preparation or the addition of a modern bonding agent.
Surface Compatibility
If you are trying to paint over a piece of furniture that has been sealed with polyurethane or a thick layer of oil-based paint, the milk paint may “crackle” or peel off in large flakes. This is often desired for a “shabby chic” look, but if you want an even, permanent finish, you must sand the piece down to the raw grain. Milk paint needs the wood’s pores to be open and hungry for the binder.
Water Sensitivity During Curing
It takes approximately 30 days for milk paint to fully cure and achieve its maximum hardness. During this time, the finish is sensitive to water spotting. If you are painting a kitchen cabinet or a high-traffic table, you must protect the surface with an oil or wax topcoat to prevent moisture from staining the fresh paint before it has had time to petrify.
Milk Paint vs. Latex Coating
Understanding the fundamental differences between these two mediums will help you choose the right tool for your project. The following table highlights the measurable factors that distinguish a traditional milk paint from a modern latex alternative.
| Feature | Milk Paint | Latex Coating |
|---|---|---|
| Binder | Natural Casein (Milk Protein) | Synthetic Acrylic or Vinyl Resins |
| Adhesion | Molecular bond into fibers | Surface film (clings to surface) |
| Breathability | High (Microporous) | Low (Plastic barrier) |
| Toxicity | Non-toxic, Zero VOCs | Varying VOCs and chemicals |
| Aging | Develops patina, wears gracefully | Brittle over time, bubbles/peels |
Practical Tips and Best Practices
Success with milk paint comes from a combination of proper preparation and a bit of pioneer-grit patience. Before you even touch a brush to the wood, ensure the surface is clean. Use a simple solution of vinegar and water to remove any oils or dust. If the wood is particularly dense or smooth, a light scuffing with 120-grit sandpaper will open up the pores and improve the mechanical bond.
Application Techniques
Apply the paint in thin, even coats. Because it is water-based, it will soak into the wood quickly. Do not try to achieve full opacity in the first pass. The first coat often looks streaky and thin—this is normal. It acts as a primer, saturating the wood fibers. The second and third coats will build the rich, velvety color that milk paint is known for.
The Importance of a Topcoat
In its raw state, milk paint has a dead-matte, chalky finish. While beautiful, it is also absorbent. For surfaces that will be handled frequently, you should seal the paint. A traditional choice is Boiled Linseed Oil or a blend of beeswax and orange oil. These topcoats will deepen the color significantly, turning a dusty red into a rich, oxblood hue, while providing the necessary protection against spills and fingerprints.
Advanced Considerations for the Serious Practitioner
Once you have mastered the basic recipe, you can begin to experiment with additives that change the performance of the paint. For outdoor use, such as on a garden gate or a shed, adding a small amount of linseed oil directly into the wet paint (about 10% by volume) will increase its flexibility and water resistance. This “oil-emulsion” milk paint was a common sight on the American frontier.
Using Borax as a Preservative
If you find that your paint is curdling too aggressively or you need it to last a few days longer, you can substitute a portion of the lime with borax. Dissolving borax in hot water and adding it to the casein creates a more stable, slightly more transparent binder. Borax also acts as a natural fungicide and insecticide, making it an excellent choice for a first “preservative” layer on raw timber before the final pigmented coats are applied.
Artistic Layering and Distressing
Milk paint is the ideal medium for creating “authentic” aged finishes. By applying one color (perhaps a dark slate grey), letting it dry, and then applying a second color (a soft linen white), you can create depth. If you rub a bit of wax on the corners of the piece between coats, the top layer will not bond in those areas, allowing it to chip away naturally and reveal the “historic” color underneath.
Examples of Milk Paint in Practice
Consider the restoration of a traditional Windsor chair. This piece of furniture is designed to be lightweight and flexible, with many joints that move slightly during use. A modern hard-film paint would eventually crack at these stress points. By using a DIY milk paint, the artisan ensures that the finish moves with the wood.
A typical project might use 1 quart of mixed paint. Following our recipe, you would take about 1/4 gallon of skim milk and a half-cup of vinegar to produce the necessary curds. After mixing with 28 grams of lime and a handful of red iron oxide, you apply three thin coats over the course of an afternoon. Within an hour of the final coat, the chair is dry to the touch. After a light buffing with fine steel wool and a coat of hemp oil, the chair takes on a glow that looks as if it has been sitting in a farmhouse parlor for a century.
Final Thoughts
The transition from modern synthetic coatings to traditional milk paint is more than a change in aesthetic; it is a shift in how we relate to our environment and our belongings. By choosing a finish that is non-toxic, breathable, and enduring, you are rejecting the “disposable” culture of plastic-wrapped furniture and embracing the wisdom of the past.
Making your own paint requires effort, a willingness to get your hands dirty, and a respect for the chemistry of the natural world. However, the reward is a finish that does not just cover the wood, but honors it. Whether you are painting a heirloom cabinet or the trim of a new homestead, milk paint provides a connection to the generations of builders who came before us.
Experiment with your own local pigments and wood species. Learn how the lime reacts with the air in your specific climate. With time and practice, you will find that these ancient formulas offer a level of beauty and resilience that no modern factory can replicate. Let your wood breathe, let it age, and let it tell a story that lasts for centuries.
