How To Become More Self-Sufficient Without Starting a Full-Blown Farm…
Want to start preserving your harvest, making your own soap, or building a backyard root cellar — but not sure where to begin? “Homesteading Advice” gives you instant lifetime access to 35+ practical homesteading books on food preservation, veggie gardening, DIY natural cleaning products (save over $250 per year with this skill alone), brewing, off-grid energy, and a whole lot more…
Click Here To Check It Out Now!
The Self-Reliant Gardener’s Guide to Newspaper Seed Pots
You’re paying for plastic trash when you could be upcycling your morning news for free. Stop wasting money on flimsy plastic trays that break after one season. Newspaper pots are free, they prevent root shock because you plant the whole thing, and they decompose into the soil. Win-win-win.
Every spring, gardeners flock to big-box stores to load up on black plastic cell trays and peat pellets. Most of that plastic ends up in a landfill within two years, cracked and useless. Our ancestors didn’t have the luxury of disposable petroleum products, and they didn’t need them. They understood that the best tools are often the ones already sitting on the kitchen table. Making your own seed pots from newsprint is more than a way to save a few dollars; it is a return to a mindset of stewardship and resourcefulness.
This guide walks you through the transition from consumer-heavy gardening to a more grounded, sustainable approach. You will learn how to turn a stack of old papers into a nursery that supports healthier, stronger plants. We are going to look at the science of root health, the mechanics of paper decomposition, and the practical steps to ensure your seedlings thrive from the windowsill to the garden bed.
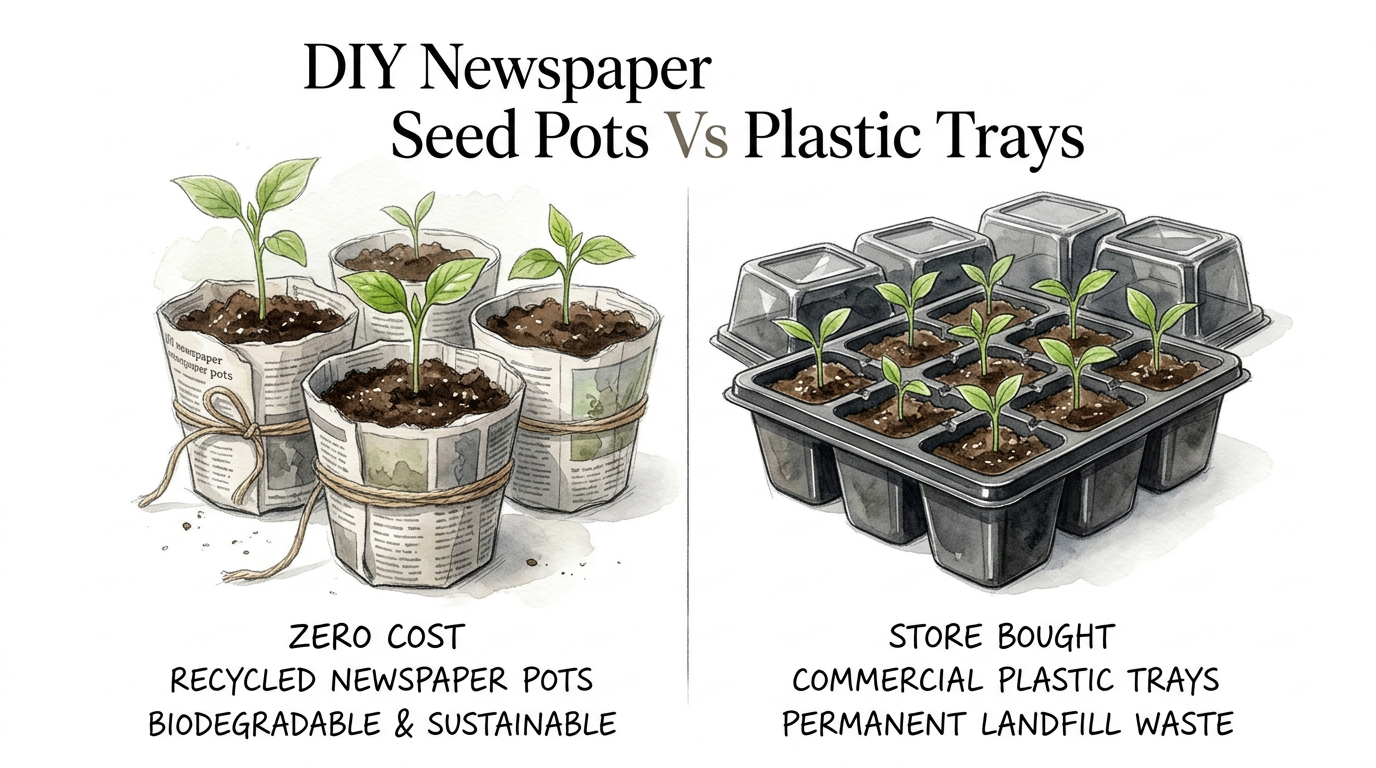
DIY Newspaper Seed Pots Vs Plastic Trays
Traditional plastic seed trays serve one primary purpose: convenience for the manufacturer. For the gardener, they often represent a cycle of waste and a risk to plant health. When you grow a seedling in a plastic cell, the roots eventually hit a hard wall. They begin to circle the container, becoming “root-bound.” This creates a structural weakness that can stunt the plant for its entire life. In contrast, a newspaper pot is a temporary vessel that becomes part of the earth itself.
DIY newspaper seed pots are exactly what they sound like—biodegradable containers fashioned from recycled newsprint. This method is used by homesteaders, organic farmers, and frugal backyard gardeners who want to minimize their environmental footprint. Because newspaper is primarily cellulose, it breaks down quickly when buried in moist soil. This allows the roots to grow straight through the walls of the pot as they expand, rather than being forced into a spiral.
Imagine the difference between a bird raised in a cage and one raised in a nest that slowly expands as the bird grows. The cage is the plastic tray. It is rigid and unforgiving. The newspaper pot is the nest. It provides shelter during the most vulnerable stage of life and then steps aside to let the plant claim its place in the world. This approach is particularly useful for plants with sensitive root systems, such as cucumbers, squash, and beans, which often fail when moved from a plastic cell to the ground.
In the real world, this technique turns a waste product—the daily paper—into a high-functioning garden tool. Most modern newspapers use soy-based inks, making them safe for the compost pile and your vegetable garden. By opting for paper over plastic, you are removing a layer of synthetic material from your food chain and keeping your hard-earned money in your pocket.
How to Construct a Functional Newspaper Pot
Constructing these pots requires no glue, no staples, and no specialized equipment. All you need is a stack of newspaper and a cylindrical object to use as a mold. A common soup can, a small glass jar, or even a dedicated wooden pot-maker tool will work perfectly. The goal is to create a sturdy, multi-layered wall that holds its shape while the seedling grows but yields once it hits the garden soil.
First, take a single sheet of newspaper and fold it in half lengthwise. This double thickness is essential for durability. If the paper is too thin, it will collapse the first time you water it. If it is too thick, it may take too long to decompose. Two layers of standard newsprint is usually the “goldilocks” zone for most vegetable starts.
Place your mold at one end of the folded strip. Ensure that about two inches of paper overhangs the bottom edge of the mold. This excess will become the base of your pot. Roll the paper around the mold, keeping it relatively tight. Once the cylinder is formed, fold the overhanging paper into the center of the mold’s base. Press it down firmly against a flat surface to “set” the bottom. Some gardeners prefer to use a small amount of water to damp the folds, which helps the paper bond to itself as it dries.
Once the bottom is secure, slide the paper off the mold. You now have a lightweight, biodegradable cup. To maximize success, fill these pots with a high-quality seed-starting mix. Avoid using heavy garden soil at this stage, as it can be too dense and may harbor pathogens. The lightness of the seed-starting mix allows for better aeration and drainage within the paper walls.
Arrange your finished pots in a flat-bottomed waterproof tray. Keeping them packed closely together helps them maintain their shape and prevents the outer walls from drying out too quickly. When it comes time to plant, you simply dig a hole and drop the entire pot in. The paper will be soft and saturated, allowing the roots to punch through with zero resistance.
The Benefits of Moving Away from Plastic
The primary advantage of newspaper pots is the elimination of transplant shock. When you pull a seedling out of a plastic tray, you inevitably tear fine root hairs. This causes the plant to stall for several days while it repairs the damage. A plant in a newspaper pot never experiences this trauma. It continues to grow as if it were never moved, leading to earlier harvests and more resilient crops.
Beyond plant health, there is the undeniable benefit of cost. Gardening can become an expensive hobby if you buy every gadget marketed to you. Newspaper is a “zero-cost” input. Even if you don’t subscribe to a paper, they are easily found in recycling bins or at local coffee shops. Redirecting this material into your garden is a hallmark of the self-reliant lifestyle.
Sustainability is another major factor. Plastic trays eventually degrade under UV light, shedding microplastics into your soil. These particles can affect soil biology and may eventually find their way into the plants themselves. Newspaper is a natural material. It feeds the earthworms and fungi as it disappears. Using paper pots aligns your gardening practices with the natural cycles of growth and decay.
Finally, there is the benefit of custom sizing. If you are starting large seeds like pumpkins, you can use a large tomato juice can as your mold. For smaller flowers, a spice jar works well. You are not limited to the standard cell sizes provided by manufacturers. This flexibility allows you to tailor your nursery to the specific needs of each variety you grow.
Challenges and Common Pitfalls to Avoid
While the process is simple, there are mistakes that can ruin your crop. The most frequent error is using the wrong type of paper. Glossy advertisements and magazine pages are not suitable for seed pots. They are often coated in clay or plastic resins that prevent water penetration and take a very long time to break down. Stick to standard, matte newsprint. If the paper feels slick or shiny, leave it out of the garden.
Water management is another area where beginners struggle. Newspaper pots act like a wick. They pull moisture away from the soil and release it into the air. This means they dry out faster than plastic containers. You must be diligent about checking moisture levels. Bottom-watering is the most effective way to keep paper pots hydrated. By pouring water into the tray rather than onto the pots, you ensure the soil stays moist while keeping the upper edges of the paper from becoming overly soggy and structuraly weak.
Mold is a potential issue in high-humidity environments. Because paper is organic matter, it can host fungal growth if there is no airflow. While most “fuzz” on the outside of a paper pot is harmless to the plant, it can be a sign that conditions are too damp. To prevent this, ensure your seedlings have adequate ventilation. A small fan moving air across the nursery area will keep the paper surfaces dry enough to discourage mold while the roots stay hydrated inside.
Another pitfall is failing to bury the pot completely during transplanting. If any part of the paper rim sticks up above the soil line, it will act as a wick, drawing moisture out of the ground and away from the plant’s roots. This can lead to the “peat pot effect” where the plant dries out and dies even if you are watering it. Always ensure the entire newspaper pot is tucked securely below the soil surface.
Limitations of the Newspaper Method
Newspaper pots are not the ideal solution for every single situation. They are temporary structures. If you are growing a plant that needs to stay in its container for several months—such as a perennial herb or a slow-growing tree seedling—a paper pot will likely fall apart before the plant is ready for the ground. For long-term nursery needs, more durable containers are necessary.
They also require more space in the initial setup. Because they are individual units rather than a single molded tray, they can be a bit more “fiddly” to move around. If you are starting thousands of seeds for a commercial operation, the time required to roll each pot manually might be prohibitive compared to using standardized trays. However, for the home gardener or small-scale homesteader, the time investment is minimal compared to the benefits.
Strength is also a limitation. You cannot pick up a wet newspaper pot by its rim. If you try, the paper will likely tear, and the soil will fall out. You must handle them from the bottom or move them while they are in a support tray. This requires a bit more care and patience than working with rigid plastic.
Comparison: Newspaper Pots vs. Other Options
To understand the value of newspaper pots, it helps to see how they stack up against the alternatives. In the table below, we compare the three most common seed-starting methods based on factors relevant to the serious practitioner.
| Feature | Newspaper Pots | Plastic Trays | Peat Pots |
|---|---|---|---|
| Initial Cost | Zero / Negligible | Moderate | High (Per Use) |
| Transplant Shock | Zero (Plant whole pot) | High (Root disturbance) | Low (Plant whole pot) |
| Durability | Low (Temporary) | High (Short term) | Medium |
| Environmental Impact | Biodegradable / Upcycled | High (Landfill / Microplastics) | Moderate (Peat mining) |
| Customization | High (Any size) | Fixed Sizes | Fixed Sizes |
As the table shows, newspaper pots excel in cost and environmental impact. While peat pots offer similar benefits regarding transplant shock, they involve the mining of peat bogs, which are critical carbon sinks. Furthermore, peat pots can sometimes be too tough for roots to penetrate if they aren’t kept perfectly moist. Newspaper provides a more reliable “melting” action once it is in the earth.
Practical Tips and Best Practices
To get the most out of your DIY pots, follow these field-tested tips. First, use a “double-fold” technique for the bottom. By folding the paper over itself several times at the base, you create a thick pad that resists rotting longer than the sides. This ensures the pot stays intact until you are ready to move it.
Batch-processing is the key to efficiency. Don’t make pots one at a time as you need them. Set aside an hour on a rainy afternoon and roll fifty or a hundred of them at once. Store them in a dry place. Having a “nursery kit” ready to go makes the busy planting season much less stressful.
When filling the pots, pack the soil firmly but not tightly. You want enough pressure to help the paper maintain its shape, but not so much that you crush the air pockets required for root respiration. A good rule of thumb is to tap the pot on the table after filling it to settle the soil, then top it off if needed.
Labeling is crucial. It is easy to forget which pot holds the ‘Cherokee Purple’ tomato and which holds the ‘San Marzano.’ Because the paper is porous, permanent markers can sometimes bleed or fade. Using small wooden craft sticks or plastic-free markers tucked into the soil is the most reliable way to keep your varieties organized.
Finally, consider the “tray mate.” Find a tray that fits your pots snugly. A heavy-duty plastic cafeteria tray or a metal baking sheet with high sides works well. When the pots are packed in, they support each other’s walls, making them much more stable during the watering process. This collective support prevents the outer pots from leaning or bulging.
Advanced Considerations for the Serious Practitioner
Once you have mastered the basic pot, you can begin to experiment with “soil blocks” versus paper pots. Some advanced practitioners use paper pots as a liner for soil blocks. This provides the air-pruning benefits of a block with the structural integrity of a container. It is a hybrid method that works exceptionally well for high-value seeds.
Consider the biology of your soil when you transplant. The decomposition of newspaper requires nitrogen. Soil microbes will “borrow” nitrogen from the surrounding soil to break down the carbon in the paper. In a healthy, organic garden, this is rarely an issue. However, if your soil is already nutrient-depleted, you might notice a slight yellowing of the plant as the paper breaks down. A quick drink of liquid seaweed or compost tea during transplanting provides the microbes with the energy they need to process the paper without starving the plant.
The thickness of the paper can also be tuned to the crop. For fast-growing greens like lettuce, a single layer of newsprint may suffice, as the plant will be in the ground within three weeks. For peppers or eggplants that spend eight to ten weeks indoors, a triple-thick wall is a better choice to ensure the pot doesn’t disintegrate on the windowsill.
Think about the “micro-climate” within the pot. The evaporation through the paper walls cools the soil. This is great for cool-weather crops like broccoli or kale, as it keeps their roots from overheating. For heat-loving plants like peppers, you might want to keep the pots closer together or in a warmer area of the house to compensate for this evaporative cooling effect.
Real-World Example: The Tomato Transition
Let’s look at a practical scenario. A gardener in Zone 6 wants to start ‘Brandywine’ tomatoes in late March. These are large, vigorous plants that hate having their roots touched. Instead of using a standard 72-cell plastic tray, the gardener uses a 15-ounce soup can to roll large newspaper pots.
By using the larger pot size, the gardener avoids the need to “pot up” (moving a plant to a larger container) before the weather warms. The tomato develops a deep, robust root system. When mid-May arrives, the gardener takes the saturated paper pot and places it directly into a hole enriched with compost. Because there was no “un-potting” involved, the tomato doesn’t wilt. It doesn’t lose a single day of growth. By the time the summer heat hits in July, that tomato plant has a root system that is deeper and wider than a comparable plant started in plastic, leading to a much higher yield of fruit.
This simple shift in methodology—choosing the right container for the plant’s biology—results in a measurable difference in the harvest. It is the difference between working against nature and working with it.
Final Thoughts
Mastering the art of the newspaper seed pot is a rite of passage for the self-reliant gardener. It marks a shift from being a consumer who buys “solutions” to a practitioner who creates them. This method respects the biology of the plant, the health of the soil, and the limits of the natural environment. It is a quiet act of rebellion against the throwaway culture that has dominated gardening for too long.
By upcycling your newsprint, you are closing a loop in your household economy. You are taking a product of the industrial world and turning it into a vessel for life. While it may take a few extra minutes to roll your own pots, the rewards are found in the health of your seedlings and the satisfaction of knowing your garden is truly your own. Experiment with different sizes, watch how the paper interacts with your local soil, and refine your technique each season.
The wisdom of the past often looks like the innovation of the future. As we look for ways to garden more sustainably and effectively, the humble newspaper pot stands out as a perfect example of ancestral logic applied to modern needs. Start your seeds with intention, give them a home that becomes part of their journey, and watch as they reward you with the vigor that only a shock-free transplant can provide.
