How To Become More Self-Sufficient Without Starting a Full-Blown Farm…
Want to start preserving your harvest, making your own soap, or building a backyard root cellar — but not sure where to begin? “Homesteading Advice” gives you instant lifetime access to 35+ practical homesteading books on food preservation, veggie gardening, DIY natural cleaning products (save over $250 per year with this skill alone), brewing, off-grid energy, and a whole lot more…
Click Here To Check It Out Now!
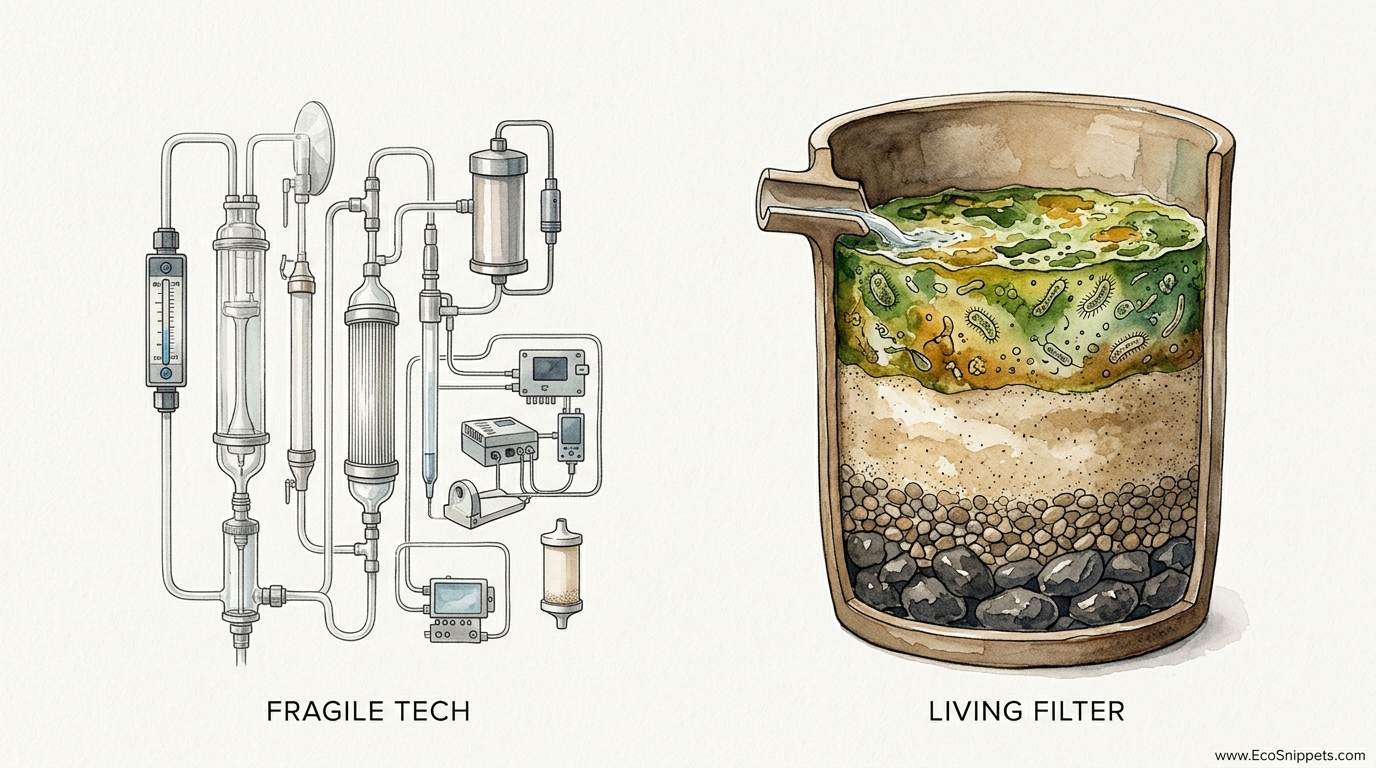
When the power grid fails, one of these systems becomes a plastic paperweight, while the other keeps providing life-saving water. Modern water filters are miracles of engineering until you run out of proprietary plastic cartridges or the electricity stops. The ‘Slow Sand’ method uses a living biological layer to consume pathogens, creating a self-cleaning system that has provided clean water for centuries. Build it once, and it works as long as gravity does.
The earth has been cleaning its own blood for eons; we are merely borrowing the method. While modern society relies on high-pressure membranes and chemical additives, the slow sand filter relies on the steady, patient laws of biology. It is a system that does not ask for much—just a bit of space, the right grade of sand, and a constant flow of water to keep its living heart beating.
If you are looking for a way to secure your family’s water supply without being tethered to a supply chain, you have found it. This guide will walk you through the grit and the glory of building a living filter that stands the test of time.
DIY Slow Sand Water Filter Guide
A slow sand water filter is a gravity-fed purification system that uses a combination of physical straining and biological predation to clean water. Unlike a “rapid” sand filter, which you might find in a swimming pool to strain out hair and dirt, a slow sand filter is designed to remove microscopic pathogens, including bacteria, viruses, and protozoa.
These systems have been the backbone of municipal water safety since the early 19th century. In 1829, engineer James Simpson installed the first large-scale system for the Chelsea Waterworks Company in London. Its effectiveness was proven beyond doubt during the 1892 cholera outbreak in Germany. The city of Hamburg, which did not filter its water, suffered thousands of deaths. Meanwhile, the neighboring town of Altona, which pulled from the same contaminated river but used slow sand filtration, remained largely untouched.
At its core, a slow sand filter consists of a container filled with a specific grade of fine sand, supported by layers of gravel. The magic, however, happens at the very top. Within a few weeks of operation, a gelatinous, brownish-green layer known as the schmutzdecke (German for “dirty layer”) forms on the surface. This is a thriving ecosystem of algae, bacteria, and zooplankton that literally eats the pathogens in your water before they can reach the sand below.
How It Works: The Triple Threat of Purification
To understand why this system is so effective, you have to look at the three distinct ways it cleans water. It is not just a sieve; it is a predator.
Mechanical Straining
As water enters the filter, the fine sand grains act as a physical barrier. The gaps between the grains are small enough to catch larger particles of silt, organic debris, and some larger microorganisms. Because the flow is slow—usually around 0.1 to 0.4 meters per hour—the water does not force these particles through the gaps. Instead, they settle on the surface or get lodged in the top few centimeters of the sand.
Adsorption and Chemical Action
The surfaces of sand grains are not just smooth rocks; they possess a slight electrical charge. As water trickles down, tiny particles and dissolved organic compounds are attracted to the sand through electrostatic forces. Over time, the sand becomes coated with a sticky biofilm that further traps contaminants. This adsorption process helps remove color and odor that simple straining might miss.
The Biological Engine: The Schmutzdecke
This is the most critical part of the process. The schmutzdecke is a living “bio-mat” that develops on the top 0.5 to 2 centimeters of the sand. It consists of bacteria, fungi, protozoa, and rotifers. When a pathogen like E. coli or a Giardia cyst enters the filter, it is intercepted by this layer. The organisms in the schmutzdecke view these pathogens as food. They consume them, break them down, and transform them into harmless organic matter. This biological predation is why a slow sand filter can achieve up to a 99.9% reduction in bacteria and viruses without a single drop of chlorine.
Benefits of the Living Filter
Choosing a slow sand filter over a high-tech alternative is a choice for long-term resilience. There are several reasons why this technology remains the gold standard for self-reliant homesteads.
- Zero Consumables: You do not need to buy replacement cartridges every three months. As long as you have sand and water, the filter keeps working.
- Incredible Purity: When properly maintained and “ripened,” these filters provide water that is often safer than what comes out of a standard municipal tap. They are particularly effective against Cryptosporidium and Giardia, which are resistant to chlorine.
- Low Energy Requirements: These systems are powered entirely by gravity. If you can move water to the top of the container, the filter will do the rest of the work for you.
- Longevity: A well-built concrete or high-density plastic basin can last for decades. The sand only needs to be “scraped” occasionally to restore flow, and it can be washed and reused.
Challenges and Common Mistakes
The biggest challenge with a slow sand filter is not the build; it is the temperament required to run it. This is a “living” system, and like any living thing, it requires consistency.
Lack of Patience (The Ripening Period)
The most common mistake is drinking the water too soon. When you first fill the filter with sand and start the water flowing, it is just a pile of wet sand. It takes three to four weeks for the schmutzdecke to fully mature. During this “ripening” phase, the water is not biologically safe. You must “filter to waste”—letting the output run onto the ground or back into the source—until the bio-mat is established.
Intermittent Flow
The organisms in the schmutzdecke need oxygen and nutrients to survive. If you stop the flow of water for a few days, the water above the sand becomes stagnant, oxygen is depleted, and the biological layer begins to die. Once the bio-mat dies, the filter loses its ability to remove pathogens, and you have to start the ripening process all over again. You must keep the water moving, even if it is just a slow trickle.
High Turbidity
If your source water is muddy or full of clay after a heavy rain, it will clog the fine pores of the sand almost instantly. Slow sand filters are meant for water that is relatively clear to begin with (less than 5 NTU). If your water is murky, you need a “pre-filter” like a sedimentation tank or a roughing filter made of gravel to take the heavy load off the sand.
Limitations: When This May Not Be Ideal
No system is perfect for every environment. There are realistic constraints you must consider before committing to this design.
Cold Climates
Biological activity slows down as the temperature drops. In freezing conditions, the schmutzdecke may take twice as long to mature, or it may not function effectively at all if the water temperature stays below 5°C (41°F). If you live in a northern climate, the filter should be housed in an insulated or semi-heated building to keep the biology active year-round.
Chemical Pollutants
While the living filter is a master at removing biological threats, it is less effective against heavy metals, pesticides, and industrial chemicals. It can remove some organic compounds, but it is not a substitute for a reverse osmosis system if your water is contaminated with lead, arsenic, or runoff from a nearby factory.
Space Requirements
Because the flow rate is slow, you need a large surface area of sand to produce significant amounts of water. A standard 55-gallon drum can provide enough water for a small family’s drinking and cooking needs, but you would need several larger basins if you wanted to water livestock or a large garden.
Comparison: Fragile Tech vs. Living Filter
| Feature | Cartridge Filter (Fragile Tech) | Slow Sand Filter (Living Filter) |
|---|---|---|
| Maintenance | Replace plastic cartridges every 3–6 months. | Scrape the top 2cm of sand every 2–4 months. |
| Initial Cost | Low ($50 – $150). | Moderate ($100 – $300 for materials/sand). |
| Operating Cost | High (ongoing purchase of filters). | Near zero. |
| Flow Rate | Fast (2–5 gallons per minute). | Very Slow (0.1 gallons per minute per sq ft). |
| Power Source | Often requires pressurized pump. | Gravity. |
Practical Tips and Best Practices
Getting the “recipe” right for your sand is the difference between a functional filter and a muddy bucket.
- Sourcing the Sand: Do not use beach sand or standard “play sand” if you can avoid it. You want “washed masonry sand” or specialized filter sand. The Effective Size (d10) should be between 0.15 mm and 0.35 mm. If the sand is too coarse, the water flows too fast for the biology to work. If it is too fine, it clogs instantly.
- Uniformity Matters: The Uniformity Coefficient (UC) should be less than 3.0. This means the sand grains are all roughly the same size. If you have too many small “fines” mixed with large grains, the small particles will fill the gaps and stop the flow.
- Wash Your Media: Before putting sand or gravel into your filter, wash it in a bucket until the water runs crystal clear. Any dust or silt left in the sand will cause high turbidity in your filtered water for weeks.
- The “Filter to Waste” Setup: Install a T-junction and a valve on your output line. This allows you to divert the water to the garden during the ripening phase or after a cleaning, ensuring only the safest water makes it into your storage tank.
- Diffuser Plate: Never pour water directly onto the sand. It will gouge a hole in the schmutzdecke and ruin the filtration. Use a “diffuser plate”—a piece of plastic or metal with small holes drilled in it—to spread the incoming water evenly across the surface.
Advanced Considerations: The GAC Sandwich
For those who want to go beyond basic pathogen removal, you can build what is known as a “GAC Sandwich.” This involves placing a 15-centimeter (6-inch) layer of Granular Activated Carbon (GAC) or high-quality biochar between two layers of sand.
The sand layers handle the biological and physical filtration, while the carbon layer uses chemical adsorption to remove pesticides, herbicides, and some heavy metals. This “advanced” version requires more maintenance—the carbon will eventually become “spent” and need replacement—but it provides a level of chemical safety that standard sand cannot match.
Another advanced technique is harrowing. Instead of scraping off the top layer of sand and throwing it away when it clogs, you can “rake” the surface while maintaining a gentle upward flow of water. This washes the debris out of the sand and keeps it in the basin, though it still requires a short re-ripening period.
Scenario: The 55-Gallon Homestead Build
Imagine a homesteading family using a 55-gallon food-grade plastic drum as their primary filter.
The drum is set up with a PVC underdrain at the bottom—a series of pipes with 2mm holes drilled in them, facing downward to prevent sand from entering. The bottom 15 centimeters (6 inches) of the drum are filled with 20mm gravel, followed by 10 centimeters (4 inches) of pea gravel.
On top of the gravel is 60 centimeters (24 inches) of fine, washed masonry sand. The family leaves 25 centimeters (10 inches) of space at the top for “head water.” They keep the water level constant using a float valve connected to their rainwater collection tanks.
This single drum produces roughly 15 to 20 liters (4 to 5 gallons) of water per hour. By running it 24/7 into a clean 100-gallon storage tank, they have an endless supply of purified water for all their domestic needs. When the flow slows down after three months, they simply drain the water down to just above the sand level, scrape off the top 2 centimeters of “dirty” sand, and refill it. Within 48 hours, the filter is “ripened” and back in service.
Final Thoughts
The slow sand filter is a testament to the idea that the best solutions are often the oldest ones. It is a system that respects the pace of nature, trading speed for reliability and complexity for longevity. In an era where we are increasingly dependent on fragile supply chains, there is a profound peace of mind that comes from knowing your water is being cleaned by a living system you built yourself.
Building a slow sand filter is more than a DIY project; it is an investment in self-reliance. It requires you to understand the biology of your land and the quality of your water. It demands a bit of your time and a lot of your patience, but in return, it offers a lifetime of security.
Whether you are preparing for a grid-down scenario or simply want to live more sustainably on your own terms, start small. Build a pilot filter, watch the schmutzdecke grow, and learn the rhythms of the living filter. Once you see the crystal-clear results, you may never look at a plastic cartridge the same way again.
