How To Become More Self-Sufficient Without Starting a Full-Blown Farm…
Want to start preserving your harvest, making your own soap, or building a backyard root cellar — but not sure where to begin? “Homesteading Advice” gives you instant lifetime access to 35+ practical homesteading books on food preservation, veggie gardening, DIY natural cleaning products (save over $250 per year with this skill alone), brewing, off-grid energy, and a whole lot more…
Click Here To Check It Out Now!
The Winter Harvest: Growing Fresh Food Without Electricity
Grow fresh food in the dead of winter without spending a single dime on heating or electricity. It sounds like a feat reserved for industrial greenhouses or high-tech labs, but our ancestors were doing it long before the first power line was ever strung. Don’t let the first frost end your gardening season. By using simple cold frames made from salvaged windows, you can harvest fresh greens while your neighbors are buying wilted produce from the store.
There is a specific kind of satisfaction that comes from brushing snow off a glass pane to reveal vibrant, emerald-green spinach underneath. It is a quiet rebellion against the modern supply chain. When you learn to harness the low winter sun, you are no longer at the mercy of the seasons. You are working with them, utilizing the earth’s natural insulation to keep your family fed with nutrient-dense food all year long.
This guide will walk you through the grit and the mechanics of building a cold frame garden. We will discuss why salvaged materials are often superior to modern plastics and how to position your structure to survive the harshest winds. This isn’t just about gardening; it is about reclaiming a piece of self-reliance that most of the world has forgotten.
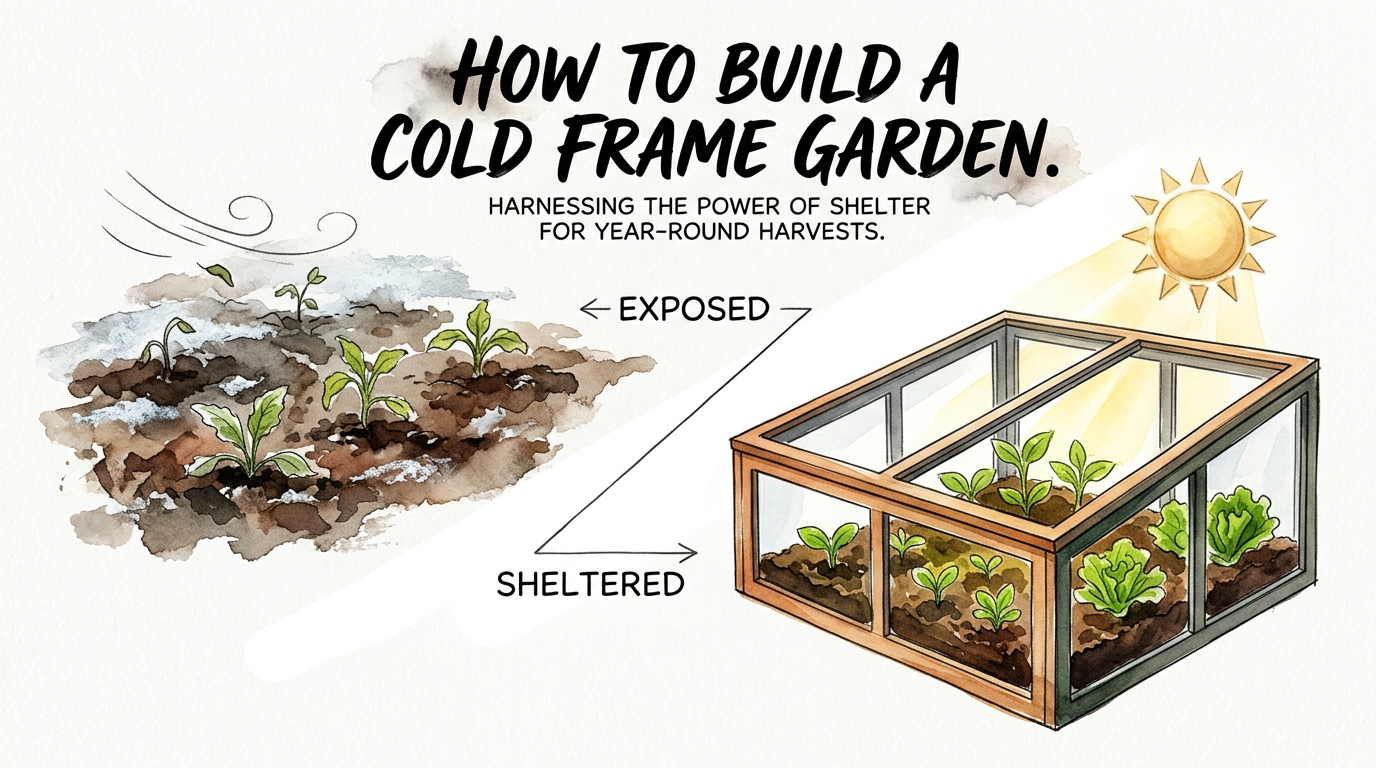
How To Build A Cold Frame Garden
A cold frame is essentially a bottomless box with a transparent lid. It acts as a miniature greenhouse, capturing solar radiation and trapping it against the soil. While you can buy kits made of thin polycarbonate and aluminum, they rarely hold up to a heavy snow load or a brutal North wind. The best cold frames are built from heavy, salvaged materials that provide both durability and thermal mass.
To begin, you need to understand the basic anatomy of the structure. The back of the box should be higher than the front, creating a slope. This slope serves two purposes: it sheds rainwater and snow, and it allows the glass to be angled toward the sun. In the northern hemisphere, this means your cold frame must face south to capture every possible minute of daylight during the short winter months.
Building one does not require a master’s degree in carpentry. If you can use a saw, a drill, and a level, you have the skills required. The beauty of using salvaged windows is that the dimensions of your frame are dictated by the glass you find. You are building the box to fit the “lights,” rather than trying to cut glass to fit a pre-built box. This saves time, money, and a great deal of frustration.
Sourcing Your Materials
Keep your eyes on the curbside of older neighborhoods or check local classifieds. Old wooden storm windows are the gold standard for this project. They are heavy enough to stay in place during a storm and provide better insulation than a single sheet of plastic. Avoid lead paint where possible, or seal old wood thoroughly to ensure no flakes migrate into your soil.
For the box itself, use thick lumber. Two-inch thick boards (like 2x10s or 2x12s) provide much better insulation than thin cedar pickets. If you can find rough-cut hemlock or cedar, you will have a frame that lasts for a decade or more. Avoid pressure-treated wood if you are concerned about chemicals leaching into your organic soil; instead, rely on naturally rot-resistant species or char the surface of the wood with a torch for a traditional “shou sugi ban” finish that preserves the timber naturally.
How It Works: The Science of Passive Solar
The magic of a cold frame lies in the greenhouse effect on a micro-scale. Short-wave solar radiation passes through the glass and hits the soil and the interior walls of the box. This energy is absorbed and then re-radiated as long-wave infrared heat. Because glass is largely opaque to these longer wavelengths, the heat remains trapped inside the box.
During the day, the soil acts as a thermal battery. It soaks up the heat, and as the sun sets and the air temperature drops, the soil slowly releases that warmth back into the air inside the frame. This prevents the plants from reaching their “killing point,” even if the outside air is well below freezing. For many cold-hardy greens, they don’t need tropical warmth; they just need to stay above the point where their cell walls rupture from ice crystals.
For added thermal mass, some gardeners line the back of the cold frame with dark-colored stones or even jugs of water painted black. These materials absorb even more heat during the day and act as a buffer against the nighttime chill. This is a classic pioneer technique—using the weight and density of the earth to fight the bite of the air.
The Importance of the Slope
The angle of your glass lid is critical. A general rule of thumb is to add 15 degrees to your latitude to find the ideal winter angle. If you live at 40 degrees north, an angle of 55 degrees would be perfect for the winter solstice. However, most gardeners find that a simpler slope—dropping from 12 inches in the back to 8 inches in the front—is sufficient for most cold-hardy crops and makes construction much easier.
How to Construct the Frame Step-by-Step
Once you have your window and your lumber, it is time to assemble. Follow these steps to ensure a sturdy, weather-tight build:
- Measure the Window: Measure the exterior dimensions of your salvaged window. Your box’s exterior dimensions should match these so the window sits flush on top.
- Cut the Sides: Cut two side pieces with a slope. For example, if your window is 36 inches deep, cut a board that is 36 inches long, starting at 12 inches high on one end and tapering down to 8 inches on the other.
- Cut the Front and Back: The back board should be 12 inches high, and the front board should be 8 inches high. Their length will depend on the width of your window.
- Assemble the Box: Use long exterior-grade screws to join the boards. Pre-drill your holes to prevent the thick lumber from splitting.
- Attach the Lid: Use heavy-duty hinges to attach the window to the back (higher) board. This allows you to prop the lid open for venting on sunny days.
- Add Weather Stripping: If the window doesn’t sit perfectly flat, a bit of adhesive foam weather stripping can seal the gaps and keep the heat in.
Once the box is built, you can either place it directly over a garden bed or dig it into the ground a few inches. Sinking the frame into the earth provides even better insulation, as the surrounding soil helps maintain a stable temperature. This is a “pit” style cold frame, a technique used for centuries in colder climates like England and New England.
Benefits of a Salvaged Window Cold Frame
Choosing to build your own frame from salvaged materials offers more than just cost savings. It aligns your gardening practice with the principles of stewardship and self-sufficiency. You are keeping glass and wood out of the landfill while creating a tool that requires zero external energy to operate.
Unlike a full-sized greenhouse, a cold frame is easy to manage and doesn’t require a large footprint. It can sit on a patio, in a small backyard, or even on a balcony if it gets enough sun. The benefits extend beyond the harvest; the cold frame also serves as a “hardening off” station in the spring, allowing you to transition your indoor seedlings to the outdoor world without the shock of direct wind and fluctuating temperatures.
- Zero Operating Costs: No electricity, no propane, no lightbulbs. Just the sun.
- Extreme Durability: Heavy wood and glass withstand snow and wind better than plastic.
- Superior Flavor: Cold-stressed greens like kale and carrots convert starches to sugars to act as a natural antifreeze, making them sweeter than anything grown in the summer.
- Season Extension: Start three weeks earlier in the spring and harvest four to six weeks later in the fall—or all winter long in moderate zones.
Challenges and Common Mistakes
The biggest threat to a cold frame garden isn’t actually the cold; it’s the heat. On a bright, sunny day in February, even if the outside temperature is only 35 degrees, the inside of a closed cold frame can quickly soar to over 90 degrees. This will cook your spinach and cause your lettuce to bolt (go to seed) prematurely.
Venting is crucial. You must be prepared to prop the lid open a few inches during the day and close it before the sun goes down to trap the remaining warmth. If you cannot be home to do this, consider investing in a solar-powered automatic vent opener. These devices use a wax cylinder that expands when heated, physically pushing the lid open without any need for batteries.
Another common pitfall is poor drainage. Because the cold frame is enclosed, moisture can build up, leading to fungal issues like “damping off” or mold. Ensure your soil is well-draining and avoid overwatering during the dark months of December and January when evaporation is at its lowest. A light dusting of cinnamon on the soil surface can act as a natural antifungal if you notice any fuzzy growth.
Location: Exposed vs. Sheltered
Where you place your cold frame is just as important as how you build it. You must consider the microclimate of your yard. An Exposed site is one that sits out in the open, vulnerable to the prevailing winter winds. While it may get maximum sun, the wind will constantly strip heat away from the glass and the wooden walls. If you must use an exposed site, consider hay bales stacked around the North, East, and West sides of the frame to act as a windbreak.
A Sheltered site is much preferred. Placing the frame against the south-facing wall of a house, barn, or stone wall provides several advantages. The building itself blocks the wind and radiates a small amount of heat. Furthermore, the ground near a foundation often stays slightly warmer than the open field. Below is a comparison of these two placement strategies.
| Feature | Exposed Site | Sheltered Site |
|---|---|---|
| Wind Resistance | Low; requires heavy anchoring. | High; protected by structures. |
| Thermal Retention | Lower; heat loss from wind chill. | Higher; gains heat from buildings. |
| Ease of Access | May be buried by drifting snow. | Usually easier to keep clear. |
| Sun Exposure | Maximum; no shadows from buildings. | Variable; must ensure no eaves block sun. |
What to Plant for a Winter Harvest
You cannot grow tomatoes or peppers in a cold frame in the middle of January. To succeed, you must work with “winter warriors”—plants that have the genetic grit to handle freezing temperatures. Most of these are leafy greens or root vegetables.
The goal for a true winter harvest is to have the plants reach near-maturity by the time the “Persephone Period” begins. This is the time of year when day length drops below 10 hours (usually from November through early February in most temperate zones). During this period, plants essentially stop growing; they go into a state of suspended animation. Your cold frame acts as a refrigerator, keeping that “living pantry” fresh until you are ready to harvest.
Recommended Crops:
- Spinach: The king of the winter garden. It can freeze solid and thaw out perfectly fine.
- Claytonia (Miner’s Lettuce): A succulent, mild green that thrives in low light.
- Mache (Corn Salad): Extremely cold-hardy and has a nutty flavor.
- Kale and Collards: These become incredibly sweet after a hard frost.
- Carrots: If sown in late summer, they will hold in the ground all winter; the cold turns their starches into pure sugar.
- Green Onions: Very resilient and easy to harvest even in the depths of January.
Practical Tips and Best Practices
To get the most out of your cold frame, you need to adopt a few habits that differ from summer gardening. In the summer, you are often fighting to keep things cool and moist. In the winter, you are fighting to keep things warm and just dry enough.
Watering: Only water when the soil feels dry an inch down. Always water in the morning on a sunny day so the leaves have time to dry before the temperature drops at night. Wet leaves in a cold, closed environment are an invitation for disease.
Insulation: On exceptionally cold nights (where temperatures drop into the single digits or below), throw an old moving blanket, a piece of carpet, or even a layer of straw over the glass. This adds an extra layer of protection. Just remember to remove it the next morning so the sun can get in.
Snow Management: A light dusting of snow won’t hurt, but a heavy accumulation will block the light and could break the glass. Keep a soft broom nearby to gently clear the “lights” after a storm. Do not use a metal shovel, as you risk shattering the glass.
Soil Health: Since you won’t be tilling or moving the frame often, top-dress the soil with an inch of well-rotted compost every autumn. This provides the nutrients the plants need to build strong cell walls, which helps them survive the cold.
Final Thoughts
The ability to grow food in the dead of winter is a foundational skill for anyone looking to increase their self-reliance. It transforms the garden from a seasonal hobby into a year-round source of sustenance. By using salvaged windows and heavy timber, you are building something that is both functional and rooted in a tradition of making do with what you have. This isn’t just about saving money at the grocery store; it is about the peace of mind that comes with knowing you can provide for yourself, regardless of what the weather or the economy is doing.
As you stand over your cold frame in the middle of a January afternoon, propping the lid open to let the scent of damp earth and fresh greens rise into the crisp winter air, you’ll realize that the gardening season never truly has to end. It simply changes its pace. The frantic growth of summer is replaced by the slow, steady resilience of the winter harvest. It is a quiet, powerful way to live.
Start small. Find one old window, build one simple box, and plant a row of spinach. Once you taste that first leaf of winter-sweetened green, you will never want to go back to store-bought produce again. The old ways are often the best ways, and the cold frame is living proof that nature provides everything we need, provided we have the grit to work alongside her.
