How To Become More Self-Sufficient Without Starting a Full-Blown Farm…
Want to start preserving your harvest, making your own soap, or building a backyard root cellar — but not sure where to begin? “Homesteading Advice” gives you instant lifetime access to 35+ practical homesteading books on food preservation, veggie gardening, DIY natural cleaning products (save over $250 per year with this skill alone), brewing, off-grid energy, and a whole lot more…
Click Here To Check It Out Now!
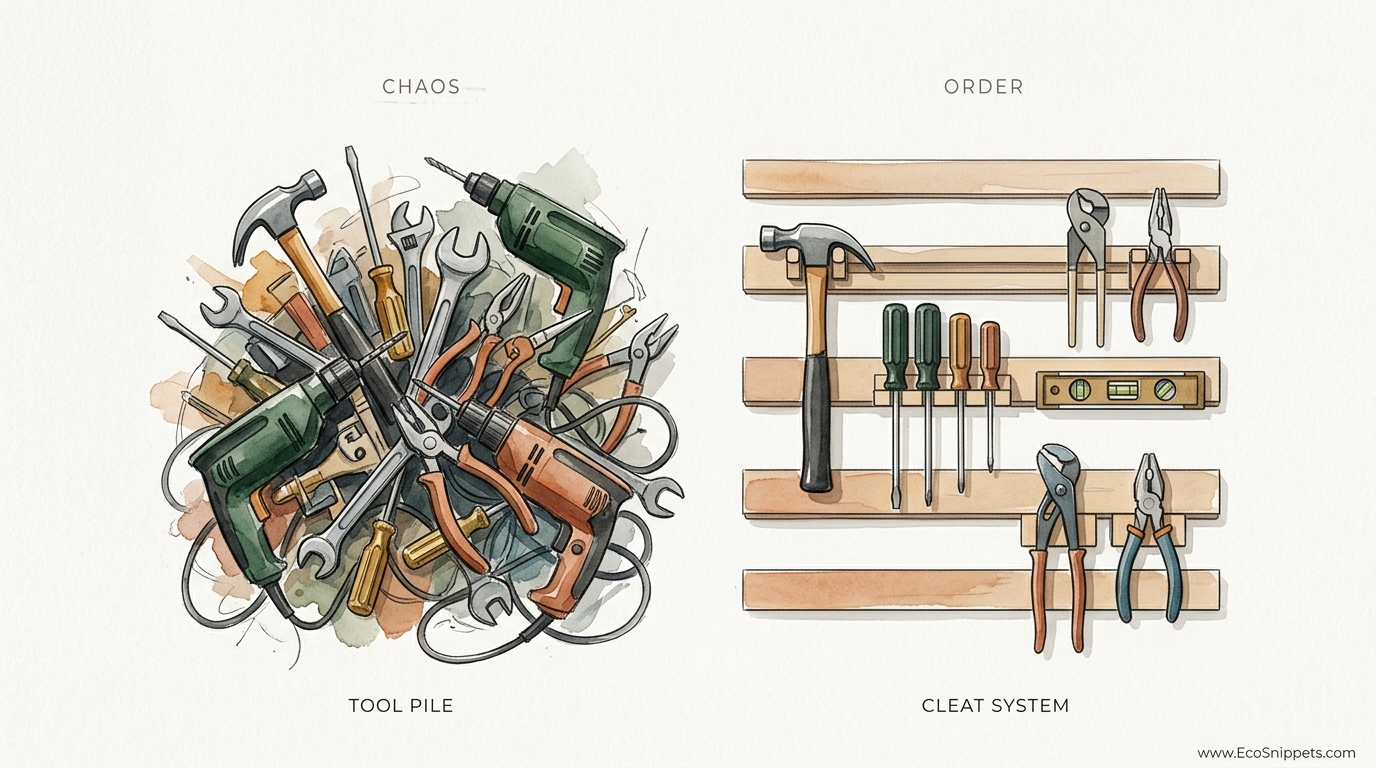
A messy shop isn’t just an eyesore; it’s a thief that steals hours of your creative life every single week. The secret to self-sufficiency is a workflow that doesn’t fight you. If you spend more than 5 seconds looking for a tool, your shop is broken. The French Cleat system turns your wall into a modular masterpiece that evolves with your skills.
There is a certain quiet dignity in a workshop where everything has a home. It’s the kind of order our ancestors understood—not the sterile, plastic organization of a modern big-box store, but a rugged, adaptable system born of necessity. When you build your own storage, you aren’t just tidying up; you are claiming mastery over your environment.
In the old days, a craftsman’s wall was a fixed thing, with nails driven into studs and shelves that never moved. But your craft is a living thing. The tools you reach for today might not be the ones you need five years from now. This is where the wisdom of the cleat comes in, offering a bridge between permanent stability and total flexibility.
How To Build A French Cleat Tool Wall
The French Cleat is a centuries-old mechanical joint used to hang heavy objects securely while allowing them to remain completely removable. At its core, it consists of two interlocking wooden strips, each with a matching 45-degree bevel. One strip is anchored firmly to the wall with the “hook” facing up and back toward the wall; the other is attached to the back of a tool holder, cabinet, or shelf, with its bevel facing down.
This system is a staple in high-end cabinetry and professional woodshops because it relies on gravity and geometry rather than complex hardware. When you hang a tool holder on a cleat, the weight of the tool actually pulls the joint tighter. It is a partnership between wood and physics that provides a level of security no plastic pegboard can match.
Historically, this technique traces its roots back to 18th and 19th-century shipbuilding and cabinetry. French shipbuilders used these “split battens” to secure interior fixtures below deck, ensuring that even in heavy seas, the cargo stayed put but could be rearranged as the ship’s needs changed. Today, we use that same ancestral logic to tame the chaos of the modern garage or basement workshop.
Visualizing it is simple: imagine two hands with fingers bent, interlocking to pull against one another. The more you pull down, the tighter the grip. This simplicity is why it has survived for hundreds of years. It doesn’t require specialized clips or proprietary hooks—just a table saw, some quality plywood, and the willingness to do the work yourself.
How It Works: The Mechanics of the System
Building a French cleat wall starts with the material. While you can use solid pine or hardwoods, most serious practitioners prefer 3/4-inch (18mm) Baltic Birch or furniture-grade plywood. Plywood is dimensionally stable, meaning it won’t warp or shrink with the seasons, which keeps your cleats straight and your joints tight over the decades.
The process begins by ripping long strips of plywood—typically 3 to 5 inches wide. You then tilt your table saw blade to a 45-degree angle and rip those strips down the center. This single cut creates two matching cleats. One becomes the “wall rail,” and the other is chopped into smaller sections to become the “mounting cleats” for your individual tool holders.
Spacing is the next critical factor. You don’t just slap cleats on the wall at random. A professional setup uses a consistent vertical interval, often between 5 and 8 inches from the top of one cleat to the top of the next. This standardization ensures that a holder built for the bottom of the wall will fit perfectly at the top, allowing you to migrate your tools as your workflow changes.
Installation requires finding the “bones” of your shop—the wall studs. A French cleat wall is only as strong as its connection to the framing. You must use heavy-duty wood screws (at least 2.5 to 3 inches long) to bite deep into every stud. Leveling the first cleat is the most important step; if your foundation is crooked, every tool you hang will look like it’s sliding off a sinking ship.
Benefits of the French Cleat System
The most immediate advantage is the sheer weight capacity. Unlike pegboards, which can tear or sag under the weight of a heavy circular saw or a rack of iron hand planes, a well-anchored French cleat wall can support hundreds of pounds. Because the weight is distributed across multiple studs via the long horizontal rail, you can hang entire cabinets full of fasteners without a second thought.
Modular freedom is the second great benefit. In a traditional shop, if you buy a new set of chisels, you have to pull out the drill and find a new spot on the wall, often leaving behind “scars” of old screw holes. With a cleat system, you simply slide your screwdriver rack to the left and drop your new chisel holder into the gap. It turns your wall into a living puzzle.
There is also a profound psychological benefit to this system. A custom-built tool wall is a reflection of the craftsman’s mind. When you build a holder specifically for your favorite mallet, you are showing respect for that tool. This level of intentionality breeds better work; when your environment is ordered, your mind is free to focus on the grain of the wood and the edge of the blade.
Finally, the system is incredibly cost-effective. Most of your tool holders can be built from the “offcuts” and scraps of other projects. It is a way to use every inch of the timber you buy, turning what would have been firewood into a functional piece of your shop’s infrastructure. It is the ultimate expression of pioneer-grit resourcefulness.
Challenges and Common Mistakes
One of the most frequent errors is “over-cleating.” Beginners often feel the need to cover every square inch of the wall in cleats from floor to ceiling. In reality, you only need cleats where you have tools. Leaving some open space allows the wall to breathe and saves you the effort of milling unnecessary lumber.
A devastating mistake is forgetting the “spacer block.” Because the mounting cleat on the back of your tool holder creates a 3/4-inch gap between the holder and the wall, the bottom of the holder will naturally want to tilt inward toward the wall. To prevent this “teeter-totter” effect, you must attach a scrap piece of wood of the same thickness to the bottom of every holder. This keeps the tool perfectly vertical and stable.
Glue management is another pitfall. If you glue and screw your wall cleats, make sure no glue “squeeze-out” lands in the 45-degree crotch of the joint. If a bead of glue dries in that corner, your tool holders won’t seat properly, leading to a frustratingly loose fit. Always wipe your joints clean and check them with a scrap piece of cleat before the glue sets.
Lastly, avoid using thin, low-quality construction lumber or OSB for the cleats themselves. These materials can split along the grain when subjected to the sheer force of a heavy tool. If a cleat splits, your tools come crashing down. Stick to high-ply-count plywood or dense hardwoods to ensure your “modular masterpiece” doesn’t become a pile of splintered regrets.
Limitations: When This May Not Be Ideal
Despite its strengths, the French Cleat system isn’t a universal solution. In a very small shop where every millimeter counts, the 1.5-inch total thickness (wall cleat plus holder cleat) might stick out too far from the wall. If you are working in a narrow hallway or a cramped closet, a flush-mounted system or a simple set of drawers might be more efficient.
Dust is the eternal enemy of the woodworker, and cleats provide a lot of “shelves” for sawdust to settle on. If you don’t have a robust dust collection system, you will find yourself blowing out the cleat channels once a week to prevent buildup. For those who prioritize a low-maintenance, “set it and forget it” shop, enclosed cabinets might be a better choice to keep tools clean and rust-free.
Environmental factors like extreme humidity can also pose a challenge if you choose the wrong wood. In an unheated garage, solid wood cleats may expand and contract enough to make tool holders difficult to remove or cause them to rattle. This is why plywood is the gold standard—its cross-grain layers resist the “breathing” of the seasons.
Finally, the system requires a significant upfront investment of time. You cannot simply buy a kit and have it up in twenty minutes. You must mill the wood, find the studs, level the rails, and then—the most time-consuming part—build individual holders for every single tool. If you are more interested in “having” a shop than “building” one, this path might feel like a chore.
Practical Tips and Best Practices
If you want your wall to look professional, start your installation from the top and work your way down. Gravity is your friend here. By setting the top rail first (usually around 6 feet high), you can use a “spacer jig”—a simple piece of wood cut to your desired interval—to perfectly position every subsequent rail. This ensures the gaps are identical across the entire wall.
When building tool holders, use “slots” instead of “holes” whenever possible. If you drill a hole for a screwdriver, you have to lift the tool several inches to clear the holder. If you cut a slot, you can simply pull the tool forward. Over the course of a day, these saved seconds add up to a smoother, less fatiguing workflow.
Don’t be afraid to combine systems. A French cleat wall is perfect for heavy items like drills, saws, and planes, but it can be overkill for tiny items like drill bits or Allen wrenches. Many craftsmen mount a small magnetic strip or a dedicated “parts bin” directly onto a cleat-mounted backer board. Use the cleat as the foundation, but adapt the storage to the specific needs of the tool.
Pro-Tip: Always “break” the sharp edges of your cleats with a quick pass of sandpaper or a block plane. A razor-sharp 45-degree point is prone to chipping and can actually cut your fingers when you’re reaching for a tool in a hurry. A slight chamfer or rounded edge makes the holders slide on and off much more smoothly.
Advanced Considerations for the Serious Builder
For those who want to take their shop to the next level, consider integrating utility into your cleat wall. You can build a “power strip” module that hooks onto the cleat, allowing you to move your electrical outlets wherever you are currently working. Some builders even run low-voltage LED strips along the underside of a cleat to provide shadow-free task lighting exactly where it’s needed.
Locking mechanisms are another advanced feature. In earthquake zones or mobile workshops (like a van or trailer), you don’t want your tools jumping off the wall. You can drill a small hole through the tool holder and the wall cleat to insert a “locking pin” or a simple wooden dowel. This keeps the modularity but adds a layer of absolute security.
If you have an uneven wall—common in old barns or houses with “wavy” drywall—you must shim your cleats. Use thin plastic or wood shims behind the wall rail at the stud locations to ensure the cleat stays perfectly straight. If the rail follows the curve of a bad wall, your tool holders will bind or sit crooked, ruining the clean lines of your shop.
Think about “tool density.” As you become more proficient, you will realize that grouping tools by task is more efficient than grouping them by type. Instead of a “hammer wall” and a “saw wall,” try building a “joinery station” on your cleats that holds your favorite dovetail saw, a few sharp chisels, a marking gauge, and a mallet all in one square yard of space.
Example Scenario: The Drill Station
Let’s look at how a typical drill station comes together. You start with a backer board of 1/2-inch plywood, roughly 18 inches wide. On the top back edge, you screw a 45-degree cleat. At the bottom back edge, you attach a 3/4-inch spacer strip.
On the front of this board, you build a “shelf” with four or five vertical slots—wide enough to slide the necks of your cordless drills and impact drivers into, but narrow enough that the battery housings hold them in place. Above that, you might add a small drawer for specialized bits and a rack for your charger.
Now, you simply lift this entire 15-pound assembly and drop it onto your wall cleat. It’s solid as a rock. If you decide you’d rather do your assembly on the other side of the shop next month, you just lift it off and move it. No tools required, no new holes in the wall, and your drills are always exactly where your hand expects them to be.
Final Thoughts
Building a French cleat tool wall is an act of commitment to your craft. It is a declaration that you value your time, your tools, and the space in which you create. This isn’t just about storage; it’s about building a workshop that functions like a well-oiled machine, where the friction between an idea and its execution is reduced to almost nothing.
The beauty of the system lies in its evolutionary nature. Your shop will never be “finished,” and that’s a good thing. As you learn new skills—perhaps moving from basic cabinetry into timber framing or fine luthiery—your wall will change with you. You will retire old holders and build new ones, always refining the dance of your daily work.
Take the time to do it right. Use the good plywood. Find the studs. Level the rails. When you stand back and see your tools arranged with such purpose, you’ll feel a surge of that old-world pride. Your shop is no longer just a room full of stuff; it is a sanctuary of self-reliance, built on a foundation of geometry and grit.
