How To Become More Self-Sufficient Without Starting a Full-Blown Farm…
Want to start preserving your harvest, making your own soap, or building a backyard root cellar — but not sure where to begin? “Homesteading Advice” gives you instant lifetime access to 35+ practical homesteading books on food preservation, veggie gardening, DIY natural cleaning products (save over $250 per year with this skill alone), brewing, off-grid energy, and a whole lot more…
Click Here To Check It Out Now!
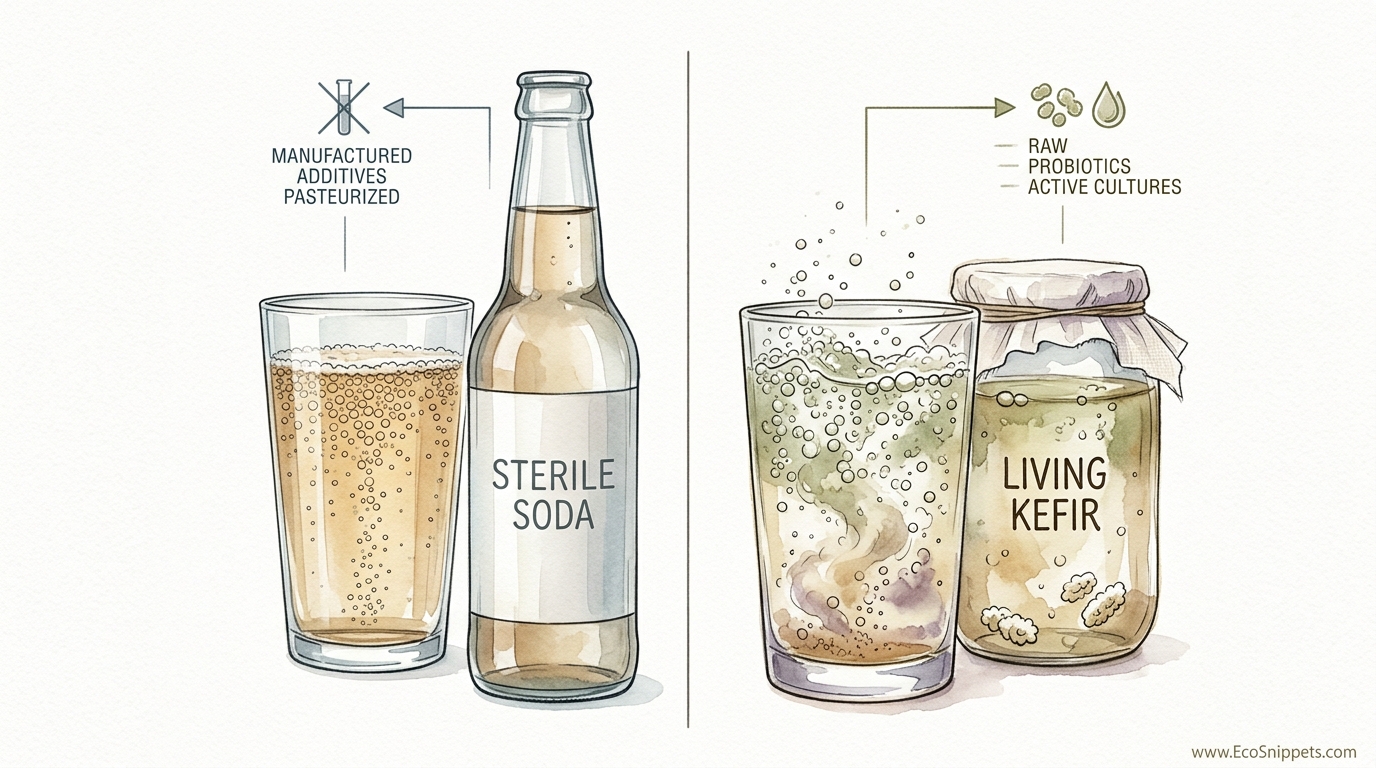
One of these is a chemical cocktail that erodes your gut, while the other is a thriving colony of 30+ probiotics that costs pennies to brew. Most people think ‘natural’ soda is a myth. But while industrial soda is literally ‘dead’—sterilized and loaded with high-fructose corn syrup—water kefir is a living medicine cabinet. It uses tiny ‘grains’ to turn sugar-water into a carbonated, probiotic powerhouse that heals your gut with every sip.
For decades, we have been conditioned to reach for a brightly colored aluminum can whenever we crave a refreshing fizz. That habit comes at a steep price, trading our long-term metabolic health for a momentary hit of sweetness. The modern gut is under siege from preservatives and artificial sweeteners that act like a scorched-earth policy on our internal microbiome.
Returning to ancestral wisdom offers a better way. Water kefir, an ancient fermented beverage, provides the same satisfying sparkle and sweetness of soda without the toxic baggage. It is a resilient, self-sustaining system that requires nothing more than water, sugar, and a handful of living “grains” to produce a continuous supply of health-boosting elixir.
How To Make Probiotic Sparkling Drinks At Home
Water kefir is a fermented beverage produced by soaking water kefir grains in a solution of sugar and water. Despite the name, these are not cereal grains like wheat or rye. They are a SCOBY—a Symbiotic Culture of Bacteria and Yeast—held together in a translucent, jelly-like matrix of polysaccharides. In the world of home fermentation, these grains are the engine that drives the transformation from simple syrup to a complex, medicinal tonic.
These grains likely originated in Mexico, where they were found on the pads of the Opuntia cactus, feeding on the sugary secretions of the plant. Throughout history, they have been known by many names: Tibicos, Japanese Water Crystals, and even California Bees. Each name reflects a different culture’s discovery of this remarkable living colony. Unlike milk kefir, which requires dairy, water kefir is completely vegan and dairy-free, making it accessible to almost any diet.
The process works through a two-stage fermentation. In the first stage, the grains consume the sugar you provide, converting it into organic acids, carbon dioxide, and a wide array of probiotics. In the second stage, you remove the grains and add fruit or juices to a sealed bottle. This creates the pressure needed for natural carbonation, resulting in a drink that rivals any commercial ginger ale or fruit soda in both flavor and fizz.
The Science of the Sip: How Fermentation Works
The magic of water kefir lies in its microbial diversity. While a store-bought probiotic pill might contain three or four strains of bacteria, a healthy batch of water kefir can host between 30 and 70 different species. These include powerful lactic acid bacteria like Lentilactobacillus hilgardii and Lacticaseibacillus paracasei, as well as beneficial yeasts like Saccharomyces cerevisiae.
When you place the grains into sugar water, the microbes immediately go to work. The yeasts break down complex sucrose into simpler glucose and fructose. The bacteria then feast on these sugars, producing lactic acid and acetic acid. This process naturally lowers the pH of the liquid, creating an environment that is hospitable to “good” bugs and hostile to pathogens.
Research indicates that within 48 hours of fermentation, these microorganisms can consume up to 80% of the initial sugar content. What remains is a low-glycemic beverage rich in enzymes, B vitamins, and electrolytes. This is not just a drink; it is a delivery system for living organisms that help rebuild the mucosal lining of the gut and support the immune system.
The Role of Minerals
Water kefir grains are living organisms, and like any living thing, they require more than just calories to thrive. They need a steady supply of minerals to maintain their structural integrity and reproductive health. Calcium, magnesium, and potassium are the primary building blocks for the polysaccharide matrix that forms the grain.
If you use highly refined white sugar and distilled water, your grains will eventually “starve” and begin to shrink or disintegrate. Successful brewers often use a blend of sugars or add mineral-rich supplements like a teaspoon of molasses, a clean eggshell, or a pinch of sea salt to ensure the colony remains robust and active.
Setting Up Your Homestead Lab: Tools and Ingredients
You do not need an industrial laboratory to brew water kefir, but you do need the right materials. The equipment should be clean and, ideally, non-reactive. Ancient traditions favored wood and ceramic, while modern practitioners prefer glass. Avoid using reactive metals like aluminum or copper, as the acidic nature of the ferment can leach metals into your drink and harm the grains.
- Glass Jars: Use a wide-mouth quart or half-gallon jar for the first fermentation.
- Breathable Cover: A coffee filter, tight-weave cloth, or paper towel secured with a rubber band allows the ferment to breathe while keeping out fruit flies.
- Non-Metal Strainer: Plastic or stainless steel is best for separating the grains from the finished liquid.
- Swing-Top Bottles: Use pressure-rated glass bottles (like Grolsch-style bottles) for the second fermentation to capture carbonation safely.
- Filtered Water: Ensure your water is free of chlorine and chloramine, as these chemicals are designed to kill bacteria—including your kefir grains.
Choosing Your Sugar
The type of sugar you use dictates the health of your grains and the flavor of the final product. Organic cane sugar is the standard, providing a clean ferment. However, adding more complex sugars can boost the mineral profile. Rapadura, sucanat, and coconut sugar are excellent for providing the trace elements the grains crave.
Avoid using honey, as its natural antibacterial properties can interfere with the kefir’s microbial balance. Similarly, never use artificial sweeteners like stevia or monk fruit; the bacteria cannot “eat” these, and the colony will starve to death in days.
The Step-by-Step Brewing Guide
Building a successful brewing rhythm is the key to consistency. Once you understand the basic cycle, it takes less than ten minutes of active work every two days to maintain a lifetime supply of probiotic soda.
Step 1: The First Fermentation (F1)
Dissolve 1/4 cup of sugar into 1 quart of room-temperature water. If the sugar is slow to dissolve, you can heat a small portion of the water, melt the sugar, and then add the rest of the cool water to reach room temperature. Never add grains to hot water, as you will scald the living culture.
Add about 3 to 4 tablespoons of active water kefir grains to the sugar water. Cover the jar with your breathable lid and set it in a warm spot away from direct sunlight. Let it sit for 24 to 48 hours. In summer, the process is faster; in winter, it may take the full 48 hours or longer.
Step 2: Harvesting and Feeding
After the initial ferment, the liquid should taste less sweet and slightly tangy. Strain the grains out using your non-metal strainer. Set the grains aside—these will be used immediately to start your next batch. The liquid you have just strained is your “plain” water kefir, which is ready for the second stage.
Step 3: The Second Fermentation (F2)
Pour the plain kefir into your swing-top bottles, leaving about an inch of headspace. This is where you add your flavorings. You can add a splash of fruit juice, a few slices of fresh ginger, or some frozen berries. Seal the bottles and let them sit at room temperature for another 12 to 24 hours.
This “bottled” environment forces the carbon dioxide produced by the remaining yeast to dissolve into the liquid, creating bubbles. Caution: Check your bottles frequently. If the pressure builds too high, the glass can shatter. Once the drink is as fizzy as you like, move the bottles to the refrigerator to stop the fermentation process.
Benefits: Why Your Gut Needs This
Industrial soda offers nothing but empty calories and metabolic stress. Water kefir, however, provides a suite of biological benefits that support overall wellness. Because it is a “living” drink, the nutrients are highly bioavailable, meaning your body can recognize and use them immediately.
Probiotic Diversity: Water kefir introduces a massive variety of beneficial microbes into the digestive tract. These organisms compete with pathogenic bacteria and help maintain a healthy balance in the gut microbiome. This can lead to improved digestion, reduced bloating, and a stronger immune response.
Enzymatic Support: The fermentation process produces enzymes that help break down other foods in your diet. Many regular drinkers report that consuming a small glass of water kefir with meals reduces the “heavy” feeling associated with difficult-to-digest foods.
Hydration with Function: Unlike plain water, kefir provides electrolytes and organic acids. It is an excellent recovery drink after physical labor or exercise, replenishing the body while providing the raw materials needed for cellular repair.
Challenges and Common Mistakes
Even the most experienced brewers encounter issues occasionally. Most problems with water kefir are related to environmental stress or hygiene. Understanding these pitfalls early can save your grain colony from an early grave.
One of the most frequent errors is using tap water without treatment. Chlorine is a broad-spectrum antibiotic added to municipal water supplies specifically to kill microbes. If you use it consistently, your grains will eventually stop multiplying and die. Always use a high-quality filter or boil your water and let it cool to dissipate the chlorine.
Another common mistake is “over-mineralizing” the grains. While they need minerals, too much of a good thing can lead to “slimy” grains or syrupy liquid. This usually happens if you use 100% molasses or very high-mineral well water. If your kefir becomes thick or “gluggy,” switch back to plain white cane sugar for a few batches to give the grains a break.
Metal Contact: There is a long-standing debate in the fermentation community about metal. While high-quality stainless steel is generally safe for short periods, prolonged contact with reactive metals like copper or aluminum can be toxic to the grains. Stick to wood, glass, or plastic to be safe.
Limitations: When This May Not Be Ideal
While water kefir is a health powerhouse, it is not a “magic bullet” for everyone. There are realistic constraints and biological realities that you should consider before starting a daily regimen.
Sugar Content: Although the microbes eat most of the sugar, water kefir is not sugar-free. If you are on a strict ketogenic diet or have severe insulin sensitivity issues, you must account for the residual sugars. Most batches will still contain 2 to 4 grams of sugar per serving.
Trace Alcohol: Any fermentation process produces a small amount of ethanol. Standard water kefir usually tests between 0.1% and 0.5% ABV. This is roughly the same amount found in a very ripe banana. However, if you are in recovery or have a zero-tolerance policy for alcohol, this is a factor to keep in mind.
Maintenance: Water kefir grains are like pets. They need to be fed every 48 hours. If you travel frequently or have a busy schedule, the constant cycle of straining and re-feeding can become a chore. You can put the grains in the fridge for a “sleep” period of up to two weeks, but they cannot be ignored indefinitely.
Industrial Soda vs. Living Water Kefir
| Feature | Industrial Soda | Homemade Water Kefir |
|---|---|---|
| Probiotic Count | Zero (Sterilized) | Billions (30+ Strains) |
| Sugar Source | High-Fructose Corn Syrup | Metabolized Organic Sugars |
| Additives | Phosphoric Acid, Dyes | None (All Natural) |
| Cost per Liter | $1.50 – $3.00 | Approx. $0.15 |
| Gut Impact | Erosive / Inflammatory | Healing / Anti-inflammatory |
Practical Tips and Best Practices
Once you have the basics down, you can start optimizing your brew for better fizz and flavor. These techniques will help you move from a beginner level to a seasoned practitioner of the craft.
- The Ginger Secret: If you struggle to get good carbonation, add a small piece of fresh ginger to your second fermentation. Ginger contains its own wild yeasts and enzymes that act as a turbocharger for carbonation.
- Dried Fruit for Minerals: Instead of adding molasses, try dropping one or two organic unsulphured raisins or a dried fig into the first fermentation. The grains love the minerals in the fruit, and it adds a subtle depth to the flavor.
- Burp Your Bottles: During the second fermentation, “burp” the bottles once every 12 hours by quickly opening and closing the lid. This allows you to gauge the pressure and prevents “geysers” when you’re finally ready to drink.
- Temperature Control: The ideal range for water kefir is between 70°F and 80°F. If your house is cold, consider placing your jar on top of the refrigerator or near a pilot light. If it’s too hot, move it to a lower cabinet where it’s cooler to prevent the yeast from becoming overactive.
Advanced Considerations: Grain Management
As you continue to brew, your grains will likely multiply. A healthy colony can double in size every few weeks. This presents both a challenge and an opportunity. If you have too many grains for the amount of sugar-water you are providing, they will compete for resources and eventually weaken.
Managing the Surplus: When you find yourself with extra grains, you can share them with friends, feed them to your compost, or even blend them into smoothies. They are essentially pure probiotic nuggets. You can also “hibernate” them by drying them out or keeping them in a concentrated sugar solution in the back of the fridge for several months.
Dealing with Biofilms: Occasionally, you may see a thin, white, dusty film on the surface of your F1. This is usually Kahm Yeast. While it looks alarming, it is harmless. It typically occurs when the ferment is exposed to too much oxygen or if the environment is too warm. Simply scrape it off, rinse your grains in filtered water, and start a fresh batch. If you see fuzzy mold or colors like green or black, however, the batch is contaminated and must be discarded.
Example Scenario: The Soda Swapper
Consider the case of a person accustomed to drinking three cans of cola per day. That habit introduces over 100 grams of processed sugar into the body daily. By switching to water kefir, they can maintain the “ritual” of a cold, fizzy drink while reducing their sugar intake by 90%.
A simple “Soda Swap” recipe would involve a second fermentation with a blend of organic grape juice and a squeeze of lime. The result is a tart, complex, and naturally bubbly drink that mimics the mouthfeel of commercial soda but provides the body with the microbial tools it needs to repair the damage caused by years of high-fructose corn syrup.
Final Thoughts
Water kefir represents more than just a healthy alternative to soft drinks. it is a reclaimation of self-reliance. In an era where most of our food is processed, sterilized, and sold in plastic, maintaining a living culture in your kitchen is a quiet act of rebellion. It connects you to a lineage of brewers who have passed these grains down through the centuries, valuing health over convenience.
Don’t be intimidated by the idea of “managing” a living organism. These grains are incredibly resilient and have survived for thousands of years in much harsher conditions than your kitchen counter. Start with the basics, trust your senses, and listen to what your gut tells you.
Once you experience the clarity of mind and digestive ease that comes from a balanced microbiome, you will never look at a “dead” soda the same way again. Experiment with flavors, share your surplus grains with your neighbors, and enjoy the living medicine cabinet that you have created for yourself.
