How To Become More Self-Sufficient Without Starting a Full-Blown Farm…
Want to start preserving your harvest, making your own soap, or building a backyard root cellar — but not sure where to begin? “Homesteading Advice” gives you instant lifetime access to 35+ practical homesteading books on food preservation, veggie gardening, DIY natural cleaning products (save over $250 per year with this skill alone), brewing, off-grid energy, and a whole lot more…
Click Here To Check It Out Now!
When the grid goes down, your freezer becomes a liability; this ancient technique makes your food invincible. Relying on a freezer for meat storage is a gamble. Confit is the French art of preserving meat in its own fat. Slow-cooking and then sealing the meat under a layer of lard creates a shelf-stable meal that lasts for months without power.
You do not need a degree in food science to master this. Our ancestors didn’t have electricity, yet they enjoyed tender, flavorful meat all winter long. They understood that fat is not just fuel; it is a biological shield.
This guide will walk you through the process of turning fresh meat into a durable, delicious pantry staple. You will learn how to render fat, cure your protein, and create a seal that stands the test of time.
Prepare to step back into a time of self-reliance. Let’s explore the world of fat-sealed preservation.
How To Store Meat In Lard For Months
Storing meat in lard is a process often called “potting” or making a “confit.” It is a two-part system of preservation that combines slow-cooking with an anaerobic seal. First, you cook the meat slowly in fat until it is tender and the moisture has largely evaporated. Second, you submerge that cooked meat in a container and pour a thick layer of rendered lard over the top.
The lard acts as a physical barrier. It prevents oxygen from reaching the meat, which stops the growth of aerobic bacteria and prevents oxidation. Without oxygen, the fat remains stable, and the meat stays preserved in a delicious, ready-to-eat state.
In the real world, this was the primary method for keeping pork and poultry after the autumn harvest. Pioneers would fill large earthenware crocks with layers of cooked sausage or ribs, pouring hot lard over each layer. These crocks were kept in cool cellars or “larders”—a word that literally means a place to store lard-preserved goods.
Modern preppers and homesteaders use this today to ensure they have high-quality protein that doesn’t rely on a hum from a machine. It is a failsafe for your food security.
The Science of the Fat Seal
Understanding why this works will make you a better practitioner. Bacteria need four things to thrive: moisture, the right temperature, food, and often oxygen. When you store meat in lard, you are attacking several of these requirements at once.
Cooking the meat at a low temperature for a long time removes a significant portion of its internal moisture. Water is the playground for microbes. By reducing the water activity, you make the meat a hostile environment for spoilage organisms.
The lard itself provides the anaerobic (oxygen-free) environment. Most common spoilage bacteria cannot survive without air. When the lard cools and solidifies, it forms a hard, airtight cap.
Important Note: Because this is an anaerobic environment, you must be aware of Clostridium botulinum. This bacteria thrives in low-oxygen, low-acid, and moist environments. This is why proper salting and thorough cooking are non-negotiable steps in the process.
Step-by-Step: Rendering Your Shield
You cannot use raw fat or store-bought “shortening” for true preservation. You need pure, rendered lard. Rendering is the process of melting raw pork fat to separate the oil from the connective tissue and water.
1. Sourcing the Fat
Search for “leaf lard” if you want the highest quality. This is the fat found around the kidneys and has the cleanest flavor. Back fat is also excellent and more abundant. Avoid fat scraps that have high amounts of blood or meat attached, as these can impart “off” flavors during long storage.
2. Prepping for the Pot
Chop the fat into small, half-inch cubes. If you have a meat grinder, running the fat through a coarse plate is even better. Smaller pieces melt faster and more evenly.
3. The Slow Melt
Place your chopped fat into a heavy-bottomed pot or a slow cooker. Add about a quarter cup of water to the bottom. This water prevents the fat from scorching before it starts to melt; it will eventually evaporate away as steam.
4. Straining and Storing
Heat the fat on the lowest setting possible. You are looking for a gentle simmer, not a fry. After several hours, the solids (cracklings) will turn golden brown and sink. Strain the liquid through a fine-mesh sieve lined with cheesecloth into clean, dry jars.
How to Prepare the Meat for Storage
Success depends on how you treat the meat before it ever touches the fat. You cannot simply throw raw meat into a jar of grease and expect it to last.
The Salt Cure
Salt is your first line of defense. Generously coat your meat—typically pork shoulder, duck legs, or even beef—with coarse salt and aromatics like thyme, garlic, and black pepper. Use about one tablespoon of salt per pound of meat.
Let this sit in the refrigerator or a very cool place for 12 to 24 hours. The salt draws out excess moisture and seasons the meat to the bone. After curing, rinse the meat under cold water and pat it perfectly dry. Any remaining surface moisture can cause the lard to “pop” or introduce water into your storage container.
The Poaching Process
Submerge the cured meat in a pot of melted lard. The meat should be completely covered. Place the pot in an oven set to 225°F (107°C) or on a very low stovetop burner.
Cook the meat until it is “fork-tender.” This usually takes 3 to 4 hours. You are looking for the point where the connective tissue has broken down into gelatin, but the meat isn’t falling apart into mush.
Packing and Sealing the Crocks
Once the meat is cooked, you must package it for the long haul. This is the most critical stage for safety and longevity.
Sterilize Your Containers
Use glass jars or traditional stoneware crocks. Wash them in hot, soapy water and dry them in a 200°F oven for 20 minutes. This ensures they are bone-dry and free of bacteria.
Layering the Meat
Place the warm, cooked meat into the container. Pack it tightly to minimize gaps, but do not crush it. You want to leave room for the fat to flow around every piece.
The Final Seal
Pour the warm, strained lard over the meat. Ensure there is at least one to two inches of pure lard above the highest piece of meat. Gently tap the container on the counter to release any trapped air bubbles.
Let the container sit undisturbed until the fat has completely solidified and turned opaque white. Seal with a tight lid or a layer of wax paper tied with twine.
Benefits of Lard Preservation
Why choose this over canning or drying? The reasons are as much about quality as they are about survival.
- Unmatched Texture: Unlike jerky, which is tough, or canned meat, which can be mushy, confit meat remains incredibly tender and succulent.
- Energy Independence: Once sealed, these jars can stay in a cool cellar or basement for months without a single watt of electricity.
- Dual-Purpose Storage: You aren’t just storing meat; you are storing a massive amount of high-calorie cooking fat that can be used for frying, baking, and flavoring other survival foods.
- Flavor Development: Much like a fine cheese or wine, the flavor of meat stored in fat actually improves and “mellows” over the first few weeks of storage.
Challenges and Common Mistakes
The biggest threat to your larder is moisture. If even a small amount of water or “meat juice” is trapped under the fat layer, it will settle at the bottom of the jar. This creates a pocket where bacteria can grow.
Another mistake is using fat that isn’t fully rendered. If your lard still contains water or bits of protein, it will go rancid. Pure lard should be white and odorless when solid.
Temperature fluctuations are also a concern. If the storage area gets too warm, the lard will soften or melt. This breaks the physical seal and allows oxygen to penetrate, leading to rapid spoilage. Aim for a storage temperature below 55°F (13°C) for best results.
Limitations and Realistic Constraints
This is not a “set it and forget it” method for a hot apartment pantry. While the technique is ancient, it relies on a “cool” environment. In the heat of a southern summer without air conditioning, your lard will melt.
This method is best suited for those with a root cellar, a basement, or a dedicated “cold room.” If you live in a tropical climate, you will still need a refrigerator to keep the fat solid, though the meat will still last much longer than fresh cuts.
Also, consider the calorie density. Lard-preserved meat is extremely high in fat. While this is a benefit in a survival situation where calories are scarce, it may be too rich for some daily diets.
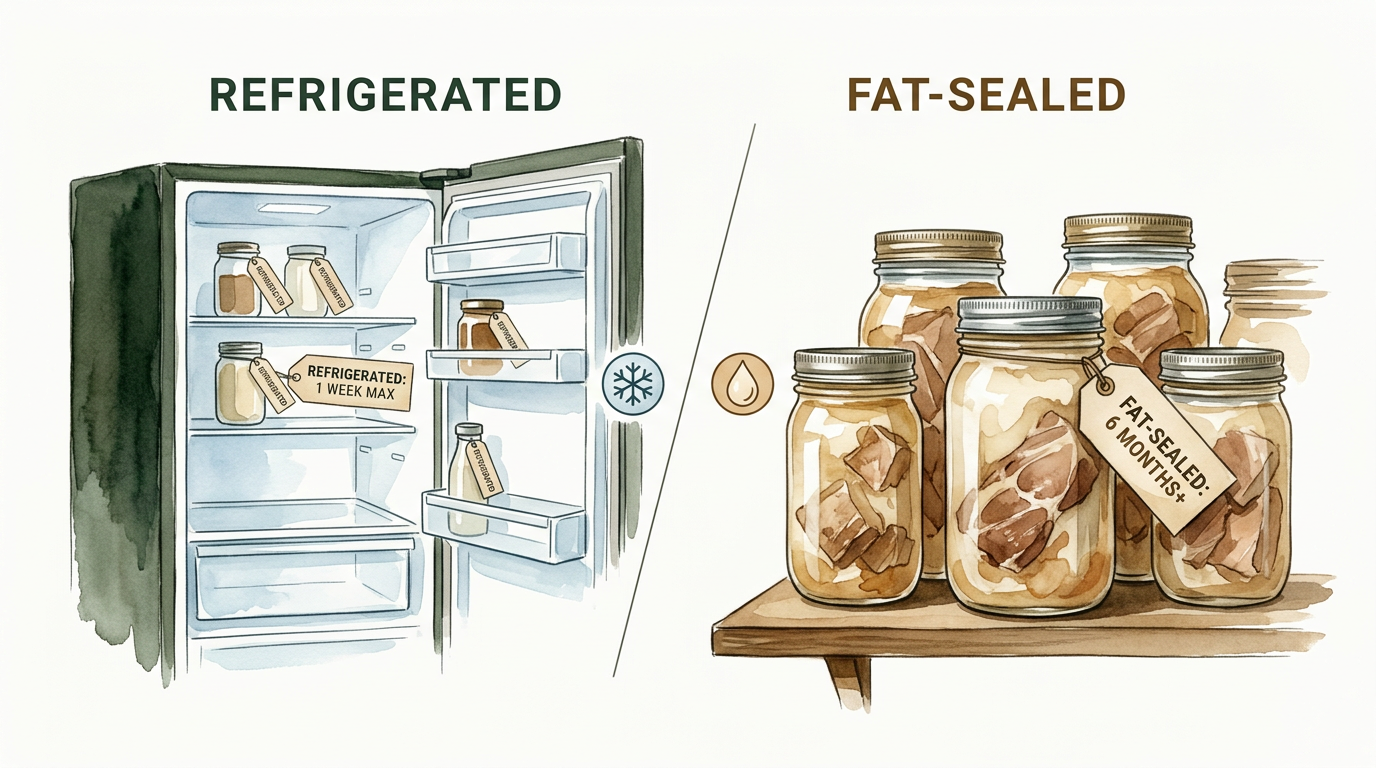
REFRIGERATED vs FAT-SEALED
It is helpful to see how this compares to our modern way of doing things.
| Factor | Refrigerated Storage | Lard-Sealed (Confit) |
|---|---|---|
| Shelf Life | 3–5 days | 4–6 months |
| Power Needed | Constant electricity | Zero (Cool cellar only) |
| Flavor | Fresh, loses quality over time | Rich, develops over time |
| Prep Time | Minutes | 2 days (Cure + Cook) |
Practical Tips for the Modern Homesteader
When you are ready to eat the meat, do not just dig it out with a spoon. You should gently warm the entire jar in a pot of water until the fat liquefies. This allows you to remove the pieces of meat without breaking them.
Once you have taken what you need, you can “reseal” the remaining meat. Simply ensure the meat is pushed back down and the fat layer is leveled and allowed to solidify again. However, every time you open the jar, you increase the risk of contamination, so smaller jars are better than one massive crock.
Use the leftover fat! The lard used for confit is heavily seasoned with the meat’s juices and aromatics. It is arguably the best medium for frying potatoes or sautéing greens.
Advanced Considerations: Aging and Flavor
Serious practitioners often talk about “ripening” their confit. In the first few weeks, the meat and fat exchange flavors. The salt moves deeper into the fibers, and the fat takes on the character of the spices.
You can experiment with different fats for different meats. Beef tallow is much harder than lard and creates a very durable seal for beef roasts or venison. Schmaltz (rendered chicken or goose fat) is delicious for poultry but has a lower melting point, meaning it requires a cooler storage area to remain solid.
Adding a small amount of “pink curing salt” (sodium nitrite) to your initial salt rub is an advanced safety measure. It provides an extra layer of protection against botulism, though many traditionalists stick to pure sea salt.
The Pioneer Larder Scenario
Imagine it is mid-November. You have just processed a hog. You have more meat than your family can eat in a month, and you want to save the best cuts for the lean weeks of February.
You take the hams and shoulders, cut them into large manageable chunks, and rub them with salt, sage, and peppercorns. After a day of curing, you simmer them in a cauldron of leaf lard over a low fire.
By sunset, you are ladling those gold-brown pieces into five-gallon stoneware crocks. You pour the clear, liquid gold fat over them until the meat disappears from sight. You carry those heavy crocks down to the cellar, where the earth is a constant 50 degrees.
Two months later, during a blizzard that has knocked out the local power lines, you go downstairs. You crack the white seal of a crock, pull out a piece of shoulder, and sear it in a cast-iron pan. Within minutes, you have a hot, tender meal that tastes like it was cooked that morning. That is the power of the fat seal.
Final Thoughts
Mastering the art of storing meat in lard is more than just learning a recipe; it is about regaining a lost piece of human heritage. It turns a temporary resource into a long-term asset. When you understand how to use fat as a shield, you no longer fear the “thaw” of a broken freezer.
Start small. Try making a single quart of pork confit this weekend. Learn the rhythm of the render and the feel of the salt cure. Once you taste the results, you will understand why this was the “gold standard” of the pioneer larder for centuries.
The skills of the past are the security of the future. By moving away from total reliance on the grid, you take another step toward true self-sufficiency. Experiment with your flavors, trust your senses, and keep your larder full.
