How To Become More Self-Sufficient Without Starting a Full-Blown Farm…
Want to start preserving your harvest, making your own soap, or building a backyard root cellar — but not sure where to begin? “Homesteading Advice” gives you instant lifetime access to 35+ practical homesteading books on food preservation, veggie gardening, DIY natural cleaning products (save over $250 per year with this skill alone), brewing, off-grid energy, and a whole lot more…
Click Here To Check It Out Now!
Build Better Soil with Cardboard: The Ultimate Guide to Sheet Mulching
Your delivery boxes are the secret ingredient to a weed-free garden bed. Don’t throw away that cardboard! It’s the highest-quality weed barrier and carbon source you can get for free. Learn how to layer waste to build soil that never needs tilling.
Gardening often feels like a constant battle against the elements and the unwanted growth that threatens your harvest. Many beginners believe they need heavy machinery or expensive chemicals to tame a wild patch of land. This modern approach often does more harm than good by destroying the delicate fungal networks beneath your feet.
Pioneers and traditional land stewards understood a simpler truth about the earth. Nature does not like bare skin; it seeks to cover itself with organic matter to protect the life within. Using cardboard mimics this natural process, turning a household nuisance into a foundation for a thriving ecosystem.
You are about to discover how to transform LANDFILL WASTE into SOIL FUEL using nothing but simple materials and a little patience. This method respects the wisdom of the past while solving the problems of the present. Let’s look at how you can stop fighting your soil and start feeding it instead.
How To Use Free Cardboard For Instant Garden Beds
Sheet mulching, often called “lasagna gardening,” is the practice of layering organic materials to create rich, fertile soil without digging. At the heart of this system lies a thick layer of corrugated cardboard. This material acts as a temporary, biodegradable barrier that suffocates weeds while providing a feast for decomposers.
This technique is used in permaculture systems and organic homesteads across the globe. It serves as a bridge between a neglected patch of weeds and a productive vegetable patch. Instead of hauling away grass clippings and old boxes, you integrate them back into the cycle of life on your property.
Think of cardboard as a concentrated form of forest floor litter. It is essentially processed wood pulp that has been flattened and dried. When it meets moisture and soil microbes, it begins a transformation that results in dark, crumbly humus. This isn’t just a trick for lazy gardeners; it is a sophisticated method of carbon sequestration and soil building.
In real-world terms, using cardboard allows you to expand your garden footprint with almost zero physical exertion compared to traditional tilling. You simply lay down the “bones” of your bed and let time do the heavy lifting. The result is a growing environment that is more resilient to drought and richer in nutrients than any tilled earth could ever be.
The Mechanics of Sheet Mulching: How It Works
The primary mechanism behind this method is light deprivation. Most garden weeds and aggressive grasses require sunlight to photosynthesize and survive. When you place a thick, overlapping layer of cardboard over them, you effectively turn off their power source. Within weeks, the plants beneath begin to die back and decompose, releasing their stored nutrients directly into the soil.
Cardboard also serves as a moisture sponge. The corrugated interior contains air pockets that help regulate temperature, while the paper fibers hold onto water. This creates a dark, damp, and protected environment that is irresistible to earthworms. As these worms move upward to feed on the cardboard, they tunnel through the soil, aerating it naturally without the need for a broadfork or tiller.
Fungal networks are the true heroes of this process. Saprobic fungi, which specialize in breaking down complex carbohydrates like cellulose and lignin, find a perfect home in wet cardboard. These fungi extend their hyphae throughout your garden bed, transporting water and minerals to your plants’ roots. By using cardboard, you are essentially building a massive fungal battery that powers your garden for years to come.
The process of sheet mulching follows a specific order of operations to ensure success. First, you must prepare the site by scalping the weeds as low as possible. Next, you saturate the ground to ensure there is deep-seated moisture. Then comes the cardboard, followed by layers of “green” nitrogen-rich materials and “brown” carbon-rich materials, effectively creating a slow-cook composting pile right on top of your future garden.
Step 1: Site Preparation
Walk your intended garden space and remove any large woody debris or stones. You do not need to pull the weeds; simply mow them or use a string trimmer to get them as close to the ground as possible. Leave the trimmings where they fall, as they will provide the first layer of nitrogen for your new bed.
Step 2: Hydration is Vital
Water the area thoroughly before laying down any cardboard. Dry soil is dormant soil, and the microbes you want to attract need moisture to move. If you skip this step, the cardboard may act as a hydrophobic barrier, preventing rain from reaching the parched earth below.
Step 3: Laying the Foundation
Flatten your boxes and remove all plastic tape, staples, and glossy labels. Overlap the edges by at least six inches to ensure no light can penetrate the gaps. If you leave even a small crack, tenacious grasses like Bermuda or crabgrass will find their way through to the surface.
Benefits of Cardboard Gardening
The most immediate benefit of using cardboard is the total suppression of weeds. Unlike plastic landscape fabric, which eventually tears and allows weeds to grow through the mesh, cardboard decomposes. By the time the cardboard is gone, the weeds beneath it have been turned into soil, and your garden plants have established a dominant root system.
Cost is another major factor that favors this method. Most gardeners spend hundreds of dollars on bags of mulch, fertilizer, and weed killers. Cardboard is a waste product that businesses are often desperate to get rid of. By sourcing free boxes, you can build hundreds of square feet of garden space for the price of a few loads of compost or wood chips.
Soil structure improves dramatically under a cardboard mulch. Tilling destroys the natural “aggregates” in the soil, leading to compaction and poor drainage. Sheet mulching preserves these aggregates and adds organic matter from the top down. This mimics the way soil is naturally built in a forest, leading to a “sponge-like” texture that holds water during dry spells and drains well during heavy rains.
Finally, the ecological impact cannot be overstated. You are diverting paper waste from landfills and sequestering carbon in your backyard. You are also providing a habitat for beneficial insects, spiders, and microorganisms that are essential for a healthy garden. This is a holistic approach that treats the garden as a living system rather than a chemistry project.
Challenges and Common Mistakes
One of the most frequent errors is using the wrong type of cardboard. Boxes with heavy wax coatings, such as those used for shipping produce or frozen meat, will not break down. These coatings prevent water from passing through and can trap gases in the soil, potentially harming your plants. Always stick to plain, matte-finished brown corrugated cardboard.
Failure to overlap the edges is another pitfall that leads to frustration. Grass is incredibly opportunistic and will find the path of least resistance. If you simply lay boxes side-by-side, you will eventually see a line of weeds growing perfectly along the seams. A generous six-to-eight-inch overlap is your best insurance policy against weed intrusion.
Many gardeners also underestimate the amount of material needed to weigh the cardboard down. A bare sheet of cardboard will curl and blow away in the first stiff breeze. You must have your top mulch—such as wood chips, straw, or compost—ready to apply immediately after the cardboard is laid. This top layer also protects the cardboard from UV rays, which can make it brittle and less effective.
Neglecting moisture during the build process can result in a “dry sandwich” effect. If the layers between the cardboard and the top mulch stay dry, decomposition will grind to a halt. You should water each layer as you add it to the stack. This ensures that the microbial “fire” stays lit and the breaking down of organic matter happens consistently across the entire bed.
Limitations: When This May Not Be Ideal
While cardboard is a miracle for most garden scenarios, it is not a universal solution. In areas with extreme infestations of woody perennials like blackberries, raspberries, or certain types of running bamboo, cardboard may not be enough. These plants have massive energy reserves in their root systems and can sometimes push through or travel long distances underground to bypass the barrier.
Environmental factors also play a role in the effectiveness of sheet mulching. In extremely arid climates with very little rainfall, cardboard may take several years to break down. Without consistent moisture, the biological activity required to rot the paper simply isn’t present. In these cases, you may need to supplement with frequent irrigation to keep the process moving.
There is also the concern of “slug havens.” In very wet, temperate climates, the cool, damp space beneath the cardboard is a paradise for slugs and snails. If you are growing sensitive leafy greens or young seedlings, you may find an increase in pest pressure during the first year of a new bed. Usually, as the bed matures and predators like ground beetles move in, this balance stabilizes, but it is a factor to monitor.
Aesthetics can be a hurdle for some. Until the top layer of mulch is applied, a yard covered in cardboard can look like a construction site or a junk pile. If you live in a neighborhood with strict homeowners’ association rules, you will need to work quickly to cover the cardboard with a decorative mulch like cedar chips or dark compost to keep the peace with your neighbors.
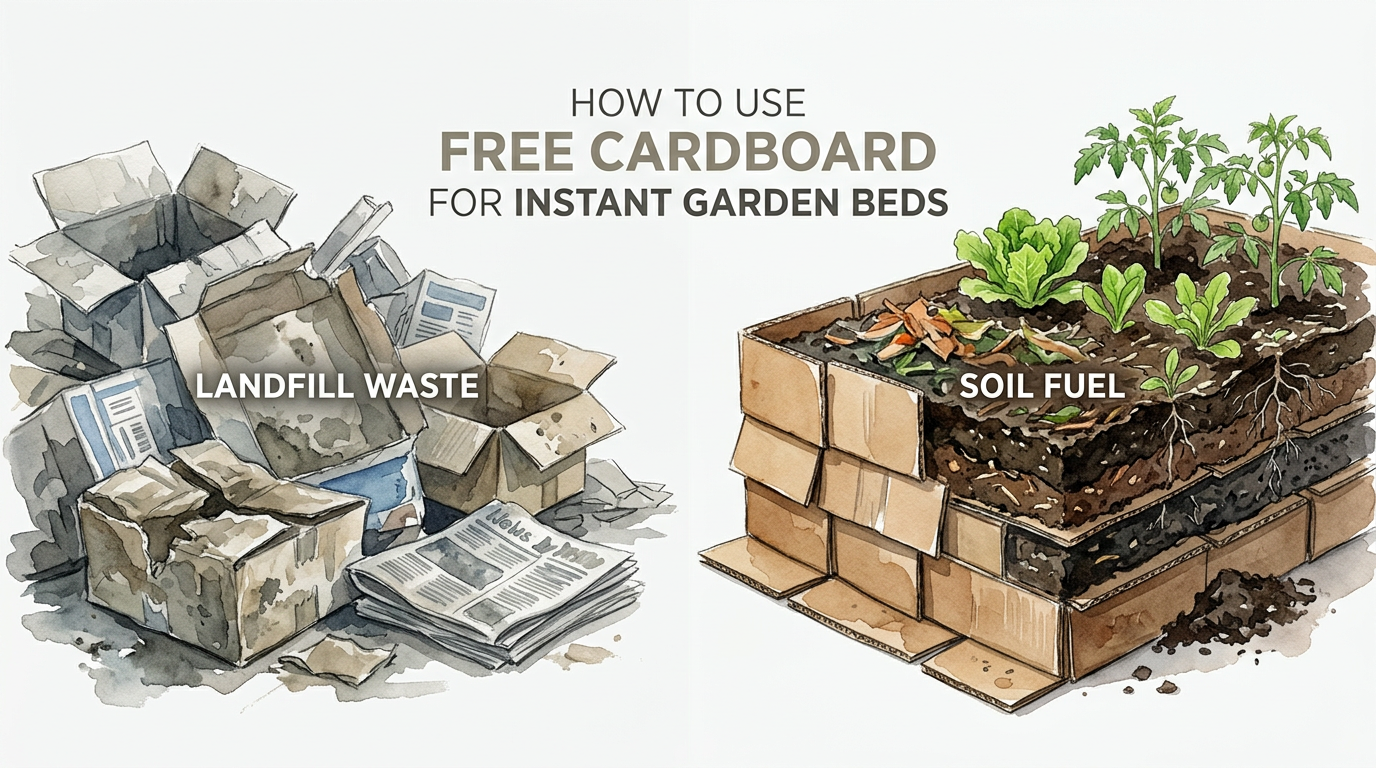
Comparison: LANDFILL WASTE vs SOIL FUEL
To understand the value of cardboard, we must look at it through the lens of resource management. Traditionally, we view used shipping boxes as a burden to be discarded. In a regenerative system, we view them as a concentrated source of energy that has already been harvested and processed for our use.
| Feature | Landfill Waste Approach | Soil Fuel Approach |
|---|---|---|
| Resource Cost | Expensive (Trash pickup fees) | Free (Resource recovery) |
| Soil Impact | Neutral to Negative | Highly Positive (Builds Humus) |
| Labor Level | High (Hauling/Sorting) | Low (Flattening/Layering) |
| Ecosystem Service | None | Worm habitat & Fungal support |
| Carbon Cycle | Released as Methane | Stored as Organic Matter |
When cardboard is sent to a landfill, it is often buried in anaerobic conditions. This leads to the production of methane, a potent greenhouse gas. By using it in your garden, you are ensuring that the carbon returns to the earth in a beneficial form. You are effectively “upcycling” a industrial product into a biological asset.
This comparison highlights the difference between a linear economy and a circular one. The pioneer-grit mindset is about seeing the potential in everything. Where others see a box from a mega-retailer, the self-reliant gardener sees the “brown” layer of a future tomato patch.
Practical Tips and Best Practices
Sourcing your cardboard is the first step toward a successful garden expansion. Look for large boxes from appliance stores, bicycle shops, or furniture warehouses. These larger sheets mean fewer seams and less work for you. Avoid small boxes from grocery stores unless you have no other choice, as they require significantly more overlapping.
Removing the tape is perhaps the most tedious but necessary task. Modern shipping tape is often made of biaxially oriented polypropylene, which will never break down in your soil. It will remain as plastic ribbons for decades, tangling in your garden tools and interfering with root growth. Make it a habit to strip every inch of tape before the cardboard hits the ground.
For the best results, aim for a total mulch depth of 6 to 12 inches on top of your cardboard. This might seem excessive, but organic matter settles and shrinks rapidly as it decomposes. A foot of loose straw and compost in the autumn will often become a rich three-inch layer of soil by the following spring.
If you intend to plant immediately, you can simply use a garden knife to cut an “X” through the cardboard. Dig a small hole, fill it with a handful of high-quality compost, and set your seedling inside. This allows you to have a productive garden on day one while the cardboard works underneath to kill the grass and build the soil for next year.
Recommended Layering Sequence
- Base: Scalped grass and weeds (The “Nitrogen Hit”).
- Foundation: Heavy-duty corrugated cardboard, soaked in water.
- Nitrogen Layer: 2 inches of aged manure, compost, or fresh grass clippings.
- Bulk Carbon Layer: 4-6 inches of straw, shredded leaves, or spoiled hay.
- Finish Layer: 2 inches of wood chips or high-quality compost for aesthetics and weight.
Advanced Considerations for the Serious Practitioner
Once you have mastered the basic sheet mulch, you can begin to optimize the biology of the bed. Consider “innoculating” your cardboard with specific mushroom spawn. Species like King Stropharia (Wine Cap) thrive in wood chips and cardboard. By adding spawn between your layers, you can harvest edible mushrooms while your garden bed is being built.
Nutrient density is another area for advancement. You can sprinkle rock dust, sea kelp, or biochar directly onto the soil before laying the cardboard. The cardboard acts as a “lid,” preventing these amendments from washing away and keeping them in the root zone where microbes can process them into plant-available forms.
Consider the “nitrogen drawdown” effect when using high-carbon materials like cardboard. When microbes break down carbon, they require nitrogen to fuel the process. If you have a very thick layer of cardboard and not enough green material, your plants may temporarily show signs of nitrogen deficiency. Balancing your “browns” and “greens” is an art form that you will refine over several seasons.
Think about the long-term rotation of your beds. A cardboard-based bed is at its peak fertility about 12 to 18 months after it is built. Many practitioners build new beds every year, moving their most demanding crops (like heavy-feeding squash or corn) to the matured beds while using new beds for lighter feeders or as a way to “clean” a new patch of land.
Real-World Example: The 100-Square-Foot Transformation
Imagine a section of your backyard that is currently covered in tough, yellowing fescue and dandelion. To dig this out by hand would take a full weekend of back-breaking labor and leave you with a pile of sod to dispose of. Instead, you decide to use the cardboard method.
You collect ten large refrigerator boxes from a local appliance dealer. After removing the tape, you have roughly 150 square feet of coverage. You mow the patch on the lowest setting and soak it with a hose for 20 minutes. You lay the boxes down, ensuring the overlap is generous, and then you bring in your materials.
You apply four wheelbarrows of composted horse manure, followed by two square bales of straw. To finish it off and keep it looking tidy, you top it with a thin layer of bark mulch. Total cost? Perhaps $20 for the straw and gas for the truck. Total time? Three hours of light work.
Six months later, you peel back a corner of the cardboard. The grass is gone, replaced by a dark, moist layer of worm castings. The cardboard itself is soft and tattered, easily yielding to a garden trowel. When you plant your tomatoes in the spring, the roots dive deep into the untilled earth, finding a reservoir of moisture and nutrients that wouldn’t exist in a traditional garden bed.
Final Thoughts
Building soil with cardboard is more than just a gardening hack; it is a return to a way of living that values every resource. It teaches us to look at “waste” as an opportunity and to work with the natural cycles of decay and rebirth. By slowing down and layering with intention, we create landscapes that are productive, sustainable, and beautiful.
This method rewards the patient gardener. While others are out tilling their soil every spring and fighting a losing battle against the weed seeds they’ve brought to the surface, you will be sitting back and watching your soil grow thicker and richer on its own. The pioneer-grit approach isn’t about working harder; it’s about working with the wisdom of the earth.
Start small if you must, but start today. Save your next few delivery boxes, find a patch of weeds, and begin the process of turning your waste into the fuel that will feed your family. Once you see the magic that happens beneath a simple sheet of cardboard, you will never look at a “trash” day the same way again.
