How To Become More Self-Sufficient Without Starting a Full-Blown Farm…
Want to start preserving your harvest, making your own soap, or building a backyard root cellar — but not sure where to begin? “Homesteading Advice” gives you instant lifetime access to 35+ practical homesteading books on food preservation, veggie gardening, DIY natural cleaning products (save over $250 per year with this skill alone), brewing, off-grid energy, and a whole lot more…
Click Here To Check It Out Now!
Is your garden on a chemical IV drip or is it a self-sustaining biological engine? Most store-bought soils are biologically dead, requiring constant chemical inputs. True ‘Living Soil’ is captured from your own land. Learn how to use indigenous microorganisms (IMOs) to turn your garden from a sterile box into a thriving ecosystem.
For generations, our ancestors didn’t rely on plastic bags of sterilized peat or synthetic salts to coax life from the earth. They understood a fundamental truth: the land knows how to heal itself if we simply step out of the way and invite the local life back in. This isn’t just about dirt; it is about the invisible workforce of fungi, bacteria, and yeasts that have spent millennia adapting to your specific climate, your rainfall, and your native trees.
By transitioning to a living soil system, you are not just growing plants; you are stewarding a legacy of microbial wisdom. This guide will walk you through the process of reclaiming that vitality using the time-tested principles of Korean Natural Farming (KNF) and the power of Indigenous Microorganisms.
Indigenous Microorganism Soil Guide
Indigenous Microorganisms, or IMOs, are the local microbial communities that naturally inhabit your specific environment. These aren’t generic lab-grown strains found in a store-bought bottle; these are the rugged survivors that have thrived in your backyard for centuries. They include a diverse consortium of beneficial fungi, bacteria, yeasts, and actinomycetes that are already perfectly tuned to your region’s “frequency.”
In a practical sense, IMOs act as the primary decomposers and nutrient cyclers in a healthy ecosystem. They break down organic matter into forms that plants can actually recognize and absorb. Without them, your garden is just a collection of inert minerals waiting for a chemical spark. With them, the soil becomes a living, breathing entity that builds its own structure and defends itself against disease.
Real-world application of IMOs is the backbone of Korean Natural Farming. It involves “trapping” these microbes in their peak state—usually from an undisturbed forest—and then multiplying them through a series of stages until they can be reintroduced to your garden beds. Think of it as capturing the “immune system” of an old-growth forest and transplanting it into your vegetable patch.
How to Capture and Cultivate IMOs: The Step-by-Step Path
Cultivating IMOs is a multi-stage journey that moves from the forest floor to your garden soil. Each stage is designed to stabilize and then expand the microbial population until it is robust enough to handle the transition to your cultivated land.
The Collection (IMO 1)
The first step is to create a “lure” for the microbes. Cook a batch of white or brown rice until it is slightly firm—al dente is better than mushy. This rice provides the simple carbohydrates that local fungi find irresistible.
Place the cooled rice into a wooden box, filling it only about two-thirds of the way to allow for airflow. Cover the top with a breathable material like a paper towel or cotton cloth, secured with a rubber band. Now, find an undisturbed spot in a local deciduous forest where the leaf litter (duff) is deep and the soil feels cool and damp.
Bury the box partially in the leaf litter, covering it with more leaves to protect it from the sun and rain. Leave it for three to seven days, depending on the temperature. When you return, the rice should be covered in a thick, white, fuzzy mat of mycelium. This “white fuzz” is the gold you are looking for. If you see black or slimy growth, the conditions were too wet or anaerobic, and you should start over.
The Preservation (IMO 2)
Once you have your colonized rice (IMO 1), you must preserve these microbes before they run out of food and die. Weigh the rice and mix it with an equal weight of raw brown sugar. The sugar creates an osmotic pressure that puts the microbes into a dormant state, essentially “pickling” them for long-term storage.
Pack this mixture into a glass jar, covering it with a breathable lid. In this state, your IMO 2 can sit in a cool, dark place for months, ready to be woken up when you are ready to build your soil.
The Multiplication (IMO 3 and IMO 4)
To create enough material for a garden, you must multiply these dormant microbes. IMO 3 involves mixing your IMO 2 “syrup” with a carbon source, usually wheat mill run or rice bran. You add water (ideally with other KNF inputs like fermented plant juice) until the moisture content is about 65%—it should hold its shape when squeezed but not drip.
Stack this mixture into a pile and cover it with straw. As the microbes wake up and begin to feast on the bran, the pile will heat up. You must turn the pile to keep the temperature between 110°F and 130°F. After about five to seven days, the pile will be covered in white fungal growth and smell like a clean forest floor.
IMO 4 is the final transition. You mix your finished IMO 3 with an equal amount of your actual garden soil. This “introduces” the forest microbes to the specific minerals and conditions of your garden. After another week of fermentation, you have a concentrated “starter” that is fully adapted to your home turf.
Benefits of Living Soil Systems
The shift from chemical-dependent gardening to a biological engine offers measurable advantages that go far beyond just “feeling good” about your methods.
- Nutrient Bioavailability: IMOs solubilize minerals like phosphorus and potassium that are often “locked” in the soil, making them available to plant roots without the need for synthetic fertilizers.
- Disease Suppression: A diverse microbial population creates a “competitive exclusion” environment. When the “good guys” occupy every niche, there is no room for pathogens like fusarium or pythium to take hold.
- Soil Structure: Fungal hyphae act as the glue of the soil, binding particles into aggregates. This improves “tilth,” allowing for better water infiltration and air exchange.
- Drought Resilience: Microbes, particularly mycorrhizal fungi, essentially extend the root system of your plants, allowing them to access water from deep within the soil profile that they couldn’t reach on their own.
- Cost Independence: Once you learn to collect your own IMOs, your reliance on expensive bagged amendments and bottled nutrients drops to near zero.
Challenges and Common Mistakes
While the process is straightforward, nature requires a certain level of finesse. Beginners often stumble on a few specific hurdles that can ruin a batch of IMO.
Moisture Management: This is the most frequent point of failure. If your rice in IMO 1 is too wet, it will attract anaerobic bacteria and turn into a stinking, grey mess. Similarly, if your IMO 3 pile is too wet, it will ferment improperly and potentially harbor pathogens. Aim for “damp sponge” consistency, never “saturated.”
Temperature Spikes: During the IMO 3 stage, the microbes generate significant heat. If the pile exceeds 140°F, you risk killing off the very fungi you worked so hard to collect, leaving behind only heat-loving (thermophilic) bacteria. Constant monitoring with a compost thermometer is essential during the multiplication phase.
Contamination: Collecting in a “dirty” area—such as near a chemical-treated lawn or a high-traffic urban zone—can introduce unwanted contaminants. Always seek out the most “pristine” and undisturbed local forest possible for your initial collection.
Limitations: When This May Not Be Ideal
Living soil is a powerful tool, but it is not a magic wand that works instantly in every situation. There are realistic constraints to consider before diving in.
In highly urbanized environments where “pristine” forest soil is unavailable, capturing a truly diverse IMO population can be difficult. While you can collect from under a single old tree in a park, the diversity may be lower than a deep-woods collection. In these cases, it may take several seasons of “re-wilding” your garden before the full benefits are realized.
Climate also plays a role. If you live in an extreme desert or a frozen tundra, the window for collecting and fermenting IMOs is much smaller. You must time your collection to the “shoulder seasons” when the soil is naturally waking up. Furthermore, the labor-intensive nature of turning piles and monitoring temperatures may not fit every gardener’s lifestyle. It requires more “observation time” than simply shaking a bottle of blue crystals.
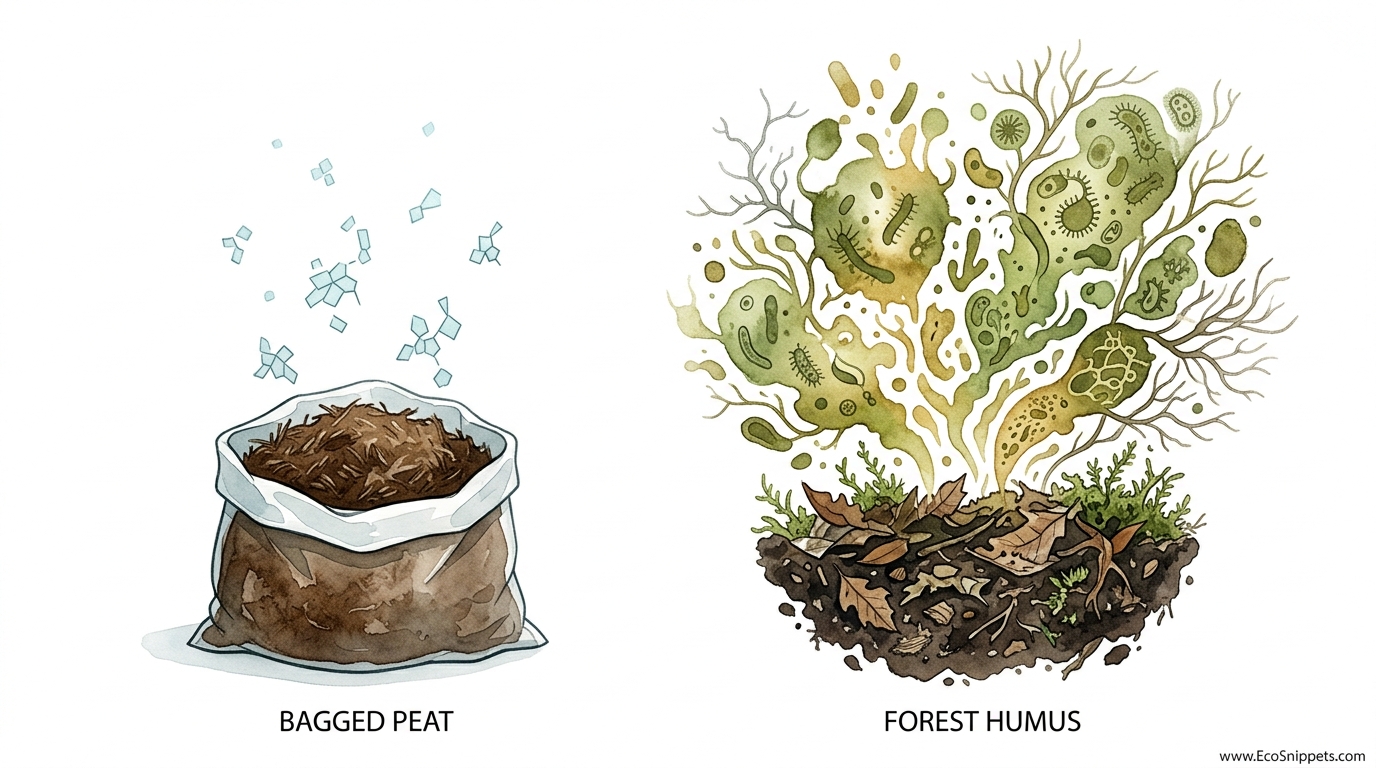
Comparing Bagged Peat vs. Forest Humus
It is helpful to understand the difference between what we often buy and what we are trying to create. Most “potting soils” are based on Canadian Sphagnum Peat Moss, which is a very different material than the forest humus we capture in an IMO collection.
| Feature | Bagged Peat Moss | Native Forest Humus / IMO |
|---|---|---|
| Biological Activity | Sterile or very low activity. | Highly active; billions of diverse microbes. |
| Nutrient Content | Virtually zero; requires added fertilizer. | Rich in trace minerals and cycling nutrients. |
| PH Level | Naturally acidic (3.5 – 4.5). | Generally balanced or adapted to local soil. |
| Sustainability | Harvested from ancient bogs; slow to renew. | Self-renewing and sourced from your own land. |
| Water Retention | High, but difficult to re-wet once dry. | Moderate to high; improves soil aggregation. |
Practical Tips and Best Practices
If you are ready to start your first collection, keep these “pioneer-grit” tips in mind to ensure success.
- Follow the Bamboo: If you have access to a bamboo grove, collect there. Bamboo roots secrete high amounts of sugar, attracting some of the most vigorous and beneficial microorganisms on the planet.
- Scent is Your Guide: A healthy IMO collection should smell like “sweet earth” or “fresh mushrooms.” If it smells like vinegar, rotten eggs, or ammonia, discard it and investigate your moisture levels.
- Timing the Collection: The best time to collect is in the spring or fall when the “bloom” of the forest is at its peak. Look for when the indigenous wildflowers are starting to pop; that’s when the soil biology is most active.
- Feed the Soil, Not the Plant: Once you apply your IMO 4 to the garden, don’t leave it bare. Cover it with a “living mulch” or a layer of straw. The microbes need protection from UV rays and a constant source of organic matter to keep working.
Advanced Considerations: Fungal vs. Bacterial Dominance
As you gain experience, you can begin to “tune” your IMO collections based on what you are growing. Different plants prefer different microbial ratios in the soil.
Tree crops, perennials, and berries generally thrive in a fungal-dominant soil. To encourage this, collect your IMOs from deep, old-growth forests and use more woody materials in your multiplication piles. Fungi are the long-term infrastructure builders of the soil.
Annual vegetables and grains, on the other hand, often prefer a more bacterial-dominant soil. You can shift the balance by collecting from healthy grasslands or edges of the forest and using “greener” materials in your piles. Understanding this balance allows you to create “bespoke” biology for different areas of your homestead.
Scenario: Rehabilitating a Dead Raised Bed
Imagine you have a raised bed that has been used for five years. The soil is hard, dusty, and nothing grows well without heavy doses of store-bought fertilizer. This is a classic “sterile box” scenario.
To fix this, you would first perform a local IMO collection. Once you have progressed to IMO 4 (mixing the forest microbes with some of that “dead” garden soil), you would apply a 1-inch layer of this IMO 4 to the top of the bed. Instead of tilling it in, you would cover it with a thick layer of high-quality compost and then a layer of wood chips or straw.
Within weeks, the IMOs will begin to migrate downward, breaking up the compaction and re-establishing the nutrient cycle. By the next season, you will find that the soil has “fluffed up,” and the plants will require significantly less water and almost no external fertilizer. You have effectively “re-booted” the biological engine of that bed.
Final Thoughts
Reclaiming the life in your soil is perhaps the most revolutionary act a gardener can perform. It is a move away from the “extractive” mindset of modern agriculture and a return to the “stewardship” model used by those who came before us. By focusing on indigenous microorganisms, you are honoring the specific history and vitality of your own land.
It takes patience to work with the speed of biology rather than the speed of chemistry. However, the rewards—resilient plants, nutrient-dense harvests, and a self-sustaining ecosystem—are well worth the effort. You aren’t just a gardener anymore; you are a soil builder, a guardian of the invisible world that makes all life possible.
Start small, observe closely, and don’t be afraid to fail a few times. The forest has been perfecting this process for millions of years; it is ready to share its secrets with you if you are willing to listen. Your garden is waiting to wake up.
