How To Become More Self-Sufficient Without Starting a Full-Blown Farm…
Want to start preserving your harvest, making your own soap, or building a backyard root cellar — but not sure where to begin? “Homesteading Advice” gives you instant lifetime access to 35+ practical homesteading books on food preservation, veggie gardening, DIY natural cleaning products (save over $250 per year with this skill alone), brewing, off-grid energy, and a whole lot more…
Click Here To Check It Out Now!
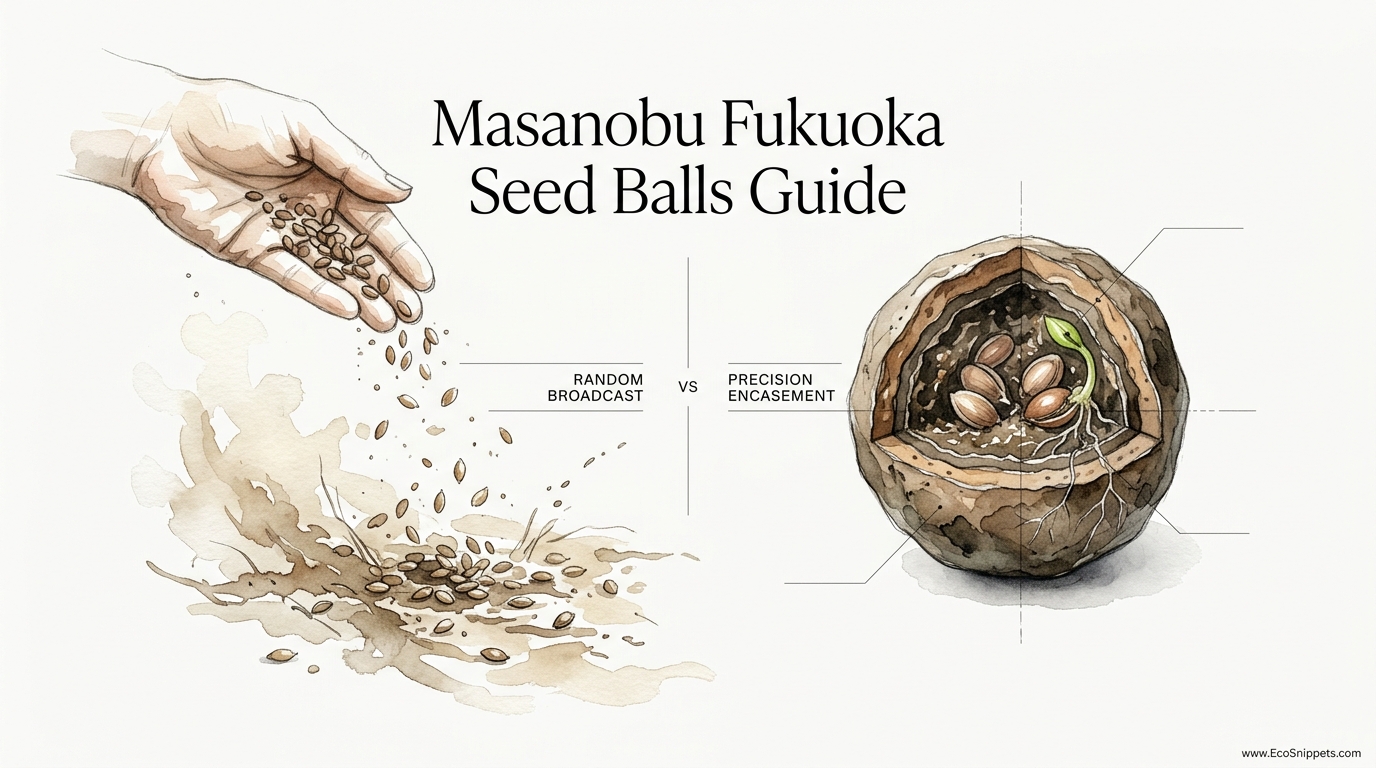
One of these is a buffet for the birds; the other is a 100% germination insurance policy. Most people scatter seeds and hope for the best, but the birds are the ones who actually profit. Encasing your seeds in a clay-compost shell is the ancient Japanese secret to guaranteed growth without tilling or irrigation. Stop broadcasting and start building biological bombs that actually sprout.
Imagine a technology so effective it can turn a desert back into a forest without a single tractor. This isn’t a futuristic laboratory invention. It is a humble ball of mud and life. For centuries, farmers across the globe used similar methods, but it took a Japanese microbiologist turned farmer to refine the practice into a weapon of mass restoration. You are looking at a system that respects the soil’s integrity while giving the seed everything it needs to survive the harshest conditions.
Modern agriculture teaches us to fight the earth. We are told to rip it open, pour chemicals into the wounds, and force life to emerge through sheer mechanical will. Masanobu Fukuoka saw the folly in this struggle. He understood that a seed is a compact miracle that already knows how to grow. It just needs a fair chance. The seed ball provides that chance by acting as a protective fortress, a nutrient-rich nursery, and a moisture-retaining vessel all at once.
Masanobu Fukuoka Seed Balls Guide
Masanobu Fukuoka was a man who looked at the world differently. Born in 1913 on the island of Shikoku, he spent his early career as a plant pathologist. While working in a government laboratory, he began to question the entire foundation of modern, industrial farming. He eventually returned to his family’s citrus orchard to develop what he called “Natural Farming” or “Do-Nothing Farming.” At the heart of this philosophy was the *Nendo Dango*, or “Clay Dumpling.”
A seed ball is a small sphere made from a specific ratio of clay, organic matter (compost), and a variety of seeds. Its purpose is to protect the seed from external threats while it waits for the perfect environmental conditions to germinate. In the natural world, a seed dropped on bare soil is vulnerable. It can be eaten by birds, carried off by ants, scorched by the sun, or blown away by the wind. The seed ball solves every one of these problems with a single, elegant solution.
Fukuoka used these clay pellets to re-green mountainsides and grow grain crops without ever picking up a plow. He didn’t just plant one type of seed; he threw a mixture. He believed that nature, not the farmer, should decide which plant is best suited for a specific patch of earth. If the soil was too dry, perhaps only the hardiest grasses would take. If it was a shaded hollow, the leafy greens might flourish. This method is a partnership with the land, rather than a conquest over it.
The history of this technique stretches back further than the 20th century. Ancient Egyptians used a version of this method to repair their fields after the annual flooding of the Nile. It was a way to sow seeds into the receding mud without losing them to the current. Fukuoka rediscovered this ancestral wisdom and modernized it for a world facing desertification and soil depletion. Today, these “bombs” are used by guerrilla gardeners in concrete jungles and by reforestation experts in the African savannah.
The Anatomy of a Biological Bomb: How It Works
To understand why a seed ball works, you have to look at it through the eyes of a seed. Most seeds fail because they germinate at the wrong time or in the wrong place. They get a little bit of dew, think it’s the monsoon, sprout a tiny root, and then die when the sun comes out an hour later. The clay shell prevents this “false start.” It requires a significant, sustained soaking—the kind of rain that actually indicates a growing season—to break down the clay and trigger germination.
The clay acts as the primary armor. It is hard and unappealing to animals. A bird looking for an easy meal won’t waste its time pecking at a hardened clay marble. Ants can’t haul it away to their colony. This protection allows the seed to sit dormant for months, or even years, until the rains arrive. This is the ultimate “set it and forget it” strategy for the self-reliant grower.
Inside the shell, the compost or humus provides the immediate fuel. When the rain finally dissolves the clay, the seed finds itself in a tiny, localized pocket of rich, microbial-active soil. It doesn’t have to struggle through compacted, dead earth immediately. It gets a “head start” with a dose of nutrients that helps it establish a strong taproot quickly. This is crucial in wild or degraded areas where the native soil might be poor or non-existent.
The physical weight of the ball is also an advantage. Unlike a bare seed that might bounce off the surface and settle in a crack, the seed ball has enough mass to settle firmly against the soil. It creates better seed-to-soil contact. As the clay softens, it creates a small, moist micro-climate around the emerging sprout. This moisture retention is often the difference between life and death in arid environments.
Master the Mix: How to Build Your Seed Balls
Building a seed ball is a tactile, grounding experience. It is a craft that requires a feel for the material. While there are many recipes, the most reliable “pioneer” method follows a simple ratio. You are aiming for a consistency that feels like modeling clay—firm enough to hold its shape, but not so wet that it becomes a muddy mess.
The Basic Ratio
- 5 Parts Red Clay: You want a high-mineral clay. Red volcanic clay is the gold standard because of its mineral content and binding strength. If you can’t find it in your soil, powdered pottery clay from a supply store works perfectly.
- 3 Parts Organic Matter: Use finely sifted compost, worm castings, or well-rotted manure. This must be sieved through a fine mesh. Large sticks or clumps will weaken the structural integrity of the ball.
- 1 Part Seed Mixture: This should be a diverse blend. Include a “pioneer” species (like clover or hardy grasses), a “producer” species (like vegetables or grains), and a “stabilizer” species (like native shrubs or trees).
- Water: Added sparingly, a spoonful at a time.
The Step-by-Step Process
First, mix your dry ingredients. Combine the sifted clay and compost in a large tub. Blend them thoroughly until the color is uniform. If you are using multiple types of seeds, mix them into the dry powder now to ensure an even distribution. You want every ball to be a “mystery bag” of potential life.
Second, add water slowly. This is where most beginners fail. If you add too much, you’ll have a bucket of slurry. You are looking for a “dough” consistency. Knead the mixture with your hands. It should be pliable but not sticky. If it sticks to your fingers, add a little more dry clay. If it crumbles when you try to roll it, add a few drops of water.
Third, roll the balls. Take a small pinch of the dough and roll it between your palms. The ideal size is about the diameter of a cherry or a large marble (1/2 inch to 1 inch). If the balls are too large, the seeds in the center may struggle to break through the thick wall. If they are too small, they won’t have enough protective mass.
Fourth, dry them thoroughly. Place your finished balls on a flat tray in a shaded, airy spot. Do not dry them in direct, scorching sun, as this can cause the clay to crack and potentially damage the seeds. Let them dry for 24 to 48 hours until they are rock hard. Once they are dry, they are stable and ready for storage or deployment.
The Benefits of Precision Encasement
The shift from random broadcasting to precision encasement is more than just a technique; it is a strategic advantage. When you scatter loose seed, you are essentially gambling. You are betting that the wind won’t blow, the birds aren’t hungry, and the rain will be perfect. The seed ball removes these variables from the equation.
One major benefit is the efficiency of labor. You can manufacture thousands of these balls in a single afternoon. Once they are dry, they can be stored in a cardboard box for years. You can carry a bag of them on a hike and “plant” an entire hillside just by tossing them as you walk. There is no need for tilling, digging holes, or hauling heavy equipment into the woods. This is the definition of low-input, high-output farming.
Another advantage is the health of the plant itself. A seed that germinates in a seed ball is “born” in the place where it will live its entire life. It doesn’t suffer from “transplant shock” like nursery-grown saplings. Its roots grow naturally into the surrounding soil from day one. Studies have shown that trees grown from seed in situ often develop deeper, more resilient taproots than those grown in plastic pots and moved later.
The biodiversity potential is also immense. Because you are throwing a “poly-culture” of seeds, you are allowing the environment to perform its own natural selection. This creates a more stable and resilient ecosystem. If a disease hits one species, the others in the mix will survive to cover the ground. You aren’t just planting a crop; you are initiating a succession of life.
Challenges and Common Mistakes
Even an ancient secret has its pitfalls. The most common mistake is using the wrong kind of seeds. You must choose seeds that are appropriate for your climate and soil type. Throwing tropical fruit seeds into a high-desert environment is a waste of clay and effort. Research your local native species and use them as the backbone of your mix.
Another frequent error is “over-seeding” the ball. It is tempting to pack twenty seeds into one marble, thinking you’ll get a lush cluster. In reality, those twenty sprouts will immediately begin competing for the tiny amount of moisture and nutrients inside the ball. They will choke each other out. Aim for 2 to 5 seeds per ball. This ensures that the strongest individual has the space to thrive.
Timing is the final hurdle. While seed balls protect the seed, they don’t make it invincible. If you throw them out in the middle of a record-breaking drought with no rain in sight for six months, the seeds may eventually lose their viability due to extreme heat. The best time to “bomb” an area is just before the arrival of your region’s most reliable rainy season. In many climates, this is late autumn or early spring.
Poor drying is also a silent killer. If you store seed balls while they are still slightly damp, they will grow mold inside the container. Even worse, the moisture might trigger the seeds to germinate inside the box. You’ll open your storage container to find a tangled mess of white, dying sprouts. Always ensure they are bone-dry and store them in a breathable container like a burlap sack or a cardboard box. Never use plastic bags.
Limitations: When This May Not Be Ideal
It is important to recognize that seed balls are not a magic wand for every situation. They are a tool for restoration and natural farming, but they have their limits. For instance, they do not work well in areas with very thick, established sod or aggressive invasive grasses. The tiny sprout emerging from the clay will simply be shaded out and strangled by the existing root mats before it can get established. In these cases, some minimal site preparation—like mowing or light mulching—might be necessary.
Environmental constraints also play a role. In extremely arid regions where it might not rain for several years, even a seed ball can’t save a seed from losing its life force. The “shelf life” of a seed is finite. While the clay helps, it doesn’t stop the biological clock. Most vegetable seeds are good for 2-3 years in a ball, while some tree seeds may only last a season.
There is also the “surface-only” limitation. Because you are tossing these on top of the soil, they are reliant on the rain to melt the clay and wash the roots downward. If the ground is as hard as concrete and has no cracks or organic mulch to catch the melting clay, the seedling might struggle to penetrate the earth. Seed balls perform best on soil that has at least some degree of natural texture or a light layer of leaf litter.
Finally, consider the scale of your project. If you are trying to grow a perfectly straight row of prize-winning carrots for a county fair, seed balls are the wrong tool. They are designed for “wild” growth and random distribution. They are for the forest-builder and the meadow-maker, not the ornamental gardener who needs every plant to be exactly six inches apart.
Comparison: Traditional Seeding vs. Seed Balls
| Feature | Random Broadcast | Seed Ball (Precision) |
|---|---|---|
| Predation Protection | None; 80-90% loss to birds/insects | High; clay armor deters most animals |
| Moisture Retention | Low; seeds dry out quickly | High; clay holds moisture for germination |
| Nutrient Supply | None; reliant on existing soil | Built-in; compost provides early fuel |
| Labor Requirement | Minimal to start, high maintenance | Upfront prep, zero maintenance later |
| Success Rate | Variable/Low (5-15%) | Reliable/High (60-80%) |
Practical Tips for Success
If you want to take your seed balling to the next level, start thinking about your “additives.” Pioneer farmers didn’t just use clay and dirt; they used what was available to give their seeds an edge. One common trick is to add a pinch of cayenne pepper or chili powder to the dry mix. This acts as a secondary deterrent for rodents who might be brave enough to nibble on the clay.
Another pro-tip is to “scuff” the ground before tossing if the soil is particularly compacted. You don’t need to till, but just dragging a rake or a heavy branch across the surface to create small depressions can give the balls a place to settle and catch more water. If you are planting on a slope, try to toss the balls into the “uphill” side of rocks or logs where moisture naturally accumulates.
Consider the “companion” aspect of your seed mix. Including nitrogen-fixing seeds like clover or vetch is essential. These plants will emerge first and begin “mining” nitrogen from the air and pumping it into the soil. This creates a fertile environment for the more demanding plants (like vegetables or fruit trees) that will come later. You are building a self-fertilizing system.
Don’t be afraid of “over-casting.” In nature, thousands of seeds are produced so that one might survive. Even with the protection of a seed ball, some will fail. If you want a dense forest, throw twice as many as you think you need. The land will thin out the weaklings on its own. Your job is to provide the opportunity; the earth’s job is to manage the results.
Advanced Considerations: Mycorrhizae and Micro-Inoculants
For the serious practitioner, the seed ball is more than just a delivery system for seeds; it is a delivery system for a whole ecosystem. One of the most powerful things you can add to your mix is a mycorrhizal inoculant. These are beneficial fungi that form a symbiotic relationship with plant roots. They effectively expand the root system’s reach, allowing the plant to absorb more water and phosphorus than it could on its own.
In degraded soils, these fungi are often missing. By including them in the seed ball, you are ensuring that the very first root the seed sends out is immediately colonized by its fungal partner. This can increase survival rates in drought-stricken areas by over 50%. You can buy these inoculants in powder form and simply mix them in with your dry clay and compost.
You can also experiment with “biochar” in your mix. Biochar is a highly porous form of charcoal that acts like a sponge for both water and nutrients. It also provides a “micro-hotel” for beneficial bacteria. Adding about 5% biochar to your compost-clay ratio can significantly improve the moisture-holding capacity of the ball, which is a game-changer in sandy or fast-drying soils.
Think about the “structure” of your forest. Fukuoka often included seeds for “green manure” trees—fast-growing, short-lived trees that provide shade and nitrogen. They act as “nurse trees” for the slower-growing, permanent hardwoods. By mixing these together in your balls, you are essentially pre-programming the next thirty years of ecological succession into a handful of mud.
Example Scenarios
To see this in action, look at a typical “abandoned lot” restoration. An urban gardener in Detroit or Baltimore might face a lot filled with gravel, broken bricks, and compacted clay soil where nothing but the toughest weeds grow. By launching seed balls filled with sunflowers, red clover, and native milkweed, they can bypass the need for expensive soil remediation. The sunflowers break up the compaction with their deep roots, the clover fixes nitrogen, and the milkweed provides habitat for pollinators. Within two seasons, what was a grey eyesore becomes a vibrant, self-sustaining “pocket prairie.”
In a large-scale reforestation scenario, such as the projects seen in Kenya’s arid regions, seed balls are being used to combat desertification. Thousands of balls containing native acacia and grass seeds are distributed via slingshot or even dropped from aircraft into remote, inaccessible areas. Because the seeds are protected by the clay, they can wait for the infrequent and unpredictable desert rains. When the rain comes, the balls dissolve, and a new “green belt” begins to take hold without a single human ever having to set foot on the dangerous or rugged terrain.
Consider a homesteading application. A farmer wants to turn a steep, rocky hillside into a “food forest” but can’t get a tractor up the slope and doesn’t have the time to hand-dig hundreds of holes. They spend their winter evenings rolling seed balls containing a mix of apple pips, kale, clover, and rye. In early spring, they simply walk the ridge and toss the balls down the slope. The rye and clover stabilize the soil, the kale provides immediate ground cover, and over the years, the apple trees emerge to create a permanent, low-maintenance food source.
Final Thoughts
The wisdom of Masanobu Fukuoka reminds us that we are not the masters of the earth, but its stewards. The seed ball is a physical manifestation of that belief. It is a tool that requires patience, observation, and a willingness to step back and let nature do the heavy lifting. By moving away from the “buffet for the birds” approach of random broadcasting, you are choosing a path of resilience and self-reliance.
Whether you are trying to heal a degraded acre of land or just want to see more wildflowers in your backyard, this method offers a level of success that modern “scatter-and-pray” techniques can’t match. It is an insurance policy for the future of your land. The clay protects, the compost nourishes, and the seed performs the miracle of growth.
Take the time to gather your materials. Feel the grit of the red clay and the richness of the compost between your fingers. There is a deep, ancestral satisfaction in rolling these little spheres of potential. Start small, experiment with your local seeds, and watch as your “biological bombs” transform the landscape one rainstorm at a time. The earth is waiting for you to stop fighting and start throwing.
