How To Become More Self-Sufficient Without Starting a Full-Blown Farm…
Want to start preserving your harvest, making your own soap, or building a backyard root cellar — but not sure where to begin? “Homesteading Advice” gives you instant lifetime access to 35+ practical homesteading books on food preservation, veggie gardening, DIY natural cleaning products (save over $250 per year with this skill alone), brewing, off-grid energy, and a whole lot more…
Click Here To Check It Out Now!
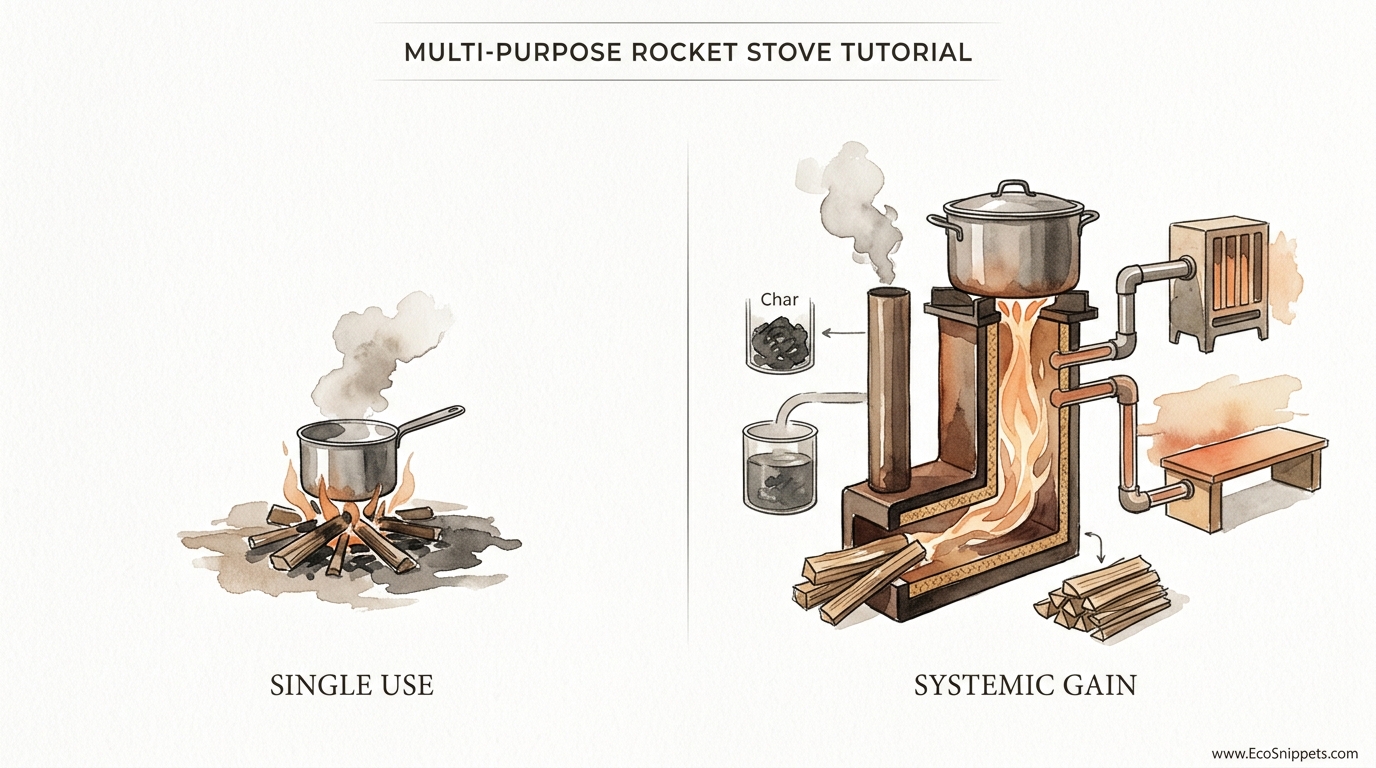
On a resilient homestead, ‘waste heat’ is a crime – here is how to make one fire do four jobs. Why waste fuel on a single task? The Integrated Energy Hub uses the ‘waste’ from your forge to cook your dinner and heat your water. It’s not just a stove; it’s a systemic revolution for the DIY crafter.
Every stick of wood you gather contains a specific amount of potential energy. Most modern appliances are designed for single-use efficiency, meaning they do one thing well while venting the rest of that hard-earned energy out of a chimney. A systemic approach changes the math entirely. By capturing the heat at different stages of its journey, you turn a simple fire into a powerhouse of productivity.
This guide explores the design and construction of an Integrated Energy Hub based on rocket stove principles. We are moving beyond the simple “rocket stove in a can” and into a permanent, multi-stage system that serves as a forge, a cooktop, a water heater, and a thermal mass heater. This is about reclaiming the ancestral wisdom of the hearth and upgrading it with modern thermodynamics.
Multi-Purpose Rocket Stove Tutorial
A multi-purpose rocket stove is a high-efficiency combustion system designed to maximize the “stack effect” for intense heat while capturing secondary and tertiary energy for auxiliary tasks. Unlike a traditional campfire or a standard wood stove, the combustion chamber is heavily insulated. This insulation keeps the heat internal, forcing temperatures high enough to achieve near-complete combustion of wood gases.
In a homestead setting, this hub serves as the central nervous system for fabrication and survival. It exists where the workshop meets the kitchen. In the real world, you might find similar principles in the “Kachelofen” of Central Europe or the “Kang” bed-stoves of China. However, our hub adds a metalworking component, allowing a blacksmith to reach forging temperatures using nothing but dry sticks and a small blower.
To visualize this, imagine a “J” shaped internal flue. You feed wood into the short end of the J. The fire burns sideways, then turns 90 degrees and screams up the vertical “heat riser.” This riser is the engine. Because it is insulated, the air inside gets incredibly hot and light, creating a powerful vacuum that pulls more oxygen into the fire. The result is a roar—hence the name “rocket stove”—and a flame that leaves almost no smoke or ash behind.
How the Integrated Energy Hub Works
The “Hub” operates on four distinct temperature zones, each corresponding to a specific homestead task. Understanding these zones is the key to building a system that doesn’t just burn wood, but manages energy.
The first zone is the Combustion Core. This is where the primary burn happens. In forge mode, we introduce forced air using a small 12v blower or a hand-cranked bellows. This concentrated oxygen allows the internal temperatures to spike above 2,300°F. This is hot enough to bring mild steel to a bright orange or yellow heat, suitable for drawing out, bending, or even forge-welding.
The second zone is the Direct Cooktop. At the very top of the heat riser, the flame is at its most concentrated. We place a heavy cast-iron surface or a grate here. Because the gases have undergone complete combustion in the riser, there is very little soot. You can cook directly over this heat, boiling water in minutes or searing meat with the intensity of a high-end commercial range.
The third zone is the Heat Exchanger. After the gases hit the cooktop, they are still incredibly hot, often 800°F to 1,000°F. Instead of venting them, we wrap the exterior of the upper riser with copper coils or surround it with a water jacket. This uses the “waste” heat to produce domestic hot water. Through a principle called a thermosyphon, the water naturally circulates from a storage tank into the coils and back, requiring no electric pumps.
The fourth zone is the Thermal Mass Exhaust. The remaining warm air, now down to perhaps 300°F, is routed through a long horizontal flue. This flue is encased in high-density material like cob (a mix of clay, sand, and straw), stone, or brick. The mass absorbs the final bits of energy, staying warm for up to 12 hours after the fire has gone out. This provides a steady, radiant heat for a workshop or greenhouse.
Benefits of a Systemic Energy Hub
Choosing an integrated system over separate appliances offers a measurable leap in homestead resilience. The most immediate advantage is fuel economy. Because you are stacking functions, you can accomplish in one hour what would normally take four separate fires. This reduces the time spent cutting, hauling, and curing firewood by nearly 75%.
Another major benefit is the quality of the work environment. Traditional forges can be incredibly smoky and hot, making indoor metalwork difficult. A properly built rocket forge vents its exhaust cleanly. Furthermore, the insulation that makes the stove efficient also makes it safer to stand next to. The heat is where you need it—inside the chamber—rather than radiating out and wasting into the air.
Systemic gain also means lower maintenance over the long term. Because the system burns so hot, it eliminates creosote—the primary cause of chimney fires. You won’t be climbing onto the roof to scrub your flues every month. The internal refractory materials, if chosen correctly, can last for years under heavy use, only requiring occasional patching with fire clay.
Challenges and Common Mistakes
One of the most frequent errors in building a multi-purpose hub is the use of improper materials in the core. Many beginners use standard red clay bricks or concrete. Under the intense thermal shock of a rocket forge, these materials will crack, crumble, or even explode if they contain trapped moisture. Always use “hard” fire bricks for the floor of the forge to resist mechanical wear, and “soft” insulating fire bricks (K23 or K26 grade) for the walls to keep the heat in.
Another challenge is balancing the air-to-fuel ratio. If the wood is fed too densely into the intake, it chokes the primary air supply, leading to smoke and a drop in temperature. The “feed tube” should always have a dedicated air channel—usually a small metal shelf that allows air to flow underneath the burning wood.
Water heating brings the risk of steam explosions. If you build a water jacket or coil system, you must never include a shut-off valve between the heater and the storage tank. If the water boils and has nowhere to expand, the pressure will rupture the copper or steel, potentially causing a catastrophic failure. Always include a T&P (Temperature and Pressure) relief valve and ensure the system is “open” to the atmosphere via the storage tank.
Limitations of the System
While powerful, the Integrated Energy Hub has realistic constraints. First, it is essentially a stationary system. Due to the weight of the fire bricks and the thermal mass, this isn’t something you can move around easily. It requires a dedicated footprint in your workshop or outdoor kitchen area.
Environmental limitations also play a role. A rocket stove requires dry, seasoned biomass. While it can burn “trash wood” like pine, pallet scraps, or brush, the wood must have a moisture content below 20%. Attempting to run a forge on green wood will result in a failure to reach welding temperatures and will produce significant smoke, defeating the efficiency of the design.
Finally, there is a learning curve to managing the “functional stack.” If you are forging a large piece of steel, it might pull so much heat from the core that your water heating slows down. Learning how to time your tasks—forging first, then cooking as the core settles, then letting the mass heat the room overnight—takes practice and observation.
Comparison: Single-Use Forge vs. Integrated Hub
| Feature | Standard Coal Forge | Integrated Energy Hub |
|---|---|---|
| Fuel Source | Coal or Propane | Biomass (Sticks/Scraps) |
| Operational Cost | High (Purchased fuel) | Near-Zero (Found fuel) |
| By-Products | Sulfurous smoke/clinkers | Clean ash/water vapor |
| Functionality | Metalwork only | Forge, Cook, Heat, Water |
| Skill Level | Intermediate | Advanced Beginner |
Practical Tips and Best Practices
When assembling your hub, start with the foundation. A layer of solid concrete blocks or a stone pad is necessary to protect the ground from the weight and the minor radiant heat that escapes through the bottom. Above this, create a “sand-box” or a layer of perlite-crete (a mix of perlite and Portland cement) to serve as a thermal break.
Use a 6-inch diameter system for most homestead applications. This size provides a perfect balance—it’s small enough to run on twigs but large enough to generate industrial-grade heat. A 6-inch heat riser usually needs to be at least 24 to 30 inches tall to create a proper draft. If the riser is too short, the stove will “back-smoke” into your face.
For the water heating coil, use 3/8-inch soft copper tubing. Anneal the copper before bending it around a 6-inch pipe to prevent kinking. Pro-tip: Fill the copper tube with dry sand and cap the ends before bending; the sand acts as an internal support, ensuring a smooth, round curve that doesn’t restrict water flow.
Advanced Considerations for the Serious Builder
For those looking to go beyond basic water and metalwork, consider adding a Thermoelectric Generator (TEG). These solid-state devices convert the temperature difference between the hot stove wall and a cold water block into electricity. While the output is modest, it is often enough to charge a battery bank for LED workshop lighting or to run the blower motor that powers the forge itself, creating a self-sustaining loop.
Scaling is another advanced tactic. If you need more heat for a larger workshop, you don’t necessarily want a bigger firebox—you want a Batch Box Burner. This design allows you to load a large volume of wood all at once, which then gasifies and burns in a highly controlled secondary combustion chamber. It requires more precise engineering but can provide enough energy to heat a 1,000-square-foot space and a 100-gallon water tank simultaneously.
Refractory coatings can also extend the life of your hub. A simple slurry of fire clay, wood ash, and a small amount of silica sand can be painted onto the interior of your forge area. This “sacrificial layer” takes the brunt of the slag and chemical flux from welding, preserving the expensive fire bricks underneath.
Example Scenario: The Winter Workshop Cycle
Imagine a cold Tuesday in January. You start the day by feeding the hub a few handfuls of dry pine bark and small maple twigs. Within five minutes, the stove is roaring. You engage the 12v blower and place a piece of 1/2-inch rebar into the forge port. While the steel heats up to a cherry red, you set a kettle on the cooktop.
By the time you have hammered out a new gate latch, the kettle is boiling for coffee. Meanwhile, the copper coils have been silently transferring heat to a 40-gallon insulated tank. By noon, you have hot water for washing up. After lunch, you stop feeding the fire, but the 800 pounds of cob thermal mass surrounding the exhaust flue continues to radiate a steady 75°F into your workshop for the rest of the afternoon.
In this scenario, you have achieved four major homestead goals using about half a bucket of wood scraps. There were no electricity bills, no propane tanks to refill, and no smoke-filled lungs. This is the definition of systemic gain.
Final Thoughts
The Integrated Energy Hub is more than just a piece of hardware; it is a shift in perspective. It asks us to look at “waste” as a resource and to design our lives around the natural flow of energy. By combining the forge, the stove, and the heater, we reclaim a level of self-reliance that was once common but has since been lost to the era of cheap, single-use convenience.
Building one of these systems requires patience and a willingness to experiment. You will likely tweak the air intake or adjust the height of the riser to find the “sweet spot” for your specific climate and fuel source. Do not be discouraged by these adjustments; they are part of the process of becoming a steward of fire.
As you master the hub, you will find that it becomes the heart of your homestead. It is where tools are born, meals are shared, and the warmth of a job well done lingers long after the sun has set. This is pioneer-grit at its finest—working smarter, wasting nothing, and building a future on a foundation of ancestral logic.
