How To Become More Self-Sufficient Without Starting a Full-Blown Farm…
Want to start preserving your harvest, making your own soap, or building a backyard root cellar — but not sure where to begin? “Homesteading Advice” gives you instant lifetime access to 35+ practical homesteading books on food preservation, veggie gardening, DIY natural cleaning products (save over $250 per year with this skill alone), brewing, off-grid energy, and a whole lot more…
Click Here To Check It Out Now!
Why buy microplastics for your soil when the forest is growing your garden protection for free? Every year, millions of pounds of plastic row covers end up in landfills after a single season of wind and UV damage. On a regenerative homestead, we harvest our own solutions. Through the practice of coppicing hazel or willow, you can weave beautiful, breathable cloches that protect your plants from frost and pests while looking like a work of art. They cost zero dollars, last for years, and eventually return to the earth as mulch.
Working with natural materials connects you to a lineage of gardeners who didn’t rely on a big-box store for success. These woven structures offer a sturdy, wind-resistant alternative to the flimsy polyethylene films that tear at the first sign of a gale. This guide will walk you through the process of sourcing your wood and weaving your very own plant protectors from the ground up.
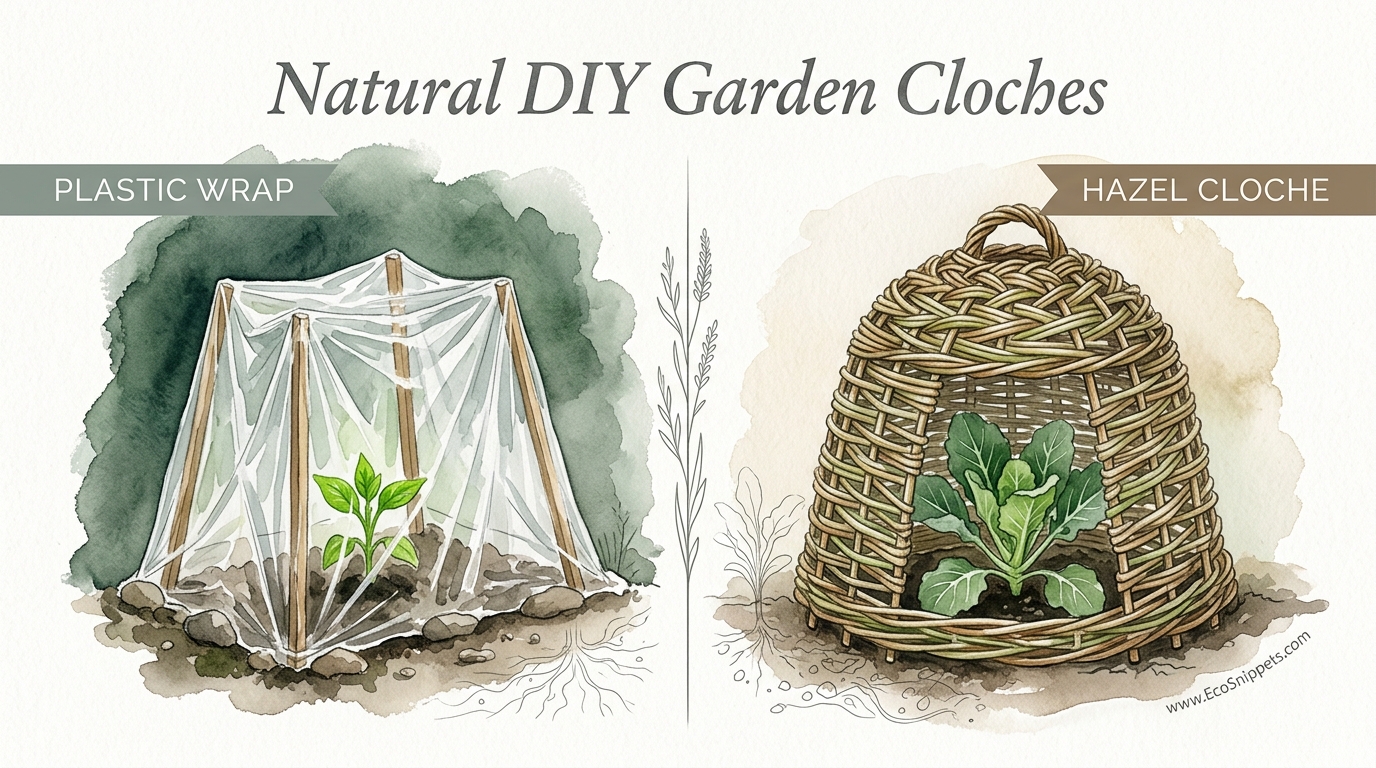
Natural DIY Garden Cloches
A natural garden cloche is a portable, bell-shaped structure traditionally woven from flexible “greenwood” like willow or hazel. The word itself comes from the French for “bell,” referring to the classic glass jars used by 17th-century market gardeners. While those glass versions were effective at trapping heat, they often baked plants if left unvented. Woven versions provide a middle ground, offering a physical barrier against pests and harsh winds while allowing air and moisture to circulate freely.
These structures serve as a miniature microclimate for your most vulnerable seedlings. In a world of “plasticulture,” where agricultural films contribute significantly to microplastic accumulation in soil, these woven cloches stand as a testament to sustainable design. They are used primarily in the early spring to protect tender greens from late frosts and hungry rabbits, or in the autumn to extend the harvest of cool-season crops.
Visualizing a hazel cloche is easy once you think of it as an upside-down basket without a handle. The thickest rods form a skeleton that is pushed into the soil, while thinner, more pliable whips are woven horizontally to create a lattice. This lattice breaks the force of the wind, creates a slight temperature buffer, and stops birds or squirrels from digging up fresh transplants.
How to Build Your Woven Cloche
Building a cloche requires a few basic tools and a bit of patience. You will need sharp secateurs, a small saw for thicker hazel poles, and a bundle of fresh-cut rods.
Sourcing and Preparing Materials
Hazel and willow are the gold standards for this work. Hazel provides the structural strength needed for the upright stakes, often called “smarts” or “stakes.” Willow is prized for its extreme flexibility, making it the ideal “weaver” to fill in the gaps. Harvesting should ideally happen in late winter or early spring while the sap is down and the wood is most pliable.
Fresh-cut wood is the easiest to work with. If your rods have dried out, you must soak them in water for several days to restore their flexibility. A general rule for dried willow is to soak it for one day per foot of length.
Step 1: Creating the Skeleton
Select six to eight thick hazel rods, roughly the thickness of your thumb and about three feet long. Sharpen one end of each rod with your knife or secateurs. Push these stakes into the ground in a circle, about 10 to 12 inches apart, depending on the desired size of your cloche.
Step 2: The Initial Weave
Take two of your most flexible willow whips. Secure the thick “butt” end of the first whip by tucking it behind one of the hazel stakes. Begin a “pairing weave” by taking two weavers and crossing them over each other between every stake. This creates a solid foundation at the base of the cloche.
Step 3: Building the Walls
Switch to a “randing” technique for the main body. This is a simple over-under weave using a single rod at a time. Work your way around the circle, adding new rods as the previous ones run out. Ensure you alternate the starting points of your rods to keep the structure level.
Step 4: Closing the Dome
As you reach the desired height, begin to gently pull the tops of the hazel stakes toward the center. Use a thin piece of willow or a bit of natural twine to lash the tops together. You can then continue weaving around the very top to create a finished look, tucking the ends of the willow whips back into the existing weave to lock everything in place.
Benefits of Woven Garden Cloches
Choosing natural materials over synthetic alternatives provides several practical and environmental advantages. These benefits extend beyond simple aesthetics, impacting the health of your soil and the resilience of your garden.
Breathability and Airflow: Unlike plastic domes that can create a stagnant, humid environment prone to fungal diseases, woven cloches allow for constant gas exchange. This prevents the “greenhouse effect” from overheating your plants on a sunny afternoon while still buffering against the chill of the night.
Sustainability and Cost: These structures represent a closed-loop system. They require no petroleum for manufacture and produce no waste at the end of their life. When a cloche eventually breaks down after three or four years of service, it can be tossed onto the compost pile or used as kindling.
Wind Resistance: The lattice structure of a woven cloche allows some wind to pass through rather than creating a solid wall that acts like a sail. This reduces the risk of the cloche blowing away or the plants being crushed by a collapsing plastic cover.
Pest Deterrence: A well-woven cloche is an effective physical barrier. It stops birds from pecking at young brassicas and prevents rabbits from leveling your lettuce patch. Because the structure is anchored deep into the soil by its hazel stakes, it is difficult for curious animals to tip over.
Challenges and Common Mistakes
Working with greenwood is a skill that improves with practice. Beginners often run into a few common hurdles that can compromise the durability of their work.
Using Brittle Material: Trying to weave with wood that has already started to dry out is the most frequent error. Brittle rods will snap rather than bend, leaving sharp edges and weak spots in the lattice. Always test the flexibility of your wood by wrapping a thin whip around your wrist; if it cracks, it needs more soaking time.
Loose Weaving: A cloche that is woven too loosely will eventually sag as the wood seasons and shrinks. Tension is your friend. Keep the weavers tight against the upright stakes and use your hand to pack down the rows of weaving every few inches.
Neglecting the Anchor: If the hazel stakes are only pushed an inch or two into the soil, the cloche will lack stability. Aim for at least six to eight inches of depth for the primary stakes. This ensures the structure remains upright during heavy rains or high winds.
Limitations of Natural Cloches
While these structures are versatile, they are not a universal solution for every gardening problem. Understanding their limits will help you use them more effectively.
Thermal Limits: A woven cloche provides roughly 2 to 4 degrees of frost protection. In extremely cold climates where temperatures drop significantly below freezing, a bare woven structure may not be enough. In these cases, you might need to drape the cloche with burlap or stuff the interior with straw for added insulation.
Small Insect Protection: The gaps in a standard weave are too large to stop small pests like aphids, flea beetles, or cabbage white butterflies. If your primary goal is insect exclusion, you will need to line the interior with a fine mesh or use a different style of protection.
Longevity: Natural wood will eventually rot. Because the stakes are in direct contact with damp soil, the base of the cloche is usually the first part to fail. You can extend the life of your cloches by storing them in a dry shed during the winter months when they are not in use.
Comparison: Plastic Row Covers vs. Hazel Cloches
The choice between modern plastic and traditional woven materials often comes down to the scale of the operation and the priorities of the gardener.
| Feature | Plastic Row Covers | Woven Hazel/Willow Cloche |
|---|---|---|
| Cost | Moderate recurring cost | Zero (if harvested locally) |
| Lifespan | 1–2 seasons | 3–5 years |
| Ventilation | Poor (requires manual venting) | Excellent (self-venting) |
| Environmental Impact | High (microplastics, landfill waste) | Zero (biodegradable) |
| Labor | Low initial setup | High initial craft labor |
| Aesthetics | Industrial/Utility | Artisanal/Rustic |
Practical Tips for Success
Applying a few “pioneer” tricks can make the process of building and using cloches much smoother. Efficiency in the woods leads to better results in the garden.
- Seasonality Matters: Cut your hazel and willow during the dormant season (November through February). This ensures the bark stays on and the wood remains at its most durable.
- The Sharpening Secret: Use a billhook or a sharp hatchet to create a “pencil point” on your stakes. A clean, slanted cut pierces the soil with less effort and causes less damage to the wood fibers.
- Avoid Rooting: Fresh willow is incredibly resilient. If you push fresh willow stakes into damp soil in the spring, they will likely take root and grow into a tree. To prevent this, either use hazel for the stakes or “season” your willow for a few weeks before the stakes touch the ground.
- Stackable Design: If you vary the diameter of your cloches slightly, you can stack them inside one another. This saves a massive amount of space in the potting shed during the off-season.
Advanced Considerations
For the serious practitioner, cloche-making can evolve into a broader system of woodland management. Integrating these crafts into your homestead creates a rhythmic cycle of harvest and growth.
Coppice Cycles: Managing your own hazel or willow stool is the ultimate step in self-reliance. Hazel is typically managed on a seven-year cycle to produce thick poles, while willow is coppiced annually for flexible weaving whips. Setting up a rotation of three or four “stools” (the base of the cut tree) ensures you have a fresh harvest every single year.
The Living Cloche: In some designs, gardeners intentionally allow the willow stakes to root. This creates a “living cloche” that grows leaves and provides shade during the heat of the summer. While this requires regular pruning to prevent it from becoming a forest, it offers a permanent, self-repairing structure for certain perennial crops.
Specific Varieties: Not all willow is created equal. Varieties like Salix viminalis are prized for their long, straight, and unbranched rods, which are perfect for basketry and cloche-making. If you are planting a woodlot specifically for garden crafts, research the “basketry willows” best suited for your climate.
Example Scenario: Early Spring Lettuce
Imagine it is late March. The soil is workable, but the nights are still biting cold, and the local rabbits are emerging from their winter hunger. You have just transplanted a row of ‘Black Seeded Simpson’ lettuce.
Instead of stretching a long, unsightly sheet of plastic across the bed, you grab three of your handmade hazel cloches. You center them over the clusters of lettuce and push the sharpened legs eight inches into the earth. That night, the temperature dips to 29 degrees Fahrenheit.
While the lettuce in the neighbor’s open garden suffers frost-burned tips, yours remains protected by the thermal buffer and the windbreak of the hazel lattice. Two weeks later, a heavy spring rainstorm rolls through. The cloches break the force of the raindrops, preventing the soil from compacting and keeping the delicate leaves from being splattered with mud. By late April, your lettuce is lush and ready for harvest, and the cloches are simply moved to the next row of seedlings.
Final Thoughts
Embracing natural DIY garden cloches is more than just a craft project. It is a rejection of the “disposable” culture that has permeated modern agriculture. By choosing to harvest from the woods rather than buying from a shelf, you are participating in a regenerative cycle that has sustained gardeners for centuries.
These structures are honest. They tell the story of the land they came from and the hands that shaped them. They offer a rare combination of high function and high beauty, proving that the most effective tools in the garden are often the ones that have been there all along, growing quietly in the hedgerow.
Start small. Find a stand of willow or hazel, cut a few rods, and try your hand at a basic weave. You will find that the time spent weaving is a meditation, and the resulting protection for your garden is a reward that no piece of plastic can ever match. Within a few seasons, your garden will be populated with these rustic sentinels, standing watch over your crops and eventually returning to the soil to feed the next generation of growth.
