How To Become More Self-Sufficient Without Starting a Full-Blown Farm…
Want to start preserving your harvest, making your own soap, or building a backyard root cellar — but not sure where to begin? “Homesteading Advice” gives you instant lifetime access to 35+ practical homesteading books on food preservation, veggie gardening, DIY natural cleaning products (save over $250 per year with this skill alone), brewing, off-grid energy, and a whole lot more…
Click Here To Check It Out Now!
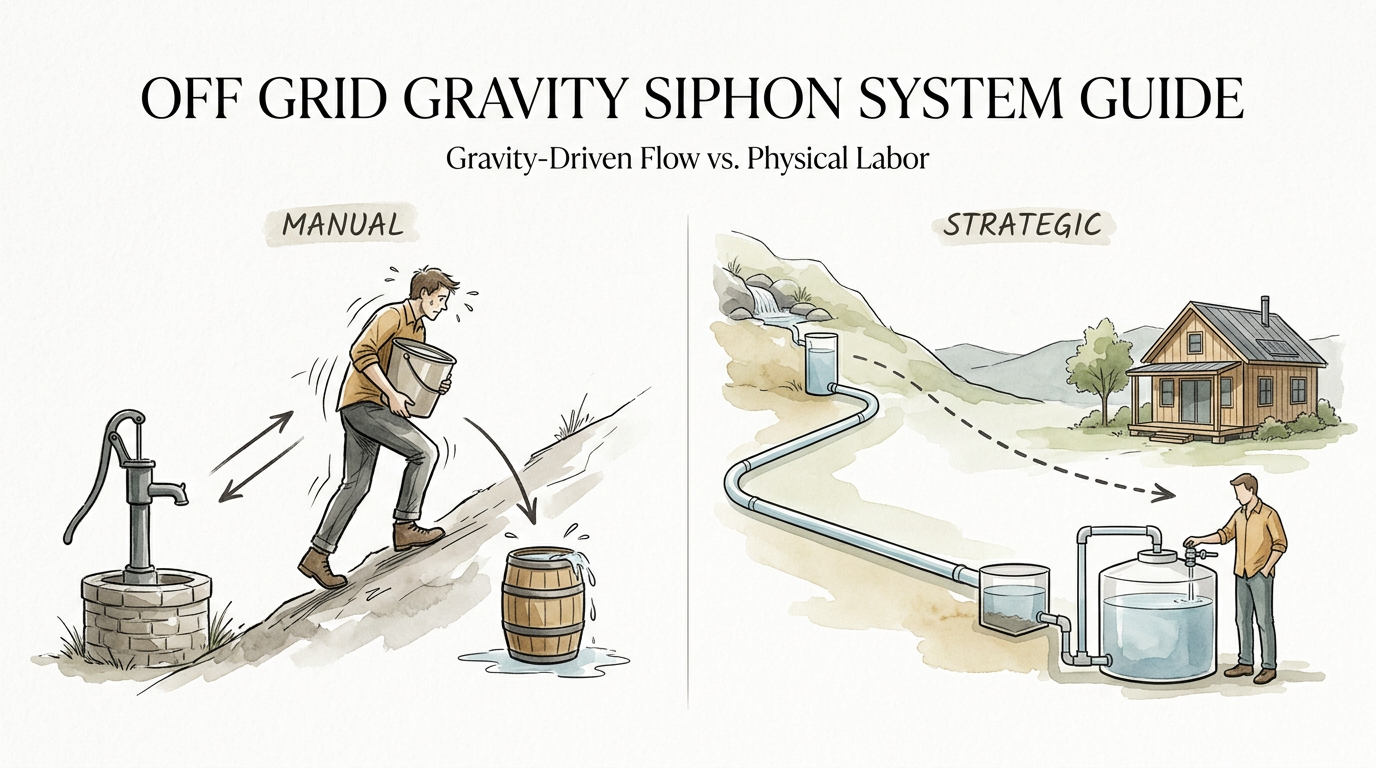
Stop breaking your back for the same result – physics can do the heavy lifting for you. Are you still hauling buckets like it’s 1850? We spent 4 hours a week carrying water until we realized gravity is free. This simple siphon setup changed everything.
There is a specific kind of exhaustion that comes from hauling water. It is a slow, rhythmic ache in the shoulders and a steady strain on the lower back that reminds you, with every step, how much of your life is consumed by basic survival. For generations, the pioneers of the frontier accepted this as the price of independence. But the ancestors were also keen observers of the natural world, and they knew that nature often provides a path of least resistance if you are clever enough to find it.
Living off the grid does not have to mean living in a state of constant physical penury. True self-reliance is not about working harder than everyone else; it is about working smarter, using the fundamental laws of the universe to secure your resources. The gravity siphon is one of those ancient “tricks” that feels like magic but is actually just disciplined engineering. It is a system that allows water to flow uphill, over obstacles, and into your storage tanks without a single drop of gasoline or a watt of electricity.
In the following guide, we will look at how to master this silent workhorse. We will move beyond the simple garden hose trick and explore how to build a robust, reliable water delivery system that can service a homestead for years. If you have a water source—be it a creek, a pond, or a mountain spring—and a bit of elevation, you have everything you need to retire the buckets for good.
Off Grid Gravity Siphon System Guide
A gravity siphon is a deceptively simple device that moves liquid from a higher elevation to a lower elevation through a pipe that must first travel “up and over” an intermediate high point. While it seems to defy gravity by pulling water upward initially, the entire system is powered by the weight of the water in the longer, downward leg of the pipe. This weight creates a vacuum at the crest of the system, which atmospheric pressure then fills by pushing water from the source into the intake.
The history of this technology is as old as civilization itself. Archaeologists have found evidence of siphons being used in ancient Mesopotamia and Egypt as early as 6000 BCE to move water from canals into irrigation channels for crops like cotton. Later, the Romans refined the concept with “inverted siphons,” using massive stone and lead pipes to transport water across deep valleys that were too wide for traditional aqueduct bridges. They understood that as long as the receiving tank was slightly lower than the source tank, the water would find its way through the dip and back up the other side.
In a modern off-grid context, the gravity siphon is the ultimate “strategic” tool. It represents the transition from manual labor to automated systems. Unlike a ram pump, which requires a significant amount of “waste water” to function, or a solar pump, which is dependent on the weather and expensive batteries, a siphon is silent, nearly maintenance-free once primed, and entirely independent of external power. It is the purest expression of homesteading grit: using the landscape itself to provide for your needs.
The Physics of Flow: How a Siphon Actually Works
To build a system that won’t fail you in the middle of a dry spell, you have to understand the forces at play. There are two primary schools of thought regarding the physics of a siphon: the atmospheric pressure model and the cohesion tension model. For most practical homesteading applications, the atmospheric model is the one that matters most. This theory suggests that the weight of the water in the “discharge” leg (the part of the pipe going downhill) creates a zone of reduced pressure at the top of the curve.
Imagine the water in your pipe as a continuous chain. As gravity pulls the heavy side of the chain down the hill, it creates a “tug” on the rest of the chain. Because the system is airtight, atmospheric pressure—the 14.7 pounds per square inch of air pushing down on everything at sea level—acts on the surface of your water source. This pressure literally shoves the water into the intake pipe to fill the void left by the water falling down the other side. This creates a continuous, self-sustaining loop that only stops if the water source runs dry or if air enters the system.
Understanding “Head Pressure” is the next critical step. In the world of gravity systems, vertical drop is king. For every foot of vertical drop between the surface of your water source and your discharge point, you gain approximately 0.43 PSI of pressure. If you have a 100-foot drop, you are looking at roughly 43 PSI—comparable to the pressure in a standard suburban home. This pressure is what allows you to run showers, fill cattle troughs, or operate drip irrigation systems with professional efficiency.
The “High Point” is your biggest hurdle. A siphon can only pull water upward to a certain limit. At sea level, the theoretical maximum height you can pull water over is about 33 feet (10 meters). However, due to friction, temperature, and the potential for dissolved gases to form bubbles, the practical limit is closer to 20 to 25 feet. If your hill is higher than that, the water column will simply “break,” and the siphon will fail. If you find yourself in this situation, you may need to look into a ram pump or a powered lift to get the water over the initial hump.
Anatomy of a Reliable Homestead Siphon
You cannot build a permanent water system out of garden hoses and duct tape. A homestead siphon needs to be rugged enough to withstand temperature swings, UV exposure, and the occasional curious animal. Here are the core components you should have on your manifest before you start digging.
1. The Intake and Foot Valve: The intake is where the journey begins. To keep the siphon from draining itself whenever the water stops, you must install a foot valve at the bottom of the intake line. This is a one-way check valve with a built-in strainer. It allows water to enter the pipe but prevents it from flowing back out. Without a foot valve, every time you shut off the water at the bottom, the entire line would drain, and you would have to re-prime the system.
2. The Main Line (HDPE or PVC): High-Density Polyethylene (HDPE) is often the preferred choice for long-distance off-grid runs. It is flexible, comes in long coils that reduce the number of leaky joints, and can handle the expansion and contraction caused by seasonal temperature changes. Schedule 40 PVC is also common, especially for shorter, more rigid runs, but it is more prone to cracking if the ground shifts or freezes.
3. The Priming Tee: This is a critical component located at the highest point of your siphon. It consists of a T-junction with a threaded plug or a high-quality ball valve. This is where you will pour water into the system to remove all the air. A siphon will not start if there is air in the line; the priming tee makes the startup process manageable rather than a chore.
4. Air Release Valves: In long runs, small bubbles of air can come out of the water and collect at high points in the pipe. Over time, these bubbles can grow into a “gas pocket” that blocks the flow—a phenomenon known as an air lock. Installing an automatic air release valve at the high points allows these bubbles to escape without letting water out or air in, keeping your flow consistent and strong.
5. The Discharge Valve: At the end of your run, you need a way to control the flow. A high-quality brass ball valve is the standard. This allows you to “freeze” the water in the pipe. When the valve is closed, the water stays in the line, held in place by the foot valve at the top and the discharge valve at the bottom. When you open it, the siphon resumes instantly.
How to Build Your Off-Grid Siphon Step-by-Step
Setting up a siphon is a task that requires patience and a bit of “pioneer-grit.” It is best done with a partner, as you will often be at opposite ends of a long pipe. Follow these steps to ensure a successful first run.
Step 1: Survey the Land
Before you lay a single foot of pipe, you must know your elevations. Use a transit level, a laser level, or even a long clear hose filled with water to find the vertical drop. Remember, your discharge point must be lower than the surface of the water source. If you have a choice, aim for the maximum possible drop to ensure high pressure at the tap. Map out the path of the pipe, avoiding sharp bends or unnecessary “up and down” undulations where air could get trapped.
Step 2: Lay the Pipe
Start from the water source and work your way down. If possible, bury the pipe at least 12 to 18 inches deep. This protects the line from UV damage, prevents the water from getting too hot in the summer (which can cause air bubbles to form), and guards against freezing in the winter. If you are using HDPE, unroll it slowly to avoid kinks. Secure the intake end so it stays submerged but isn’t resting in the mud at the bottom of your pond or creek.
Step 3: Install the High-Point Fittings
Identify the absolute highest point of your pipe run. This is where you will install your Priming Tee. Ensure all connections are airtight; even a pinhole leak here will eventually suck in enough air to break the siphon. Use high-quality thread sealant or Teflon tape on all threaded joints. If your run is particularly long, consider adding an air release valve just downstream of the priming point.
Step 4: Priming the System
This is the moment of truth. Close the discharge valve at the bottom of the hill. Go to the high point and open the Priming Tee. Begin filling the pipe with water. You may need to do this slowly to allow air to burp out. Once the pipe is full to the brim, seal the Priming Tee tightly. Now, go down to the discharge valve. When you open it, the weight of the water in the lower leg should immediately begin pulling water from the source. You will likely see some initial sputtering as the last bits of air are flushed out.
Step 5: Testing and Securing
Let the water run for several minutes to ensure the flow is steady. Check every joint for leaks—even a tiny “sweat” of water can lead to a failure later. Once you are satisfied, finish burying the pipe and secure your intake and discharge points against the elements. A well-built system should begin flowing the second you turn the tap, every single time.
Benefits of the Gravity Siphon Approach
Why choose a siphon over a modern electric pump? The reasons are rooted in the philosophy of the homestead. A siphon is a “passive” system, meaning it requires no ongoing input of energy to do its job. In a world where fuel prices fluctuate and electrical grids can be unreliable, having a water system that depends only on the laws of physics is a massive advantage.
Longevity is another key factor. Mechanical pumps have moving parts that wear out, seals that dry up, and motors that burn out. A siphon, essentially being just a “smart pipe,” can last for decades. Aside from the occasional cleaning of the intake strainer or the replacement of a ball valve, there is very little that can go wrong. This simplicity translates to a lower total cost of ownership and a higher degree of peace of mind.
The silence of a siphon is also a benefit that shouldn’t be overlooked. There is something jarring about the drone of a generator or the whine of a pump in the middle of a quiet forest or field. A gravity system works in total silence, moving thousands of gallons of water without disturbing the peace of your land. It allows you to feel more connected to the environment, rather than being an operator of noisy machinery.
Finally, siphons are incredibly scalable. You can start with a small half-inch line for a garden and later upgrade to a two-inch main line that provides enough volume for a whole house and livestock. By understanding the principles of head pressure and flow rate, you can design a system that grows with your homestead’s needs.
Challenges and Common Mistakes to Avoid
While the concept is simple, the execution of a long-distance siphon can be tricky. The most common point of failure is the “Air Lock.” This happens when air bubbles migrate to a high point in the pipe and create a blockage that gravity cannot overcome. This often happens because the pipe was laid with too many “humps” or because the water in the line became too hot, causing dissolved oxygen to come out of solution.
Leaks in the suction side (the part of the pipe between the water source and the high point) are the second most common issue. In a pressurized pipe, a leak sprays water out. In a siphon’s suction line, a leak pulls air in. This air accumulates at the high point and eventually breaks the siphon. Because you can’t see water leaking out, these leaks are notoriously hard to find. The best defense is to use continuous HDPE pipe for the suction run to eliminate as many joints as possible.
Another mistake is failing to account for “Vapor Pressure.” If the high point of your siphon is too close to the theoretical limit (around 30 feet), the pressure at the top becomes so low that the water can actually begin to boil at room temperature. This creates steam bubbles that immediately break the vacuum. Always aim to keep your “lift” as low as possible to avoid this cavitation-like failure.
Finally, don’t underestimate the power of nature. Intakes can get clogged with algae, leaves, or even small fish. Always use a high-quality, oversized strainer at the intake. Some homesteaders even build a “settling box” or a “wet well” to pre-filter the water before it enters the siphon line. This ensures that the only thing entering your pipes is clean, clear water.
Limitations: When a Siphon Is Not the Answer
It is important to be realistic about what gravity can and cannot do. A siphon is not a universal solution for every property. The most obvious limitation is the landscape itself. If your water source is lower than your house or garden, no amount of siphoning will get the water there. You can’t siphon water “uphill” in the final tally. For those situations, you must look into hydraulic ram pumps, solar pumps, or wind-powered lifts.
The “33-Foot Rule” is an absolute law of physics. At sea level, the weight of the atmosphere can only support a column of water about 33.9 feet high. At higher elevations, where the air is thinner, this limit is even lower. For example, if your homestead is at 5,000 feet, your maximum lift might only be 25 feet. If you need to pull water over a 50-foot ridge to get it to a valley on the other side, a simple siphon will not work, regardless of how deep the valley is on the discharge side.
Environmental factors can also pose a challenge. In extremely cold climates, a siphon line that isn’t buried below the frost line will freeze solid. Unlike a pump system that you can drain easily, a siphon is meant to stay full of water. If it freezes, the expanding ice can burst your pipes, turning your clever system into a series of expensive plastic shards. If you live in a deep-freeze zone, you must either bury the lines deep or have a reliable way to blow the lines dry with compressed air before the first frost.
Lastly, siphons are best for continuous or semi-continuous flow. If you only need a small amount of water once a week, the effort of priming and maintaining a long siphon might not be worth it. Siphons shine when they are providing a steady supply of water to a storage tank or a large-scale irrigation system. For small, intermittent tasks, a simple portable pump might actually be more practical.
Strategic vs. Manual: Comparing Your Options
When deciding how to move water on your land, it helps to look at the trade-offs. The choice usually comes down to three approaches: Manual Hauling, Strategic Siphoning, and Powered Pumping. Each has its place, but for long-term self-reliance, the middle ground is often the strongest.
| Factor | Manual Hauling | Gravity Siphon | Electric/Gas Pump |
|---|---|---|---|
| Initial Cost | Near Zero | Moderate (Piping/Valves) | High (Pump/Power/Fuel) |
| Ongoing Labor | Very High | Near Zero | Low (Maintenance/Fueling) |
| Reliability | Dependent on You | Excellent (Passive) | Moderate (Moving Parts) |
| Pressure | None | Variable (0.43 PSI/ft) | High/Adjustable |
| Complexity | None | Moderate (Physics-based) | High (Electrical/Mechanical) |
Manual hauling is the baseline—it requires no setup but consumes your most valuable resource: time. Powered pumps offer the most convenience and the highest pressure but introduce a dependency on external supply chains and mechanical parts that will eventually fail. The gravity siphon sits in the “goldilocks” zone of off-grid living. It requires a one-time investment in materials and a bit of mental labor to set up, but once it is running, it provides a level of freedom that neither of the other options can match.
Practical Tips and Best Practices
Over the years, homesteaders have developed several “pro-tips” to make siphon systems even more reliable. One of the best is to use “Oversized Pipe.” While a 1/2-inch line might be enough for your flow needs, a 1-inch or 2-inch line is far less likely to suffer from air locks. The larger volume of water has more “momentum,” which can help push small air bubbles through the system rather than letting them congregate at the high points.
Another best practice is the use of a “Floating Intake.” Instead of letting your foot valve sit on the bottom of a pond where it can suck up silt, attach it to a float so it sits about 12 to 18 inches below the surface. This is usually where the cleanest water is found—away from the surface debris and above the mud at the bottom. Use a flexible section of hose to allow the intake to move up and down as the water level changes.
For seasonal maintenance, always inspect your valves and seals in the spring and fall. A small leak in a ball valve’s packing nut can be enough to let in air and break your siphon over several days. Keep a “Priming Kit” nearby—a dedicated bucket and a wrench for the priming plug—so that if the system does fail, you can get it back up and running in minutes rather than hunting for tools.
Finally, consider installing a “Vacuum Gauge” at the high point of your system. This allows you to monitor the health of the siphon at a glance. If you see the vacuum dropping over several days, it’s a sign that air is slowly leaking into the system. This “early warning” allows you to fix a tiny leak before it becomes a total system failure.
Advanced Considerations: Cascading and Multi-Tank Systems
For those who want to take their gravity systems to the next level, there are ways to overcome some of the standard limitations. One such method is the “Cascading Siphon.” If you have a very long run with multiple hills, you can set up a series of storage tanks at the low points of each ridge. You siphon water from the source to Tank A, then from Tank A to Tank B, and so on. This “breaks” the siphon into manageable segments, ensuring that no single lift exceeds the 25-foot practical limit.
Integrating your siphon with a large-scale storage cistern is another advanced strategy. By siphoning into a high-capacity tank (1,000 to 5,000 gallons) located at a high point on your property, you create a “battery” of water. This tank then provides consistent gravity pressure to the rest of the homestead, even if the source flow is slow. This is particularly useful for mountain springs that might only provide a few gallons a minute; over 24 hours, that slow trickle can fill a massive tank, giving you plenty of volume for high-demand tasks like laundry or garden watering.
You can also use a siphon to “automate” the drainage of low-lying areas or to manage the levels of a farm pond. By setting the intake at a specific height, you can ensure that the pond never overflows its banks. As soon as the water level rises above the intake, the siphon “activates” (if it’s a self-starting design) and drains the excess water to a lower field or creek. This is a classic example of using physics as a silent, unpaid employee to manage your land’s hydrology.
Real-World Example: The Pond-to-Garden Setup
Let’s look at a practical scenario. Suppose you have a pond that is 15 feet higher than your garden, but there is a small ridge between them that is 10 feet higher than the pond’s surface. To get water to your vegetables, you lay 200 feet of 1-inch HDPE pipe. You install a foot valve at the pond end and a ball valve at the garden end.
You install a Priming Tee at the top of the 10-foot ridge. After sealing the garden valve, you fill the entire 200-foot line through the tee. It takes about 10 gallons of water to fill the pipe. You cap the tee, walk down to the garden, and open the valve. Because you have a 15-foot vertical drop from the pond’s surface to the garden, you will have about 6.5 PSI of pressure. While that isn’t enough for a high-powered oscillating sprinkler, it is perfect for a series of “soaker hoses” or a drip irrigation system.
In this scenario, you have successfully moved water over a ridge and delivered it to your crops without a pump. If you leave the system primed, you can water your garden all summer just by turning a single valve. You’ve saved yourself hundreds of hours of hauling and dozens of dollars in fuel or electricity. That is the power of the strategic siphon.
Final Thoughts
The transition to off-grid living is often a journey of rediscovering what was once common knowledge. The gravity siphon is a bridge between the ancient wisdom of our ancestors and the practical needs of the modern homesteader. It is a reminder that we are surrounded by forces—gravity, atmospheric pressure, cohesion—that are ready to work for us, provided we take the time to understand them.
Building a reliable water system is perhaps the most important step in securing your independence. By moving away from manual hauling and expensive, fragile machinery, you create a homestead that is more resilient and more peaceful. The initial effort of laying pipe and priming the line is a small price to pay for a lifetime of free, silent water delivery.
As you move forward with your projects, I encourage you to experiment. Start small, learn how the water behaves on your specific land, and then scale up. There is a deep, quiet satisfaction in turning a tap and knowing that the water flowing out is being delivered by the mountain itself. It is a testament to your grit, your strategy, and your willingness to let nature do the heavy lifting.
