How To Become More Self-Sufficient Without Starting a Full-Blown Farm…
Want to start preserving your harvest, making your own soap, or building a backyard root cellar — but not sure where to begin? “Homesteading Advice” gives you instant lifetime access to 35+ practical homesteading books on food preservation, veggie gardening, DIY natural cleaning products (save over $250 per year with this skill alone), brewing, off-grid energy, and a whole lot more…
Click Here To Check It Out Now!
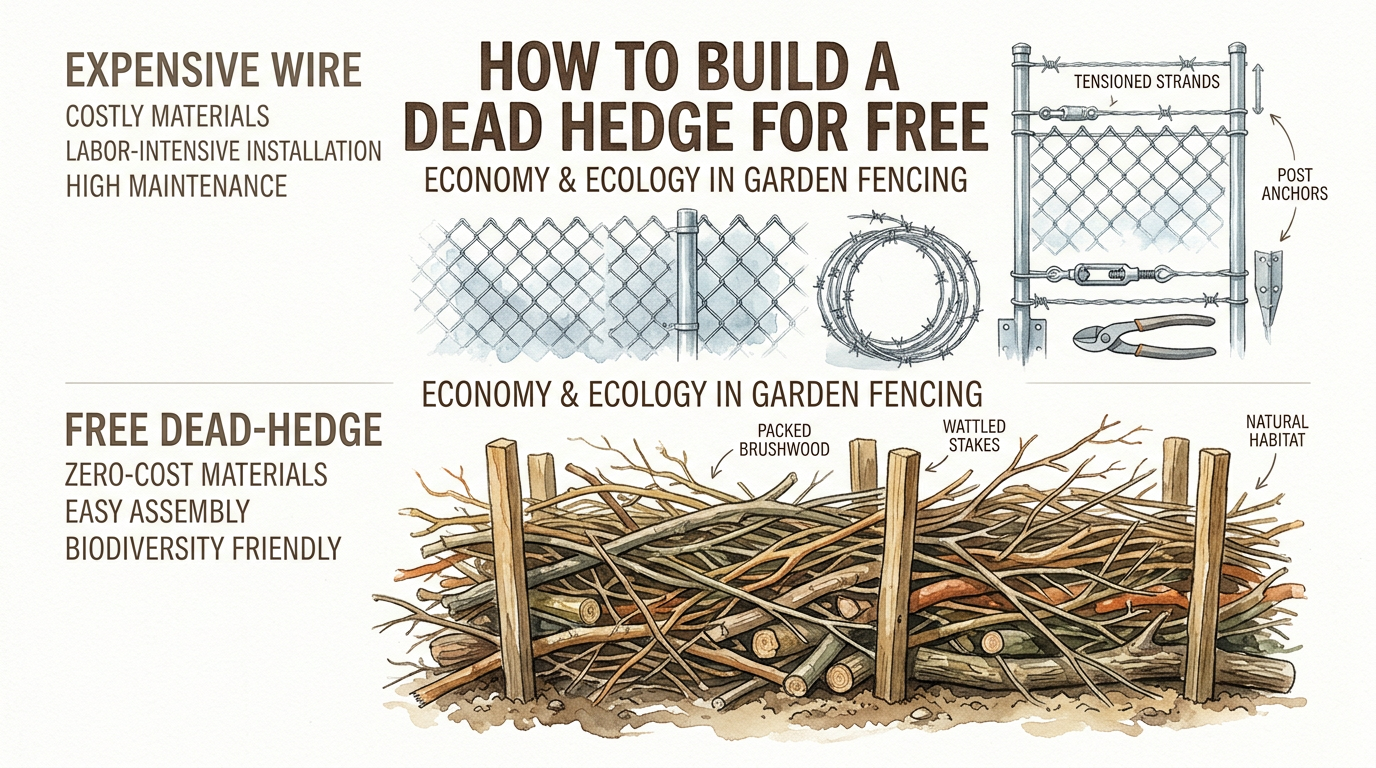
Why spend thousands on industrial wire when the forest floor is giving away better fencing for free? The hardware store wants you to believe that security comes in a roll of steel. But true homesteaders know that the ‘waste’ in your woods is actually a $0 boundary waiting to be built. This ‘Dead-Hedge’ hack creates a windbreak, a wildlife sanctuary, and a sturdy fence all at once.
Building a dead hedge is more than just a weekend project; it is an act of stewardship that honors the ancestral wisdom of those who worked the land long before the age of plastic-coated chain link. In the world of modern homesteading, we often focus on what we can buy to solve our problems. We buy posts, we buy wire, and we buy fasteners. Yet, the most resilient solutions are often found in the very materials nature is trying to cycle back into the earth.
By intercepting that cycle and giving it structure, you create a boundary that doesn’t just keep things out—it invites life in. Whether you are looking to mark a property line, protect a vegetable patch from the wind, or create a corridor for beneficial insects, the dead hedge is the ultimate “closed-loop” solution for the self-reliant pioneer.
The Ancestral Blueprint: How to Build a Dead Hedge for Free
A dead hedge is essentially a vertical container made of stakes, filled with the woody debris—known as “brash”—that accumulates during seasonal pruning or after a storm. It is a traditional technique used for centuries in European woodland management and permaculture to manage land without the need for imported materials. Unlike a living hedge, which requires years to grow and establish, a dead hedge provides an immediate physical barrier and a functional windbreak from day one.
The beauty of this structure lies in its simplicity. You are essentially building a long, narrow “basket” and filling it with sticks. As these sticks settle and eventually decompose, they create a dense, interlocking matrix that is surprisingly difficult to push through. Over time, the bottom of the hedge turns into rich humus, feeding the soil and any nearby plants, while the top continues to serve as a sturdy boundary.
Gathering Your Materials
Before you drive a single stake into the ground, you must look to your landscape. A dead hedge is built from two primary components: the upright stakes (the skeleton) and the filling (the muscle).
For the stakes, you need straight, sturdy limbs roughly 3 to 6 centimeters in diameter. Traditional woodsmen prefer species like hazel, sweet chestnut, or oak because of their natural rot resistance. If those aren’t available, any hardwood will do, though you may find yourself replacing them sooner. You will want these stakes to be at least 30 centimeters taller than your intended hedge height to ensure they have enough “bite” in the soil.
For the filling, almost any woody material is fair game. This includes fruit tree prunings, fallen birch branches, brambles (which add a “thorny” deterrent), and even woody perennial stems. Avoid using large amounts of “green” or sappy material like lawn clippings in the center, as these can rot anaerobically and smell. Stick to the brown, the brittle, and the branchy.
How to Build Your Dead Hedge: Step-by-Step
Building a dead hedge requires more grit than gear. You don’t need a power drill or a level; you need a heavy mallet, a pair of sharp loppers, and a pair of thick leather gloves to protect your hands from the “pioneer-grit” reality of handling raw wood.
Step 1: Marking the Line
Begin by deciding where your boundary needs to go. Use a simple string line or a trail of flour to mark the path. Dead hedges can be perfectly straight for a formal look or gracefully curved to follow the contour of the land. For a standard boundary, aim for a width of about 50 to 60 centimeters (roughly 2 feet). This provides enough depth to be sturdy without taking up excessive space in your garden or pasture.
Step 2: Driving the Stakes
This is the most critical step for the longevity of your fence. Using your mallet, drive your stakes into the ground in two parallel rows along your marked line. Space the stakes about 1 to 1.5 meters apart within each row. To make the structure even stronger, offset the stakes so they aren’t directly across from each other; this creates a zig-zag tension that helps hold the filling in place. Drive them at least 30 to 40 centimeters deep until they feel “set” in the earth.
Step 3: The Foundation Layer
Once your “cage” is built, it’s time to fill it. Start with your longest, heaviest branches at the very bottom. Lay them lengthwise between the stakes. This creates a solid base that prevents smaller debris from sinking into the mud and disappearing too quickly. This foundation layer acts like the sill plate of a house, providing a stable platform for everything that comes after.
Step 4: Stacking and Packing
Now comes the satisfying part: the fill. Pile your branches and brush into the gap. As you add layers, use your weight to compress the material. Walk on it if you have to, or use a heavy log to pack it down. The goal is density. A loosely packed dead hedge is just a pile of sticks; a tightly packed dead hedge is a fence. Aim to criss-cross the branches so they interlock, creating a maze-like structure that is wind-resistant and animal-proof.
Step 5: Capping and Weaving
To give your hedge a finished, intentional look, save your most flexible branches—like willow or hazel—for the very top. You can weave these horizontally around the stakes in a “wattle” style. This “caps” the hedge, preventing the loose fill from blowing away in high winds and giving the structure a sense of craftsmanship that distinguishes it from a random woodpile.
Why It Works: The Ecology of a “Living” Dead Hedge
While the wood in the hedge is technically dead, the structure itself becomes one of the most vibrant “living” features on your homestead. Because it is porous and filled with nooks and crannies, it serves as a massive, multi-story hotel for wildlife.
Birds: Species like wrens, robins, and dunnocks love the tangled interior of a dead hedge for nesting. It provides protection from predators like hawks and house cats that cannot easily penetrate the dense branch network.
Small Mammals: Hedgehogs—the homesteader’s best friend for slug control—frequently use the base of dead hedges for overwintering. By leaving a small gap every few meters at ground level, you create a “wildlife highway” that allows these beneficial creatures to move safely across your land.
Beneficial Insects: The decaying wood at the bottom of the hedge attracts stag beetles, ground beetles, and solitary bees. These insects are essential for a healthy garden ecosystem, providing both pollination services and natural pest control. As the wood slowly breaks down, it also supports a diverse array of fungi and mosses, further increasing the biodiversity of your property.
Dead Hedge vs. Wire Fencing: A Practical Comparison
For many, the choice between a dead hedge and a wire fence comes down to a balance of cost, time, and utility. While industrial wire offers “instant” security, the dead hedge offers a deeper, more ecological value.
| Feature | Industrial Wire Fencing | Free Dead-Hedge |
|---|---|---|
| Upfront Cost | High (Wire, posts, clips, tools) | $0 (Found materials) |
| Installation | Requires specialized tools/tensioning | Manual labor; simple tools |
| Wildlife Impact | Can block or trap small animals | Creates habitat and corridors |
| Longevity | 15–20 years before rust/rot | 3–10 years (but easily replenished) |
| Wind Protection | Low (Wind passes through) | High (Acts as a porous filter) |
| Maintenance | Hard to repair if broken | “Self-healing” by adding more brush |
Benefits Beyond the Boundary
The practical advantages of a dead hedge extend far beyond merely marking a line. In the wind-swept plains or exposed coastal areas, a dead hedge acts as a superior windbreak. Unlike a solid wall, which creates turbulent “eddy” currents on the leeward side, the dead hedge is porous. It slows the wind down rather than trying to stop it entirely, protecting delicate vegetable crops and reducing soil erosion.
Furthermore, it is a masterclass in carbon sequestration. When you burn a pile of brush, you release its stored carbon into the atmosphere in a matter of minutes. When you build a dead hedge, that carbon is locked into the structure for years, slowly returning to the soil as organic matter. This improves soil tilth and water retention in the immediate vicinity of the hedge, essentially creating a “slow-release” fertilizer for your land.
Challenges and Common Pitfalls
Despite its many benefits, the dead hedge is not a “set it and forget it” solution. Because it is made of organic material, it is subject to the laws of nature.
The Sinking Effect: Within the first year, your hedge will likely “sink” by 20% to 30% as the branches settle and begin to decay. This isn’t a failure; it’s a feature. Simply top it up with new prunings each spring.
Fire Risk: In extremely dry, fire-prone climates, a long line of dry wood can be a liability. Avoid building dead hedges too close to your home or outbuildings if you live in a high-risk wildfire zone.
The “Messy” Factor: To the untrained eye, a dead hedge can look like a neglected pile of trash. To avoid neighbor complaints or code violations in more suburban settings, ensure your stakes are neatly aligned and the top is woven or capped. This signals that the structure is intentional and managed, rather than a result of laziness.
Practical Tips for the Long Haul
To ensure your dead hedge stands the test of time and serves its purpose effectively, keep these best practices in mind:
- Use “living stakes”: In damp areas, you can use fresh willow or dogwood stakes. Sometimes these will root and grow, eventually turning your dead hedge into a living, reinforced boundary.
- Avoid invasive species: Be careful not to use branches from invasive plants that might still be “alive” enough to root, such as certain types of privet or honeysuckle, unless you want them to take over.
- Mix your sizes: A hedge made only of thin twigs will collapse quickly. A hedge made only of logs will have too many gaps. Use a mix of both to create a truly dense barrier.
- Leave the base clear: If you are building the hedge to support hedgehogs or other small ground-dwellers, ensure there are small “tunnels” at the base every few meters.
Final Thoughts
The dead hedge is a testament to the idea that a homesteader’s greatest asset isn’t their bank account, but their ability to see value where others see waste. By taking the “scraps” of the forest and giving them structure, you are participating in a tradition of self-reliance that spans generations. You are building a fence that breathes, a boundary that provides, and a legacy that eventually returns to the earth to feed the next generation of growth.
In an age of planned obsolescence and expensive industrial solutions, there is something deeply radical about a fence that costs nothing but a few callouses and a little time. It reminds us that we don’t always need to conquer nature to find security; sometimes, we just need to stack it neatly between two rows of stakes.
Whether you are protecting a small garden or managing forty acres of timber, the dead hedge offers a practical, beautiful, and profoundly ethical way to define your space. So, the next time a storm brings down a branch or the orchard needs a trim, don’t reach for the matchbook. Reach for your mallet and start building your own $0 boundary.
