How To Become More Self-Sufficient Without Starting a Full-Blown Farm…
Want to start preserving your harvest, making your own soap, or building a backyard root cellar — but not sure where to begin? “Homesteading Advice” gives you instant lifetime access to 35+ practical homesteading books on food preservation, veggie gardening, DIY natural cleaning products (save over $250 per year with this skill alone), brewing, off-grid energy, and a whole lot more…
Click Here To Check It Out Now!
Your fence could be feeding your family instead of just marking a property line.
Why spend thousands on wood or metal that eventually rots and offers nothing back? A living fence provides privacy, acts as a windbreak, builds habitat for pollinators, and produces food. It is the ultimate permaculture integration for a productive backyard farm.
Our ancestors understood the value of a boundary that worked as hard as the people who planted it. They didn’t rely on pressure-treated lumber shipped from a thousand miles away. They turned to the soil, using hawthorn, hazel, and osage orange to create impenetrable barriers that served multiple generations.
Building a living larder takes time and patience, but the rewards far outweigh the instant gratification of a hammer and nails. You are not just building a wall; you are planting a legacy that grows stronger, thicker, and more useful every passing year. This guide walks you through the process of turning a static boundary into a thriving ecosystem.
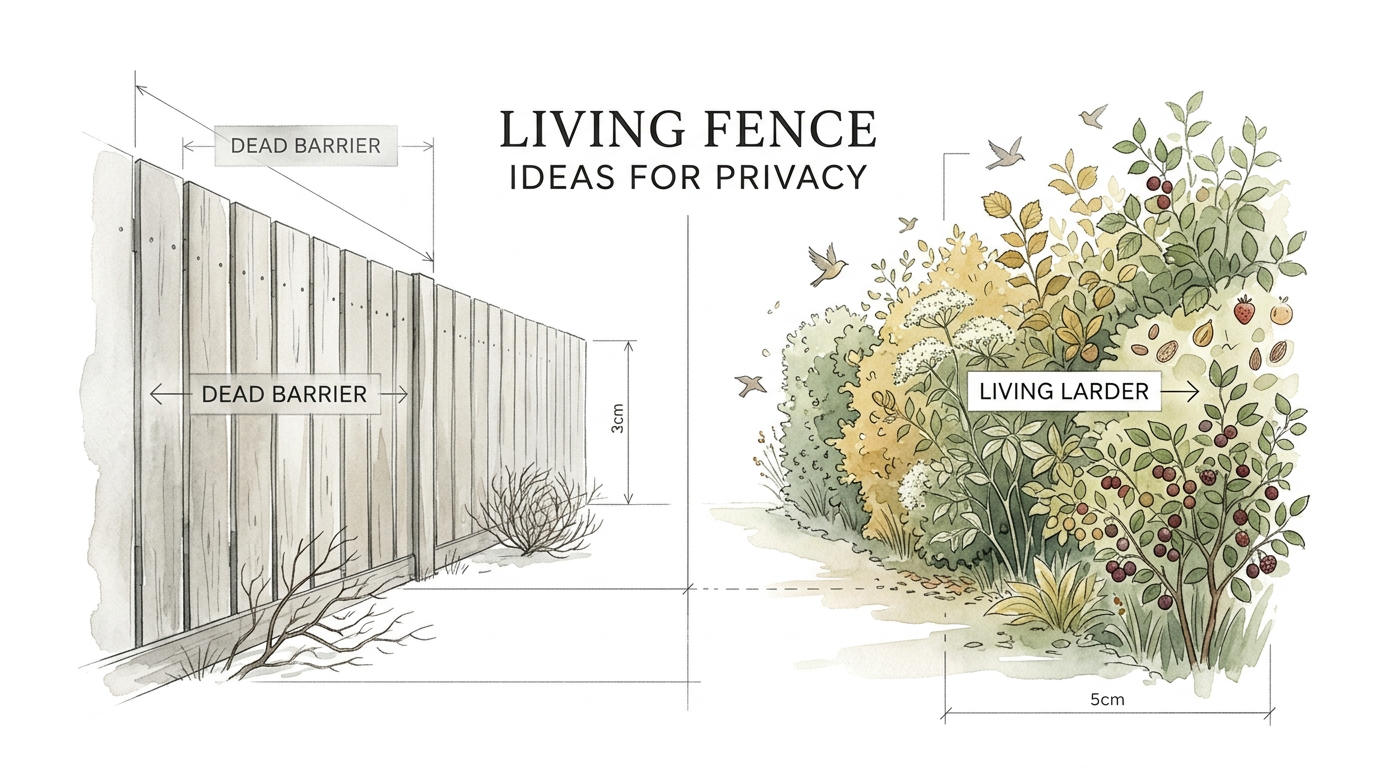
Living Fence Ideas For Privacy
Privacy is the most common reason people reach for a fence, but a wooden panel is a static, dead thing. A living fence for privacy uses dense foliage and strategic branching to create a visual barrier that feels like a secluded sanctuary. These green walls filter noise, catch dust, and soften the wind in ways that a solid wooden structure never could.
In a real-world setting, a living privacy screen serves as a buffer between you and the modern world. If you live near a busy road, a thick hedge of evergreens or tightly woven deciduous trees can reduce decibel levels significantly. It turns a noisy suburban lot into a quiet homestead where you can hear the birds instead of the traffic.
Visual density is the primary goal here. You want plants that hold their leaves late into the season or evergreens that provide year-round coverage. Choosing species with “pioneer grit”—plants that are tough, resilient, and fast-growing—ensures that your privacy arrives sooner rather than later. Options like Arborvitae are common, but for the self-reliant grower, species like Elderberry or Hazel offer privacy alongside a harvest.
Think about the height you need. A low hedge might define a garden path, while a tall, thick screen protects your home from prying eyes and harsh northern winds. Successful living fences mimic the layers of a forest edge, providing a multi-story barrier that looks natural and performs beautifully.
How to Design and Plant Your Living Larder
Creating a living fence requires more than just digging a few holes. You must consider the spacing, the species, and the eventual shape of the mature hedge. Planning starts with understanding your soil and your sunlight, as these factors dictate what will thrive and what will wither.
Preparation is the foundation of a fence that lasts a century. Start by clearing a strip of land at least three feet wide where your fence will stand. Removing competition from grass and weeds gives your young saplings the best chance to establish deep roots. Adding a layer of well-rotted manure or compost provides the fuel these plants need to explode with growth in their first few seasons.
Spacing depends heavily on the technique you choose. If you are planting a “faggot” or “wattle” style fence where you weave branches, you may plant your main uprights every two feet. If you are aiming for a traditional hedgerow, a double-staggered row is often the best approach. This creates a thicker base and prevents gaps from forming as the plants mature.
Planting during the dormant season—late autumn or early spring—is essential for most species. This allows the roots to settle in without the stress of summer heat or the demands of supporting new leaf growth. Dig a hole twice as wide as the root ball, spread the roots out carefully, and firm the soil down to eliminate air pockets. Water deeply immediately after planting to settle the earth around the new inhabitants of your fenceline.
Techniques for Creating Structure
Structure turns a row of bushes into a functional fence. Without guidance, plants grow upward and leave the bottom of the fence thin and “leggy.” To create a barrier that keeps animals in or out, you must use specific management techniques like hedgelaying or pleaching.
Hedgelaying is an ancient skill that involves cutting the stems of young trees partway through and leaning them over at an angle. These “pleachers” are then woven together. The plant remains alive because the cambium layer is intact, and new vertical shoots grow up from the bent stems. This creates a thick, thorny, and impenetrable weave that was historically used to keep cattle and sheep contained.
Pleaching is a more formal technique where the branches of trees are woven together to form a high, flat screen. This is excellent for narrow spaces where you want a tall privacy barrier without taking up too much ground room. Linden and Beech trees are classic choices for this method, as their branches are flexible and they respond well to heavy pruning.
Espalier is another productive technique for the living fence. This involves training fruit trees to grow flat against a support system, such as wires or a light wooden frame. It allows you to grow apples, pears, or peaches in a very small footprint. An espalier fence provides a clear boundary and a massive amount of fruit at a height that is easy to harvest.
Benefits of the Living Larder
Practical benefits of a living fence extend far beyond mere aesthetics. A wooden fence starts to die the moment it is installed, requiring staining, board replacement, and eventually complete reconstruction. A living fence, conversely, is a self-repairing asset that increases in value and biomass over time.
Food security is a primary driver for many homesteaders. A hedge made of Hazel can yield several pounds of nuts every year. An Elderberry fence provides berries for wine, jam, and immune-boosting syrups. By choosing edible species, you turn a non-productive space into a vertical orchard. This is the essence of the “Living Larder” concept.
Wind protection is another measurable advantage. A solid fence creates turbulence, as wind hits the barrier and “rolls” over the top with force. A living fence acts as a filter. It slows the wind down and breaks it up into smaller, less destructive gusts. This creates a microclimate in your yard that is several degrees warmer in the winter and more protected for delicate garden plants.
Environmental stewardship is built into the roots of this project. A living fence provides food and shelter for beneficial insects, birds, and small mammals. These creatures help control pests in your vegetable garden and provide the pollination services required for a bountiful harvest. You are not just building a fence; you are building a home for the biodiversity that keeps your land healthy.
Challenges and Common Mistakes
Impatience is the most common pitfall when starting a living fence. People often plant their trees too close together in an attempt to get an “instant” screen. Overcrowded plants compete for water and light, leading to poor health and a fence that dies back in sections within a few years. Respect the mature width of the species you choose.
Neglecting the “bottom” of the fence is another frequent error. If you let the plants grow straight up without pruning or training, you will end up with a row of trees with bare trunks. This offers no privacy at eye level and does nothing to stop pets or wildlife from wandering through the gaps. Regular “topping” or using the hedgelaying techniques mentioned above is required to keep the density near the ground.
Poor species selection can ruin a project before it begins. Planting a water-hungry willow in a dry, sandy upland will lead to constant stress and eventual failure. Likewise, choosing a species that is invasive in your area can turn your helpful fence into a nightmare for your neighbors and the local ecosystem. Always check the local status of a plant before putting it in the ground.
Maintenance procrastination is a trap that catches many. A living fence requires annual pruning to maintain its shape and productivity. If you skip a few years, the task becomes significantly harder and may require heavy machinery rather than hand shears. Treating your fence like any other crop—with regular attention and care—is the key to long-term success.
Limitations and When to Choose Traditional Fencing
Realistic constraints must be acknowledged when planning your homestead. A living fence is not a fast solution. If you need a legal boundary to contain a dangerous dog or to meet an immediate building code requirement today, a wooden or chain-link fence is your only option. A living fence can take three to seven years to become fully functional as a barrier.
Space is another limiting factor. A productive living fence usually needs a width of three to five feet to thrive. If you have a tiny urban lot where every inch counts, a thin wooden panel might be the only way to mark your line without sacrificing your entire yard. Living fences grow both up and out, and they require room to breathe.
Rental properties present a unique challenge. Since a living fence is a permanent installation that requires years of commitment, it is rarely suitable for someone who does not own the land. You cannot take your hedge with you when you move, and a landlord may not appreciate the maintenance requirements of a productive hedgerow.
Maintenance capacity is a personal boundary you must respect. If you have physical limitations that prevent you from pruning or if you travel frequently, a living fence may become overgrown and unruly. It is a biological system that requires human interaction. If you want a “set it and forget it” solution, stick to dead materials.
Dead Barrier vs. Living Larder
Understanding the difference between a traditional fence and a living fence helps clarify your long-term goals. While both serve to mark a boundary, their lifecycles and outputs are drastically different. Use the following comparison to see which fits your lifestyle and homesteading philosophy.
| Feature | Dead Barrier (Wood/Metal) | Living Larder (Hedge/Trees) |
|---|---|---|
| Initial Cost | High (Materials + Labor) | Low (Saplings/Seeds) |
| Time to Function | Immediate | 3–7 Years |
| Maintenance | Staining, Repairs every 5 years | Annual pruning and mulching |
| Lifespan | 15–25 Years | 100+ Years (with care) |
| Output | None | Food, Fodder, Medicine, Fuel |
| Ecological Impact | Resource extraction/Waste | Carbon sequestration/Habitat |
Measurable factors show that while the dead barrier wins on speed, the living larder wins on every other metric. The “pioneer-grit” approach favors the living system because it turns an expense into an investment. Instead of spending money to replace a rotting post, you spend time harvesting hazelnuts or elderberries.
Practical Tips and Best Practices
Success in the field comes from attention to detail. When planting, always use a string line to keep your fence straight. While a “natural” look is nice, a crooked fence line makes maintenance much harder and can lead to property line disputes with neighbors. A straight row is easier to mulch and easier to prune with a consistent hand.
Mulching is the secret to fast growth. Use a thick layer of wood chips, straw, or leaves around the base of your young plants. This suppresses weeds, retains moisture, and slowly feeds the soil as it breaks down. Keeping the “feet” of your hedge cool and moist will double its growth rate in the first three years.
Watering deeply and infrequently is better than a light daily sprinkle. You want to encourage the roots to grow deep into the subsoil where they can find moisture during a drought. A light watering keeps the roots near the surface, making the plants vulnerable to heatwaves. Use a soaker hose along the length of the fence for the first two summers to ensure deep establishment.
Sharpen your tools before every pruning session. Clean, sharp cuts heal faster and reduce the risk of disease entering the plant. Using dull shears crushes the stems rather than cutting them, which leads to “die-back” and can invite pests. Invest in a high-quality pair of loppers and a sharp folding saw; they are the only tools you will truly need once the fence is established.
Advanced Considerations for the Serious Practitioner
Optimization of a living fence involves “stacking functions.” This is the permaculture principle of ensuring every element in your system serves at least three purposes. A truly advanced living fence might provide human food (berries), livestock fodder (willow or mulberry leaves), and structural materials (hazel rods for basket weaving or garden stakes).
Grafting is a technique for the patient expert. You can plant a base hedge of hardy, wild hawthorn and then graft choice varieties of pear or medlar onto the established structure. This gives you the resilience of the wild plant with the high-quality fruit of a domestic cultivar. It is a way to turn a “thorny barrier” into a “fruit-bearing wall” without sacrificing security.
Scaling a living fence requires thinking about the whole landscape. In larger acreages, “shelterbelts” are essentially giant living fences. They protect entire fields and livestock herds from the elements. If you are managing more than an acre, consider a multi-species windbreak that includes tall canopy trees, mid-story nitrogen-fixers, and low-level berry bushes.
Soil biology is the final frontier. Inoculating the root zones of your living fence with mycorrhizal fungi can significantly increase the health and growth rate of the plants. These fungi form a symbiotic relationship with the roots, extending their reach and helping them pull nutrients and water from the soil more efficiently. It is an ancestral wisdom backed by modern science.
Real-World Examples of Living Fences
Consider the “Fruited Boundary” scenario. A homesteader in Zone 6 wants to secure a 100-foot property line. Instead of a $3,000 cedar fence, they purchase 50 bare-root Hazelnut saplings and 50 Elderberry cuttings for less than $200. They plant them in a staggered double row, spacing the plants about 2 feet apart.
In the first two years, the plants are mulched heavily and kept watered. By year three, the Elderberries have reached six feet in height, providing a summer screen. By year five, the Hazelnuts have filled in the gaps, creating a dense thicket. The homesteader now harvests 20 pounds of hazelnuts and several gallons of elderberries every year. The “fence” has paid for itself many times over in food value alone.
Another example is the “Security Hedge” using Osage Orange or Hawthorn. These plants have formidable thorns that deter even the most determined trespasser. Historically, “hedge-and-ditch” barriers were used to define borders in the English countryside that have stood for over 500 years. These fences are so thick that a rabbit can barely squeeze through, making them more secure than any chain-link barrier ever could be.
Finally, look at the “Espalier Apple Wall.” In a small suburban backyard, three apple trees are trained along a simple wire frame. Over several years, the branches are tied down to grow horizontally. The result is a four-foot-tall fence that produces 50 pounds of apples in a space only 12 inches wide. This demonstrates that even with limited room, a living fence can be a high-yielding asset.
Final Thoughts
Choosing a living fence is an act of defiance against the “disposable” culture of modern landscaping. It is a commitment to the land and a way to provide for your family while marking your territory. By following the principles of ancestral wisdom and pioneer grit, you create a boundary that is alive, productive, and beautiful.
Start small if you must. Plant a single row of berry bushes along a path or replace a broken section of wooden fence with a few hazel saplings. Observation is your best teacher. Watch how the plants respond to your soil and your climate, and adjust your techniques as you go. The most important step is to get the first root into the ground.
The time you invest in your living larder today will pay dividends for decades. You are building a system that breathes, grows, and feeds the soul. Whether you are looking for privacy, food, or a deeper connection to your homestead, the living fence is the answer. Put down the hammer, pick up the spade, and start planting your legacy.
