How To Become More Self-Sufficient Without Starting a Full-Blown Farm…
Want to start preserving your harvest, making your own soap, or building a backyard root cellar — but not sure where to begin? “Homesteading Advice” gives you instant lifetime access to 35+ practical homesteading books on food preservation, veggie gardening, DIY natural cleaning products (save over $250 per year with this skill alone), brewing, off-grid energy, and a whole lot more…
Click Here To Check It Out Now!
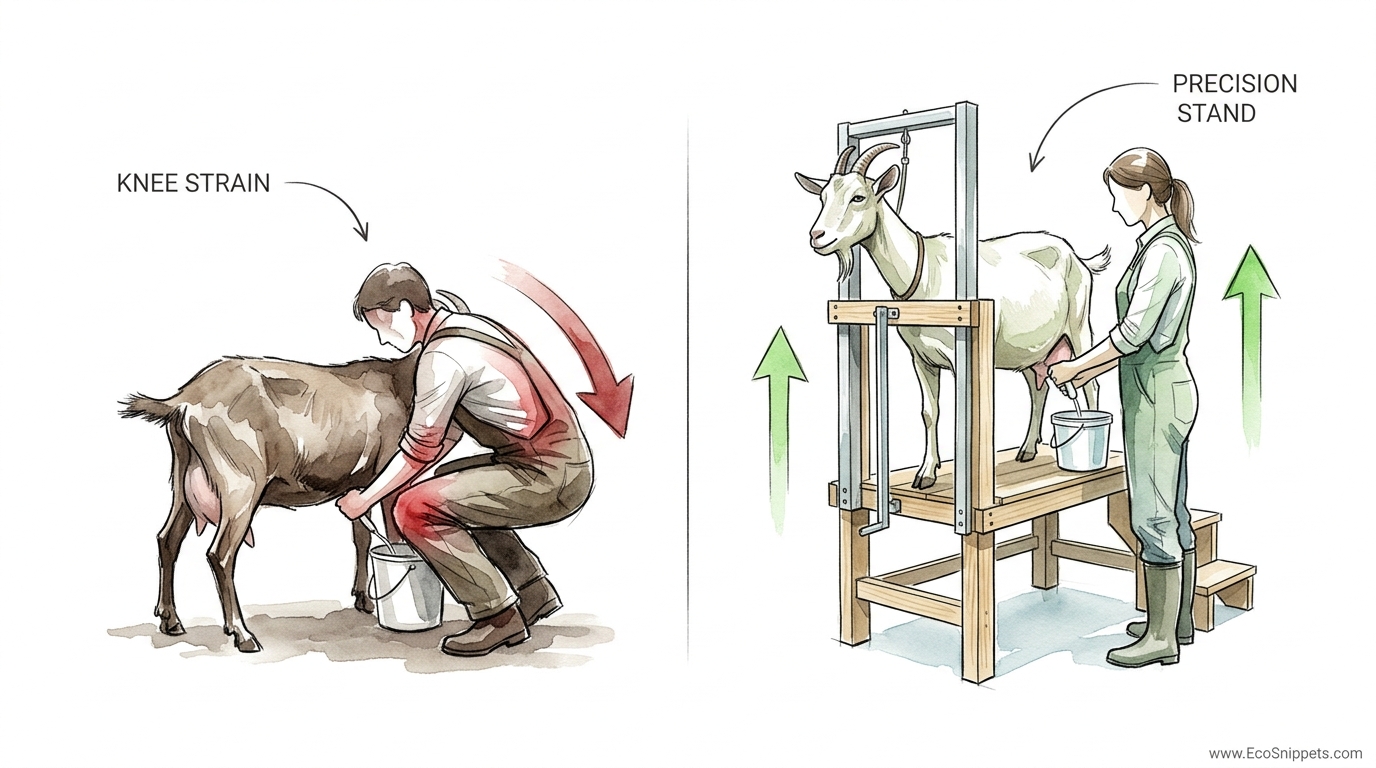
If your back hurts after milking, you’re not farming—you’re just punishing yourself for a gallon of milk. Milking doesn’t have to be a wrestling match. A precision-built stanchion locks the goat in place with their favorite snack, elevating them so you can sit comfortably and finish the job in half the time without the backache.
In the old days, a farmer might have huddled in the straw, bracing against a restless doe while trying to keep a bucket steady. That might satisfy a romantic notion of the past, but it is no way to run a productive homestead today. True self-reliance is about working smarter, using your hands to build infrastructure that respects both your time and the animal’s dignity. A proper milking stand is the cornerstone of a functional dairy operation, whether you have one Nigerian Dwarf or a dozen Alpine does.
Understanding the mechanics of a goat stanchion allows you to transition from a chaotic morning chore to a rhythmic, meditative practice. When the animal is secure and the milker is comfortable, the milk let-down is better, the hygiene is superior, and the longevity of your farming career is assured.
DIY Goat Milking Stand
A DIY goat milking stand, often referred to as a stanchion, is an elevated platform designed to hold a goat securely during the milking process. It consists of three primary components: a sturdy platform, a set of legs to provide elevation, and a head gate that gently but firmly restrains the animal’s neck while they eat from a feed bin.
The primary reason this tool exists is ergonomics. A standard dairy goat is not tall enough for a human to milk while standing or sitting in a standard chair without significant crouching. By raising the goat roughly 15 to 24 inches off the ground, the udder is brought to eye level for a seated milker. This position prevents the chronic KNEE STRAIN vs PRECISION STAND debate from ever entering your mind—because you’re no longer kneeling in the dirt.
In real-world homesteading, the stand is a multi-purpose workstation. Beyond the twice-daily milking routine, it serves as a secure location for hoof trimming, administering vaccinations, and performing routine health checks. It is an island of control in the often unpredictable environment of the barnyard.
How to Build Your Own Goat Stanchion
Building a stand requires basic carpentry skills and a few hours of dedicated labor. The goal is a structure that is rock-solid and free of wobbles, as a nervous goat will sense a flimsy stand and refuse to climb it.
Start by constructing the base frame. Use 2×4 lumber to create a rectangle that fits your specific breed. For standard-sized goats like Nubians or Alpines, a platform measuring 20 inches wide by 42 inches long is ideal. If you are breeding Nigerian Dwarfs, you can scale this down to roughly 16 inches by 35 inches. Screw these together with 3-inch exterior deck screws to ensure they hold up against the moisture of a barn environment.
Next, attach the legs. For a standard milker sitting on a 12-inch stool, a leg height of 17 to 18 inches usually puts the udder in the “sweet spot.” Use 4×4 posts for maximum stability, or double up 2x4s for a similar effect. Ensure each leg is plumb and braced. Many farmers find that adding a 45-degree mitered brace between the leg and the frame significantly reduces sway when a 150-pound doe jumps onto the deck.
The head gate is the most technical part of the build. It consists of two vertical 1×4 or 2×4 boards. One is fixed permanently to the front of the stand, while the other pivots on a carriage bolt at the bottom. The space between these boards when closed should be approximately 3.5 to 4 inches for smaller breeds and up to 5 inches for larger ones. This gap allows the neck to move freely but prevents the head from pulling back through. Secure the top with a simple hook-and-eye latch or a heavy-duty bungee.
Finally, attach the floor. Three-quarter-inch plywood is a standard choice, though some prefer individual 1×6 boards with small gaps for drainage. If you use plywood, consider screwing down a rubber mat or adding “cleats” (small strips of wood) to provide traction so the goat doesn’t slip when the surface gets wet.
Benefits of an Elevated Milking Stand
The most immediate advantage is the preservation of the human body. Repetitive strain on the lower back and wrists is a common reason people give up on dairy goats. An elevated stand eliminates the need to hunch over, allowing you to maintain a straight spine and use your core muscles while milking.
From an animal management perspective, the stand creates a “contract” between you and the doe. She receives a high-protein grain ration in the feeder, and in exchange, she stands still for the duration of the milking. This Pavlovian response makes the chore predictable and stress-free. A calm goat has better milk let-down, as stress hormones like cortisol can physically inhibit the release of milk from the mammary tissue.
Hygiene is also greatly improved. When the goat is elevated, her udder is further away from the dust and bedding on the floor. It is easier for you to see what you are doing, ensuring that you properly clean and sanitize the teats before and after milking. This visibility helps you spot early signs of mastitis or skin irritations that might go unnoticed if you were milking at ground level.
Challenges and Common Building Mistakes
One of the most frequent errors is making the head gate opening too wide. If a goat can pull her head back through the stanchion while you are mid-milk, she may kick the bucket or jump off the stand, leading to spilled milk and potential injury. Always measure your goats’ neck widths and err on the side of a tighter fit that still allows for comfort.
Another pitfall is using pressure-treated lumber for the platform itself. While it resists rot, the chemicals used in the treatment process can potentially contaminate your milk if the goat or the equipment comes into contact with the wood. It is better to use untreated cedar or a high-quality pine that is regularly cleaned and dried. If you must use treated wood for the legs (where it touches the ground), ensure the deck where the goat stands is made of “clean” materials.
Neglecting traction is a recipe for disaster. A goat that slips once on a wet plywood surface may become “stand-shy,” refusing to climb up for days. Whether you use a heavy-duty rubber mat or textured paint with sand mixed in, ensuring a non-slip surface is non-negotiable for safety.
Limitations of the DIY Stand
While a wooden stand is excellent for a small homestead, it has its limits. Wood is porous, meaning it can harbor bacteria and odors over time if not meticulously maintained. In a high-volume commercial setting, health inspectors often require stainless steel or galvanized metal stands because they can be completely sanitized with high-pressure washers and harsh disinfectants.
Portability can also be an issue. A well-built wooden stand is heavy. If your milking area is far from your kidding pens or if you need to move the stand for shows, you may find the weight a significant hurdle. Some practitioners solve this by adding heavy-duty locking casters to the legs, but this adds another layer of complexity to the build.
Environmental factors like extreme humidity can cause wood to swell or warp, potentially jamming the pivoting arm of the head gate. If you live in a particularly wet climate, you will need to apply a food-safe sealant or oil to the moving parts to ensure they remain functional throughout the seasons.
Comparing Wood vs. Metal Stanchions
When deciding whether to build from scratch with lumber or purchase a manufactured metal unit, consider the following trade-offs:
| Factor | Wooden DIY Stand | Commercial Metal Stand |
|---|---|---|
| Cost | $50 – $150 | $300 – $600+ |
| Weight | Heavy and solid | Often lighter (aluminum) |
| Sanitation | Moderate (porous) | Excellent (non-porous) |
| Durability | 5-10 years | Lifetime with care |
| Customization | Infinite | Limited |
For most beginners, the wooden DIY approach is the logical starting point. It allows you to test heights and dimensions to see what fits your specific herd before committing to a significant financial investment.
Practical Tips for Best Results
Attach the feeder at a height that allows the goat to eat comfortably while standing. If the bin is too low, she will hunch her shoulders, making her unstable. If it is too high, she may struggle to reach the bottom of the bowl. An adjustable feeder system, perhaps using a French cleat design, allows you to move the bin up or down depending on the size of the animal currently on the stand.
Keep a “milking kit” attached directly to the stand. This might include a hook for your strip cup, a holder for teat dip, and a clean place to set your rags. The more organized you are, the less movement you’ll have to make, which keeps the goat calm.
If you have a particularly stubborn goat, don’t force her onto the stand. Instead, lead her to it with a handful of grain and let her explore it on her own terms for a few days before you ever try to lock the head gate. Building that trust is just as important as the carpentry itself.
Advanced Considerations for Serious Practitioners
For those looking to optimize their workflow, consider a double-headed stanchion. This allows you to bring two goats up at once. Even if you only milk one at a time, the second goat is distracted by food and ready to go the moment you finish the first. This “staging” technique can shave significant time off your morning routine.
Collapsible designs are another advanced feature. If space in your barn is at a premium, building a stand with folding legs and a removable head gate allows you to tuck the entire unit against a wall when it’s not in use. This requires high-quality hinges and locking pins to ensure it remains stable when deployed.
Think about the “flow” of your milking parlor. The stand should be positioned so that goats enter from one side and exit through the front or the other side. A “straight-through” design prevents you from having to back a 150-pound animal off a narrow platform, which is safer for everyone involved.
Example Scenario: The Small-Scale Dairy Setup
Imagine a homesteader named Silas who has three Alpine does. He built his stand with a 22-inch wide deck and 18-inch legs. To make the process smoother, he added a small ramp at the back so the pregnant does wouldn’t have to jump.
Every morning, Silas leads the first doe, Clara, to the stand. Clara hops up, puts her head through the gate, and begins munching on a mix of alfalfa pellets and oats. Silas slides the locking bar and drops a pin in place. He sits on a stool he built to match the stand’s height, cleans Clara’s udder, and finishes milking in six minutes. Because the stand is solid, Clara doesn’t fidget. Silas moves her out, wipes down the plywood deck with a vinegar solution, and brings in the next doe. This system allows him to manage his dairy needs before heading to his day job, all without a single twinge of back pain.
Final Thoughts
Building a DIY goat milking stand is more than just a weekend project; it is an investment in your future as a producer. By taking the time to measure your animals and understand the ergonomics of the task, you create a tool that bridges the gap between traditional labor and modern efficiency.
A well-made stanchion respects the “pioneer-grit” mentality by solving a problem with sweat equity and smart design. It ensures that the relationship between you and your herd remains one of partnership rather than struggle.
Once you have mastered the construction of the stand, you may find yourself looking for other ways to improve your barn’s infrastructure. From hay feeders to kidding pens, every piece of equipment you build yourself strengthens your self-reliance. Start with the stand, and let the rhythmic clink of milk hitting the pail be the reward for your craftsmanship.
