How To Become More Self-Sufficient Without Starting a Full-Blown Farm…
Want to start preserving your harvest, making your own soap, or building a backyard root cellar — but not sure where to begin? “Homesteading Advice” gives you instant lifetime access to 35+ practical homesteading books on food preservation, veggie gardening, DIY natural cleaning products (save over $250 per year with this skill alone), brewing, off-grid energy, and a whole lot more…
Click Here To Check It Out Now!
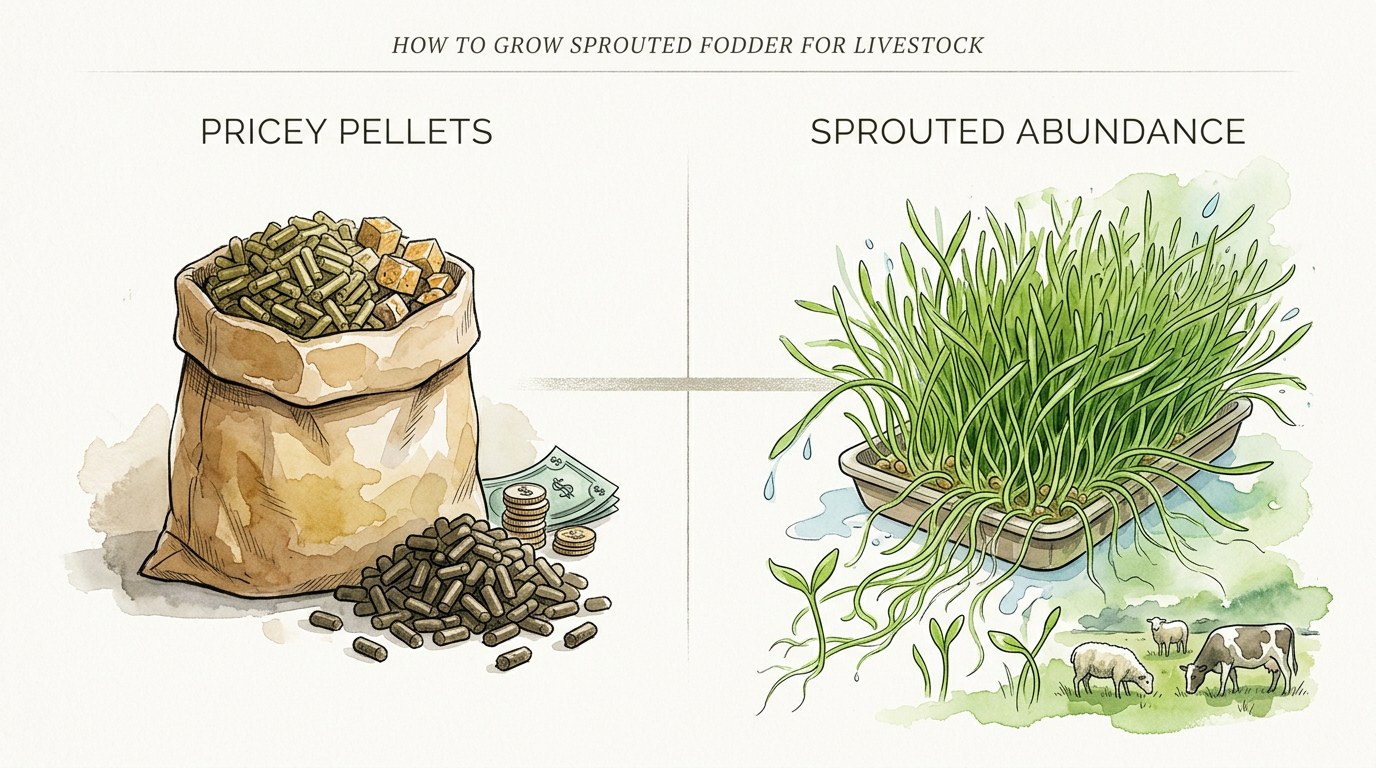
Why pay for the weight of dry grain when you can grow a living ‘vitamin pill’ for pennies? Stop letting commercial feed mills eat your profits. By sprouting simple grains into fodder, you increase the volume and nutrient density of your feed using nothing but water and light. It’s the ultimate ‘free’ upgrade for your livestock’s health.
Modern farming often relies on expensive, processed pellets that lose vital nutrients during storage. Ancestral wisdom tells us that fresh, living greens are the foundation of animal vitality. Bringing the pasture indoors through sprouted fodder allows you to bridge the gap between lean winter months and lush spring grazing.
This system turns a single pound of dry seed into six to eight pounds of succulent green forage in just seven days. It is a cycle of renewal that mimics nature’s spring flush. You can provide your animals with peak nutrition regardless of the weather outside your barn doors.
How To Grow Sprouted Fodder For Livestock
Sprouted fodder is essentially a living carpet of young cereal grains harvested at the peak of their nutritional value. You grow these sprouts hydroponically, meaning you use water instead of soil. The process involves soaking seeds like barley or wheat and allowing them to grow until they reach six to ten inches in height.
This method exists to solve the problem of high feed costs and poor-quality winter forage. In many regions, drought or freezing temperatures make natural grazing impossible for months at a time. Sprouting provides a consistent, high-protein alternative that keeps rumen microbes active and healthy.
Think of a fodder mat as a dense, edible sod. The animal eats the green blades, the remaining seed, and the entire white root system. Nothing goes to waste. It is a closed-loop system where the energy stored in a dormant seed is unlocked and multiplied through simple hydration and light.
How the Sprouting Process Works Step-by-Step
The journey from a hard seed to a lush mat of greens is a seven-day cycle. Success depends on maintaining a clean environment and consistent moisture. You do not need a fancy laboratory, but you do need a disciplined routine.
Phase 1: Seed Preparation and Sanitization
Start with high-quality, untreated seeds with a germination rate above 90 percent. Cleanliness is your primary defense against failure. Soak your seeds in a bucket of water for 12 to 24 hours.
Adding a small amount of apple cider vinegar or a weak bleach solution to the soak water helps kill latent mold spores. These spores are naturally present on almost all grain. Eliminating them early prevents the “root rot” that can ruin a batch later in the week.
Phase 2: The Germination Period
Drain the seeds thoroughly after the initial soak. Place them in a “sprouting bag” or keep them in a dark, warm bucket for another 24 hours. You are looking for the “pip,” which is the tiny white root emerging from the seed.
Once the seeds have germinated, spread them into your growing trays. Aim for a thickness of about half an inch to one inch. Spreading them too thin results in a weak mat, while spreading them too thick leads to poor airflow and mold growth.
Phase 3: The Growing Cycle
Water the trays three to four times daily. The goal is to keep the seeds moist without letting them sit in stagnant water. Use trays with drainage holes to ensure excess liquid escapes immediately.
Light is not necessary for the first few days, but once the green shoots appear around day four, they need sunlight or grow lights. This triggers photosynthesis, which increases the vitamin content and gives the fodder its vibrant green color. Harvest usually occurs on day seven or eight when the root mat is thick enough to be peeled out of the tray like a rug.
Benefits of Living Sprouted Feed
The primary advantage of fodder is the massive boost in digestibility. Dry grain is often only 30 to 40 percent digestible, as much of it passes through the animal’s system unused. Sprouted fodder increases this digestibility to nearly 80 percent.
Enzymes activated during the sprouting process break down complex starches into simple sugars. This makes the energy immediately available to the animal. You will notice less waste in the manure and more “bloom” on the animal’s coat.
Hydration is another massive benefit, especially in winter. Fodder is roughly 80 to 90 percent water. Feeding a succulent mat of greens helps prevent impaction and keeps the animal’s internal systems running smoothly when they might otherwise be reluctant to drink icy water.
Milk production often sees a noticeable spike in quality and quantity. Dairy goats and cows fed on barley fodder frequently show higher butterfat content and improved flavor in their milk. The increased levels of Vitamin A and E contribute to overall reproductive health and stronger immune systems in young stock.
Challenges and Common Mistakes
The “Mold Monster” is the most frequent hurdle for new fodder growers. Mold thrives in the same warm, moist conditions that sprouts love. If you see grey fuzz or smell a sour, fermented odor, your system lacks proper ventilation or sanitization.
Failure to control temperature is another common pitfall. The ideal range is between 60 and 75 degrees Fahrenheit. If the room gets too hot, mold explodes; if it gets too cold, germination slows to a crawl, allowing pathogens to take hold before the sprouts can outpace them.
Many beginners forget to clean their trays between every single use. Scrubbing with a stiff brush and a sanitizing solution is mandatory. Residual organic matter from a previous batch acts as a landing strip for bacteria and fungi.
Limitations and Environmental Constraints
Sprouted fodder is a supplement, not a total replacement for dry roughage. Ruminants like cattle and sheep require long-stem fiber to keep their rumen functioning correctly. Feeding only fodder can lead to “scours” or loose stools because the material lacks the “scratch factor” provided by hay or straw.
Space and labor are also realistic constraints. While the footprint of a fodder rack is small, the daily commitment is real. You must be there to water and rotate trays every day, or the system will fail. Automated systems can help, but they increase the initial cost significantly.
There is also the “Dry Matter” paradox to consider. While a pound of seed grows into seven pounds of fodder, most of that weight is water. On a dry-matter basis, you actually lose a small percentage of total mass through the plant’s respiration. You are trading a small amount of bulk for a massive increase in nutritional quality and digestibility.
Choosing the Right Grain for Your Livestock
Different grains offer different nutritional profiles. Selecting the right one depends on your specific livestock goals and local availability.
| Grain Type | Best For | Protein Level | Growth Speed |
|---|---|---|---|
| Barley | Cattle, Goats, Sheep | Highest (17-20%) | 7 Days |
| Wheat | Poultry, Rabbits | High (14-16%) | 7-8 Days |
| Oats | Horses, Young Stock | Moderate (12-14%) | 8-9 Days |
| Corn (Maize) | Swine, Beef Finishing | Energy Dense | 10 Days |
Practical Tips for Success
Airflow is your best friend in a fodder room. Installing a simple oscillating fan can reduce mold issues by 90 percent. Stagnant air allows humidity to settle in the root mat, which is where problems begin.
Using a timer-controlled pump and mister system can save you hours of manual labor. If you are building a DIY setup, ensure your shelves have a slight pitch of about one inch per foot. This encourages water to flow across the seeds and drain away completely rather than pooling.
Rotation is the secret to a steady supply. If you need one tray of fodder per day, you must have at least eight trays in the system. Every day, you harvest one, clean it, and restart it with fresh seeds. This creates a perpetual harvest cycle that never leaves your animals waiting for their “green treat.”
Advanced Scaling for Commercial Needs
Serious practitioners may want to move beyond a few plastic trays on a wire rack. Climate-controlled shipping containers or dedicated insulated rooms are common for larger herds. These systems often use automated dosing for nutrients or mild sanitizers to keep the water supply pristine.
Recirculating water systems can save thousands of gallons of water per year. However, they require advanced filtration and UV sterilization to prevent the spread of pathogens from one tray to the next. For most smallholders, a “drain to waste” system where the runoff waters a garden or orchard is simpler and safer.
Monitoring the Brix levels of your fodder can help you fine-tune your process. Higher Brix levels indicate more complex sugars and better nutrition. Adjusting the spectrum of your grow lights or the mineral content of your water can push these levels higher, resulting in even better animal performance.
Example Scenario: Feeding a Small Flock
Imagine you have 50 laying hens and want to reduce your feed bill while improving yolk color. A standard 10×20 inch tray produces about 5 to 7 pounds of barley fodder. Since chickens can safely replace 15 percent of their daily ration with fodder, one tray per day is sufficient for a flock of this size.
Place the tray in the coop in the morning. The hens will spend the entire day scratching at the root mat and pecking the green shoots. This reduces boredom and prevents feather pecking while providing them with the enzymes needed to absorb more nutrients from their standard grain.
Within two weeks, you will likely see yolks turning a deep, rich orange. This is a direct result of the increased beta-carotene in the living sprouts. Your feed costs drop, and your egg quality increases, providing a clear return on the small investment of time.
Final Thoughts
Growing sprouted fodder is more than just a cost-saving measure; it is an act of stewardship. It reconnects our animals with the living food they were designed to eat. By mastering this simple cycle, you take back control of your livestock’s health from the industrial food chain.
The transition from dry grain to living fodder takes patience and a bit of trial and error. Do not be discouraged by a moldy tray or a slow-growing batch. Every failure is a lesson in airflow, temperature, or cleanliness.
Start small with a single tray and watch your animals’ reactions. Their enthusiasm for the fresh greens will be all the proof you need to continue. Embrace the grit and wisdom of those who came before us and keep your farm thriving through every season.
