How To Become More Self-Sufficient Without Starting a Full-Blown Farm…
Want to start preserving your harvest, making your own soap, or building a backyard root cellar — but not sure where to begin? “Homesteading Advice” gives you instant lifetime access to 35+ practical homesteading books on food preservation, veggie gardening, DIY natural cleaning products (save over $250 per year with this skill alone), brewing, off-grid energy, and a whole lot more…
Click Here To Check It Out Now!
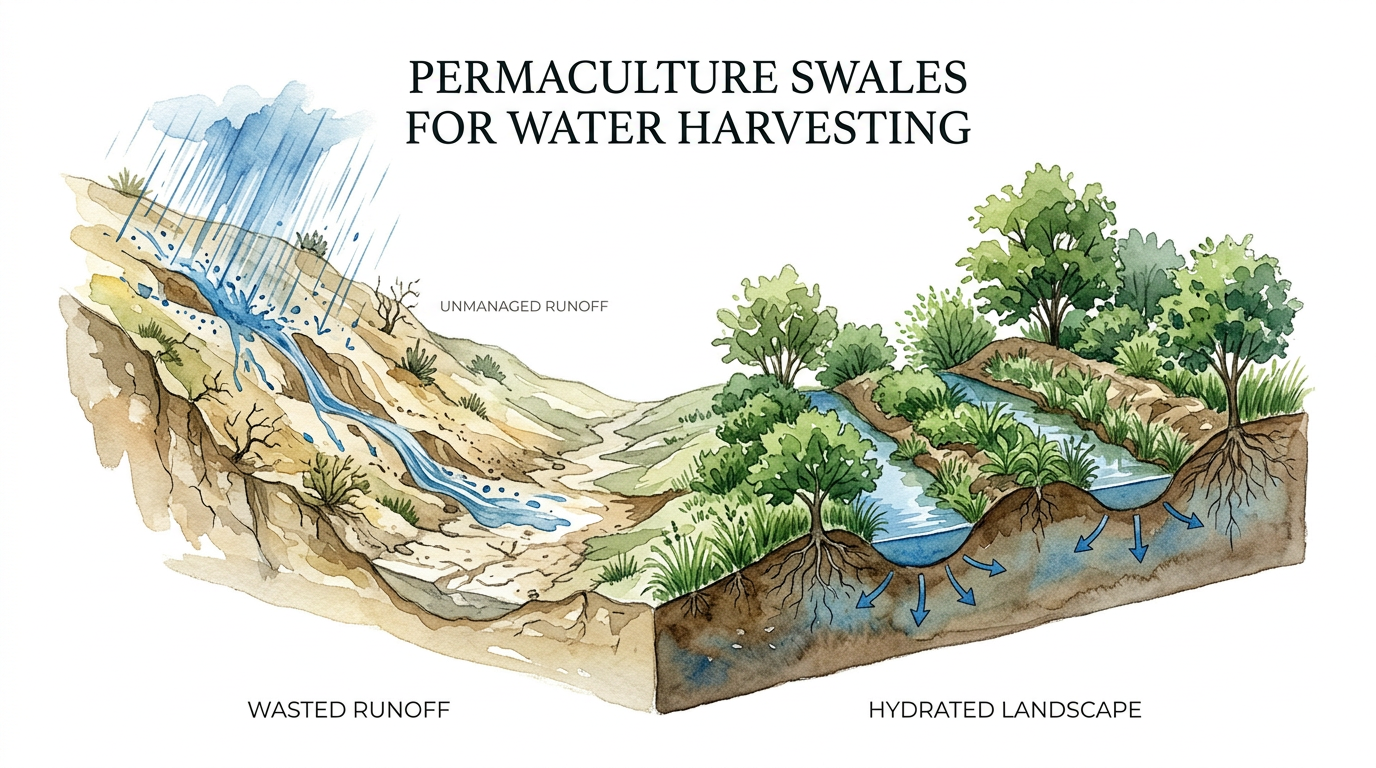
Stop throwing away your land’s most precious resource during every rainstorm. Conventional engineering treats rainwater like a nuisance to be removed. Permaculture treats it like a gift to be banked in the soil. Here is how swales transform a flood into a food forest.
Water is the lifeblood of any homestead, yet most people watch it race across their property, carving gullies and carrying away topsoil. This tragedy of wasted runoff is the difference between a parched, struggling landscape and a thriving, hydrated one. Ancient civilizations understood that the earth is the best water tank we have, provided we know how to open its “valves.”
Mastering the art of the swale is a return to that ancestral wisdom. It is about more than just digging a ditch; it is about redesigning the hydrology of your land to favor life. When you slow water down, you give it the time it needs to soak deep into the subsoil where tree roots can reach it months after the last cloud has vanished.
This guide will walk you through the grit and the science of building these earthen sponges. Whether you are working with a small backyard or a sprawling acreage, the principles of passive water harvesting remain the same. Let’s look at how to stop fighting the rain and start partnering with it.
Permaculture Swales For Water Harvesting
A permaculture swale is a level, on-contour trench with a mound of uncompacted soil on the downhill side. Unlike a traditional drainage ditch, which is designed to move water from point A to point B as fast as possible, a swale is designed to stop water in its tracks. It acts as a long, narrow reservoir that holds water perfectly level across a slope.
In the world of earthworks, swales are the primary tool for “rehydrating” a landscape. When rain falls, gravity naturally pulls it downhill. On degraded or compacted land, this water gains speed, picking up speed and soil until it hits a creek or a storm drain. A swale interrupts this process, forcing the water to spread out along the entire length of the trench.
Once the water is trapped in the swale, it has nowhere to go but down. It begins to “plume” into the ground, creating a lens of moisture that moves slowly through the soil profile. This process recharges local aquifers and provides a steady supply of hydration to the plants growing on the mound, or “berm,” located immediately downhill of the trench.
Think of it as a subterranean irrigation system that requires no pumps, no electricity, and no maintenance once the plants are established. It is a passive system that leverages the simplest laws of physics to do the heavy lifting of land restoration.
The Anatomy of a Swale
Every functional swale consists of three main parts: the trench, the berm, and the spillway. The trench is the “catchment” area where the water sits. It should always be dug exactly on-contour, meaning every point along the bottom of the trench is at the same elevation. If one end is lower than the other, the swale becomes a pipe, and the water will rush to the low point and blow out the side.
The berm is the mound of loose soil created from the excavation of the trench. In permaculture, we never compact this mound. Instead, we plant it heavily with fruit trees, nitrogen-fixers, and groundcovers. The roots of these plants act as a living net, holding the berm together while the loose soil allows for incredible root penetration and gas exchange.
The spillway is the most neglected but vital part of the system. It is a designated low point in the berm, reinforced with stone or tough vegetation, where excess water can exit safely during a “once-in-a-century” storm. Without a spillway, a swale will eventually overflow at its weakest point, often resulting in catastrophic erosion.
How to Design and Build a Swale Step-by-Step
Building a swale begins with observation. You must spend time on your land during a rainstorm to see where the water naturally flows and where it gathers speed. Proper placement is the difference between a productive asset and a muddy disaster.
1. Mapping the Contour
Accurate contour lines are the foundation of a swale. You cannot eyeball this; the human eye is notoriously bad at judging “level” on a slope. Use an A-frame level, a laser level, or a transit to mark out your lines. If you use an A-frame, walk it across the slope, marking each spot where the plumb bob or bubble indicates a true level. Connect these marks with a string or spray paint to reveal the natural curve of the land.
2. Calculating the Catchment
Before you dig, you must know how much water you are dealing with. A common rule of thumb is that 1,000 square feet of catchment area will produce approximately 600 gallons of water for every inch of rain. Calculate the area of land above your proposed swale. If you have a large catchment area, your swale needs to be wider and deeper to handle the volume. For most homestead applications, a trench 18 to 24 inches wide and 12 inches deep is a solid starting point.
3. Excavation and Berm Placement
Start digging on the downhill side of your marked line. Place the excavated soil immediately downhill of the trench to form the berm. As you dig, use your leveling tool to ensure the bottom of the trench remains perfectly flat. A flat bottom ensures that even a small amount of rain spreads across the entire swale rather than pooling in one corner. Remove any large rocks from the berm soil, but keep them nearby for reinforcing the spillway.
4. Shaping and Stabilizing
Shape the berm so it has a gentle slope. A steep, narrow berm is prone to sliding. Aim for a base width that is at least four times the height of the mound. Once the earth is moved, the clock is ticking. Raw soil is vulnerable soil. You must immediately cover the berm with mulch—straw, woodchips, or leaf litter—to protect it from “raindrop impact,” which can seal the soil and cause erosion before the first seed even sprouts.
5. Creating the Spillway
Identify a safe exit point for excess water. This should be an area with a gentle slope and established vegetation, such as a wooded patch or a pasture. Dig the spillway about 4 to 6 inches lower than the rest of the berm’s crest. Line this exit point with large, flat stones to “armour” it against the force of rushing water. This ensures that when the swale reaches capacity, the overflow happens on your terms.
The Many Benefits of Swale Systems
Implementing swales provides a ripple effect of benefits that go far beyond just “stopping water.” It is a foundational move that shifts the entire ecology of a site from a state of scarcity to a state of abundance.
Drought Resilience and Groundwater Recharge
The most immediate benefit is the creation of a “water bank.” By forcing water into the subsoil, you are hydrating the land from the inside out. In the heat of summer, when neighboring properties are drying up and turning brown, the plants on a swale system often remain green and productive. The deep moisture plume acts as a buffer against long periods without rain.
Soil Building and Fertility
Swales are excellent at catching “organic “trash.” Leaves, twigs, and manure that would otherwise wash off the property are trapped in the swale trench. As this material decomposes in the moist environment of the trench, it turns into rich, black humus. This fertility is then wicked into the berm, feeding the trees and crops planted there. Over time, the swale becomes a self-fertilizing system.
Erosion Control
Every swale you build acts as a speed bump for runoff. By breaking a long slope into several shorter segments, you prevent water from ever gaining the “erosive velocity” needed to strip away topsoil. This preserves the most valuable part of your land—the top few inches of biological activity—and keeps it on your property instead of in the local river system.
Microclimate Creation
The combination of standing water (even temporarily) and dense vegetation on the berm creates a unique microclimate. The evaporation from the swale can cool the immediate area on hot days, and the increased thermal mass of the hydrated soil can provide a slight buffer against early frosts. This allows you to grow a wider variety of plants than might otherwise survive in your region.
Challenges and Common Mistakes to Avoid
While swales are powerful, they are not a “set it and forget it” solution. Poorly designed earthworks can cause more damage than they solve. Success requires attention to detail and a willingness to observe and adjust.
Building Off-Contour
The number one mistake is failing to ensure the swale is perfectly level. If the trench has even a slight slope, it will act as a canal. Water will rush to the lowest point, accumulate there, and eventually “blow out” the berm. This creates a concentrated flow of water that can lead to massive gullies. Always double-check your levels during and after the digging process.
Ignoring the Spillway
Many beginners think a swale will just soak everything up. During an extreme weather event, the ground can become saturated, and the swale will fill up like a bathtub. If you haven’t designed a reinforced spillway, the water will find its own way out—usually by destroying your berm and washing away your expensive fruit trees. Your system is only as strong as its weakest point.
Compacting the Berm
It is tempting to walk on or drive over the berm to “firm it up.” This is a mistake. The goal of the berm is to be a loose, aerated environment for roots to thrive. Compaction destroys the soil structure, kills beneficial microbes, and prevents water from wicking up from the trench. Keep foot traffic and machinery in the trench or on designated paths between swales.
Failing to Vegetate Immediately
Bare soil is an emergency in nature. If you leave your swale and berm unplanted, weeds will take over, or the rain will melt the berm back into the trench. You must have your seeds and mulch ready before you move the first shovelful of dirt. A “living” swale is a stable swale.
Limitations: When Swales Are Not the Answer
Permaculture is about using the right tool for the job, and a swale isn’t always that tool. There are specific environmental conditions where building a swale can be useless or even dangerous.
Steep Slopes and Landslide Risks
Standard swales are generally recommended for slopes under 15%. On steeper terrain, the weight of the trapped water can actually lubricate the soil layers, increasing the risk of landslides or slope failure. On steep hillsides, other techniques like terracing or “net-and-pan” systems are often safer and more effective.
High Water Tables and Soggy Soils
If your land is already swampy or has a very high water table, a swale will only exacerbate the problem. Swales are designed to increase infiltration. If the ground is already saturated, the water has nowhere to go. In these cases, you may need “diversion drains” to move excess water to a pond or a lower point on the property rather than trying to sink it into the ground.
Heavy Clay Soils
In extremely heavy clay, water may sit in the trench for weeks without soaking in. This can lead to anaerobic conditions (no oxygen), which can rot the roots of the trees on the berm. It can also create a breeding ground for mosquitoes. In heavy clay, swales often need to be filled with “woody debris” or organic matter to help break up the soil over time, or they may need a slight “fall” to slowly move water rather than hold it indefinitely.
Proximity to Foundations
Never build a swale within 10 to 20 feet of a house foundation or a septic system. The goal of a swale is to saturate the ground, and the last thing you want is a “plume” of water undermining your home’s structural integrity or flooding your leach field. Always prioritize the safety of your permanent structures.
Wasted Runoff vs. Hydrated Landscape
Understanding the difference between conventional drainage and permaculture water harvesting is crucial for long-term land management. The following table highlights the core differences between these two approaches.
| Feature | Wasted Runoff (Traditional) | Hydrated Landscape (Swales) |
|---|---|---|
| Water Goal | Remove water from the site quickly. | Slow, spread, and sink water into the soil. |
| Soil Impact | Increases erosion and topsoil loss. | Prevents erosion and builds fertility. |
| Vegetation | Plants often require external irrigation. | Plants become self-watering over time. |
| Maintenance | Requires frequent dredging and repair. | Becomes self-sustaining with mature plants. |
| Ecosystem | Drains local biodiversity and moisture. | Recharges groundwater and creates habitat. |
Practical Tips and Best Practices
Once your swales are dug, the real work begins. Successful water harvesting is as much about biological management as it is about earthmoving. Here are some “pioneer-grit” tips for getting the most out of your system.
- Mulch the Trench: Don’t leave the bottom of your swale as bare dirt. Filling it with woodchips or coarse gravel helps prevent the soil from sealing up and allows for faster infiltration. Over time, this mulch breaks down into “sponge-soil” that holds even more moisture.
- The 24-Hour Rule: Ideally, a swale should drain within 24 to 48 hours. If water stands for longer than three days, you may have compaction issues or soil that is too heavy. Long-standing water can lead to root rot for the trees on your berm.
- Plant Nitrogen Fixers: On your new berm, plant “pioneer” species like clover, vetch, or autumn olive (if appropriate for your area). These plants pull nitrogen from the air and put it into the soil, jumpstarting the fertility for your fruit trees.
- Start High: Always build your first swale as high up the slope as possible. If you start at the bottom, the volume of water from the upper slope might be too much for it to handle. Working from the top down allows you to manage small amounts of water progressively.
- Use “Soft” Spillways: In addition to your main rock spillway, consider planting tough, water-loving grasses like vetiver or switchgrass in the overflow area. Their dense root systems act as a secondary filter and stabilizer.
Advanced Considerations: Scaling and Integration
For those looking to take their water management to the next level, swales should be seen as one component of a larger “hydrological web.” Integrated systems are more resilient and productive than isolated ones.
One advanced technique is the “Dam-Swale Connection.” By connecting the spillway of a high-altitude pond to the beginning of a swale, you can use the pond’s overflow to hydrate your entire orchard. This turns a potentially destructive overflow into a controlled irrigation event. Conversely, a swale can be used to harvest water from a large catchment and direct it into a storage pond.
Another consideration is the “Keyline” concept. While swales are strictly level, Keyline drains are dug at a very slight “fall” (usually 1:100 or 1:500) to move water from wet valleys out toward dry ridges. Combining swales on the ridges with Keyline drains in the valleys allows you to achieve near-perfect hydration across an entire property, regardless of its topography.
Finally, think about the “biological swale.” As your food forest matures, the accumulation of leaf litter and the activity of earthworms and fungal networks will create a soil structure so porous that it acts like a swale itself. At this stage, the physical earthworks become less important because the entire forest floor has become a high-capacity sponge.
Example Scenario: The One-Acre Orchard
Imagine a one-acre property with a 10% slope. The owner wants to plant a diverse fruit orchard but lives in an area with a six-month dry season. Without swales, the heavy spring rains would wash off the site, leaving the trees to suffer in the summer heat.
The owner maps out three swales, each 150 feet long, spaced approximately 30 feet apart. Each swale trench is 2 feet wide and 1 foot deep. During a 1-inch rain event, the top swale alone captures nearly 1,800 gallons of water. Over the course of the rainy season, these three swales might sink over 50,000 gallons of water into the soil that would have otherwise been lost.
On the berms, the owner plants apple, pear, and plum trees. Between the fruit trees, they plant comfrey and lupines to build soil. In the first three years, they provide some supplemental water to get the trees established. By year five, the roots have followed the moisture plume deep into the subsoil. Even during a record-breaking drought, the orchard remains productive, and the owner never has to turn on a hose.
Final Thoughts
Building swales is an act of long-term stewardship. It is a rejection of the “quick-fix” mentality that relies on plastic pipes and expensive pumps. Instead, it is a commitment to understanding the rhythms of your land and providing the infrastructure that nature needs to heal itself. Every gallon of water you sink today is an investment in the fertility and resilience of your homestead ten years from now.
Do not be intimidated by the scale of the task. Start with one small swale in your garden or near your most prized tree. Observe how it behaves during the next storm. See how the soil feels under your feet a week later. Once you see the power of a hydrated landscape firsthand, you will never look at a rainstorm the same way again.
True self-reliance is built from the ground up. By mastering water harvesting, you are securing the most basic requirement for life. Take the shovel, find your contour, and begin the work of turning your “wasted runoff” into a legacy of abundance.
