How To Become More Self-Sufficient Without Starting a Full-Blown Farm…
Want to start preserving your harvest, making your own soap, or building a backyard root cellar — but not sure where to begin? “Homesteading Advice” gives you instant lifetime access to 35+ practical homesteading books on food preservation, veggie gardening, DIY natural cleaning products (save over $250 per year with this skill alone), brewing, off-grid energy, and a whole lot more…
Click Here To Check It Out Now!
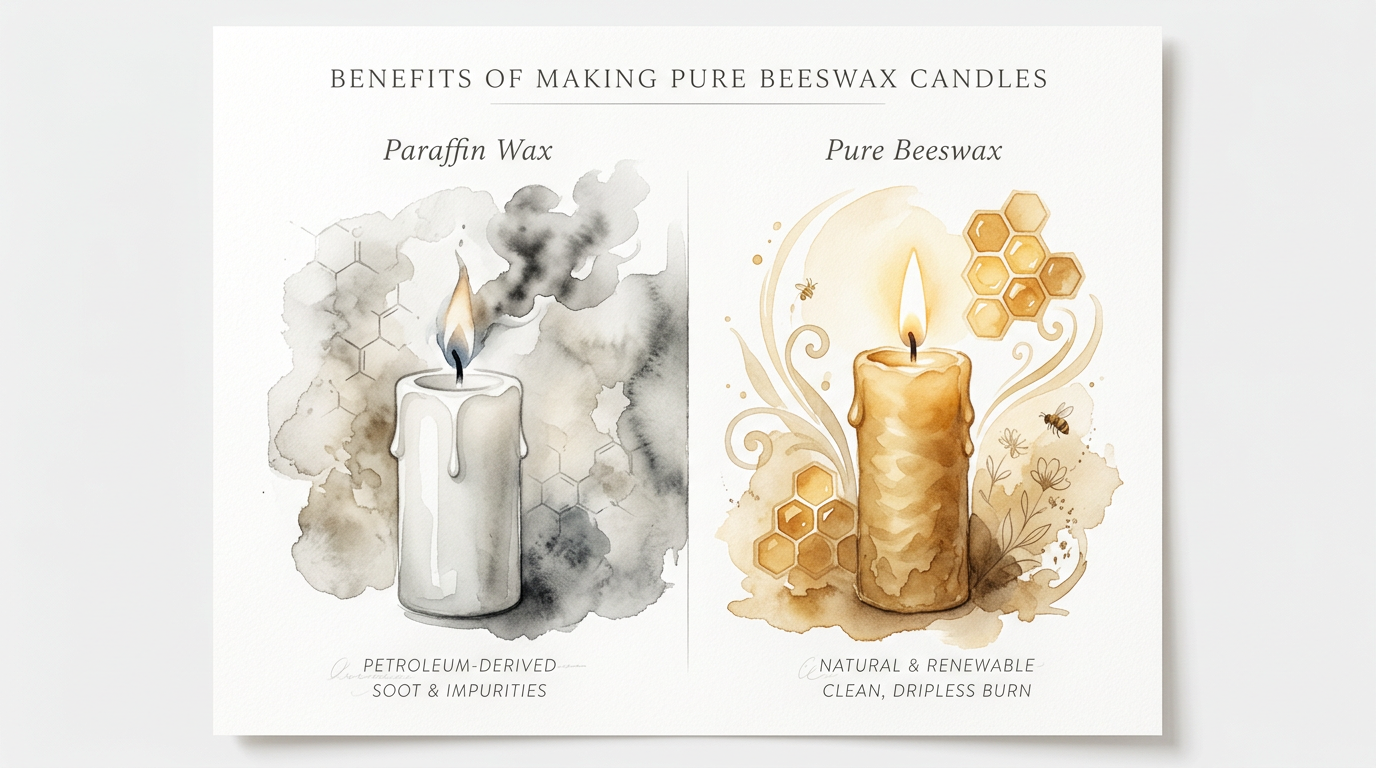
One of these candles is cleaning your air, while the other is quietly polluting your home with petroleum byproducts. Most store-bought candles are essentially burning oil spills. We switched to local beeswax not just for the scent, but for the air quality. Beeswax actually releases negative ions that help clean the air! Have you made the switch yet?
If you are tired of the black soot that clings to your walls and the synthetic, headache-inducing perfumes of modern candles, it is time to return to the ways of our ancestors. Making your own beeswax candles is more than just a hobby; it is an act of self-reliance. It brings the golden warmth of the sun and the industrious spirit of the hive into your living space.
Pure beeswax has been a prized commodity for centuries, once reserved for the high altars and the homes of the wealthy. Today, we have the privilege of reclaiming this ancient craft. This guide will walk you through the process of creating candles that do more than just provide light—they improve the very atmosphere you breathe.
Benefits Of Making Pure Beeswax Candles
Pure beeswax is a remarkable substance produced by honeybees as they build their hives. It is a natural, renewable resource that requires no chemical processing to become a functional light source. When you burn a beeswax candle, you are witnessing one of nature’s most efficient energy transfers.
Environmental benefits are the primary reason many homesteaders make the switch. Unlike paraffin, which is a sludge-like byproduct of the petroleum refining process, beeswax is entirely biodegradable. It does not contribute to the depletion of fossil fuels. Instead, its production supports the pollination of crops and the health of local bee populations.
Health-conscious individuals choose beeswax because it burns cleaner than any other wax. It lacks the synthetic dyes and fragrances that often trigger allergies or respiratory issues. The natural honey scent is subtle and soothing, provided by the nectar and pollen the bees collected. This makes it the safest choice for homes with children, pets, or anyone sensitive to airborne toxins.
Air purification is perhaps the most fascinating benefit of beeswax. These candles are believed to release negative ions when burned. These ions attach to positively charged particles in the air, such as dust, pollen, and mold spores. Once attached, these particles become too heavy to remain airborne and drop to the floor, where they can be vacuumed or swept away. This process effectively cleans the air in your home while providing a warm, steady glow.
How It Works: Step-by-Step Candle Crafting
Creating your own candles requires patience and a few basic tools. You will need a double boiler to melt the wax safely. Never melt beeswax directly over an open flame, as it has a high flash point and can ignite if overheated.
Preparation and Melting
Start by breaking your raw beeswax into small, manageable chunks. If you are using refined pellets, you can skip this step. Place the wax into the top portion of your double boiler and fill the bottom with water. Heat the water to a gentle simmer.
Wait for the wax to reach a liquid state. Beeswax has a relatively high melting point, usually between 143°F and 147°F. Use a dedicated thermometer to monitor the temperature. For container candles, you want to pour the wax when it is around 160°F to 165°F to ensure proper adhesion.
Wicking Your Candle
Select a 100% cotton or hemp wick. Beeswax is a dense fuel and requires a “square braid” wick designed to handle the high heat and viscosity of the wax. If the wick is too thin, the candle will tunnel. If it is too thick, it will produce excess soot.
Secure the wick to the bottom of your container using a dab of melted wax or a wick sticker. Keep the wick centered by using a simple wooden skewer or a clothespin balanced across the top of the jar. This ensures a consistent burn from the first light to the last.
The Pouring Process
Pour the melted wax slowly into your prepared containers. Leave about half an inch of space at the top. Let the candles sit undisturbed in a warm, draft-free area. Rapid cooling can lead to cracks or sinkholes.
If you are making hand-dipped tapers, the process is different. You will repeatedly dip a long length of wick into a tall, narrow vat of melted wax. Between each dip, allow the wax to cool and harden slightly. This builds up layers over time, creating a classic, elegant taper that carries the mark of the maker’s hand.
Advantages of Choosing Beeswax
Beeswax offers a superior burn quality that paraffin cannot match. It has a higher melting point, which translates to a significantly longer burn time. A single beeswax candle can often outlast two or three paraffin candles of the same size. This makes it a more economical choice in the long run, despite the higher initial cost of the raw materials.
The light spectrum emitted by a beeswax flame is another advantage. It is the same spectrum as natural sunlight. This creates a cozy, golden ambiance that is much easier on the eyes than the harsh, blue-tinted light of many synthetic alternatives. It is the perfect companion for evening reading or quiet reflection.
Minimal soot production is a hallmark of a well-made beeswax candle. Because it is a pure fuel, it does not release the black carbon clouds associated with oil-based waxes. This keeps your air cleaner and prevents the “ghosting” effect of soot stains on your ceilings and furniture.
Challenges and Common Mistakes
One of the most frequent errors is using the wrong wick size. Beginners often reach for standard flat wicks found in craft stores. Beeswax is too heavy for these; it will quickly clog the fibers and extinguish the flame. Always insist on square braid cotton wicks.
Cracking on the surface of the candle is another common hurdle. This usually happens when the wax cools too quickly. To avoid this, preheat your glass jars in a low oven before pouring. You can also wrap the finished candles in a towel to slow down the cooling process.
Tunneling occurs when the flame only melts a small hole down the center of the wax, leaving a thick “wall” of unused fuel around the edges. This is almost always caused by an undersized wick or by extinguishing the candle before a full melt pool has reached the edges of the container. Always let your candle burn for at least one hour for every inch of its diameter during the first lighting.
Limitations of the Method
Beeswax is a premium material, and its cost reflects that. If you are looking for the cheapest possible way to light a room, beeswax may not be the answer. It is an investment in quality and health rather than a budget-friendly mass-market solution.
Scent throw is another limitation for those used to synthetic candles. Beeswax does not “hold” fragrance oils as well as soy or paraffin. While you can add essential oils, the result will always be more subtle. If you desire a candle that fills a whole house with a heavy perfume, you might find the natural honey aroma of pure beeswax too faint.
Sourcing high-quality, local wax can sometimes be difficult. Not all wax sold online is 100% pure. Some suppliers “cut” their beeswax with paraffin or stearic acid to lower costs. To get the true benefits, you must ensure you are using 100% pure, unadulterated beeswax, ideally from a local beekeeper you trust.
Comparison: Paraffin vs. Pure Beeswax
Understanding the technical differences helps illustrate why the switch matters. The following table breaks down the key characteristics of these two common candle bases.
| Feature | Paraffin Wax | Pure Beeswax |
|---|---|---|
| Source | Petroleum byproduct | Natural bee secretion |
| Air Impact | Releases VOCs (Benzene/Toluene) | Releases negative ions |
| Burn Time | Fast | Very slow/Long-lasting |
| Scent | Artificial perfumes | Natural honey and nectar |
| Melting Point | Low (approx. 120°F) | High (approx. 145°F) |
Practical Tips and Best Practices
Working with beeswax requires a slight shift in mindset compared to other crafts. Keeping your workspace clean is essential, as wax is notoriously difficult to remove from fabrics and porous surfaces once it hardens.
- Use a dedicated melting pot: Do not use your favorite cooking pot. Beeswax is nearly impossible to clean out completely. A large tin can or a dedicated metal pitcher works best.
- Filter your wax: If you buy raw “cappings” from a beekeeper, they will contain bits of propolis and bee parts. Melt the wax and pour it through a fine mesh or cheesecloth to ensure a smooth, clean burn.
- Add a touch of coconut oil: For container candles, adding about 10% coconut oil can help the wax remain slightly softer. This reduces the risk of the wax pulling away from the sides of the jar as it cools.
- Trim the wick: Before every light, trim the wick to about a quarter of an inch. This prevents the flame from becoming too large and ensures a steady, soot-free burn.
Advanced Considerations
Serious practitioners often delve into the nuances of wax grades. “Cappings wax” is the newest wax bees produce to seal honey cells. It is the lightest in color and has the most pleasant aroma. Older “brood wax” is darker and may have a more earthy scent, which some find better suited for rustic tapers.
Wick chemistry is another area for optimization. For candles larger than 3 inches in diameter, consider using multiple wicks. This creates a larger melt pool and ensures that the candle burns all the way to the edges without leaving waste. Testing is the only way to find the perfect configuration for your specific wax and container combination.
Curing time is often overlooked. While a beeswax candle is ready to burn as soon as it is solid, letting it “cure” for a week or two allows the crystalline structure of the wax to fully stabilize. This can result in a slightly more consistent burn and a better scent profile.
Example Scenarios
Imagine a winter evening in a drafty farmhouse. A paraffin candle might flicker and sputter, sending wisps of black smoke into the rafters. In contrast, a thick beeswax pillar stands steady, its high melting point allowing it to withstand slight drafts while filling the room with the scent of summer fields. The negative ions it releases help combat the “stale” air common in tightly sealed winter homes.
Consider a holiday dinner table. Hand-dipped beeswax tapers provide a tall, elegant light that does not compete with the smell of the food. Unlike synthetic candles that can overwhelm a meal with fake vanilla or cinnamon, the natural honey notes complement the savory aromas of a feast. The lack of soot means you can use your finest linens without fear of gray stains.
Final Thoughts
Returning to beeswax candle making is a way to reconnect with the rhythms of nature and the wisdom of the past. It turns a simple source of light into a tool for health and a testament to craftsmanship. By choosing to make your own, you are taking control of your indoor environment and supporting a sustainable cycle that begins in the flower and ends in your home.
The process may seem daunting at first, but the rewards are measurable. You will notice the difference in the air you breathe and the quality of the light that guides your evenings. Start with a few small jars or a pair of simple dipped tapers, and you will likely find that you can never go back to “oil spill” candles again.
Embrace the grit and the gold of the hive. Whether you are seeking a cleaner home, a meditative hobby, or a way to live more like the pioneers who came before us, beeswax is the steady light that will lead you there. Experiment with different wicks, source your wax from the nearest apiary, and enjoy the transformative power of a truly natural flame.
