How To Become More Self-Sufficient Without Starting a Full-Blown Farm…
Want to start preserving your harvest, making your own soap, or building a backyard root cellar — but not sure where to begin? “Homesteading Advice” gives you instant lifetime access to 35+ practical homesteading books on food preservation, veggie gardening, DIY natural cleaning products (save over $250 per year with this skill alone), brewing, off-grid energy, and a whole lot more…
Click Here To Check It Out Now!
True craftsmanship doesn’t need a power grid; it just needs a steady rhythm. While the world relies on the hum of the motor, the homestead craftsman relies on the beat of the heart. We built a spring-pole lathe that uses the tension of a sapling to spin wood. No electricity, no deafening noise, and a level of control that modern machines simply can’t replicate. Turn bowls while the birds sing.
Woodworking in its most primal form is a conversation between the maker and the material. The modern shop is often a place of dust and high-decibel screaming, where a single slip of an electric tool can ruin a week’s work in a millisecond. In contrast, the spring-pole lathe offers a slower, more deliberate pace. It is a machine born of necessity and perfected over centuries by the “bodgers” of old who turned chair legs in the deep woods.
This article serves as a comprehensive guide to understanding, building, and mastering the spring-pole treadle lathe. Whether you are looking to reduce your reliance on the grid or simply wish to connect with the ancestral roots of the craft, you will find the answers here. We will move through the mechanics of reciprocating motion, the anatomy of the lathe, and the practical skills needed to turn raw timber into functional art.
DIY Spring Pole Treadle Lathe
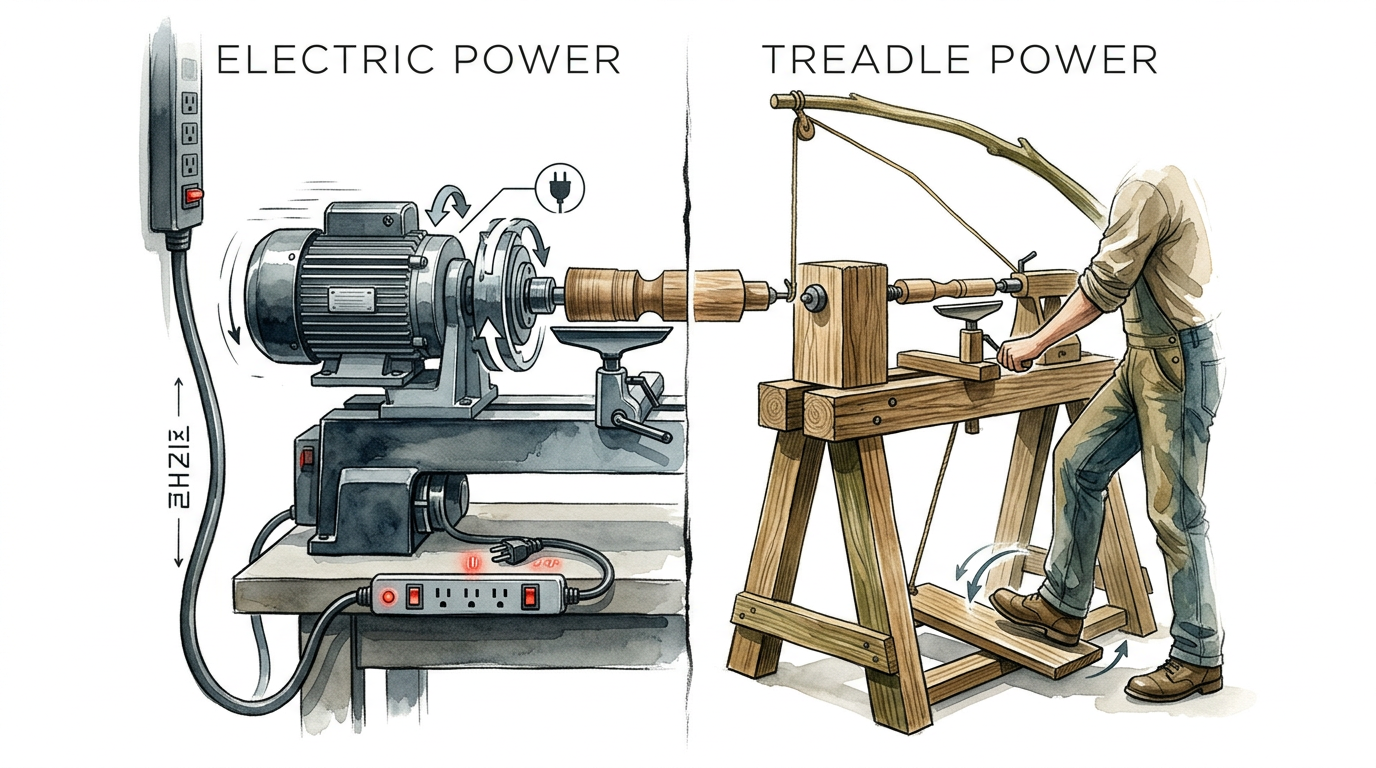
The DIY spring pole treadle lathe is a human-powered machine that uses the natural elasticity of wood to provide a return stroke for woodturning. Unlike modern lathes that spin a workpiece in a continuous circle, this lathe uses reciprocating motion. When you press down on the foot treadle, a cord wrapped around the wood pulls it toward you, causing it to spin. When you release your foot, the tension from a springy pole—often a sapling mounted above the lathe—pulls the cord back up, reversing the spin.
This design is a masterclass in ancient engineering. Historically, these lathes were the standard for producing everything from chair rungs to elegant bowls. Because they require no external power, they were used by nomadic woodworkers who could set up shop wherever a good stand of timber was found. The lathe is traditionally built from heavy timbers to provide a stable platform, ensuring that the only thing moving is the workpiece itself.
In a modern context, the spring pole lathe represents a return to “green woodturning.” It is most efficient when working with unseasoned wood, which is softer and more pliable than kiln-dried lumber. This makes it an ideal tool for the homesteader who has access to fresh-cut branches or small logs. It is a tool of self-reliance, requiring only a few hand tools to build and a bit of leg power to operate.
The Anatomy of a Reciprocating Lathe
Understanding the parts of the lathe is the first step toward building one that actually works. Every component has a specific job, and if one is out of alignment, the whole system suffers.
The Ways (The Bed)
The ways are the horizontal rails that form the foundation of the lathe. They must be perfectly straight and parallel. Traditionally, these are made from heavy 4×4 or 6×6 beams to provide mass. Mass is your friend in a manual lathe; it absorbs vibration and keeps the machine from walking across the shop floor while you work.
The Poppets (Headstock and Tailstock)
In a spring pole lathe, the poppets are the two vertical blocks that hold the wood in place. One is usually fixed, while the other is adjustable along the ways to accommodate different lengths of wood. They are often secured with a wedge-and-mortise system, allowing for quick adjustments without the need for wrenches or bolts.
The Centers
These are the metal points that bite into the ends of the workpiece. On a manual lathe, these are typically “dead centers,” meaning they do not rotate. Because there is high friction, these points must be lubricated—traditionally with a bit of beeswax or tallow—to prevent them from burning the wood or squealing during the turn.
The Treadle and the Spring
The treadle is the long board at the bottom that your foot presses. It acts as a lever to multiply your leg’s power. The “spring” can be a literal sapling (ash and hickory are excellent choices) or a modern bungee cord. While the sapling provides a more nostalgic and authentic feel, a bungee cord is often used in shops with low ceilings where a 12-foot pole isn’t practical.
How It Works: The Physics of the Downstroke
The core principle of the spring pole lathe is the tension-release cycle. You wrap a cord around the workpiece—usually 1.5 to 2 full wraps—with the cord leading from the spring pole above, around the wood, and down to the treadle below.
When you step down on the treadle, you are overcoming the tension of the pole and pulling the cord down. This rotates the wood toward you. This is the only time you can actually cut. You must time your chisel work so that the blade engages only on the downstroke. As your foot reaches the bottom and begins to rise, you slightly back the chisel off.
The spring pole then pulls the cord back up, spinning the wood in reverse to reset the system. This “rhythm of the turn” is what defines the experience. It feels less like operating a machine and more like playing an instrument. Beginners often struggle with the timing, but within an hour of practice, the “scrit-scrit” sound of the blade engaging becomes second nature.
Benefits of Treadle Power over Electric Power
Choosing a human-powered lathe over an electric one isn’t just about nostalgia; there are measurable, practical advantages to this approach.
- Safety: Because the lathe only has as much power as your leg provides, it is much safer for beginners. If a tool catches, the lathe simply stops. There is no high-torque motor to throw a heavy bowl blank across the room.
- Quiet Operation: You can work in total silence. This allows you to hear the wood as it cuts, which provides valuable feedback on your tool angle and the sharpness of your blade.
- Zero Energy Cost: No electricity means you can work anywhere—the middle of the woods, a remote cabin, or your backyard during a power outage.
- Green Wood Friendly: The slower speeds are perfectly suited for green woodturning. You don’t have to worry about the heat build-up that often ruins tools when turning unseasoned timber on high-speed electric lathes.
Step-by-Step: Building Your First Lathe
Building a spring pole lathe is a weekend project that requires only basic carpentry skills. Here is a simplified roadmap to get you started.
1. Construct the Frame
Start with two 6-foot lengths of 2×10 or 2×12 lumber for the ways. Space them about 2 inches apart using spacer blocks at the ends. This gap is where your poppets will slide. Mount this bed on four sturdy legs, ensuring the height of the ways is at roughly your waist level. A lathe that is too low will lead to a sore back.
2. Fabricate the Poppets
Cut two blocks of hardwood (oak or maple) to act as your poppets. They should be wide enough to span the ways and about 12-14 inches tall. Cut a tenon on the bottom of each poppet that fits snugly into the 2-inch gap between the ways. Drill a hole through the tenon below the ways to accept a wooden wedge. This is how you will lock the poppets in place.
3. Install the Centers
For a simple setup, use two large lag bolts. Grind the heads off and sharpen the ends to a 60-degree point. Screw these into the poppets so they align perfectly. If the centers don’t meet point-to-point when the poppets are pushed together, your turnings will never be true.
4. Set Up the Spring and Treadle
If you are outdoors, find a flexible sapling. If indoors, mount a sturdy beam to your ceiling and attach a heavy-duty bungee cord. The treadle should be a wide board hinged at the back or side of the lathe. Connect the spring to the treadle using a high-quality cord like paracord or braided leather.
Challenges and Common Mistakes
Even the simplest machines have their quirks. New builders often run into a few common hurdles that can be frustrating if you don’t know what to look for.
Insufficient Mass: If your lathe is too light, it will bounce. This causes “chatter” on the surface of your wood, leaving it rough and uneven. Always use the heaviest timber you can find or weight the base down with sandbags.
Poor Center Alignment: If the two points holding the wood aren’t perfectly aligned, the wood will wobble. This makes it impossible to turn a perfectly round cylinder. Take the time to shim your poppets until those points meet perfectly.
Dull Tools: Because you are using your own muscle, you will feel the difference between a sharp blade and a dull one immediately. Electric lathes can “brute force” a cut with a dull tool, but a spring pole lathe requires a razor-sharp edge. You should be honing your chisels every 15-20 minutes of turning.
Limitations: When This May Not Be Ideal
While we love the spring pole lathe, it is important to be realistic about its constraints. It is a specialized tool with specific boundaries.
| Factor | Spring Pole Lathe | Electric Lathe |
|---|---|---|
| Workpiece Speed | Low (Variable) | High (Constant) |
| Cutting Direction | Reciprocating (Downstroke only) | Continuous (360 degrees) |
| Material Preference | Best for green/soft wood | Handles dry/hard wood easily |
| Physical Effort | High (Aerobic exercise) | Minimal (Standing only) |
If your goal is to mass-produce 500 identical chair legs for a commercial furniture business, a manual lathe will likely burn you out. Similarly, if you primarily work with extremely hard, kiln-dried exotic woods, the reciprocating motion may feel slow and tedious. This lathe is about the process, the environment, and the mastery of hand-eye coordination.
Practical Tips for the Modern Bodger
Once your lathe is built, these tips will help you get the most out of your sessions.
- Use the “Hook” Tool for Bowls: When turning bowls on a spring pole lathe, a standard gouge won’t work well for the interior. You need a “hook tool,” which allows you to reach inside the bowl and cut with the reciprocating motion.
- Wrap the Cord Wisely: The direction you wrap the cord matters. Make sure the wood spins *toward* you on the downstroke. If it spins away, you won’t be able to cut.
- Posture is Key: Don’t lean into the lathe. Keep your back straight and use your core to stabilize your chisel. The power comes from your leg, but the control comes from your center.
- Lubricate the Centers: Always keep a block of beeswax nearby. Rub it on the tips of the centers every time you mount a new piece of wood. It reduces friction and prevents the wood from scorching.
Advanced Considerations: Tuning Your “Engine”
Experienced turners often refer to the spring pole as the “engine” of the lathe. You can tune this engine to suit your project.
For small, delicate items like lace bobbins or pens, you want a light, fast return. This means a thinner sapling or a lighter bungee. For large, heavy bowls, you need a much “stiffer” engine to pull the weight of the wood back up efficiently.
You can also adjust the “stroke length” by changing where the cord attaches to the treadle. Moving the cord closer to the hinge of the treadle will give you more power but a shorter stroke. Moving it further away increases the stroke length, allowing the wood to spin more times per kick, but it requires more leg strength. Finding the “sweet spot” for your specific height and strength is part of the journey.
Example Scenario: Turning a Green Ash Mallet
Imagine you’ve just felled a small ash tree. You cut a 12-inch section of the trunk, roughly 4 inches in diameter. On an electric lathe, you’d have to wait months for it to dry or risk a watery mess.
On your spring pole lathe, you mount that green ash immediately. You wrap the cord twice around the center of the billet. With the first few kicks, you use a roughing gouge to take off the bark. The wood is so wet that curls of ash peel off like butter, spraying a light mist that smells of the forest. Within twenty minutes, you’ve turned a tapered handle and a heavy head. Because the wood is green, it won’t crack as easily under the pressure of the centers. You finish the mallet with a simple oil rub, and it’s ready for the shop—all without using a single watt of power.
Final Thoughts
The DIY spring pole treadle lathe is more than just a tool; it is a bridge to a different way of living. It forces you to slow down, to breathe with your work, and to develop a physical connection to the wood that machines simply cannot provide. It is a testament to the fact that we do not always need more technology to achieve better results.
By building this lathe, you are reclaiming a piece of lost history. You are proving that a craftsman with a steady rhythm and a sharp blade can produce work that is just as beautiful and functional as anything made in a high-tech factory. Whether you use it for self-sufficiency or for the pure joy of the craft, the spring pole lathe will change the way you look at woodworking.
Take the time to experiment with different wood species for your pole, and don’t be afraid to fail on your first few turnings. Every “scrit” of the blade is a lesson learned. Soon enough, you won’t even hear the absence of the motor; you’ll only hear the rhythm of your own heart and the song of the wood.
