How To Become More Self-Sufficient Without Starting a Full-Blown Farm…
Want to start preserving your harvest, making your own soap, or building a backyard root cellar — but not sure where to begin? “Homesteading Advice” gives you instant lifetime access to 35+ practical homesteading books on food preservation, veggie gardening, DIY natural cleaning products (save over $250 per year with this skill alone), brewing, off-grid energy, and a whole lot more…
Click Here To Check It Out Now!
The sun provides enough energy to bake stone—why are you still paying for a power grid to cure your crafts? Crafting shouldn’t come with a monthly bill. Ancestral cob building techniques and simple solar physics allow you to build a high-heat oven that cures pottery and bakes bread using only the power of the sky.
Modern makers often forget that for millennia, the only tools we had were the earth beneath our feet and the fire above our heads. Reclaiming these skills is more than just a DIY project; it is a declaration of independence from the meter on the side of your house. You can turn a pile of mud and a discarded glass lens into a precision tool that rivals industrial equipment.
Harnessing the sun requires patience and a bit of pioneer grit. You will learn to read the weather, understand the weight of thermal mass, and respect the raw power of concentrated light. This guide will walk you through the process of building a solar cob oven designed for high-heat applications like ceramic firing and artisanal baking.
How To Bake Pottery Without Electricity
Baking pottery without electricity involves concentrating diffuse sunlight into a localized point of intense thermal energy. While a standard solar cooker might reach 300°F—perfect for a slow-roasted stew—firing clay requires temperatures upwards of 1,800°F for a basic bisque. Achieving these heights necessitates a hybrid approach that combines the insulating power of cob with the magnifying power of solar concentrators.
This method exists because the “free” energy of the sun is often wasted on surfaces that cannot hold it. Ancient builders used thick earthen walls to regulate temperature, and we apply that same logic to our kiln chamber. By focusing light through a Fresnel lens or reflecting it with a parabolic mirror into a well-insulated cob “vault,” you create a trapped environment where heat accumulates until the stone itself begins to glow.
Real-world applications of this technology range from survivalist pottery to high-efficiency homestead kitchens. In regions with high solar gain, these ovens serve as a primary tool for making durable kitchenware and building materials without burning a single stick of wood. It is a clean, silent, and infinitely renewable way to practice your craft.
The Mechanics of Solar Concentration and Heat Retention
Understanding the “how” requires a look at two distinct systems working in tandem: the concentrator and the thermal battery. The concentrator is typically a Fresnel lens—the kind found in old projection televisions—or a series of mirrors arranged in a parabolic curve. This component gathers a large area of sunlight and forces it into a small focal point, often just a few inches wide.
The cob chamber acts as the thermal battery. Cob is a mixture of clay, sand, and straw that provides both thermal mass (the ability to store heat) and insulation (the ability to stop heat from escaping). When the concentrated solar beam enters the chamber through a small aperture, it hits the interior walls or the pottery itself, converting light into radiant heat.
Layers of different densities make the oven effective. The innermost layer is a “fire-cob” of pure clay and sand, designed to withstand intense heat without cracking. Surrounding this is an insulation layer packed with straw or perlite, which creates tiny air pockets that trap the heat inside the vault. Without this insulation, the heat would simply bleed out into the surrounding air as fast as the sun could provide it.
How To Build Your Solar Cob Oven
Building this system is a labor-intensive but rewarding process. Start by selecting a site that receives at least six to eight hours of direct, unobstructed sunlight. You need a stable, non-flammable foundation, often built from “urbanite” (broken concrete chunks) or fieldstone, raised to a comfortable working height.
Step 1: The Foundation and Hearth
Construct a solid base using dry-stacked stones or bricks. Fill the center with a non-compressible material like gravel or sand. Top this with a layer of insulating glass bottles embedded in a sand-clay mix; these bottles prevent the earth from sucking the heat out of your oven floor. Lay high-quality firebricks on top of the sand to create a smooth, durable hearth where your pottery will sit.
Step 2: Creating the Sand Mold
Build a dome-shaped mound of damp sand on top of your firebrick floor. This sand serves as the “form” for your oven’s interior. Cover the sand with wet newspaper to prevent the cob from sticking to it. Ensure the dome is proportional to your needs—a smaller chamber reaches higher temperatures more quickly.
Step 3: Applying the Thermal and Insulation Layers
Mix your first layer of cob using roughly equal parts clay and sand. Stomp this mixture with your feet on a tarp until it is uniform and “tough as leather.” Apply a three-inch layer of this over the sand dome, pressing firmly to eliminate air pockets. Follow this with a four-to-six-inch insulation layer made of clay, sand, and a heavy amount of straw. The straw acts as a binder and creates the necessary air gaps for heat retention.
Step 4: Mounting the Solar Concentrator
Once the cob has dried and the sand mold has been removed, you must integrate your solar component. Mount a large Fresnel lens on a wooden or metal frame that allows it to tilt and track the sun. Position the lens so its focal point enters the oven through a small, reinforced opening in the dome. You may want to cover this opening with a piece of high-heat borosilicate glass (like Pyrex) to keep the heat in while letting the light pass through.
Benefits of Solar Cob Firing
Choosing the sun over the socket offers more than just financial savings. The environmental impact is zero; there are no carbon emissions, no wood smoke, and no reliance on a fragile electrical grid. For a potter or baker, this means your “fuel” is delivered to your doorstep every morning without effort or cost.
Durability is another hallmark of this method. A well-built cob oven, protected from the rain by a simple roof, can last for decades. Unlike electric kilns with coils that eventually burn out or gas kilns with valves that leak, a solar cob oven is a primitive, solid-state machine. It is remarkably quiet, allowing you to work in a peaceful environment without the hum of industrial fans.
There is also a profound satisfaction in the quality of the finish. Solar firing is a “clean” atmosphere, meaning there is no soot or ash to discolor your glazes unless you intentionally introduce it. This allows for bright, vibrant colors and a level of control over the “soak” time that is unique to the steady, predictable movement of the sun.
Challenges and Common Mistakes
Cracking is the most frequent enemy of the novice cob builder. This usually happens because the clay-to-sand ratio is off or because the oven was fired before it was “bone-dry.” A mixture with too much clay will shrink and pull apart as it dries. You must perform “biscuit tests” with your local soil to ensure the mix remains stable when exposed to high heat.
Failing to insulate the foundation is another common error. Many builders spend all their energy on the dome but forget that the ground is a massive heat sink. If your firebricks are sitting directly on damp earth or a solid concrete slab, your oven will struggle to reach the temperatures required for vitrification.
Tracking the sun requires constant attention. Unlike an electric kiln that you can “set and forget,” a solar oven needs to be adjusted every 15 to 20 minutes to keep the focal point centered on the aperture. If the sun moves and the beam hits the cob walls instead of the pottery, you lose efficiency and risk damaging the structure of the oven.
Limitations of the Method
Environmental constraints are the most obvious limitation. This system is entirely dependent on the weather. If you live in a region with persistent cloud cover or short winter days, your firing window will be narrow. Attempting to fire pottery on a hazy day will result in “under-fired” ware that is brittle and porous.
Size is also a factor. While you can build a massive wood-fired cob oven, a solar-powered one is limited by the size of your concentrator. To fire large batches of pottery, you would need an array of lenses or a massive parabolic dish, which increases complexity and cost. For most hobbyists, solar cob ovens are best suited for small, artisanal batches rather than mass production.
Thermal shock is a risk during the cooling phase. Because the sun sets relatively quickly, the temperature inside a solar kiln can drop faster than in a heavily insulated electric kiln. You must be prepared to plug the aperture with an insulated “door” the moment the sun goes down to slow the cooling process and prevent your pottery from dunting (cracking due to rapid cooling).
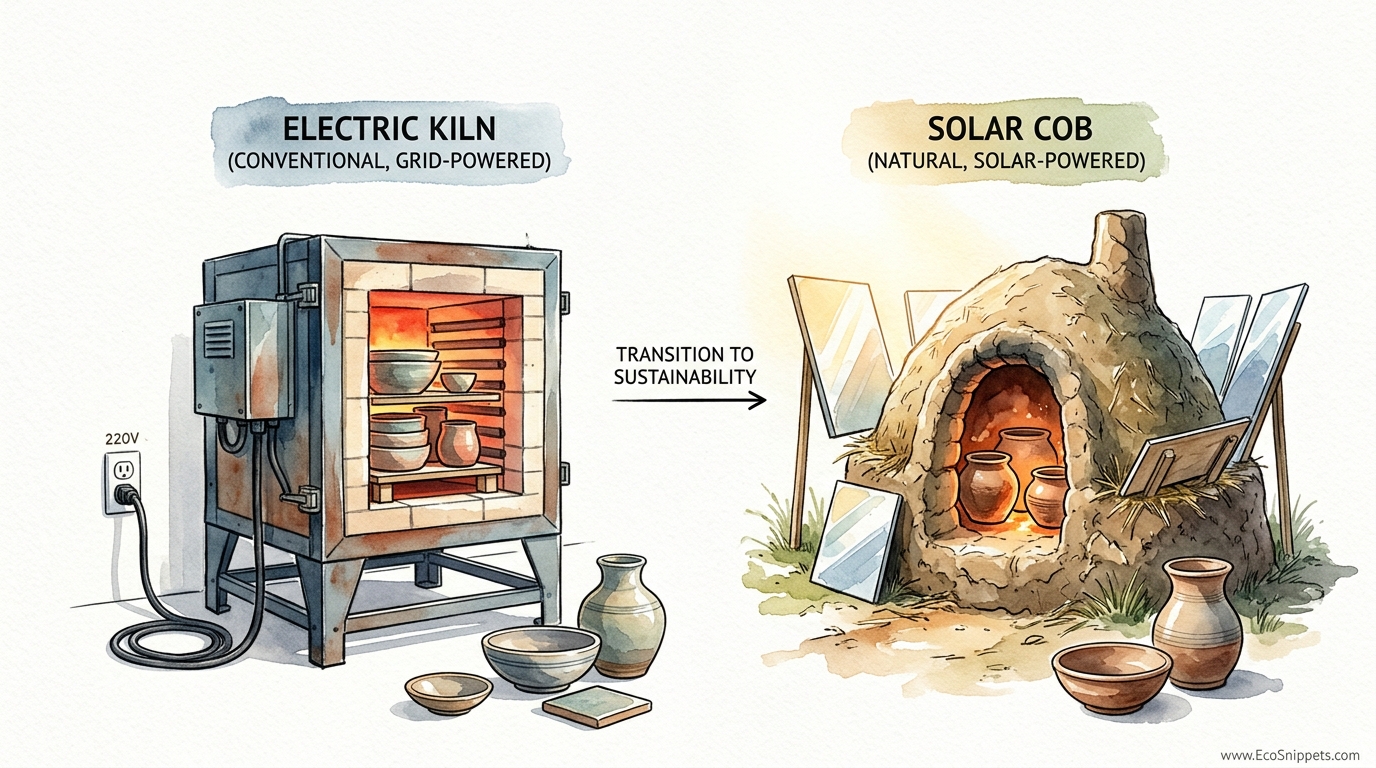
Comparison: Solar Cob vs. Electric Kiln
Choosing between these two systems depends on your priorities regarding convenience and self-sufficiency.
| Feature | Solar Cob Kiln | Electric Kiln |
|---|---|---|
| Fuel Cost | $0 (Free Sunlight) | High (Electricity bills) |
| Initial Setup | Low (Natural materials) | High ($800 – $3,000+) |
| Learning Curve | Moderate (Building skills) | Low (Plug and play) |
| Reliability | Weather Dependent | Highly Consistent |
| Maintenance | Occasional plaster repair | Coil/Switch replacement |
Practical Tips and Best Practices
Always test your local clay before committing to a full build. Mix a small amount of soil with water, let it settle, and observe the layers of sand and clay. Aim for a 30% clay and 70% sand mixture for the best structural integrity. If your soil is too “fat” (high clay), it will crack; if it is too “lean” (high sand), it will crumble.
Optimize your solar gain by painting the interior of the oven with a black, high-heat slip made of clay and manganese dioxide or iron oxide. This dark surface absorbs more light energy and converts it into heat more efficiently than pale clay. Ensure your aperture is just large enough for the focal beam; a hole that is too big will allow precious heat to escape.
Safety is paramount when working with concentrated light. The focal point of a Fresnel lens is hot enough to ignite wood instantly and can cause permanent eye damage or severe skin burns in seconds. Wear specialized welding goggles or high-shade solar glasses whenever you are aligning the lens or looking into the chamber during a firing.
Advanced Considerations for High Heat
Serious practitioners may want to explore “dual-stage” concentration. This involves using a large primary lens to gather light and a smaller secondary mirror or lens near the aperture to further tighten the beam. This setup can push temperatures well beyond 2,500°F, allowing for the firing of stoneware and even some porcelains.
Automating the sun-tracking process can significantly improve results. Simple “solar trackers” use small photo-resistors and worm-gear motors to keep the lens pointed directly at the sun throughout the day. This removes the need for manual adjustment and ensures a consistent rise in temperature, which is critical for complex glazes.
Consider the “soak” period at the end of a firing. In ceramics, “heat work” is a combination of time and temperature. By holding the oven at its peak temperature for an hour—achieved by carefully micro-adjusting the lens to maintain a steady beam—you allow the chemical reactions in the clay and glaze to fully mature. This leads to a more professional and durable finish.
Example Scenario: The Weekend Potter’s Firing
Imagine a clear Saturday morning. You have spent the last two weeks slowly drying a set of hand-coiled bowls. At 9:00 AM, you load them into the cob oven, carefully stacking them on the firebrick hearth. You align your six-square-foot Fresnel lens, and within minutes, the interior temperature begins to climb.
By noon, the aperture glows a dull red. You check the pyrometric cones inside the chamber through a small peep-hole; they are beginning to soften. You make minor adjustments to the lens every twenty minutes, keeping the “sun-dagger” centered on the pots. By 3:00 PM, the chamber has reached a blistering 1,850°F, and the bowls have transitioned from raw clay to ceramic stone.
As the sun dips toward the horizon at 5:00 PM, you withdraw the lens and block the aperture with a thick plug of straw-rich cob. The massive walls of the oven hold the heat, allowing the pottery to cool slowly over the next twelve hours. Sunday morning, you open the door to find a perfectly cured set of bowls, created without a single watt of commercial power.
Final Thoughts
Building a solar cob oven is a journey back to the roots of human craftsmanship. It combines the most basic elements of our world—earth, water, and light—into a tool of incredible power and utility. This approach proves that we do not need complex infrastructure or expensive monthly bills to create beautiful, functional art.
The skills you gain during the build—soil testing, masonry, and optics—are transferable to dozens of other self-reliance projects. Whether you are baking the perfect sourdough loaf or firing a set of heirloom dinnerware, the sun provides everything you need if you have the patience to harness it.
Take the leap and start gathering your materials. Scour your land for clay, find a discarded television lens, and begin building. The independence that comes from firing your first piece of pottery using only the energy of the sky is a feeling that no electric kiln can ever replicate.
