How To Become More Self-Sufficient Without Starting a Full-Blown Farm…
Want to start preserving your harvest, making your own soap, or building a backyard root cellar — but not sure where to begin? “Homesteading Advice” gives you instant lifetime access to 35+ practical homesteading books on food preservation, veggie gardening, DIY natural cleaning products (save over $250 per year with this skill alone), brewing, off-grid energy, and a whole lot more…
Click Here To Check It Out Now!
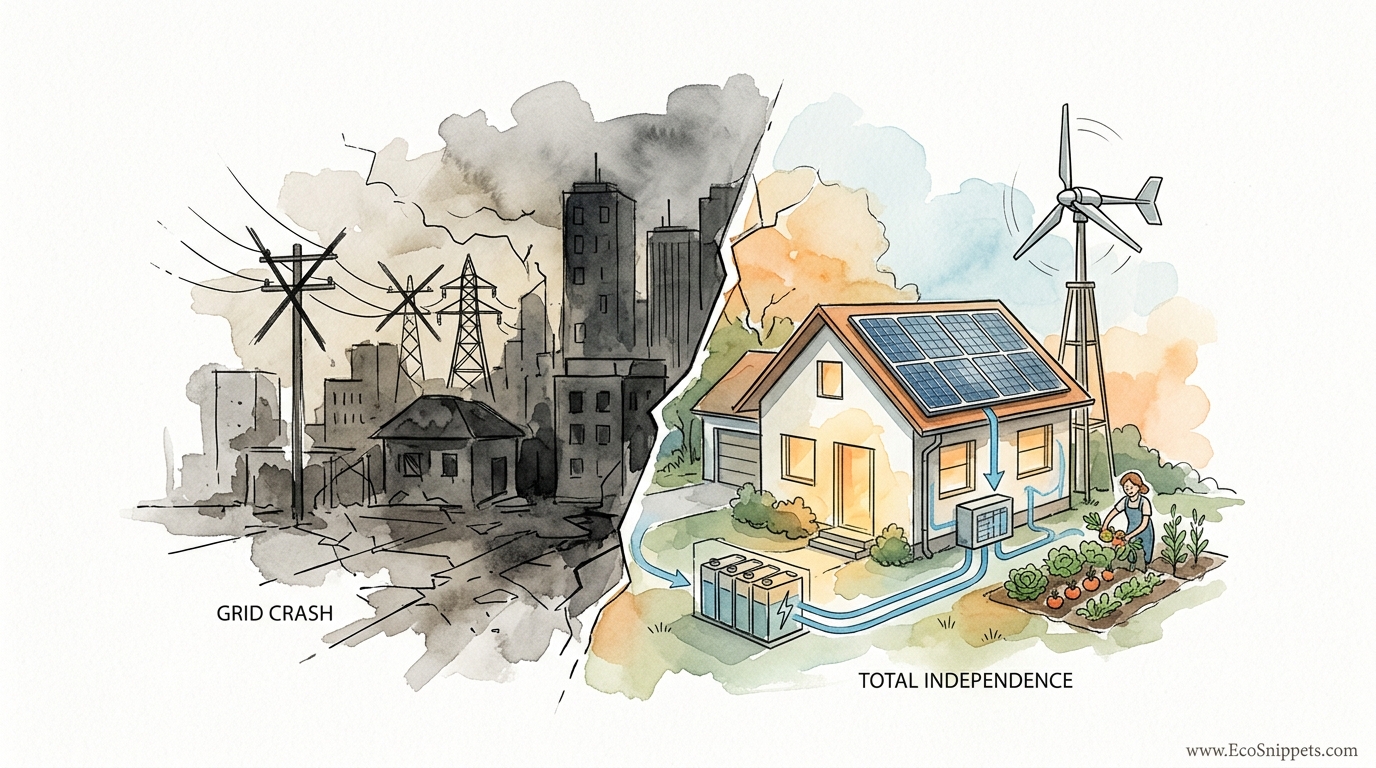
You don’t need to rely on power monopolies when you know the modular hybrid trick. If you think you need a $20,000 professional installation to keep your freezer running and lights on during a blackout, you are missing the simple DIY hybrid trick.
By combining wind and solar into a modular power bank, you can build your own essential backup system for a fraction of the cost, even if you’ve never wired a plug. This method uses physics, not expensive permits. Learn how to build your backyard modular power plant right now.
Our ancestors didn’t wait for a utility company to string wires across the plains to get things done. They used the sun to dry their crops and the wind to pump their water. Today, we have better tools, but that same spirit of self-reliance is what keeps a home running when the modern world decides to flicker out. Building a hybrid system is about merging the best of both worlds so you are never left in the dark.
How To Build A DIY Hybrid Solar And Wind System
A DIY hybrid system is a power plant that draws energy from two distinct natural sources: the sun and the moving air. Most people make the mistake of choosing just one, but nature rarely provides a single constant. Solar panels are fantastic when the sun is high, but they are useless at 2:00 AM or during a heavy thunderstorm. Wind turbines, however, often find their stride during the very storms and night hours when solar panels are dormant.
This system exists to provide a “balanced diet” for your battery bank. Instead of needing a massive solar array to cover your needs on a cloudy day, you use a smaller, more affordable mix of equipment. It works in real-world situations like remote cabins, homesteads, or even suburban backyards where you want a redundant backup for critical appliances like medical equipment or well pumps.
Think of it like a hybrid car. The gasoline engine and the electric motor work together to ensure you never get stranded. In your backyard, the sun is your primary fuel during the day, and the wind is your auxiliary generator that kicks in when conditions change. This synergy allows you to downsize your components, saving you thousands of dollars while increasing your reliability.
The Anatomy of Your Backyard Power Plant
Every modular hybrid system relies on five core components that must work in harmony. Understanding these parts is the first step toward true energy independence. You don’t need a degree in electrical engineering to grasp how these pieces fit together.
The Solar Array
Solar panels are the workhorses of the day. For a DIY setup, monocrystalline panels are generally preferred because they offer higher efficiency in a smaller footprint. These panels capture photons and convert them into Direct Current (DC) electricity. A modular system allows you to start with just one or two 100-watt panels and add more as your budget allows.
The Wind Turbine
The wind turbine is the “night shift” of your power plant. It consists of blades, a hub, and a generator (often a permanent magnet alternator). When the wind blows, it spins the blades, which creates AC or DC electricity depending on the model. Most small-scale DIY turbines are designed to start producing power at wind speeds of around 7 to 10 miles per hour.
The Hybrid Charge Controller
This is the brain of the operation. A hybrid charge controller has separate inputs for both your solar panels and your wind turbine. It regulates the incoming voltage to ensure your batteries don’t overcharge. Crucially, a good hybrid controller includes a “dump load” or an electronic brake for the wind turbine. Without this, a high-wind event could spin your turbine so fast that it physically disintegrates or fries your electronics.
The Battery Bank
Energy must be stored for when neither the sun is shining nor the wind is blowing. Deep-cycle batteries are mandatory here. While old-school lead-acid batteries are cheaper upfront, modern Lithium Iron Phosphate (LiFePO4) batteries are the gold standard for DIYers. They last ten times longer, are much lighter, and can be discharged almost completely without damage.
The Pure Sine Wave Inverter
Your batteries store DC power, but your fridge and lights run on AC power. The inverter performs this conversion. Always opt for a pure sine wave inverter rather than a modified sine wave version. Sensitive electronics like laptops and modern refrigerators can be damaged by the “dirty” power of a cheap modified inverter.
Step-by-Step Build Process
Starting your build requires a logical order of operations. Rushing into wiring without a plan is how components get smoked. Follow these steps to ensure a safe and functional setup.
Step 1: Site Assessment and Sizing
Before buying a single bolt, you must know what you are trying to power. Calculate the wattage of your essential devices. A standard chest freezer might pull 100 watts when running, while a few LED lights might pull 30 watts. Multiply these numbers by the hours they run daily to find your total watt-hour needs.
Check your local wind maps and solar insulation data. If you live in a valley with zero wind, a turbine might be a waste of money. If you are under a dense forest canopy, you’ll need to mount your solar panels on a pole or roof to find the light. Most DIYers find success with a 400-watt solar array paired with a 400-watt wind turbine for basic emergency backup.
Step 2: Preparing the Battery Bank
Always connect your battery to the charge controller first. This is a non-negotiable rule. The controller needs to “see” the battery voltage (usually 12V, 24V, or 48V) to calibrate itself. Use thick-gauge copper wire—typically 4 AWG or larger for the battery connections—to prevent heat buildup and energy loss.
Step 3: Mounting and Wiring the Solar Panels
Mount your panels facing south (in the northern hemisphere) at an angle that matches your latitude. Connect the panels in series or parallel depending on your controller’s voltage requirements. Series connections increase voltage, while parallel connections increase amperage. Run the wires to the “PV” input on your hybrid controller, but keep the circuit breaker off until everything else is ready.
Step 4: Erecting the Wind Turbine
The wind turbine needs “clean” air, which means it should be at least 20 feet above any obstacles within a 250-foot radius. Turbulent air from nearby trees or buildings will vibrate the turbine and reduce its lifespan. Secure the turbine to a sturdy mast and run the three-phase AC wires down to the “Wind” input on your controller.
Step 5: Testing and Commissioning
Switch on the battery breaker first, then the solar breaker. If it’s a breezy day, release the wind turbine brake. Use a multimeter to check the voltage at the battery terminals. You should see a steady climb in voltage as the sun and wind begin their work. Finally, connect your inverter to the battery bank (never to the charge controller’s load terminals) and plug in a small test device like a lamp.
Benefits of the Hybrid Approach
The primary advantage of a hybrid system is its consistency. A solar-only system requires a massive battery bank to survive three days of rain. By adding a wind turbine, you significantly reduce the “autonomy” requirements of your batteries. When a storm rolls in, the solar production drops, but the wind usually picks up, creating a natural hand-off of power generation.
Another measurable benefit is the footprint. To get the same 24-hour reliability from solar alone, you might need twice as many panels, which takes up significant space on your roof or in your yard. A turbine utilizes vertical space, leaving your ground area free for other uses.
Cost-effectiveness is the final pillar. DIY modular systems allow you to buy components over time. You can buy the battery and one panel this month, then add the turbine and more panels next season. This avoids the massive “sticker shock” of professional installations while teaching you exactly how your home’s power works.
Challenges and Common Mistakes
One of the most frequent errors is ignoring the “Braking” requirement for wind turbines. A turbine without a load or a brake will “run away” in high winds. This creates excessive voltage that can destroy the charge controller and the turbine itself. Always ensure your hybrid controller has an integrated manual and automatic braking system.
Improper wire sizing is another silent killer. Electricity traveling through a wire that is too thin generates heat, which is essentially wasted energy. Even worse, it can melt insulation and cause a fire. Always use a wire gauge calculator to ensure your cables can handle the maximum possible current from your panels and turbine.
Placement of the turbine is the third major pitfall. Many beginners mount small turbines directly to the roof of their house. This is a mistake. The vibrations and noise from the turbine will resonate through the structure of the home, making it sound like a small plane is landing on your roof. Always use a free-standing pole or a mount that is isolated from living spaces.
Limitations to Consider
This method is not a “magic bullet” for every environment. In urban areas, wind turbines are often inefficient because the buildings create “dirty air” full of turbulence. If you live in a tightly packed neighborhood, you might find that 90% of your power still comes from the solar side of your hybrid system.
Environmental constraints also play a role. Wind turbines have moving parts, which means they require mechanical maintenance. You will need to lower the turbine once or twice a year to check for loose bolts, grease bearings, and inspect the blades for cracks. If you are not comfortable climbing a ladder or handling mechanical repairs, a hybrid system might be more work than you bargained for.
Modular Hybrid vs. Traditional Grid-Tie
Understanding the difference between a DIY modular hybrid and a professional grid-tie system is vital for making the right choice for your homestead.
| Feature | DIY Modular Hybrid | Professional Grid-Tie |
|---|---|---|
| Upfront Cost | Low ($1,000 – $3,000) | High ($15,000 – $25,000) |
| Complexity | Moderate (Step-by-Step) | High (Requires Licensed Pros) |
| Blackout Protection | Native (Battery-Based) | None (Unless specialized) |
| Maintenance | User-Performed | Service Contracts |
| Permitting | Minimal (Off-grid/Portable) | Strict & Extensive |
The DIY approach focuses on measurable factors like resilience and low entry cost, whereas professional systems are optimized for selling power back to the utility company—a prospect that becomes useless the moment the grid crashes.
Practical Tips for Peak Performance
To get the most out of your setup, you must fine-tune the system. Use a “blocking diode” if your components don’t already have them. This prevents your batteries from “leaking” power back into the solar panels at night, which can happen with older or cheaper equipment.
Keep your battery bank in a temperature-controlled environment. Batteries are like humans; they hate being too hot or too cold. Extreme cold slows down the chemical reaction, making it harder to pull power out, while extreme heat degrades the battery’s internal components rapidly. A simple insulated box in a garage or shed can double the life of your batteries.
Clean your solar panels regularly. A thin layer of dust or bird droppings can reduce output by 20% or more. A quick spray with a garden hose once a month is often all it takes to keep the electrons flowing at their maximum rate. For the wind turbine, listen to it. Any new whistling or grinding sound is a signal that a bolt is loosening or a bearing needs attention.
Advanced Scaling Considerations
Once you have the basics down, you can scale your modular plant into a serious powerhouse. Consider moving from a 12V system to a 48V system. Higher voltage means lower amperage, which allows you to use thinner wires and experience much less energy loss over long distances. This is how the pros do it for large homesteads.
Integration of a “smart” transfer switch is another advanced move. This allows your home to automatically pull from the hybrid system when the batteries are full and switch back to the grid (or a backup generator) when they are low. This creates a seamless experience where you don’t have to manually flip switches every time a cloud passes by.
You might also explore “diversion loads.” When your batteries are 100% full and the wind is still blowing, that extra energy is usually wasted. An advanced charge controller can divert that excess power to a DC water heating element. This turns “wasted” wind into a hot shower, further increasing the overall efficiency of your homestead.
Real-World Scenario: The Three-Day Blizzard
Imagine a winter storm that knocks out power lines across three counties. Thick clouds block the sun for 72 hours, rendering a solar-only system nearly useless within the first day. Because you built a hybrid system, the same high winds that caused the blizzard are now spinning your turbine at maximum capacity.
While your neighbors are shivering and watching their freezer food spoil, your hybrid plant is generating 300 watts of constant power through the night. This is enough to keep your furnace fan running, your phones charged, and your LED lights bright. The modular nature of your build meant you were able to afford this redundancy, and now it is paying for itself in comfort and safety.
Final Thoughts
Building your own modular hybrid power plant is one of the most empowering projects you can undertake. It shifts the power dynamic from being a helpless consumer to a self-sufficient producer. You are no longer at the mercy of aging infrastructure or corporate pricing; you are simply harvesting the natural cycles of the earth.
The beauty of the modular approach is that it rewards curiosity and patience. You don’t need to be an expert on day one. Start small with a single panel and a modest battery, and let your system grow as your confidence increases. Each wire you crimp and each bolt you tighten is a step toward a future where you own your energy.
Take what you have learned here and begin your assessment. Look at your backyard, feel the wind, and watch the path of the sun. The power is already there, waiting for you to catch it. Experiment, stay safe, and enjoy the quiet satisfaction of watching your lights stay on when the rest of the world goes dark.
