How To Become More Self-Sufficient Without Starting a Full-Blown Farm…
Want to start preserving your harvest, making your own soap, or building a backyard root cellar — but not sure where to begin? “Homesteading Advice” gives you instant lifetime access to 35+ practical homesteading books on food preservation, veggie gardening, DIY natural cleaning products (save over $250 per year with this skill alone), brewing, off-grid energy, and a whole lot more…
Click Here To Check It Out Now!
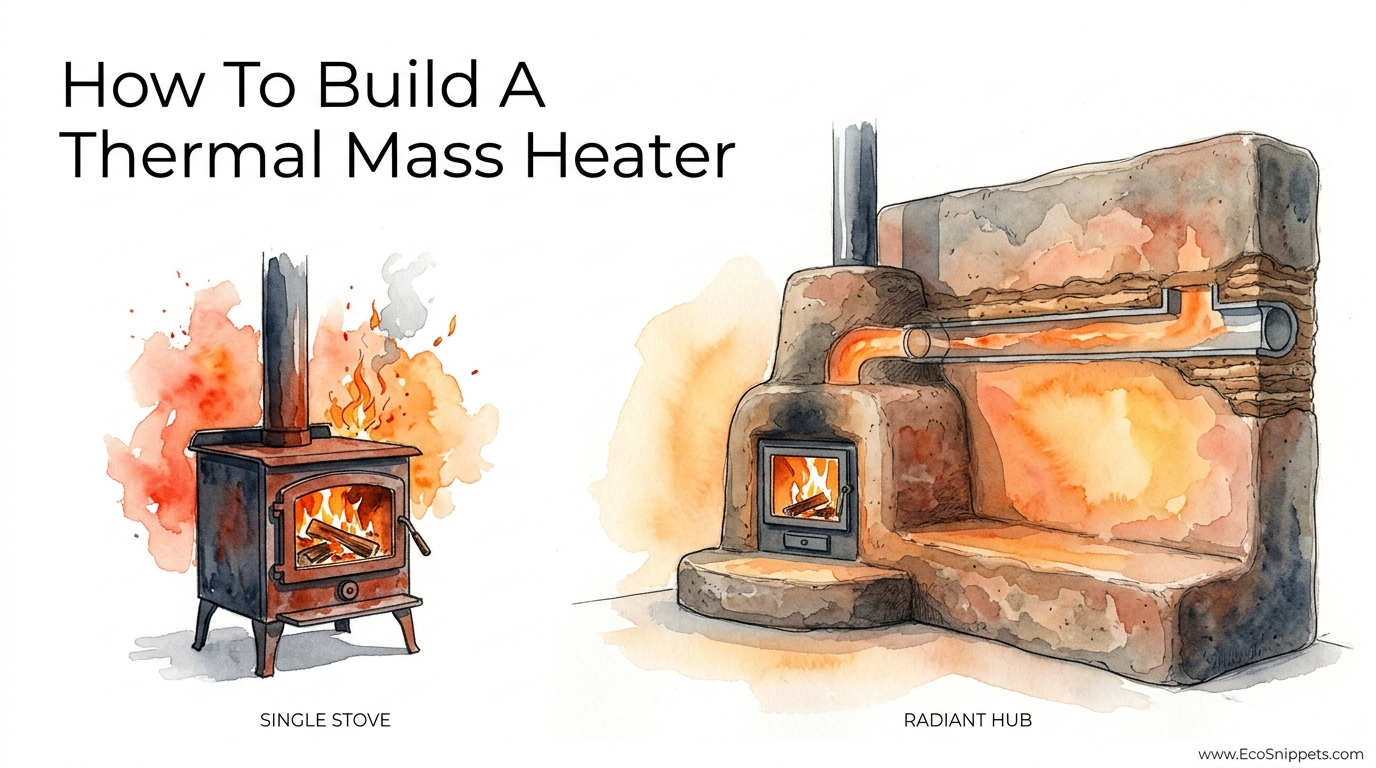
Why settle for a heater that only warms the air when you can have one that cooks your food, heats your water, and stays warm for 24 hours? Modern wood stoves are efficient, but once the fire goes out, the room gets cold. A masonry heater captures every bit of energy in its stone mass, releasing it slowly all day. It’s an oven, a bed, a heater, and a water-warmer all in one.
Stepping into a home with a thermal mass heater feels different than standing next to a roaring cast iron stove. Instead of a blast of scorched air that dries your skin, you feel a gentle, deep warmth radiating from every surface. This is the difference between a high-temperature convective cycle and a steady radiant battery.
Building your own heater is a journey into self-reliance and ancestral wisdom. It requires a bit of sweat and some basic understanding of physics, but the reward is a lifetime of nearly free heat. Let’s walk through the grit and grace of building a system that turns a handful of sticks into a day’s worth of comfort.
How To Build A Thermal Mass Heater
A thermal mass heater is a high-efficiency wood-burning system designed to store heat in a dense material like stone, brick, or cob. Unlike a standard stove that sends 60% to 80% of its energy up the chimney, this system traps that energy before it can escape. The goal is complete combustion followed by maximum heat extraction.
These systems come in two primary forms: the traditional masonry heater and the modern rocket mass heater. Traditional masonry heaters are often large, upright structures built from firebrick and stone, common in cold regions like Russia and Scandinavia. Rocket mass heaters are a more recent DIY innovation that uses a horizontal “J-tube” or “batch box” to achieve super-hot, clean-burning fires with very little fuel.
Real-world application for these heaters ranges from off-grid cabins to modern suburban homes looking to slash their carbon footprint. Because they are so heavy, they typically sit on the ground floor or a reinforced foundation. They function as a “radiant hub,” acting as a thermal battery that regulates the temperature of the entire building even after the fire has been extinguished for twelve hours.
Visualizing the system is simple if you think of it as a battery for heat. A small, intense fire “charges” the mass over the course of two hours. For the next twenty hours, that mass slowly “discharges” its warmth into the room, maintaining a steady 21°C to 24°C (70°F to 75°F) without any further effort from the operator.
The Core Mechanics: How the System Works
Building a thermal mass heater begins with understanding the internal “engine.” In a rocket mass heater, this is the burn tunnel and the heat riser. The heat riser is a vertical, insulated chimney hidden inside the heater that creates a massive draft. This draft pulls the flames sideways through the wood, resulting in a roar that sounds like a jet engine.
Combustion in these units happens at incredibly high temperatures, often exceeding 1,000°C (1,832°F). Because the fire is so hot and oxygen-rich, it burns up the smoke and creosote that would normally clog a chimney. What exits the riser is almost entirely CO2 and water vapor, which then enters the thermal mass.
Once the hot gases hit the top of the heater, they are forced back down and channeled through a series of horizontal pipes or “bells.” These channels are buried inside tons of masonry. As the gases travel through this long path, they transfer their heat to the mass. By the time the exhaust finally leaves the house, it is often as cool as 40°C to 60°C (104°F to 140°F).
Practical construction follows a logical sequence:
- The Foundation: You must start with a base capable of supporting 1,500 kg to 4,000 kg (3,300 lbs to 8,800 lbs). A concrete slab or a thickened earth floor is mandatory.
- The Core: Use firebricks and refractory mortar to build the combustion chamber and the heat riser. This is the only part of the system that must withstand extreme thermal shock.
- The Manifold: This connects the core to the horizontal exhaust pipes, usually made of 15 cm to 20 cm (6-inch to 8-inch) heavy-gauge stovepipe.
- The Bench: This is where you lay the pipe in a horizontal zigzag pattern and cover it with cob or stone. This becomes your heated seat or bed.
- The Exit: The final pipe carries the cooled, clean exhaust through the wall or roof.
The Practical Benefits of Massive Heat
Efficiency is the most measurable advantage. A well-built thermal mass heater can use 70% to 90% less wood than a conventional stove. Instead of cutting, splitting, and hauling four cords of wood every winter, you might only need one. This reduction in labor is a significant victory for any self-reliant household.
Air quality is another major factor. Because the combustion is nearly 100% complete, there is no visible smoke coming out of the chimney. This makes thermal mass heaters ideal for sensitive environments or areas with strict wood-burning regulations. You are burning the smoke itself, which is where a large portion of wood’s energy is actually stored.
Comfort provided by radiant heat is superior to convective air. Forced-air systems and metal stoves create hot spots and drafty cold corners while drying out the air and circulating dust. Radiant heat from a masonry mass warms objects—including the people in the room—directly. It feels like the warmth of the sun on a spring day, providing a deep, bone-warming sensation.
Multi-functionality turns the heater into a piece of furniture. A “radiant hub” design often includes a heated bench, a bread oven, and a surface for heating kettles. It becomes the heart of the home, a place where families naturally gather to sit, sleep, or cook during the coldest months of the year.
Common Mistakes and How to Avoid Them
One of the most frequent errors is using the wrong materials in the core. Beginners often try to use standard red clay bricks or metal pipes for the internal burn tunnel. Extreme heat will cause red bricks to crack and metal pipes to “spall” or flake away, eventually leading to a structural collapse of the inner engine. Always use high-duty firebricks and a properly insulated heat riser.
Failing to calculate the cross-sectional area (CSA) is another pitfall. The system relies on a delicate balance of air pressure. If your exhaust pipe is smaller than your intake, or if you create a bottleneck in the manifold, the heater will “smoke back” into the room. Maintain a consistent CSA throughout the entire gas path to ensure a strong, reliable draft.
Neglecting insulation around the heat riser is a subtle but critical mistake. The riser needs to stay as hot as possible to maintain the draft. If you surround the riser with heavy masonry too early, the mass will “steal” the heat, cooling the riser and killing the draft. Wrap the riser in ceramic fiber blanket or perlite-clay mix before encasing it in the final mass.
Improper seasoning of the mass can lead to structural cracks. When you first build a cob or masonry heater, it contains hundreds of liters of water. If you light a massive fire immediately, that water turns to steam and can blow the heater apart from the inside. Start with tiny, “candle-size” fires for several days to slowly drive out the moisture before attempt a full-heat cycle.
Limitations and Realistic Constraints
Weight is the primary limitation for many dwellers. You cannot simply install a 3,000 kg (6,600 lbs) heater on a standard 2×8 wood joist floor without significant structural reinforcement. This makes these systems difficult to retrofit into second-story apartments or homes with crawl spaces unless you are willing to build a dedicated masonry pillar from the ground up.
Thermal lag is a trade-off that requires a change in habits. A masonry heater takes two to four hours to start feeling warm if it has gone completely cold. This is not a “quick-fix” heater for a weekend cabin that you only visit for a few hours. It is designed for continuous occupancy where the mass is kept “charged” throughout the season.
Building codes and insurance can be a hurdle in some jurisdictions. Because rocket mass heaters are often site-built and don’t always carry a UL listing, some building inspectors and insurance companies may be hesitant. Traditional masonry heaters, however, often have better-established standards (like ASTM E1602) that make them easier to permit in urban areas.
Space requirements are substantial. A system with a 2-meter (6-foot) heated bench takes up a lot of floor real estate. While it replaces other furniture like sofas or beds, you must plan your floor layout carefully. The “Single Stove” footprint is much smaller, but it lacks the 24-hour heat retention and multi-use surfaces of a larger mass system.
Choosing Your System: A Brief Comparison
When deciding how to heat your space, you generally weigh the complexity of the build against the long-term performance.
| Feature | Standard Metal Stove | Thermal Mass Heater |
|---|---|---|
| Fuel Efficiency | 30% – 70% | 80% – 95% |
| Heat Duration | 2 – 6 hours | 12 – 24 hours |
| Build Cost | High ($1,500+) | Low – Med ($500 – $3,000) |
| Skill Required | Installation only | Moderate to High DIY |
| Weight | 100 – 300 kg | 1,500 – 4,000 kg |
Traditional stoves are “plug-and-play” but demand constant attention. A thermal mass heater is a “build-once” investment that pays dividends in fuel savings and comfort for decades. The choice often comes down to whether you prefer a quick, hot fire or a steady, lasting embrace of warmth.
Practical Tips for Best Performance
Sourcing the right wood is the first step to a clean burn. Unlike a traditional fireplace where you might want slow-burning oak logs, a rocket mass heater thrives on small-diameter “trash” wood. Dry branches, pallet scraps, and coppiced wood burn fast and hot, which is exactly what the “engine” needs to reach peak efficiency.
Cleaning out the ash is a task that only needs to happen once every few weeks or even months. Because the combustion is so complete, there is very little residue. However, you must include “clean-out ports” in your horizontal bench runs. Use a shop vac once a year to clear out the fine fly-ash that settles in the horizontal pipes to keep the air flowing freely.
Finishing the heater with a breathable plaster is vital. Cob (a mix of clay, sand, and straw) is the most common material because it is cheap and effective. You can finish it with a lime or clay plaster to give it a smooth, stone-like appearance. Avoid using cement-based plasters or oil-based paints, as these can trap moisture and crack under the thermal expansion of the mass.
Managing the “cold start” is an essential skill. If the heater has been sitting for a long time in a cold house, the air in the chimney may be heavy and stagnant. Lighting a small piece of newspaper at the base of the heat riser or in the clean-out port will “prime” the draft, ensuring that when you light the main fire, the smoke goes exactly where it’s supposed to.
Advanced Considerations for the Serious Builder
Integrating a water coil can turn your heater into a boiler for domestic hot water. By wrapping a stainless steel or copper coil around the base of the heat riser, you can harvest “excess” heat to fill a tank for showers or radiant floor loops. This requires careful plumbing and a pressure-relief valve to ensure safety, but it makes the home even more self-sufficient.
Designing a “Black Oven” or “White Oven” into the masonry adds a culinary dimension. A black oven is one where the fire is built directly inside the oven chamber, which is then wiped clean before baking. A white oven is heated by the hot gases passing *around* the outside of a steel or stone box. Both allow you to bake bread or slow-roast meats using the residual heat of the mass.
Scaling the system for different climates involves adjusting the mass-to-core ratio. In temperate climates, you might want a smaller mass that heats up faster. In extreme sub-zero environments, you want the largest mass possible—perhaps 5,000 kg (11,000 lbs)—to ensure the house never drops below freezing even if you skip a day of firing.
Considering “Bell” technology instead of long pipe runs can improve performance in larger homes. A bell is a large hollow chamber where hot gases naturally rise to the top and stay until they cool and fall to the exit. This creates a more even heat distribution and reduces the friction that can sometimes slow down the draft in very long pipe systems.
Scenario: The 8-Inch J-Tube System
Imagine a 100-square-meter (1,076-square-foot) cabin in a northern climate. The owner chooses an 8-inch (20 cm) diameter J-tube system with a 4-meter (13-foot) cob bench. The core is built from 120 firebricks, and the bench is filled with a mixture of local subsoil and sand.
During a typical winter evening, the owner feeds about 10 kg (22 lbs) of dry pine and maple branches into the feed tube over two hours. The internal riser hits 950°C (1,742°F). The bench surface slowly rises to a comfortable 45°C (113°F). By the time the owner goes to bed, the fire is out, and the intake is capped.
The next morning, the outdoor temperature has dropped to -15°C (5°F), but the cabin remains at a steady 22°C (72°F). The bench is still warm to the touch. The owner doesn’t need to light another fire until the following evening. The total wood consumption for the year is less than two cords, harvested entirely from deadfall on the property.
Final Thoughts
Building a thermal mass heater is a commitment to a different way of living. It moves you away from the frantic cycle of “feed the fire, starve the fire” and toward a rhythmic, sustainable relationship with your home’s energy. It is an act of defiance against planned obsolescence and a return to the heavy, honest materials of the earth.
The physical labor of mixing cob and laying bricks is a small price to pay for the security of a heater that doesn’t need electricity or expensive fuel. Once the mass is built and the first fire roars, you will understand why this ancient technology is seeing a modern resurgence. It isn’t just about heat; it’s about the peace of mind that comes with a warm hearth.
Do not be afraid to experiment with the design of your radiant hub. Whether you build a sleek masonry tower or a wild, sculpted cob bench, the physics remain the same. Respect the fire, insulate the riser, and give the heat plenty of mass to call home. Your reward will be a house that stays warm long after the last ember has faded.
