How To Become More Self-Sufficient Without Starting a Full-Blown Farm…
Want to start preserving your harvest, making your own soap, or building a backyard root cellar — but not sure where to begin? “Homesteading Advice” gives you instant lifetime access to 35+ practical homesteading books on food preservation, veggie gardening, DIY natural cleaning products (save over $250 per year with this skill alone), brewing, off-grid energy, and a whole lot more…
Click Here To Check It Out Now!
Don’t throw away that beef fat; it’s actually hours of free, high-quality light for your homestead. Beef tallow isn’t just for cooking. In the old days, it was the primary source of light. We show you how to render those scraps into odorless, long-burning candles that cost absolutely zero dollars to make.
Walking the path of self-reliance means seeing value where others see waste. In a modern kitchen, beef trimmings often end up in the bin, but for a homesteader with pioneer grit, those scraps are a vital energy source. Transforming animal fat into light is an ancestral skill that connects you directly to the resourceful generations that came before.
You do not need fancy equipment or expensive wax pellets from a craft store. With a little heat, some water, and a bit of patience, you can create a stockpile of emergency lighting or everyday candles that burn with a warm, steady glow. This process is about more than just saving money; it is about reclaiming the knowledge of how to provide for yourself from the land.
Rendering fat might seem like a daunting chore at first, but it is a meditative and rewarding practice. Once you learn the secret to purifying the tallow, you will have a hard, white wax that rivals any store-bought alternative. Let’s look at how to turn your kitchen waste into a sustainable fuel source.
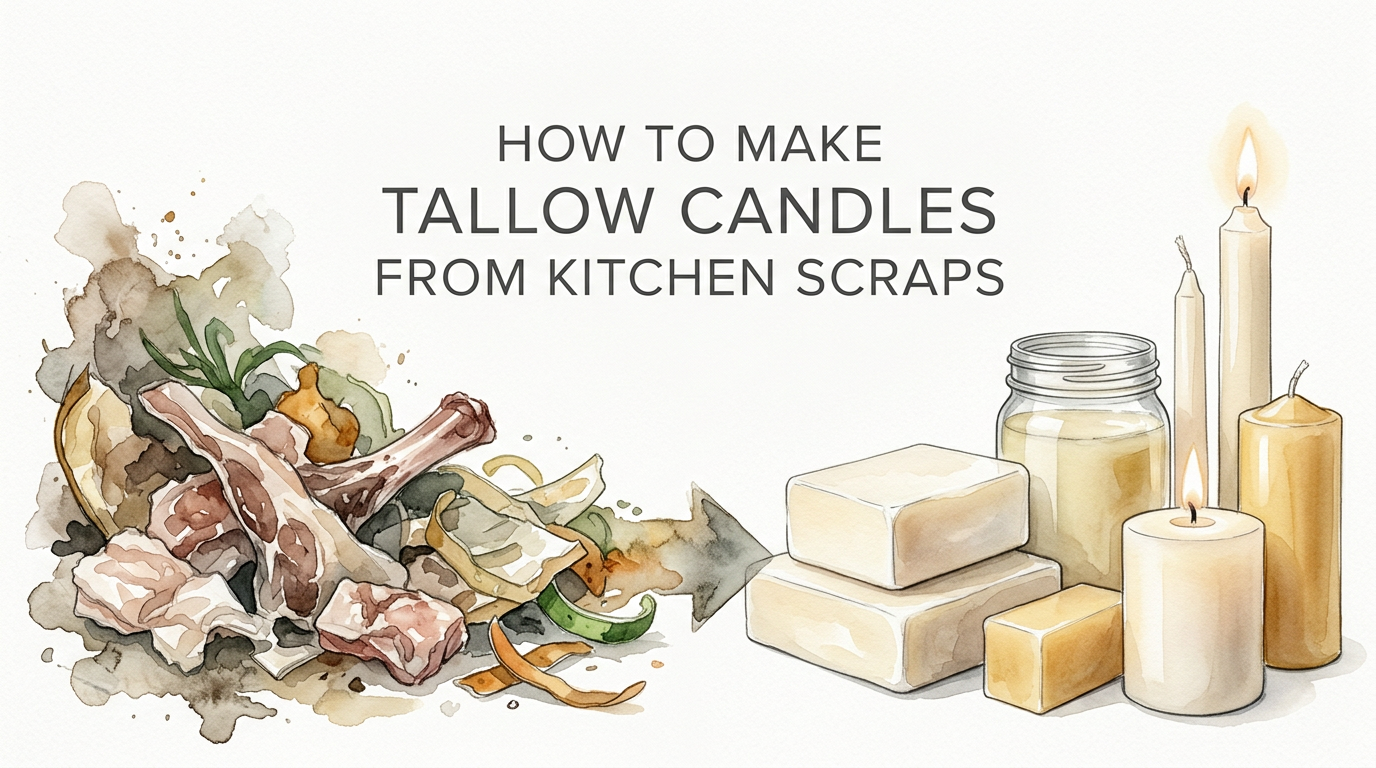
How To Make Tallow Candles From Kitchen Scraps
Tallow candles are essentially light sources made from rendered ruminant fat, most commonly beef or sheep fat. Historically, these were the candles of the common folk for centuries because beeswax was a luxury reserved for the wealthy and the church. While they fell out of favor with the advent of kerosene and electricity, they remain a pinnacle of zero-waste homesteading today.
The core of this process is “rendering,” which is the act of melting raw animal fat to separate the pure oils from the connective tissue and meat solids. Raw fat contains water and protein that will rot or smell if left alone. Rendering stabilizes the fat, turning it into a shelf-stable substance called tallow that can last for years when stored correctly.
Modern tallow candles are vastly superior to the “stinking” dips of the medieval era. By using a purification process involving salt and water, you can remove the “beefy” scent almost entirely. The result is a clean-burning candle that provides a soft, yellow light without the chemicals found in petroleum-based paraffin.
Beef fat is particularly well-suited for this because it has a higher melting point than pork fat (lard). While lard remains soft or even liquid at room temperature, beef tallow—especially suet from around the kidneys—cools into a firm, carvable block. This hardness is what allows it to hold its shape as a pillar candle or a sturdy taper.
How the Rendering and Purification Process Works
To get a high-quality candle, you cannot simply melt fat and stick a wick in it. You must follow a specific sequence to ensure the fuel is pure and odorless. Success depends on low heat and multiple “washes” to pull out impurities.
Step 1: Sourcing and Preparing the Fat
Start with the best scraps you can find. Suet, the hard white fat found around the kidneys of cattle, is the gold standard for candles because it is the hardest fat on the animal. However, any beef trimmings from your butcher or your own kitchen will work. Trim away as much red meat, blood, and gristle as possible before you begin.
Chop the fat into very small pieces or run it through a meat grinder. The smaller the surface area, the faster and more evenly the fat will render. Many homesteaders find that partially freezing the fat makes it much easier to dice without it becoming a slippery mess in your hands.
Step 2: The Wet Rendering Method
Place your chopped fat into a heavy-bottomed pot or a slow cooker. Add about a cup of water for every few pounds of fat. This water acts as a thermal buffer, preventing the fat from scorching or “frying.” Scorched fat develops a permanent burnt-beef smell that is nearly impossible to remove later.
Set the heat to its lowest possible setting. You are looking for a gentle simmer, not a rolling boil. Over several hours, the fat will melt into a golden liquid, and the “cracklings” (the leftover bits of tissue) will turn brown and sink or float. Strain this entire mixture through a fine-mesh sieve lined with several layers of cheesecloth into a large bowl.
Step 3: The Salt-Water Wash (The Secret to Odorless Wax)
Once you have your strained liquid fat, it is time to purify it. Add a tablespoon of salt and a quart of hot water to the melted tallow and stir vigorously. The salt helps draw out the remaining proteins and impurities that cause odor. Let the bowl sit in a cool place or the refrigerator until the tallow forms a hard, white “cake” on top.
Pop the tallow cake out of the bowl and flip it over. You will see a layer of brown, grayish “gunk” on the bottom where the impurities settled. Scrape this off with a knife and discard it. Repeat this salt-water wash process at least two or three times. With each wash, the water underneath will get clearer and the tallow will become whiter and less scented.
Step 4: Final Dehydration
After the final wash, melt the tallow one last time on very low heat without any added water. This step is crucial because it evaporates any residual moisture trapped in the fat. If water remains in your candle wax, it will sputter and “pop” when you light the wick. Once the tallow is clear and still, it is ready to be poured into molds.
The Step-by-Step Candle Making Process
With your purified tallow ready, you can now move on to the actual craft of candle making. You have two primary choices: container candles or dipped tapers.
Wicking Your Candles
Selection of the wick is vital for a good burn. Tallow is a “soft” wax compared to beeswax, so it requires a slightly thicker cotton wick to pull the fuel up effectively. Square-braid cotton wicks are often recommended for tallow because they are sturdy and resist “drowning” in the melt pool.
If you are making container candles, secure the wick to the bottom of a glass jar or tin using a bit of melted tallow or a metal wick tab. Use a pencil or a clothespin across the top of the jar to keep the wick centered and taut while the tallow cools and shrinks slightly.
Pouring and Cooling
Heat your purified tallow to about 130°F to 150°F. If you go too hot, you risk cracking the glass jars or causing excessive shrinkage. Pour the liquid slowly into your containers, leaving a bit of space at the top. Let them cool at room temperature; rushing the process in the fridge can cause the candle to crack or pull away from the sides of the jar.
For dipped tapers, you will need a deep container filled with melted tallow. Tie two wicks to a stick, leaving a few inches between them. Dip the wicks into the tallow, pull them out, and let them cool for a minute until the layer hardens. Repeat this process—dipping and cooling—dozens of times until the candles reach your desired thickness.
Benefits of Making Tallow Candles
The most immediate advantage is the cost. When you use kitchen scraps, your primary fuel source is effectively free. This turns a waste product into a valuable homestead asset, reducing your reliance on commercial supply chains for emergency lighting.
Tallow candles are also significantly healthier for your indoor air quality. Most cheap commercial candles are made from paraffin, a byproduct of petroleum refining that releases soot and volatile organic compounds when burned. Tallow is a natural, biodegradable fat that burns clean when properly purified.
From a performance standpoint, tallow offers a very long burn time. Because it is a dense saturated fat, it does not evaporate as quickly as many vegetable waxes. A standard-sized tallow candle can provide hours of steady light, making it an efficient use of your rendering efforts.
Challenges and Common Mistakes
The biggest challenge for most beginners is the “beefy” smell. If you skip the salt-water purification steps, your house may smell like a Sunday roast every time you light a candle. While some don’t mind this, most prefer a neutral scent. Do not rush the purification; those extra washes are what make the difference between a “utility” candle and a “luxury” one.
Overheating the fat during rendering is another frequent error. High heat oxidizes the fat, turning it yellow or brown and locking in bad odors. If the fat starts to smoke or smell like it is frying, turn the heat down immediately. Slow and low is the mantra for tallow success.
Improper wick sizing can lead to “tunneling,” where the flame burns a hole straight down the center of the candle, leaving a wall of unburnt wax on the sides. If your wick is too small, it won’t generate enough heat to melt the entire surface. If it is too large, the flame will be too big and produce soot.
Limitations of Tallow Lighting
Tallow has a relatively low melting point compared to beeswax or paraffin. In the heat of a high summer, tallow candles can become soft or even begin to “slump” if they are standing as free-pillars. For this reason, many homesteaders prefer to make container candles in jars during the warmer months.
There is also the potential for rancidity if the tallow isn’t rendered or stored correctly. If you leave bits of meat or water in the tallow, it will eventually go bad. However, well-rendered, bone-dry tallow is incredibly shelf-stable and can stay fresh for a year or more at room temperature, and even longer in a cool cellar.
Finally, tallow candles are inherently “softer” in their light output. They produce a warm, amber glow that is beautiful and nostalgic, but it may not be as bright as modern high-intensity LED lighting. This is a tool for ambiance and emergency preparedness, not for illuminating a large workshop.
Kitchen Waste vs. Tallow Fuel
It is important to understand the difference between raw kitchen waste and processed tallow fuel. They are not interchangeable when it comes to candle making. The following table highlights the transformation that occurs during the rendering process.
| Feature | Raw Kitchen Scraps | Rendered Tallow Fuel |
|---|---|---|
| Shelf Life | Days (must be refrigerated) | Months to Years (shelf-stable) |
| Odor | Strong animal scent | Neutral to faint sweet scent |
| Burn Quality | Sputters, smokes, and smells | Steady, clean-burning flame |
| Consistency | Chunks of fat and tissue | Uniform, hard white wax |
| Safety | High risk of mold/bacteria | Safe and sanitary |
Practical Tips and Best Practices
To get a harder candle that stands up better to summer heat, consider mixing your tallow with a small amount of beeswax. A ratio of 75% tallow to 25% beeswax creates a much sturdier candle that burns even longer and has a higher melting point. This is the “gold standard” blend for many experienced chandlers.
When rendering, always use a dedicated “tallow pot.” The process isn’t dirty, but the smell of raw fat can linger in porous materials. Stainless steel or cast iron are excellent choices because they are easy to scrub clean. Avoid plastic containers for hot tallow, as they can warp or leach chemicals into your wax.
If you want to add scents, use essential oils like cedarwood, lavender, or pine. Add these only after the tallow has cooled slightly but is still liquid. If you add them to boiling-hot fat, the delicate oils will evaporate instantly, and you will waste your expensive scents.
Advanced Considerations
Serious practitioners often distinguish between “body fat” and “kidney fat.” Kidney fat (suet) has a higher stearic acid content, which makes it naturally harder. If you have the choice, save your suet specifically for candles and use the softer trimmings from the brisket or steaks for soap making or high-calorie bird suet blocks.
You can also experiment with “winterized” tallow if you live in an extremely cold climate. By allowing the tallow to cool very slowly, you can sometimes separate the harder stearins from the softer oleins. This is a more complex process, but it allows you to engineer the perfect wax for your specific environmental conditions.
For those interested in historical accuracy, look into “rushlights.” These were made by peeling a common rush and dipping the pith into tallow. They were the cheapest form of light available to the poor and burn surprisingly well. It is a great skill to have in a total “grid-down” scenario where even cotton string might be hard to find.
Example Scenario: Emergency Preparedness
Imagine a winter storm knocks out the power for three days. While others are hunting for batteries or expensive store-bought candles, you head to your pantry. Earlier in the year, you saved the fat from two large beef roasts and rendered it into four pint-sized mason jar candles.
Each of these jars provides approximately 30 to 40 hours of light. With just those four jars, you have enough light to see your way through the entire blackout. Because you purified the tallow with salt, there is no “locker smell” in your living room—just a steady, reliable flame that cost you nothing but a few hours of work on a rainy afternoon months ago.
Final Thoughts
The transition from kitchen waste to high-quality light is one of the most satisfying transformations on the homestead. It embodies the spirit of using everything the animal provides and ensures that nothing goes to waste. By mastering the art of the salt-water wash and careful rendering, you elevate a simple fat into a reliable resource.
Do not be discouraged if your first batch isn’t perfect. Candle making is a craft that rewards repetition and observation. Pay attention to how the fat behaves at different temperatures and how different wicks react to the tallow. Over time, you will develop a “feel” for the material that no book can fully replace.
Start small with your next beef roast. Save those trimmings, give them a clean render, and pour a single jar candle. Once you see that first flame flickering, powered by what was once “trash,” you will never look at a scrap of beef fat the same way again. It is a small but powerful step toward a more self-reliant and sustainable life.
