How To Become More Self-Sufficient Without Starting a Full-Blown Farm…
Want to start preserving your harvest, making your own soap, or building a backyard root cellar — but not sure where to begin? “Homesteading Advice” gives you instant lifetime access to 35+ practical homesteading books on food preservation, veggie gardening, DIY natural cleaning products (save over $250 per year with this skill alone), brewing, off-grid energy, and a whole lot more…
Click Here To Check It Out Now!
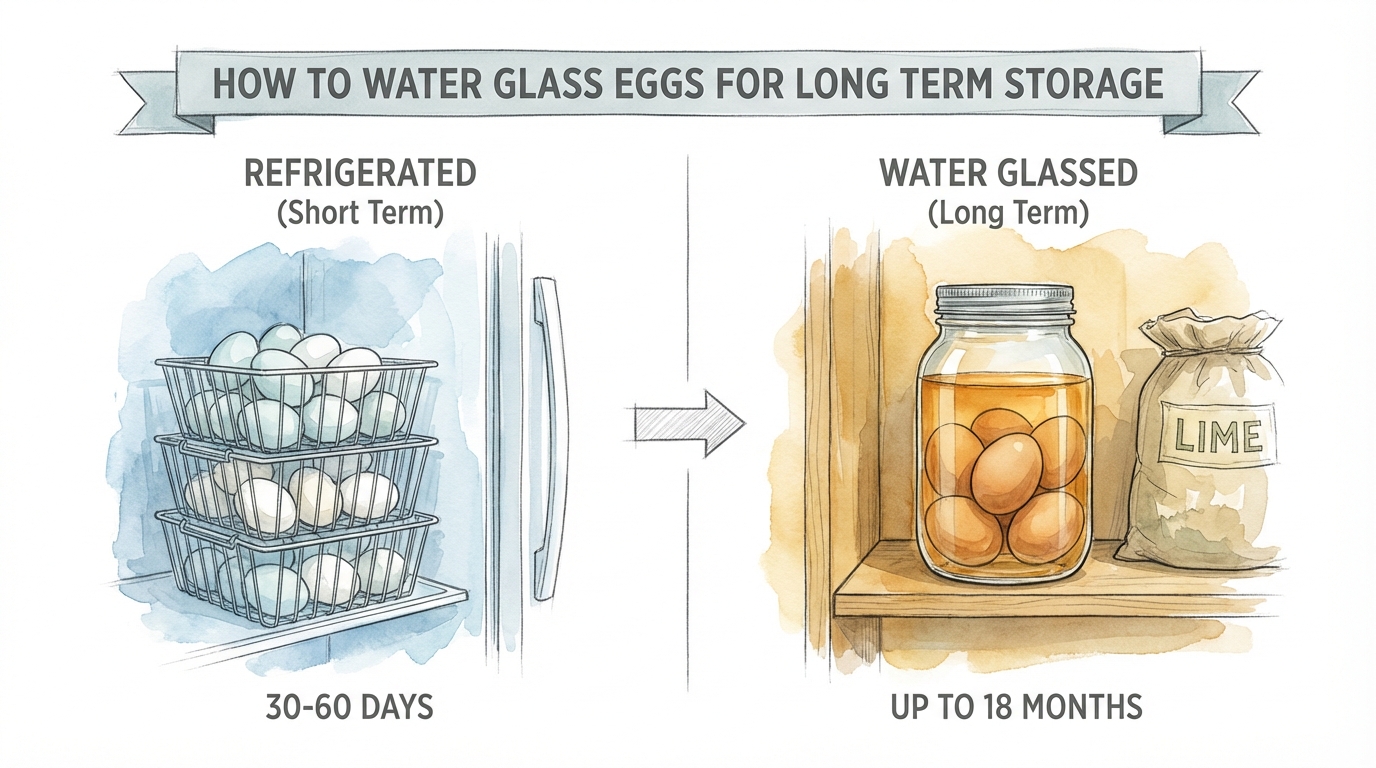
When the supply chain snaps, will your pantry be ready? The modern food system is incredibly fragile, relying on constant refrigeration and just-in-time delivery. We went back to the 1800s for the solution. Water glassing allows us to store the spring abundance of eggs all the way through the winter slump. No power required, just simple chemistry and homestead foresight.
For the modern homesteader, the rhythm of the seasons is a reality we cannot ignore. In the spring, the coop is overflowing, and we find ourselves giving away dozens of eggs to anyone who will take them. But come November, the hens go into molt, the days shorten, and the nesting boxes sit empty. Without a plan, you end up buying tasteless, pale-yolked eggs from the grocery store. Water glassing bridges that gap, preserving the nutrient-dense bounty of spring for the lean months of winter.
This method isn’t just about survival; it is about reclaiming the skills our great-grandparents used to thrive without a power grid. By understanding the chemistry of an eggshell and the properties of lime, you can keep your kitchen stocked with fresh eggs for twelve to eighteen months. It is a simple, elegant process that demands respect for the ingredients and a bit of pioneer-grit.
How To Water Glass Eggs For Long Term Storage
Water glassing is a preservation technique that involves submerging clean, unwashed, farm-fresh eggs in a solution of water and hydrated lime. Historically, “water glassing” referred to sodium silicate, but today, the term is most commonly used for the lime-water method. Both work by sealing the pores of the eggshell to prevent oxygen and bacteria from entering.
An eggshell might look solid, but it is actually a semi-permeable membrane with thousands of tiny pores. These pores allow the developing chick to breathe. However, for those of us wanting to store eggs, these pores are the enemy. They allow moisture to evaporate and air to enter, which eventually leads to spoilage. By submerging the eggs in a high-alkaline environment, we create a mineral barrier that keeps the egg in a state of suspended animation.
The beauty of this method lies in its simplicity. You don’t need expensive dehydrators, vacuum sealers, or a massive freezer that will fail the moment the power goes out. You only need a food-grade bucket, filtered water, and a bag of hydrated lime. It is a low-tech solution for a high-stakes problem.
The Science: How It Works
To master water glassing, you must first understand the anatomy of an egg. When a hen lays an egg, she coats it in a protective layer called the “bloom” or cuticle. This is the first line of defense against bacteria. In the modern commercial egg industry, eggs are washed, which strips this bloom away. This is why store-bought eggs must be refrigerated. They have no natural protection left.
For water glassing, we rely on that bloom. We take eggs straight from the nesting box and place them into a solution of calcium hydroxide (hydrated lime). The lime water has a very high pH level, which creates an environment where bacteria cannot survive. Simultaneously, the lime reacts with the eggshell and the surrounding water to effectively “petrify” the exterior, sealing those thousands of pores.
When you pull an egg out of the lime water six months later, the yolk will still be upright and the white will still be viscous. Because the egg hasn’t lost any moisture, it performs exactly like a fresh egg in the frying pan or in your baking recipes. It is a preservation of quality, not just a preservation of calories.
Choosing the Right Lime
It is crucial to use the correct type of lime. You are looking for Hydrated Lime (calcium hydroxide). This is often labeled as “Pickling Lime” in the canning aisle or “Slaked Lime.” You must avoid “Garden Lime” or “Dolomitic Lime,” which is calcium carbonate and will not create the necessary alkaline environment for preservation.
The lime should be a fine, white powder. It is caustic in its concentrated form, so handle it with care. Avoid breathing in the dust when you are mixing your solution. Once it is diluted in water, it is safe to handle, though it can still dry out your skin.
Step-by-Step: How to Water Glass Your Eggs
Before you begin, ensure you have gathered all your supplies. You will need a clean, food-safe container. Glass half-gallon jars work well for smaller batches, while five-gallon BPA-free buckets are ideal for a large harvest. You will also need a kitchen scale and filtered, chlorine-free water.
Step 1: Inspect Your Eggs
This is the most critical step. You must use eggs that are perfectly clean and free of any cracks. Do not wash them. If an egg has a smear of mud or a “skid mark” of manure, set it aside for immediate use. Only the cleanest, most pristine eggs should go into the long-term storage bucket. Use a flashlight or a candle to check for hairline cracks that the naked eye might miss.
Step 2: Measure Your Solution
The standard ratio for water glassing is 1 ounce (by weight) of hydrated lime to 1 quart (by volume) of water. If you are filling a large bucket, you might need 8 ounces of lime and 8 quarts of water. Use a scale for the lime to ensure accuracy. If you use too little, the solution won’t be strong enough to preserve the eggs. If you use too much, it won’t hurt the eggs, but the excess will simply settle at the bottom.
Step 3: Mix the Solution
Add the lime to your water and whisk it vigorously. The water will turn a milky white color. Don’t worry if it looks opaque; that is exactly what you want. As the solution sits, some of the lime will settle to the bottom of the container. This is normal and actually provides a “buffer” to keep the solution saturated over time.
Step 4: Load the Eggs
Gently place your clean, unwashed eggs into the container. It is best to place them pointy-side down, as this keeps the air cell at the blunt end stable, but it isn’t strictly necessary for water glassing. You can add eggs to the bucket over several days or weeks as your hens produce them. Just ensure the solution always covers the top egg by at least two inches.
Step 5: Seal and Store
Once your container is full or you have run out of eggs, cover it with a tight-fitting lid. This prevents the water from evaporating and stops carbon dioxide from the air from reacting with the lime, which could lower the pH. Store the container in a cool, dark place like a basement, root cellar, or the back of a pantry. Avoid areas that experience temperature swings or direct sunlight.
Benefits of Water Glassing
Why choose this method over freezing or dehydrating? The advantages are numerous, especially for those looking to decrease their dependence on modern infrastructure.
- Zero Energy Requirement: Once the eggs are in the jar, they require no electricity to stay fresh. This is the ultimate “grid-down” food storage solution.
- Retention of Quality: Unlike frozen eggs, which can become rubbery, or dehydrated eggs, which change texture, water-glassed eggs remain virtually indistinguishable from fresh eggs.
- Nutritional Integrity: Because the egg is sealed in its own shell, the vitamins, minerals, and fats remain protected from oxidation.
- Scalability: Whether you have two hens or fifty, you can scale this method to fit your needs. It is as easy to preserve a dozen eggs as it is to preserve a thousand.
- Cost-Effective: A large bag of hydrated lime costs very little and can preserve hundreds of dozens of eggs, making it one of the cheapest preservation methods available.
Challenges and Common Mistakes
While the process is simple, there are a few pitfalls that can ruin a batch of eggs. Success in homesteading requires attention to detail and a refusal to cut corners.
Using Dirty Eggs: This is the number one cause of failure. Any bacteria on the shell from manure or mud can be introduced into the solution. While the high pH helps, a large amount of organic matter can overwhelm the solution or find its way into a microscopic crack in the shell.
Washing the Eggs: If you wash the eggs, you remove the bloom. Without the bloom, the lime solution can sometimes seep into the egg, giving it a limey or “off” taste. The bloom acts as a secondary barrier that works in tandem with the lime water.
Temperature Fluctuations: If the storage area gets too warm, the quality of the egg will degrade faster. Aim for a consistent temperature between 35°F and 60°F. If the solution freezes, it can crack the eggshells, so keep them in a frost-free area.
Using Tap Water: Many municipal water sources contain chlorine or fluoride, which can interfere with the lime’s ability to preserve the eggs. Always use filtered water or distilled water for the best results. If you have a well, ensure your water isn’t excessively high in iron or other minerals that might react with the lime.
Contextual Comparison: Storage Methods
It is helpful to see how water glassing stacks up against other common egg storage methods. Each has its place, but for long-term self-reliance, one clearly stands out.
| Method | Shelf Life | Power Needed? | Best Use |
|---|---|---|---|
| Refrigeration | 2-3 Months | Yes | Short-term daily use |
| Freezing | 6-12 Months | Yes | Baking and scrambles |
| Dehydrating | 5-10 Years | No (after processing) | Emergency kits/Camping |
| Water Glassing | 12-18 Months | No | Long-term fresh use |
As the table shows, water glassing offers a unique combination of long shelf life and “fresh” quality without the need for constant electricity. While dehydrated eggs last longer, they lose the ability to be fried “sunny side up.” Water glassing preserves the egg’s versatility.
Practical Tips for Success
To ensure your water glassing experience is successful, consider these practical tips from the field. These are the small details that make a big difference over six months of storage.
The “Float Test”
When you are ready to use your eggs, it is always a good idea to perform a float test. Place the egg in a bowl of plain water. If it sinks to the bottom and stays there, it is perfectly fresh. If it stands on one end but stays at the bottom, it is starting to age but is still safe. If it floats to the surface, discard it. Floating indicates that the air cell has grown large enough to indicate spoilage or a compromised shell.
Washing Before Use
When you pull an egg out of the lime solution, it will be covered in a slippery, white residue. You must wash the egg thoroughly before cracking it. If the lime water gets into your skillet or mixing bowl, it will affect the taste and pH of your food. A simple rinse under cool water is usually sufficient to remove the lime.
Label Your Containers
In the heat of the harvest season, it is easy to forget which bucket was filled in April and which was filled in June. Use a permanent marker or a piece of tape to label the date and the approximate number of eggs in each container. This allows you to practice “First In, First Out” (FIFO) inventory management, ensuring you are always eating the oldest eggs first.
Check the Solution Level
Every few months, take a peek at your buckets. If you didn’t have a perfectly airtight seal, some of the water might have evaporated. If the top eggs are exposed to the air, they will spoil and could potentially ruin the rest of the batch. If the water level is low, simply top it off with a bit more lime-water solution (following the 1oz to 1qt ratio).
The Anatomy of a Perfect Preservation Egg
Not all eggs are created equal. If you want eggs that will last eighteen months, you need to be selective. The health of the hen directly impacts the strength of the shell and the quality of the bloom. Hens that have access to pasture and a high-quality source of calcium (like oyster shells) produce eggs with thicker, more resilient shells.
Avoid using eggs from very young “pullets” or very old hens for long-term water glassing. Pullet eggs are often small and can have irregular shells. Old hens may produce shells that are thin or porous. Stick with the robust, mid-sized eggs from your healthiest birds. These are the ones that have the “pioneer-grit” to withstand the test of time.
Also, consider the timing. Eggs laid in the cool of the spring tend to store better than those laid in the sweltering heat of August. Heat can begin to degrade the interior of the egg before you even get it into the lime solution. Aim to gather your storage eggs twice a day during the peak spring flush.
Integrating Water Glassed Eggs into Your Kitchen
How do you use these eggs once you’ve retrieved them from their limey bath? For most applications, you won’t notice a difference. They fry, poach, and boil just like fresh eggs. However, there is one minor change that occurs over time: the shell becomes slightly more brittle.
Because of the mineral exchange, the shell can become very hard but also more prone to shattering if you aren’t careful. When boiling water-glassed eggs, some homesteaders find that the shells are more likely to crack. To prevent this, you can use a small pin to prick a tiny hole in the air cell end of the egg before boiling. This allows the pressure to equalize.
In terms of flavor, water-glassed eggs are superior to anything you will find in a carton. The yolks remain rich and creamy, and the whites retain their ability to fluff up for meringues or soufflés. It truly is like having a time machine in your pantry.
Final Thoughts
Water glassing is more than just a kitchen hack; it is a fundamental skill for anyone serious about food security and self-reliance. It forces us to slow down and work with the natural cycles of our livestock. By storing the abundance of today, we provide for the uncertainty of tomorrow. It is a practice rooted in foresight and ancestral wisdom.
As you build your homestead pantry, remember that true resilience comes from diversity. Water glassing should be one tool in your kit, alongside canning, fermenting, and root cellaring. When you can look at your shelves and see jars of preserved eggs, you can rest easy knowing that your family is fed, regardless of what happens at the local supermarket or on the national power grid.
Take the leap this spring. When the hens start laying in earnest, don’t just give the surplus away. Mix a batch of lime water, find a sturdy bucket, and start building your egg reserve. Your future self—sitting in a kitchen during a cold, eggless January—will thank you for your pioneer foresight.
